To get started with Application Integration-based enrichment and validation configurations, use recipes.
A recipe is a set of pre-configured assets that you can use to achieve common Application Integration use cases. A recipe contains multiple assets, such as process objects, app connections, and processes that you can configure based on your use case.
With recipes, you can save time as you don't have to manually create multiple assets from scratch for an Application Integration use case. You can copy a recipe to quickly create a process for an Application Integration use case. After you copy a recipe, you need to complete certain configuration tasks to use the recipe. For example, you need to configure properties related to user authentication and runtime environment in app connections and processes and publish the assets. You can modify the assets further based on your use case.
To learn to configure rule associations that assign records to hierarchies, use the Auto Classification for MDM 360 Applications recipe. For more information about the recipe, see Introduction to Auto Classification for MDM 360 Applications recipe in the Application Integration help.
To learn to configure Application Integration processes and rule associations for data enrichment, use the Auto Translation for MDM 360 Applications recipe. For more information about the recipe, see Introduction to Auto Translation for MDM 360 Applications recipe in the Application Integration help.
Scenario: Creating a process for Application Integration-based enrichment
You work for Acme, and your goal is to enrich the Person records with correct addresses. You use AddressMaster as the data provider for this enrichment.
Consider the following sample request that AddressMaster requires you to send:
{ "addressline1":"GP", "postalcode":"", }
Also, consider the following sample response that you receive from AddressMaster:
To create a process for enriching records with data from AddressMaster, perform the following steps:
1Create process objects to define input and output formats.
2Create a process.
Step 1: Create process objects for input and output fields
You want to define input and output fields for a process to enrich records with the data from AddressMaster. Define process objects in Application Integration for this scenario.
1In Application Integration, create a folder within your project.
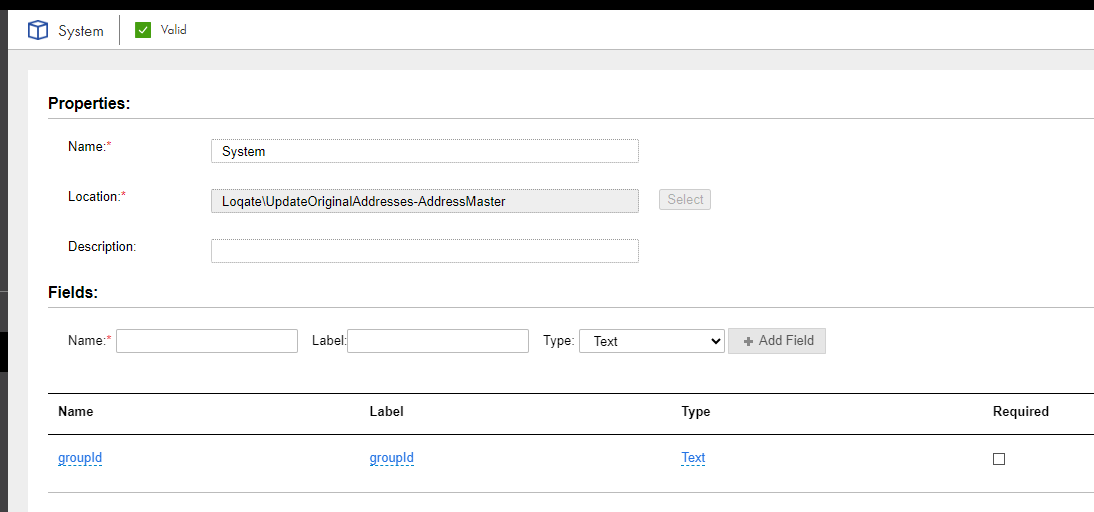
2Create a process object named System with a text field named groupId.
The following image shows a process object named System with a field named groupId:
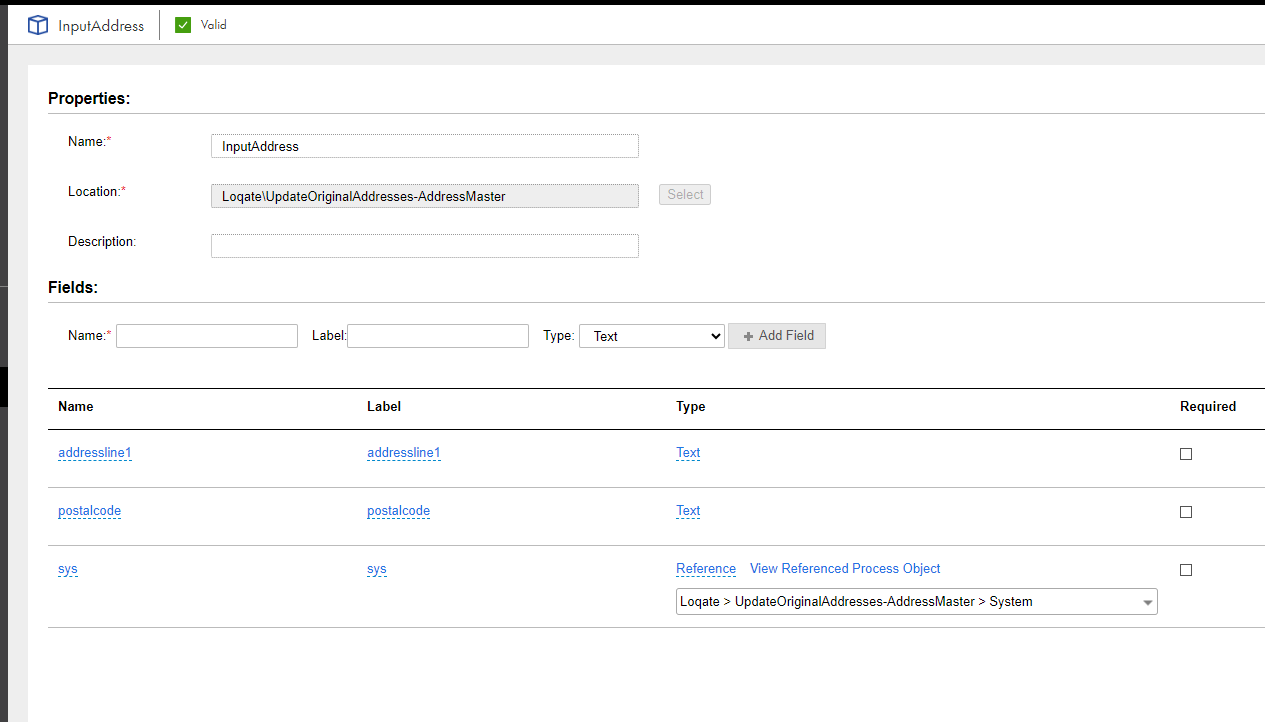
3To define a set of fields that you want to accept as input fields from MDM SaaS, create a process object named InputAddress with the following fields:
Field
Label
Type
addressline1
addressline1
Text
postalcode
postalcode
Text
sys
sys
Reference
Note:
Reference the System process object that you created in step 2.
Note:
Even though the request to AddressMaster requires a flat structure, you need a field group in this scenario because addressline1 and postalcode are child attributes of the Address field group in the Person business entity.
The following image shows a process object named InputAddress with the fields named addressline1, postalcode, and sys:
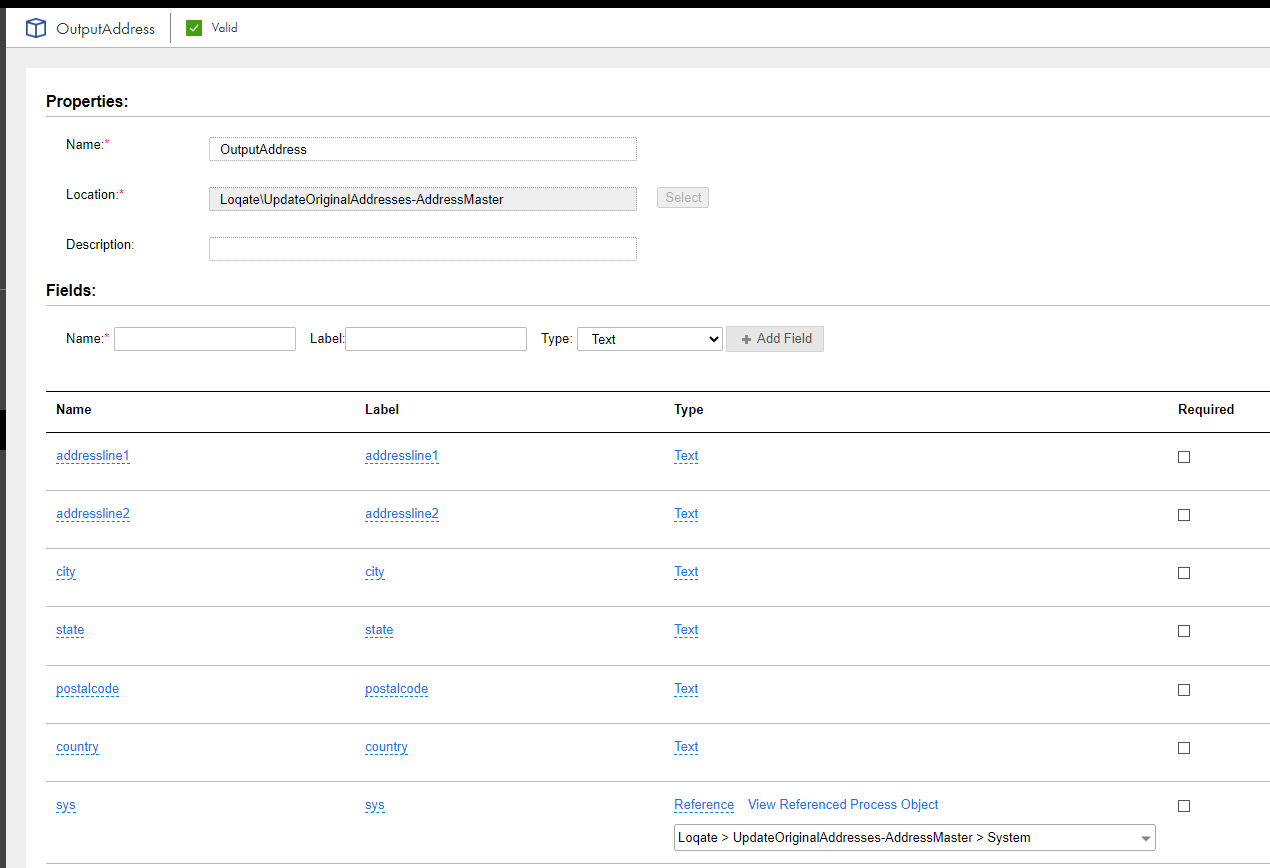
4To define a set of fields that you want to send back to MDM SaaS, create a process object named OutputAddress with the following fields:
Field
Label
Type
addressline1
addressline1
Text
addressline2
addressline2
Text
city
city
Text
state
state
Text
postalcode
postalcode
Text
country
country
Text
sys
sys
Reference
Note:
Reference the System process object that you created in step 2. If you include this parameter, the original field group entry is updated. Otherwise, a new field group entry is added to the record when a user accepts a CLAIRE recommendation.
The following image shows a process object named OutputAddress with the fields named addressline1, addressline2, city, state, postalcode, country, and sys:
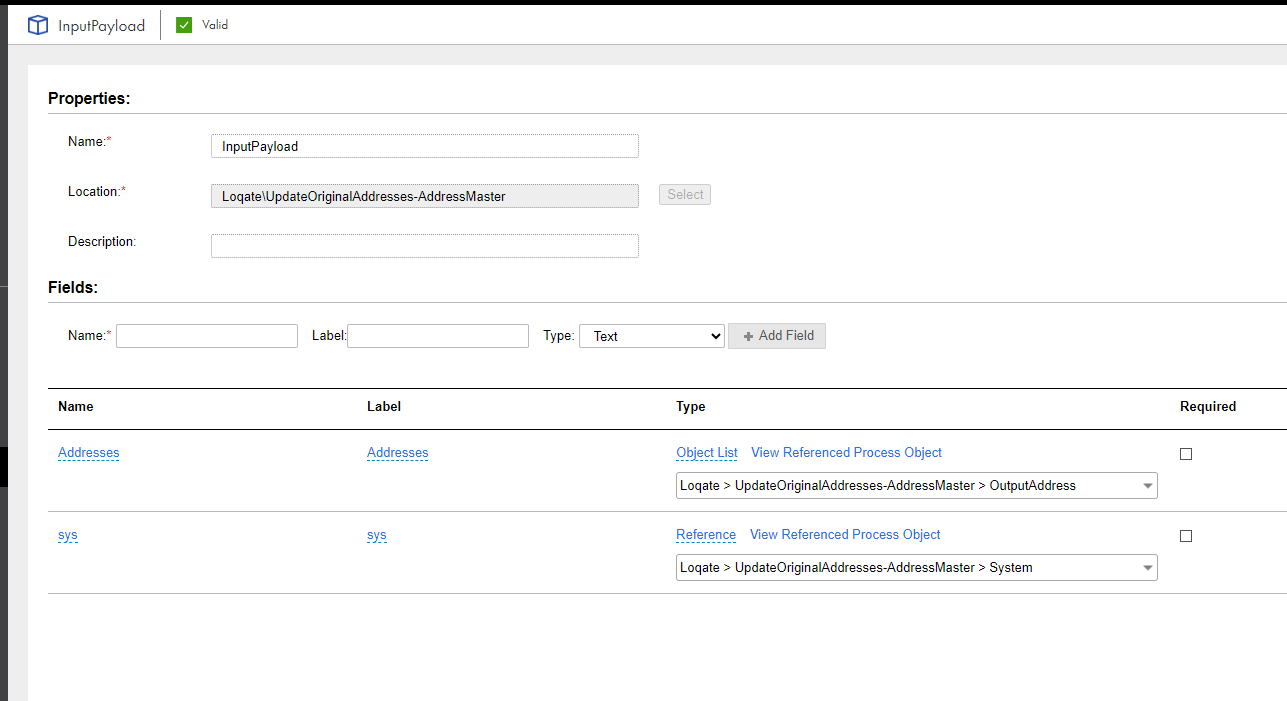
5To define the payload for the request from MDM SaaS, create a process object named InputPayload with the following fields:
Field
Label
Type
Addresses
Addresses
ObjectList
Note:
Select the InputAddress process object that you created in step 3.
sys
sys
Reference
Note:
Reference the System process object that you created in step 2.
The following image shows a process object named InputPayload with the fields named Addresses and sys:
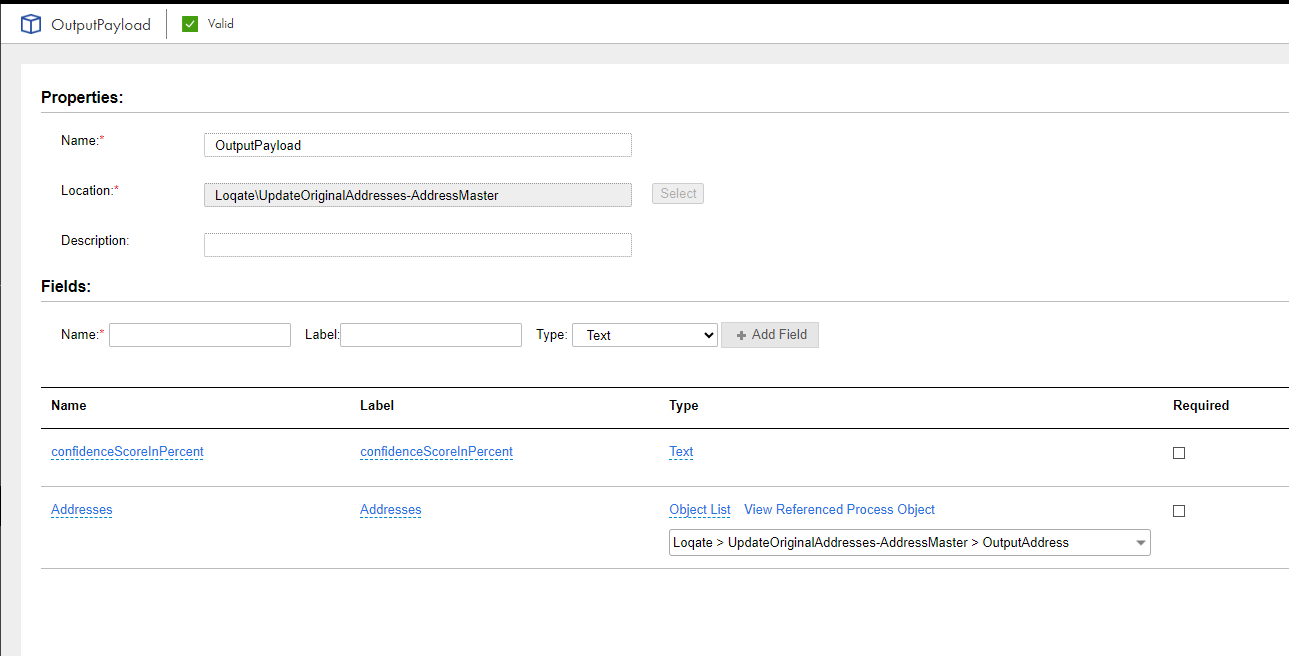
6To define payload for the response to MDM SaaS, create a process object named OutputPayload with the following fields:
Field
Label
Type
Addresses
Addresses
ObjectList
Note:
Select the OutputAddress process object that you created in step 4.
confidenceScoreInPercent
confidenceScoreInPercent
Text
The following image shows a process object named OutputPayload with the fields named confidenceScoreInPercent and Addresses:
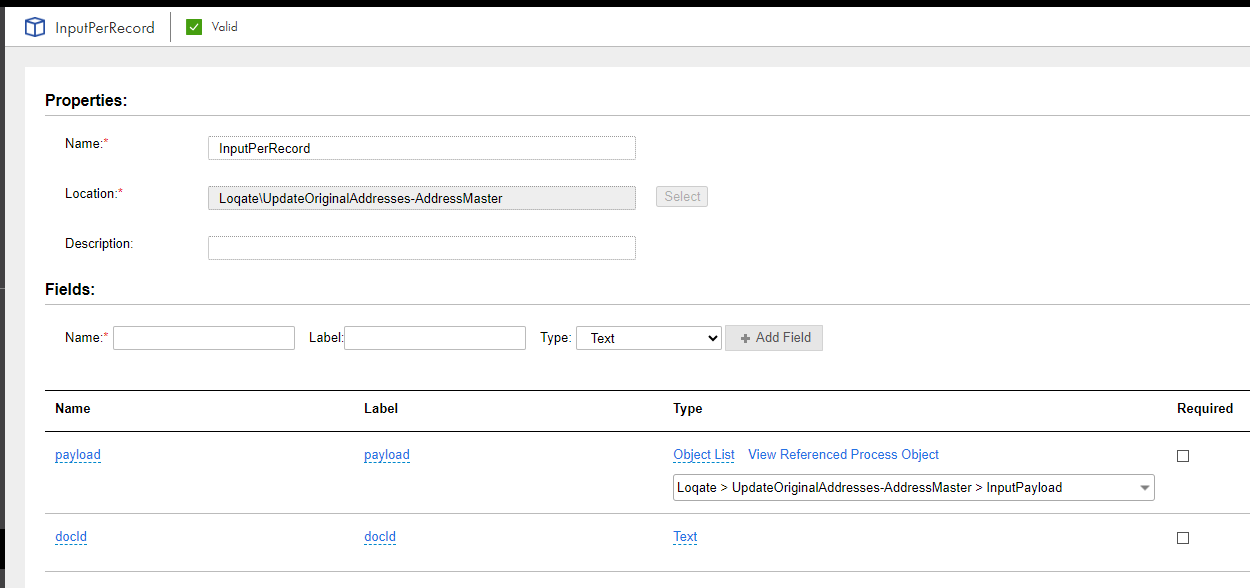
7To define the request structure, create a process object named InputPerRecord with the following fields:
Field
Label
Type
payload
payload
ObjectList
Note:
Select the InputPayload process object that you created in step 5.
docId
docId
Text
Note:
docId is a required parameter in the response.
The following image shows a process object named InputPerRecord with the fields named payload and docId:
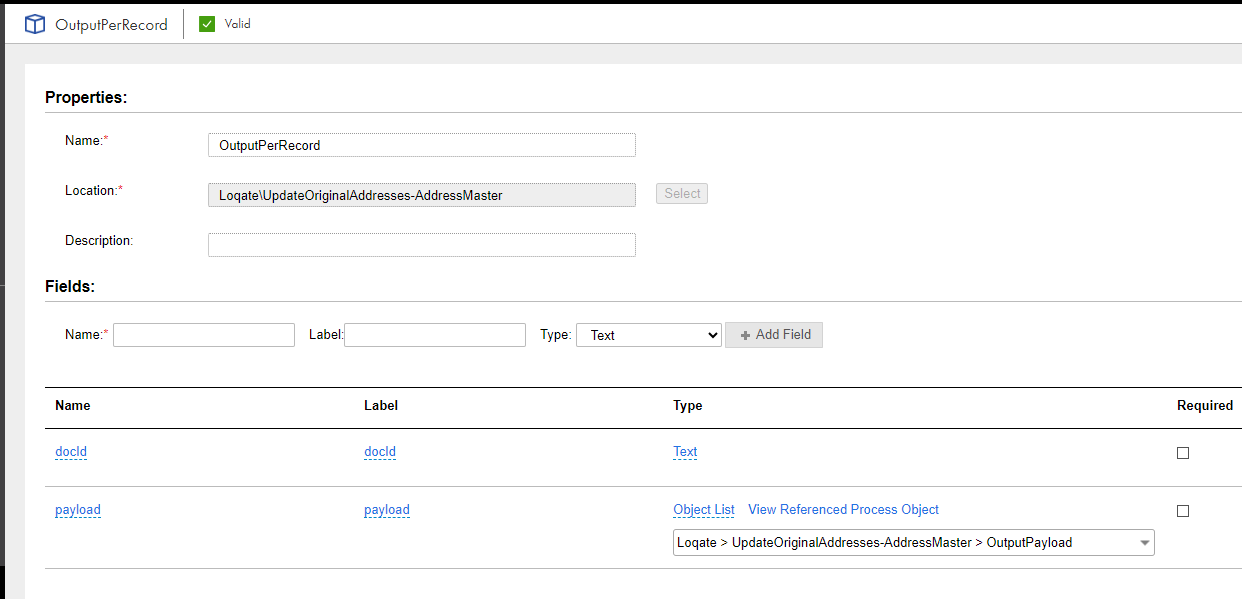
8To define the response structure, create a process object named OutputPerRecord with the following fields:
Field
Label
Type
docId
docId
Text
payload
payload
ObjectList
Note:
Select the OutputPayload process object that you created in step 6.
The following image shows a process object named OutputPerRecord with the fields named docId and payload:
Step 2: Create a process
To enrich records with data from the AddressMaster data provider, you need a process that receives a set of input fields from MDM SaaS and sends a response back to MDM SaaS.
1In Application Integration, create a process.
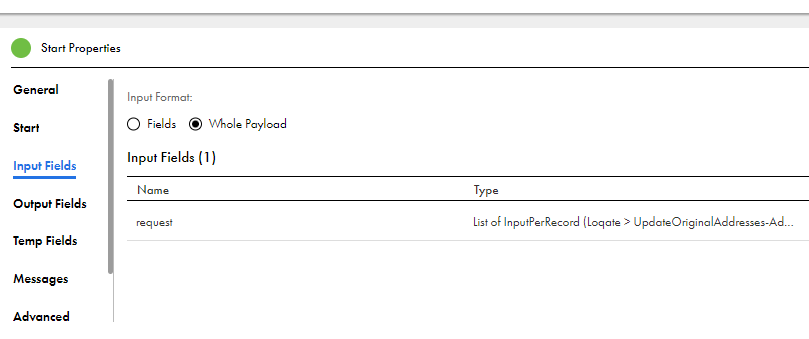
2In the Start Properties panel of the process, perform the following steps:
aClick the Start tab, and select Allow anonymous access.
bClick the Input Fields tab.
cSelect Whole Payload, add an input field named request, and set its type to List of InputPerRecord by selecting the InputPerRecord process object.
The following image shows the input field named request and its type as List of InputPerRecord:
dClick the Output Fields tab.
eSelect Whole Payload, and add an output field named response and set its type to List of OutputPerRecord by selecting the OutputPerRecord process object.
The following image shows the output field named response and its type as List of OutputPerRecord:
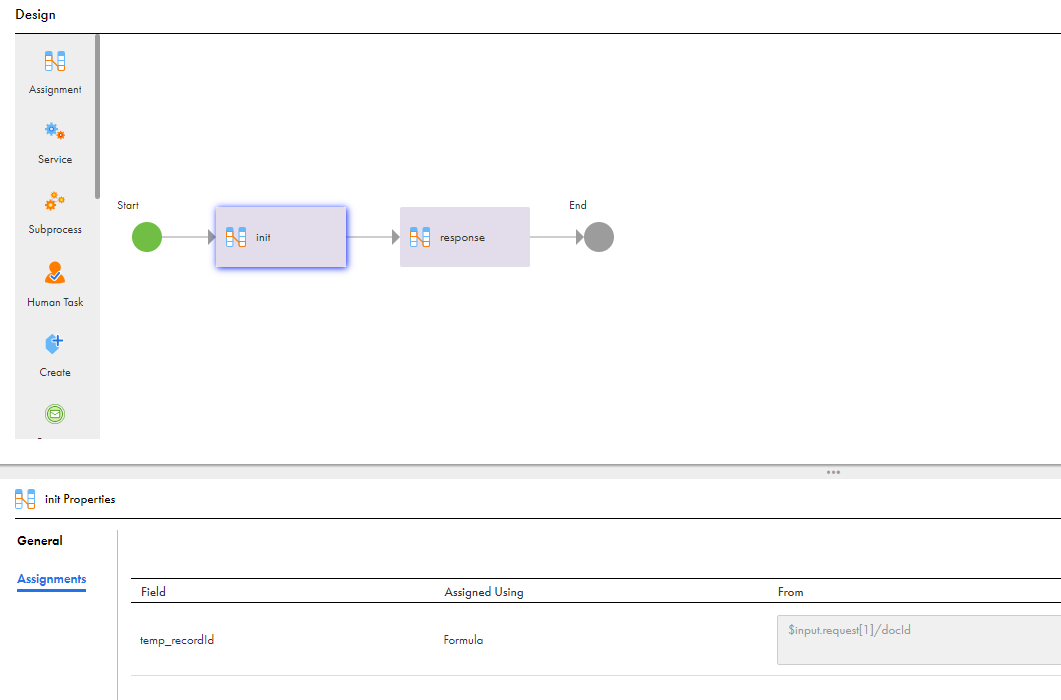
3Create a temp field named temp_recordId, and set its type to Text.
4Add an assignment step to the process.
5In the Properties panel of the assignment step, click the Assignment tab, and set the temp_recordId field to the $input.request[1]/docId formula.
Note:
Additionally, you can create a process object that represents the request to the data provider. You can then assign the process input fields to the AddressMaster request fields. This sample process doesn't connect to a real data provider.
The following image shows that the $input.request[1]/docId formula is assigned to the temp_recordId field:
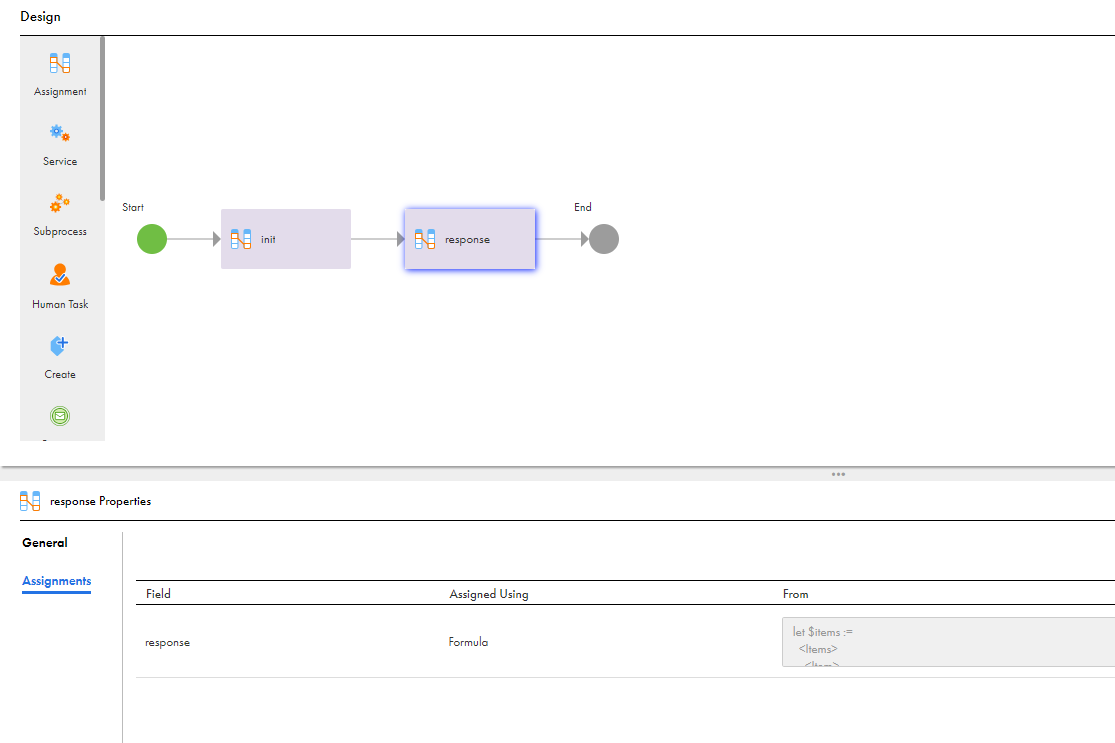
6Add an assignment step to the process.
7In the Properties panel of the assignment step, click the Assignment tab and perform the following assignment tasks:
aAdd a field named response.
bIn the Assigned Using field, select Formula.
cAdd the response that you want to send to MDM SaaS, such as the following sample response:
$items represents a sample response from AddressMaster. In the return block, you can loop through the fields in the AddressMaster response and assign the required fields to the fields in the OutputPayload process object.
The following image shows that the response variable is assigned to a formula:
Scenario: Configuring CLAIRE-based classification of records
Use CLAIRE-Based Enrichment plugin to classify records automatically.
You work with Meridian Retail Group. The company manages a large product catalog with thousands of retail items, ranging from electronics to apparels. To streamline product discovery and reporting, you want to automatically classify each item into the correct category in the product hierarchy.
Your company already uses the Retail Item business entity to create product records. Currently, data stewards manually assign Retail Item records to hierarchies. This approach is time-consuming and introduces errors. Instead of having data stewards manually assign items to categories, you want them to use CLAIRE Copilot to automatically classify the records. To achieve this goal, you want to configure an objective that can be triggered when users prompt CLAIRE Copilot to classify records.
To configure CLAIRE-based classification, perform the following tasks:
1Create an objective with CLAIRE as trigger.
2Create a data enhancement rule with the CLAIRE-Based Enrichment plugin.
3Configure a rule association for classification.
Note:
Effective in the April 2026 release, the ability to configure CLAIRE-based classification of records is available for preview. Preview functionality is supported for evaluation purposes but is unwarranted and is not supported in production environments or any environment that you plan to push to production. Informatica intends to include the preview functionality in an upcoming release for production use, but might choose not to in accordance with changing market or technical circumstances. For more information, contact Informatica Global Customer Support.
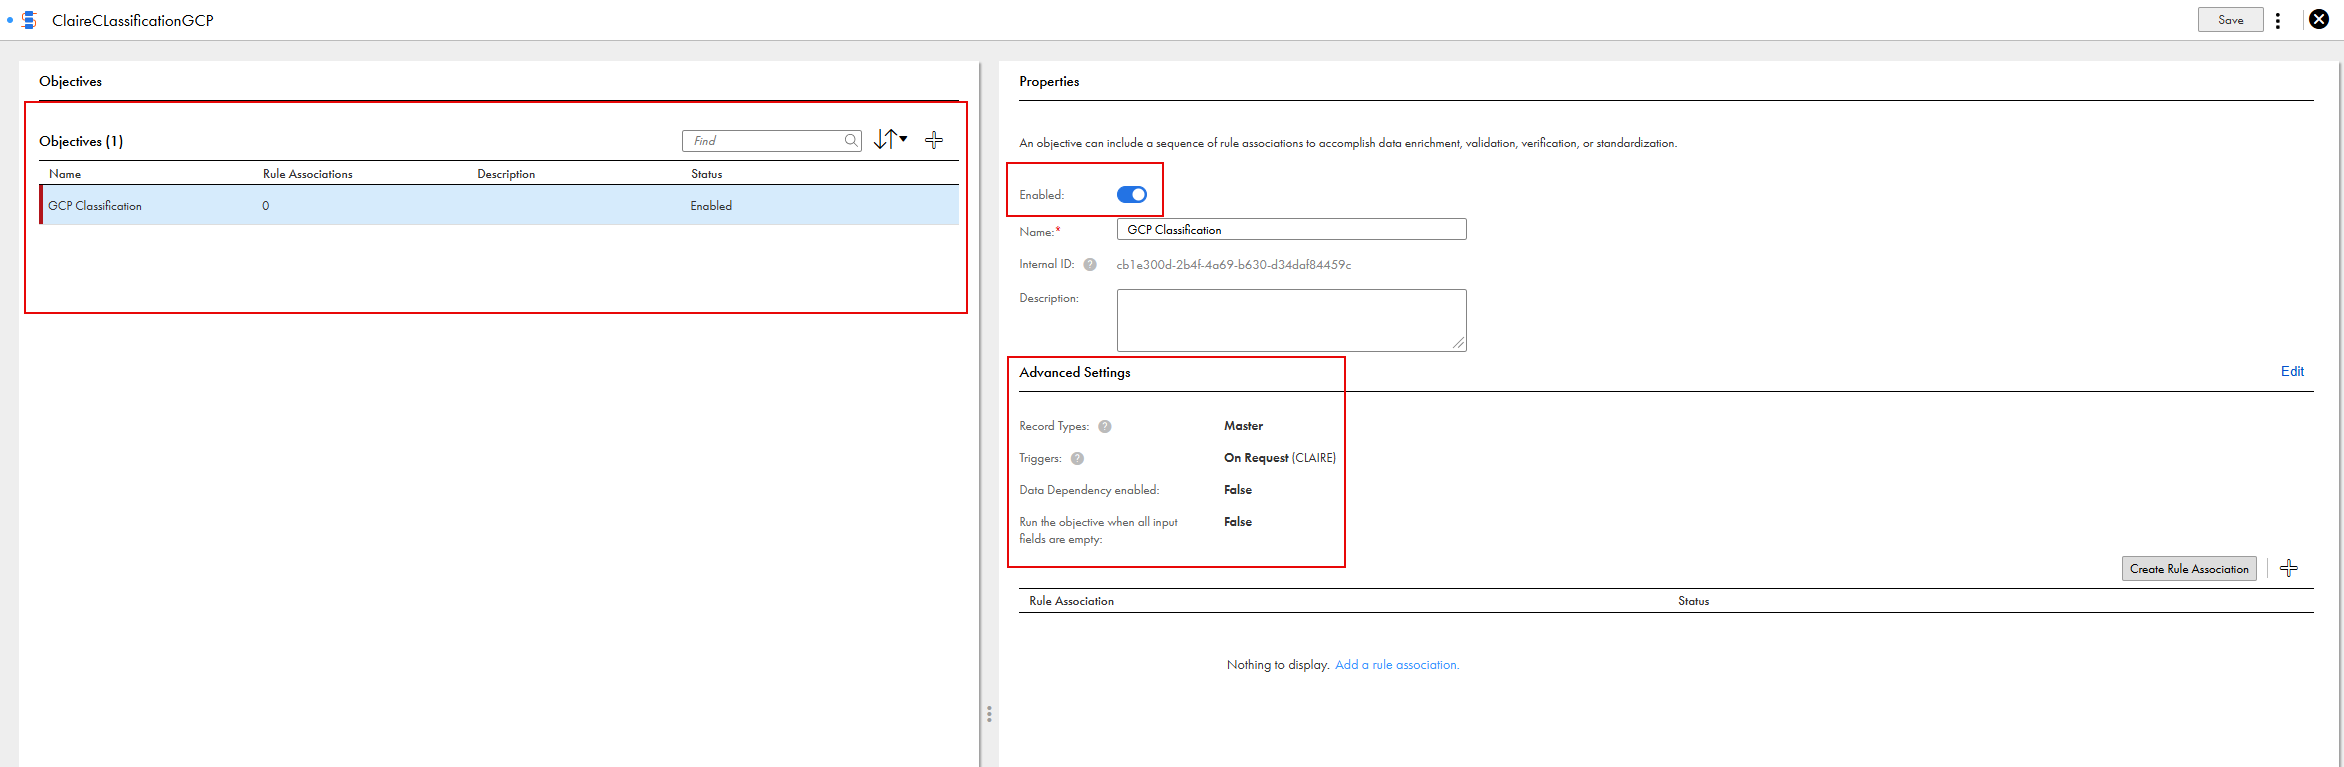
Step 1: Create an objective with CLAIRE as a trigger
To run an objective when users prompt CLAIRE Copilot to classify records, configure the objective with CLAIRE as the trigger.
1Open the business entity for which you want to configure CLAIRE-based classification.
2Click the Data Quality tab, and then click the Objective Groups tab.
3Create an objective group.
4On the objective group page, add an objective.
5On the Properties panel, enable the objective.
6In the Advanced Settings section, click Edit.
7Click the General tab, and select Master Records.
8Click the Triggers tab, and then select On Request as the trigger mode.
9In the CLAIRE section, turn on the Enable the objective for CLAIRE option.
The following image shows the GCP Classification objective with CLAIRE as the trigger in the Advanced Settings section:
Step 2: Create a data enhancement rule with the CLAIRE-Based Enrichment plugin
To automatically classify records with CLAIRE Copilot, use the CLAIRE-Based Enrichment plugin.
2In the Create Rule Association dialog box, specify details, such as name, description, and location for the rule association, and then click OK.
3On the rule association page, click Create Data Enhancement Rule.
4In the Add Data Enhancement Rule dialog box, specify details, such as a name, description, and the location of the rule, and then click OK.
5On the data enhancement rule page, select the CLAIRE-Based Enrichment plugin.
6Configure the plugin properties:
Property
Description
Hierarchy Model
Hierarchy model associated with the hierarchy to which you want to assign records.
Hierarchy
Business ID of the hierarchy to which you want to assign records.
Business Entity to Classify
Business entity for which you configured the objective.
Relationship Type
Relationship type from the hierarchy mode. For example, p360_item24_to_p360_category24 is selected in the example.
Accept Threshold
Confidence score above which CLAIRE automatically accepts and applies a classification recommendation.
The following image shows a sample data enahanement rule settings for classification:
In the sample configuration, Retail Item is configured as the business entity to classify because you want to assign Retail Item records to hierarchies..
7Save the rule and continue to configure the rule association that you created in step 2.
Step 3: Configure a rule association for classification
After you configure a data enhancement rule with the CLAIRE-Based Enrichment plugin, configure a rule association with the rule.
1Go back to the rule association that you created in 2.
2On the Select Data Enhancement Rule page, select the data enhancement rule with the CLAIRE-Based Enrichment plugin.
3Click Next.
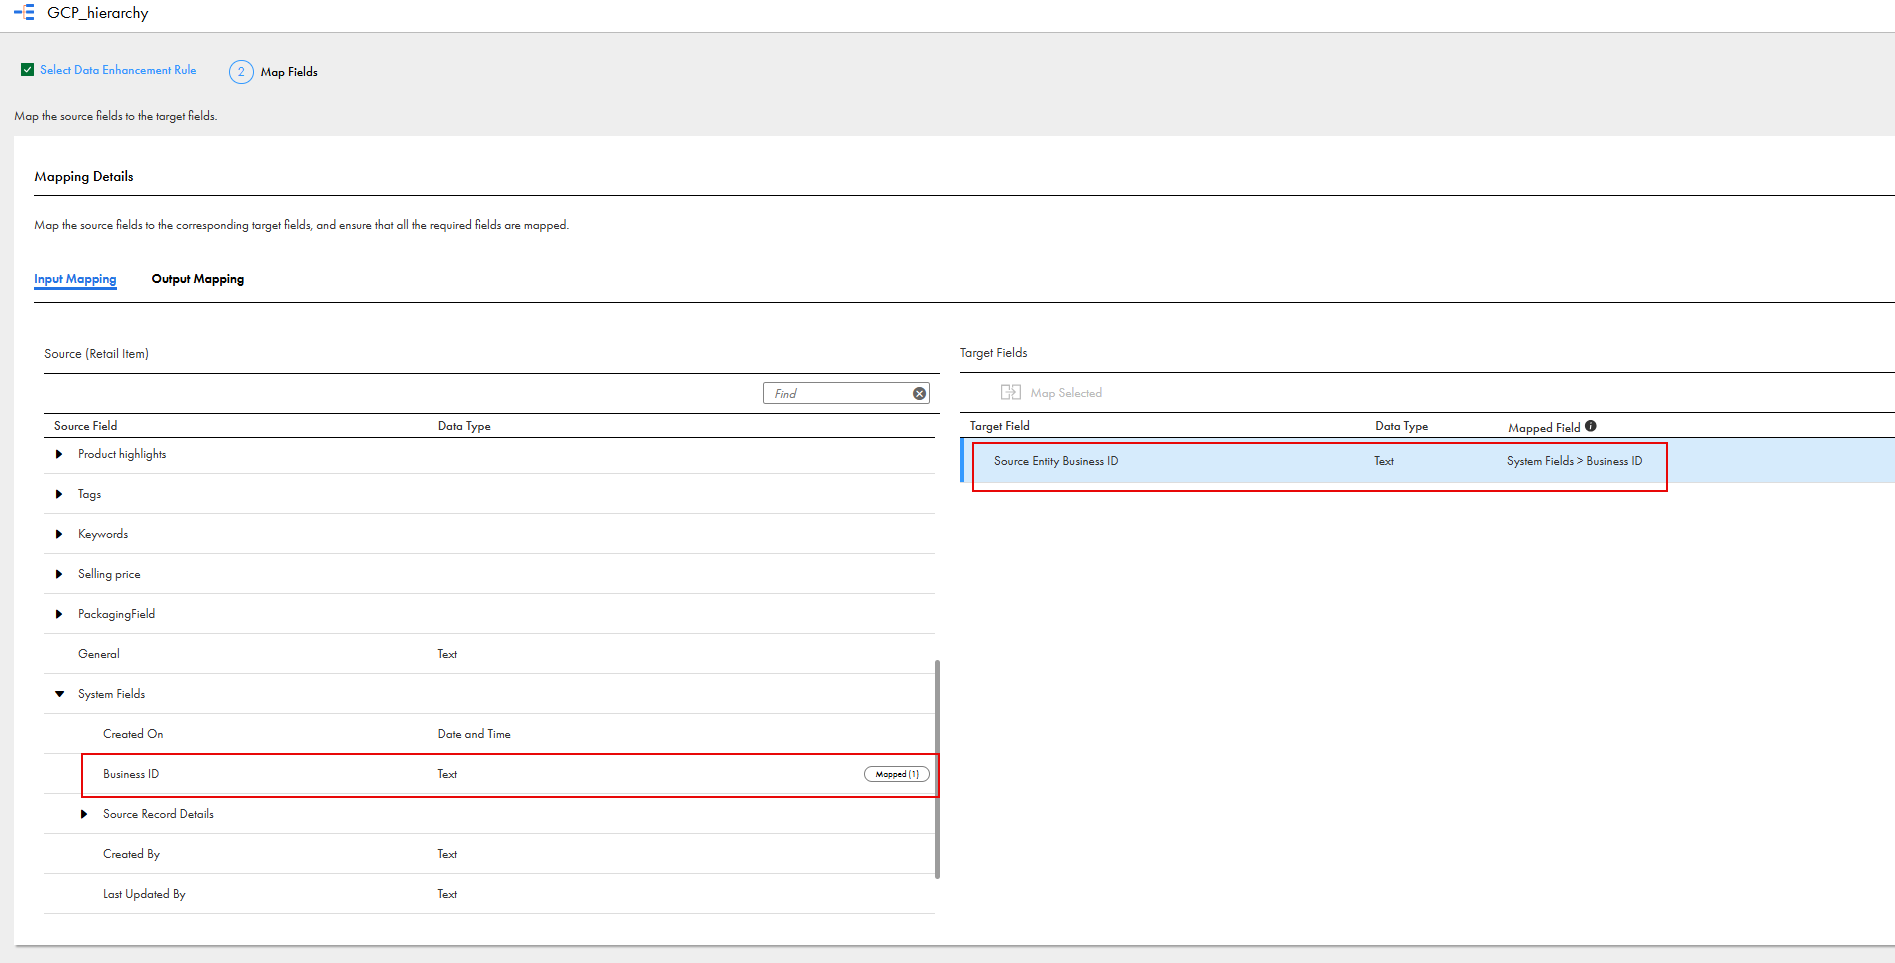
4On the Input Mapping tab, expand System Fields in the Source section and map the Business ID system field to the Source Entity Business ID target field.
The following image shows that the Business ID of the Retail Item business entity is mapped to the Source Entity Business ID target field on the Input Mapping tab:
5Click the Output Mapping tab.
6In the Target panel, click the plus icon in the Target Hierarchies section, and then select the hierarchy model that you specified in the data enhancement rule.
7In the Target fields column, expand the relationship type you specified in the data enhancement rule, and then map the output field to the target business entity in the relationship type.
For example, if the relationship begins from Item and connects to Category, map the output field to the Category business entity in the relationship type.
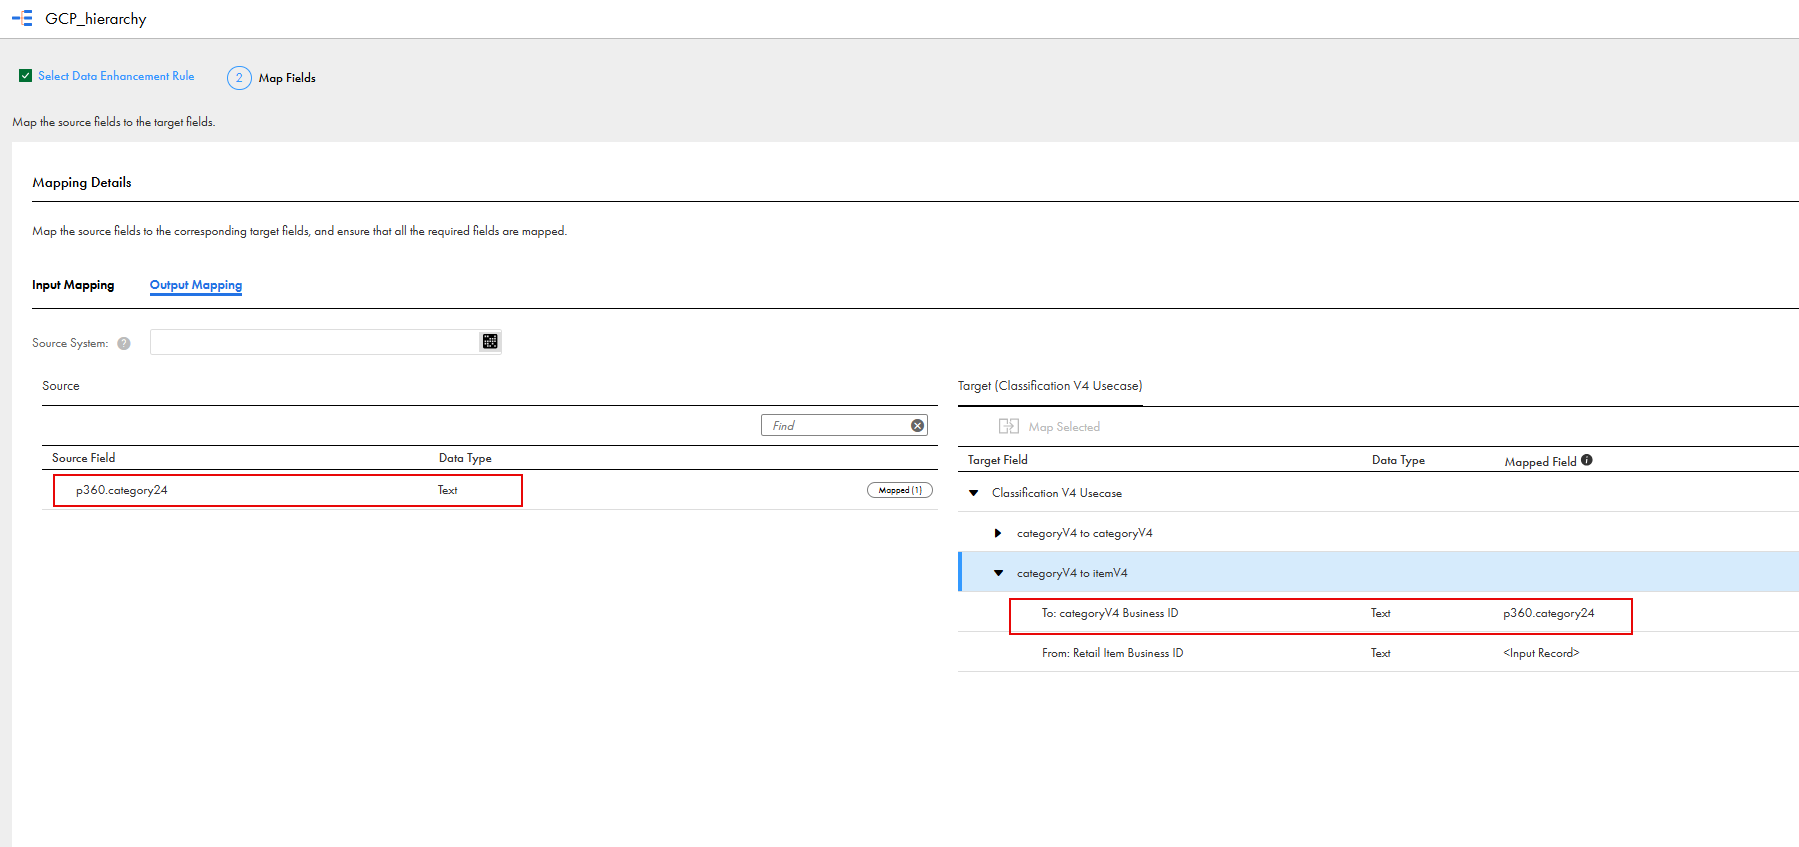
The following image shows that the p360.categoryv4 output field is mapped to the To: categoryV4 Business ID target field in the categoryV4 to itemV4 relationship type:
In this example, Retail Item is the business entity to classify, and the output field is mapped to the Category V4 target field.