You can enable single sign-on (SSO) capability so that users can access their organization without the need to enter login information. You can use SSO for user authentication or for both authentication and authorization in an organization. You configure SSO capability for an organization on the SAML Setup page.
Single sign-on to IDMC is based on the Security Assertion Markup Language (SAML) 2.0 web browser single sign-on profile. The SAML web browser single sign-on profile consists of the following entities:
Identity provider
An entity that manages authentication information and provides authentication services by using security tokens.
Service provider
An entity that provides web services to principals, for example, an entity that hosts web applications. IDMC is a service provider.
Principal
An end user who interacts through an HTTP user agent.
SAML 2.0 is an XML-based protocol that uses security tokens that contain assertions to pass information about a principal between an identity provider and a service provider. An assertion is a package of information that supplies statements made by a SAML authority. You can find more information about SAML on the Oasis web site: https://www.oasis-open.org
The process that occurs when a user enters the IDMC URL in a browser or launches IDMC through a chiclet differs based on whether the organization uses SAML SSO for authentication only or for both authentication and authorization.
SAML single sign-on for authentication only
When a user signs on to IDMC and the organization uses SAML SSO for user authentication only, the following process occurs:
1IDMC sends a SAML authentication request to the organization's identity provider.
2The identity provider confirms the user's identity and sends a SAML authentication response to IDMC. The authentication response includes a SAML token.
3When IDMC receives the SAML authentication response from the identity provider, it completes the following tasks:
- If the user exists, IDMC establishes the user session and logs the user in.
- If the user does not exist and auto-provisioning of users is enabled, IDMC gets the user attributes from the SAML token, creates the user, and assigns the user the default role and the default group, if it is configured. IDMC establishes the user session and logs the user in.
- If the user does not exist and auto-provisioning of users is disabled, IDMC fails the login.
4When a user logs out of IDMC or the session times out, IDMC sends a SAML logout request to the identity provider.
5The identity provider terminates the user session on the identity provider side.
SAML single sign-on for authentication and authorization
When a user signs on to IDMC and the organization uses SAML SSO for authentication and authorization, the following process occurs:
1IDMC sends a SAML authentication request to the organization's identity provider.
2The identity provider confirms the user's identity and sends a SAML authentication response to IDMC. The authentication response includes a SAML token.
3When IDMC receives the SAML authentication response from the identity provider, it completes the following tasks:
- If the user exists, IDMC gets the user roles, groups, and attributes from the SAML token. It finds the corresponding IDMC user roles and groups, and updates the user roles, if necessary. IDMC establishes the user session and logs the user in.
- If the user does not exist and auto-provisioning of users is enabled, IDMC gets the user roles, groups, and attributes from the SAML token and creates the user. IDMC establishes the user session and logs the user in. If the token contains no SAML role or group information, IDMC fails the login.
- If the user does not exist and auto-provisioning of users is disabled, IDMC fails the login.
4When a user logs out of IDMC or the session times out, IDMC sends a SAML logout request to the identity provider.
5The identity provider terminates the user session on the identity provider side.
SAML single sign-on requirements
SAML single sign-on for an IDMC organization requires an appropriate identity provider.
To set up SAML single sign-on for an organization, ensure that the following requirements are met:
•The system uses a SAML 2.0-based identity provider.
Common identity providers include Microsoft Active Directory Federation Services (AD FS), Okta, SSOCircle, OpenLDAP, and Shibboleth. The identity provider should be configured to use either the DSA-SHA256 or RSA-SHA256 algorithm to generate the signature.
•The IDMC organization has the SAML based Single Sign-On license.
•You have access to the organization as an organization administrator to set up single sign-on.
Single sign-on restrictions
There are some restrictions for SAML single sign-on access to IDMC.
The following restrictions apply to SAML single sign-on access:
•Your license with the identity provider must remain valid to access IDMC through single sign-on.
•If the identity provider is down or IDMC servers can't reach it, users can't log in to IDMC through single sign-on.
•If the identity provider certificate used for SAML single sign-on to IDMC expires, users can't access IDMC through single sign-on.
•If your organization uses trusted IP address ranges, users can't log in to IDMC from an IP address that is not within the trusted IP address ranges.
User management with SAML single sign-on
The following rules apply to users and user accounts when you enable SAML single-sign on for IDMC:
•IDMC stores user information that passes from the identity provider such as first name and email address in the IDMC repository.
•You can create a regular user account with credentials in IDMC after you enable an organization for single sign-on, and the user credentials are saved in the IDMC repository. However, the user must log in to IDMC directly instead of using single sign-on.
•If you delete a user from IDMC, the user is deleted from the IDMC repository. The user is not deleted from the identity provider.
Configuring SAML single sign-on for IDMC
Configure SAML single sign-on (SSO) in IDMC to exchange authentication and authorization information with your identity provider.
Tip:
To watch a video that describes the SAML configuration procedure, see https://youtu.be/4DewSNbvJBc?si=VAeGj5-5Oq0HbXtF.
SAML single sign-on requires an identity provider and service provider. Examples of identity providers include: Okta, Microsoft Azure AD, and PingFederate. In this scenario, the service provider is IDMC.
Before you can configure SAML SSO in IDMC, it must already be set up in your identity provider. For information about configuring two common identity providers, see the following articles on the Informatica network:
1Contact your identity provider team for the following information:
- Issuer
- Single Sign-on Service URL
- Signing Certificate
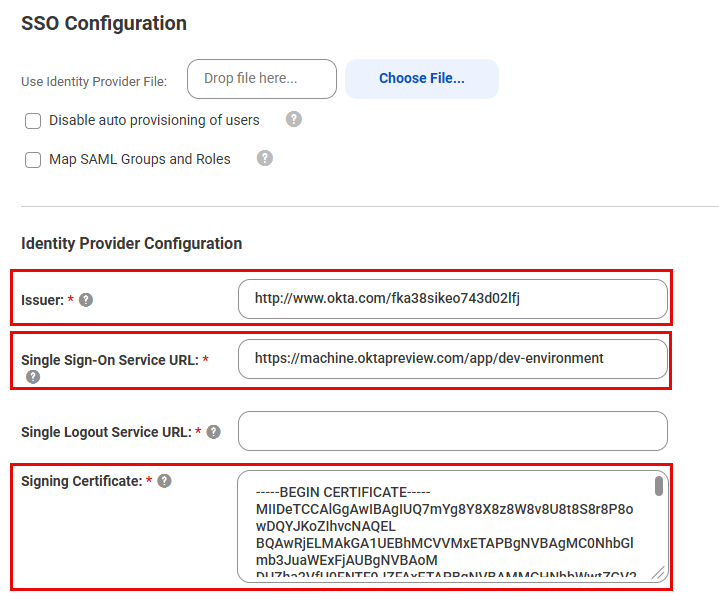
2Enter the information into the corresponding fields in Identity Provider Configuration section of the SAML Setup page:
- Issuer
- Single Sign-on Service URL
- Signing Certificate
The following images shows these fields on the SAML Setup page:
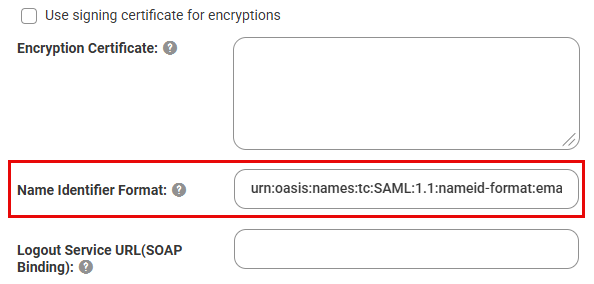
3Enter the Name Identifier Format if possible, otherwise this can be added later. The following image shows the Name Identifier Format field:
4Click Save.
IDMC generates the service provider metadata file and a unique token for your organization.
5Click Download Service Provider Metadata. This downloads the file iics_saml_sp_metadata.xml to your machine. It contains information that your service provider needs to complete the configuration.
6In the Information dialog box, note the URL for single sign-on access to your IDMC organization. For example:
If there isn't a matching IDMC group, enter a new group name and IDMC will create this group and map it to the SAML group. Groups created this way are read-only in IDMC.
12If you don't want to map specific groups and instead just use a default group, perform the following steps:
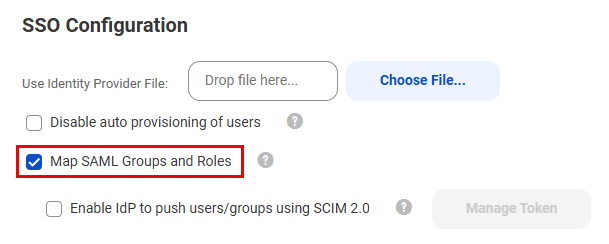
aEnsure that Map SAML Groups and Roles is not selected.
bIn the SAML Group Mapping tab, scroll to the bottom of the list and select a Default Group.
The Administrator can change the groups later.
13Complete the remaining fields on the SAML Setup page as necessary.
Configuring provider settings and mapping attributes
Configure SAML single sign-on settings and map SAML attributes on the SAML Setup page.
1Log in to IDMC as an organization administrator.
2In Administrator, select SAML Setup.
3On the SAML Setup page, configure the following properties:
- SSO configuration properties
- Identity provider configuration properties
- Service provider settings
- SAML attribute mapping properties
- SAML role and group mapping properties (if you use SAML SSO for authentication and authorization)
4Click Save.
IDMC generates the service provider metadata file. IDMC also generates a unique token for your organization and saves the token to the IDMC repository. The single sign-on URL for your organization includes the token. For example:
After you save your changes on the SAML Setup page, download the service provider metadata, and send it to your identity provider along with the IDMC single sign-on URL.
Identity provider configuration properties
Define identity provider configuration properties on the SAML Setup page.
The following table describes the identity provider configuration properties:
Property
Description
Issuer
The entity ID of the identity provider, which is the unique identifier of the identity provider.
The Issuer value in all messages from the identity provider to IDMC must match this value. For example:
<saml:Issuer>http://idp.example.com</saml:Issuer>
Single Sign-On Service URL
The identity provider's HTTP-POST SAML binding URL for the SingleSignOnService, which is the SingleSignOnService element's location attribute. IDMC sends login requests to this URL.
Single Logout Service URL
The identity provider's HTTP-POST SAML binding URL for the SingleLogoutService, which is the SingleLogoutService element's location attribute. IDMC sends logout requests to this URL.
Signing Certificate
Base64-encoded PEM format identity provider certificate that IDMC uses to validate signed SAML messages from the identity provider.
Note:
The identity provider signing algorithm must be either DSA-SHA256 or RSA-SHA256.
Use signing certificate for encryption
Uses the public key in your signing certificate to encrypt logout requests sent to your identity provider when a user logs out from IDMC.
Encryption Certificate
Base64-encoded PEM format identity provider certificate that IDMC uses to encrypt SAML messages sent to the identity provider.
Applicable if you do not enable use of the signing certificate for encryption.
Name Identifier Format
The format of the name identifier in the authentication request that the identity provider returns to IDMC. IDMC uses the name identifier value as the IDMC user name.
The name identifier cannot be a transient value that can be different for each login. For a particular user, each single sign-on login to IDMC must contain the same name identifier value.
To specify that the name identifier is an email address, the Name Identifier Format is as follows:
The identity provider's SAML SOAP binding URL for the single logout service. IDMC sends logout requests to this URL.
Logout Page URL
The landing page to which a user is redirected after the user logs out of IDMC.
IDMC redirects the logged out user to the landing page in the following ways:
- If you specify a logout page URL, IDMC redirects the user to this URL after logout.
- If you do not specify a logout page URL, IDMC redirects the user to a default logout page.
Service provider settings
Define the IDMC service provider settings on the SAML Setup page.
The following table describes service provider settings:
Property
Description
Informatica Cloud Platform SSO
Displays the single sign-on URL for your organization. IDMC generates this URL.
Clock Skew
Specifies the maximum permitted time, in seconds, between the time stamps in the SAML response from the identity provider and the IDMC clock.
Default is 180 seconds (3 minutes).
Name Identifier value represents user's email address
If enabled, IDMC uses the name identifier as the email address.
Default is enabled.
Sign authentication requests
If enabled, IDMC signs authentication requests to the identity provider.
Default is enabled.
Sign logout requests sent using SOAP binding
If enabled, IDMC signs logout requests sent to the identity provider.
Default is enabled.
Encrypt name identifier in logout requests
If enabled, IDMC encrypts the name identifier in logout requests.
Note:
Verify that the identity provider supports decryption of name identifiers before you enable this option.
Default is disabled.
SAML attribute mapping properties
The authentication response from the identity provider to IDMC includes user login attributes such as name, email address, and user role. If the identity provider passes user and group information using SCIM 2.0, the authentication response includes additional SCIM attributes such as Display Name, Employee Number, and Organization.
Map the IDMC user fields to corresponding SAML attributes on the SAML Setup page.
Note:
The attribute format differs based on your identity provider. Refer to the provider documentation for more information.
The following table describes the SAML attribute mapping properties:
includes user login attributes such as name, email address, and user role
includes user login attributes such as name, email address, and user role
The authentication response from the identity provider to
Property
Description
Use friendly SAML attribute names
If selected, uses the human-readable form of the SAML attribute name which might be useful in cases in which the attribute name is complex or opaque, such as an OID or a UUID.
First Name
SAML attribute used to pass the user first name.
Last Name
SAML attribute used to pass the user last name.
Job Title
SAML attribute used to pass the user job title.
Email Addresses
SAML attribute used to pass the user email addresses. This property is required.
Emails Delimiter
Delimiter to separate the email addresses if multiple email addresses are passed.
Phone Number
SAML attribute used to pass the user phone number.
Time Zone
SAML attribute used to pass the user time zone.
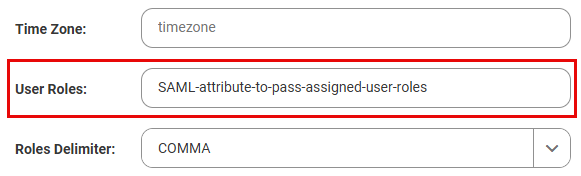
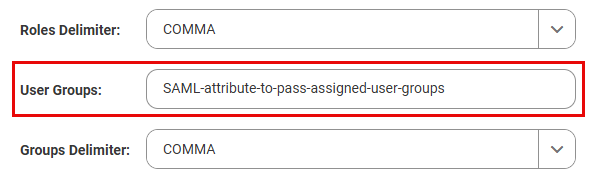
These four properties are enabled when the Map SAML Groups and Roles option is enabled:
User Roles
SAML attribute used to pass the assigned user roles.
Roles Delimiter
Delimiter to separate the roles if multiple roles are passed.
User Groups
SAML attribute used to pass the assigned user groups.
Groups Delimiter
Delimiter to separate the groups if multiple groups are passed.
The following table describes the additional attributes. These attributes are visible when the Enable IdP to push users/groups using SCIM 2.0 option is enabled:
Property
Description
Display Name
SCIM attribute used to pass the user displayName.
Employee Number
SCIM attribute used to pass the enterprise user employeeNumber.
Organization
SCIM attribute used to pass the enterprise user organization.
Department
SCIM attribute used to pass the enterprise user department.
Street Address
SCIM attribute used to pass the user streetAddress.
Locality
SCIM attribute used to pass the user locality.
Region
SCIM attribute used to pass the user region.
Post Code
SCIM attribute used to pass the user postalCode.
Country
SCIM attribute used to pass the user country.
Locale
SCIM attribute used to pass the user locale.
Preferred Language
SCIM attribute used to pass the user preferredLanguage.
ID
SCIM attribute used to pass the user id.
External ID
SCIM attribute used to pass the user externalId.
For Azure Active Directory, this is the objectID. For Okta, it is the id.
SAML role and group mapping properties
When you use SAML for authentication only, define a default role and optionally a default user group for new users. When you use SAML for both authentication and authorization, you can map specific SAML role and group names to IDMC role names. You can map multiple SAML roles and groups to a single IDMC role.
Note:
For instructions on how to map groups with Azure Active Directory, see the HOW TO: Create a SAML Group Mapping with Azure AD Knowledge article.
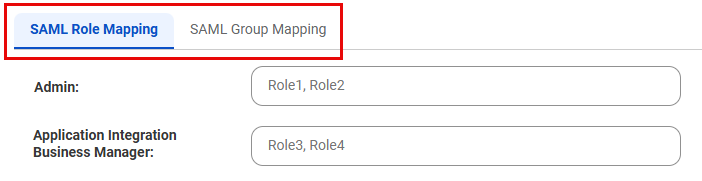
When the Map SAML Groups and Roles option on the SAML Setup page is enabled, you can map specific IDMC roles and groups in the SAML Role Mapping and SAML Group Mapping tabs, as shown in the following image:
You can map multiple IDMC roles and groups, separated by commas.
When the Map SAML Groups and Roles option is disabled, all SAML roles and groups become non-editable, except for the following fields at the end of the list:
Property
Description
Default Role
Default user role for single sign-on users. When auto-provisioning is enabled, new users are assigned this role the first time they sign in to IDMC.
Default User Group
Optional, default user group for single sign-on users. When auto-provisioning is enabled, new users are assigned to this user group the first time they sign in to IDMC.
Downloading the service provider metadata
The identity provider requires the SAML service provider metadata and IDMC URL to complete the SAML single sign-on setup process. After IDMC generates the service provider metadata file, deliver the file and the IDMC URL to the identity provider.
1On the SAML Setup page, click Download Service Provider Metadata.
The service provider metadata file is downloaded to your machine.
2In the Information dialog box, note the URL for single sign-on access to your IDMC organization.
3Click OK to close the Information dialog box.
4Send the metadata file and the IDMC single sign-on URL to your identity provider administrator.