About ActiveVOS Platform SDK
The Platform SDK contains a business user tool for workflow development called the Guide Designer. The guide designer has a simple interface for creating steps such as screens and automated actions and they can use and modify data in a host system. The guides that you create are applications that run from within a web browser connecting to either an internal or external server. The browser can be within a PC or a computer created by Apple.
The Host Provider SDK and associated Service Programming Interface (SPI) allow developers to expose data and operations in their host system to the Designer. At the heart of the system are reusable services that are defined using the powerful Process Developer environment and deployed to the Process Server environment. These services implement the SPI necessary for providing a hosting environment (Host Provider) and are described to the Process Servr using a simple descriptor mechanism
Sample Guide Designer Orchestration Project Templates
Project Developer has three sample Guide Designer orchestration project templates:
- •Guide Designer Demo: This sample has the source for all demo guides and service all steps used in the demo environment. It also includes additional guides and service call steps. The emphasis here is interacting with databases. You can use the way this orchestration project is organized to help you get started designing your own applications. Also, after deploying the project, you can use the guides it installs to introduce your users to the way guides work without having them interact with your business applications.
- •Guide Designer Customization Starter: This template can be used as a starting point for creating services and custom themes for use in Guide Designer.
- •Guide Designer Host Provider: This template can be used as a starting point for customizing the sample host provider.
Each of these projects has its own cheat sheet that will guide you through using them.
Note: Do not deploy more than one of these projects at the same time. If you do, you will see an error dialog with the following message 'Application is not correctly configured' when you are using Process Central'. This occurs because each sample project has its own configuration file and only one can exist. Correct this problem by going to the Process Console, selecting Catalog | Contribution, clicking on a contribution's link, then deleting one of the projects.
Guide Designer Host Provider Template
The easiest way to get started is by installing the Guide Designer Host Provider sample project provided with the Process Developer and which runs sin the Process Designer environment. The Process Developer has an orchestration project template sample for creating a Host Provider. Simply select File > New Project > Orchestration Project, enter a project name, and then select Guide Designer Host Provider Template to set up the project in your workspace.
Sample Project Contents
The sample project contains resources that illustrate how to use an SQL database as the host application on which Process Designer will operate. All screens operate on one or more entities that are contained within a database table. Internally, this sample uses the Data Access system service provided by Process Server to connect to the database with a JDBC connection configured in JNDI.
BPEL Folder
The bpel folder contains the following resources:
- •dbHostEnvironmentRuntime.bpel: A single entry point that Process Designer can use to interact with the entities on the host platform. The interface for this process defines five basic operations: Create, Read, Update, Delete (CRUD) and an advanced Query operation.
- •dbCreateAnyEntityService.bpel: A simple conversion process that maps service call step requests for creating any entity to the dbHostEnvironmentRuntime.
- •dbDeleteAnyEntityService.bpel: A simple conversion process that maps service call step requests for deleting any entity to the dbHostEnvironmentRuntime.
The deployment artifacts for each of these BPEL process are in the deploy directory.
Config Folder
The config folder contains resources typically found in many projects:
- •aeiHolidayCalendar.xml: Names holidays. This is used by date data types.
- •app-config.xml: Configuration file that specifies design time and run time properties for the host provider that are paired with Process Designer. This configuration defines features supported by the host platform as well as possible overrides to Process Designer.
- •custom-services.xml: Details for custom service call steps that all guide designers can access.>
- • custom-types.avcconfig: Process Central configuration file for deploying custom Guide Designer custom JavaScript renderers, i18n properties, and the request forms used in the sample that are embedded in the runtime in Process Central.
You can override Process Designer messages by creating a new messages.properties file. After creating this file, make sure that the avcconfig file that refers to this messages.properties file comes later than built-in avcconfig file when they are sorted alphabetically. For example, you could update custom-types.avcconfig to include a line such as <tns:i18n location="messages.properties"/>.
You can see what the order is by selecting Catalog | Resources | Central Configs from within the Process Console. If one of your files is inadvertently overriding another, you will need to change the file's name to change the execution order.
- •custom-types.xml : Custom data types and their corresponding JavaScript renderers.
- •MapItRenderer.js: A simple example of a JavaScript renderer that puts a link on a guide screen that links to a mapping service such as Google Maps.
- •Stage_picklist.xml: The definition of the values to which a variable can be set. These values are displayed as a picklist.
db_schema Database Artifacts Folder
The db_schema folder in the sample project provides the DDL for some common databases that creates the tables required by the guides packaged with the sample. The included Derby database is prepopulated with a schema and sample data.
Forms
This sample has two folders:
- •guide_explorer: This folder contains the implementation for the guide explorer within the Forms pane of Process Central. This code, if you like, can be the basis for changing the way the explorer displays.
- •request: This folder contains the implementation for the guide viewer. Similar to the way you can use files in the guide_explorer folder, use this file as the basis for changing the way in which the guide viewer displays.
Guides
Sample guides are in the guides folder. These are imported and published during when the sample is deployed.
host_env Environment Definition Folder
The host_env folder contains the definitions of all entities used by the host application. In this sample, each table in the database schema is mapped to a single entity in this folder. For example, the contacts table is represented by the contacts_detail.xml file. In addition, the entityList.xml file is a master index of all entities that will be deployed.
Other Resources
The icons folder has images that guide designers can use and which are used by published guides. Other folders containing data are deploy, sample-data, and xquery.
Sample Customization Starter Template
The Sample Customization Starter template can be used as a starting point for creating service call steps and custom themes for use in Guide Designer Simply select File > New Project > Orchestration Project, enter a project name, and then select Guide Designer Customization Starter to set up the project in your workspace. The following sections describe the contents of this project.
BPEL Processes
The bpel folder contains the HelloWorld.bpel file that is based on the HelloWorldAutomatedStep system service. The service receives a name and returns a Hello World-type of greeting based on the time of day. The process demonstrates the use of a complex-type response and shows a complex type being rendered for display in HTML and uses JavaScript and related technologies for this purpose. You must always create a custom renderer for your custom types.
Deployment artifacts for these BPEL process are in the deploy directory.
Guides
This folder contains the definition for the "Hello World" guide. It also contains the system-generated guide-catalog.xml file.
A guide is the application that users build in Guide Designer. (Application developers can also create them within Process Developer and Process Designer.) The guide within this folder has a few step types, including a service call step. This step is essentially the HelloWorld.bpel process. All of your application's guides will reside in the guides folder.
Forms
The folders in the forms folder define two of the components that Process Central displays as part of its user interface: the guide explorer and the guide viewer. Use the code in the following folders to see how each was created. You can also use this code if you wish either to create your own explorer or viewer or modify the ones that exist..
- •guide_explorer: This folder contains the implementation for the guide explorer within the Forms pane of Process Central. This code, if you like, can be the basis for changing the way the explorer displays.
- •request: This folder contains the implementation for the guide viewer. Similar to the way you can use files in the guide_explorer folder, use this file as the basis for changing the way in which the guide viewer displays.
The samples-starter.avcconfig.xml contains information used when configuring form filters.
avcconfig files here and in other folders control how Process Designer resources are used in a project.
Note: The Process Server executes your avcconfig files in alphabetical order. You can see this order by selecting Catalog | Resources | Central Configs from within the Process Console. If one of your files is inadvertently overriding another, you will need to change the file's name to change the execution order.
Reports
The reports folder contains the files needed to construct the guides report that displays within Process Central. Use the information in this folder as the basis for creating your own reports. (This report, like other reports used in Process Central, was created using BIRT--Business Intelligence and Reporting Tools.) The avcconfig file contains sections that are commented out, and you should uncomment them if you are creating your own versions.
Guide Designer
The guides folder contains the resources that the project requires, some of which are deployed in the project deployment contribution and others that you must import directly into Guide Designer. Open the .xml files within each of the subfolders to see what was done for this project.
This folder contains four additional folders as well as the app-config.xml file.
- •renderings: The greeting rendering file defines how output data is displayed. It contains layout details and a script that implements the rendering interface. This file is deployed in the project deployment contribution.
- •resource-contribs: If you wish to provide images to guide designers, you must package them into the contribution being deployed along with a screenflowContribution metadata file.
- •service-contribs: You must add a services.xml file to the deployment package for a service call step. This file contains the configuration details that make the service call step type available and to describe how data is used. This file is deployed in the project deployment contribution.
- •theme-contribs: When a guide runs, the default background colors, button styles, and other style elements are defined in HTML/CSS format in files deployed to the Process Server and made available to Guide Designer. You can create new themes and use them in a guide. A theme.xml descriptor is deployed as part of the project deployment contribution. This folder also contains other files used by the render.
Note: If you create more than one Guide Designer Customization Starter project, do not deploy themes.xml more than once. Duplicate deployments create a duplicate theme name conflicts.
The folder also has the app-config.xml configuration file. This file has design-time and run-time properties for Guide Designer that declared to be used by the host provider This configuration defines features supported by the host platform as well as possible overrides to Guide Designer.
Note: There can be no more than one app-config.xml file on a server.
Permissions
Permissions determine who can see guides when information within the Forms, Designs, and Report panes. (Reports are not available in Process Designer.) Each is set independently; that is, the permissions that you set for one pane do not affect the permissions in the other. An application configuration file sets permissions for the Designs pane and an .avcconfig file sets them for the Forms pane. For example, if you set permissions for access in the Designs pane, these settings do not affect what users can see in the Forms pane.
Setting Permissions in an Application Configuration file
When you create an application configuration file with a
Sample Configuration element, setting
globalPermissions to
true tells Guide Designer to display a Permissions tab within the guide designer's
Settings dialog. Here is an example of setting the
globalPermissions feature:
<screenflowConfig ...>
<global ...>
<features>
<feature name="guidePermissions" enabled="true"/>
...
</features>
...
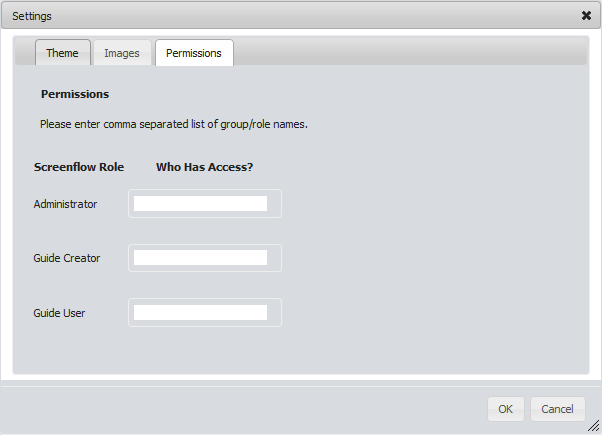
Now that this is set, users will see the following dialog when displaying the Settings dialog from the guide designer's toolbar.
Any user who has access to Process Designer will then be able to make changes here that affect the privileges that a user has for guides.
The permissions allow the following access:
- •Administrator: Has full access to guides; that is, an administrator can create and run guides, and can see and use this Permissions tab. Only administrators can see and use the Terminate Running Guides button that appears when a guide is selected in the upper-right panel displayed when the Designs pane is being displayed.
- •Guide Creator: Can create and run guides; however, users in this role do not see the Permissions tab.
- •Guide User: Can only run guides.
The settings made by users in this dialog do not affect permissions for accessing guides in the Forms pane.
Setting Permissions in an .avcconfig File
When you add an .avcconfig file that is associated with forms, you can set roles for who can access information. Here's an example that allows users in the three named roles to access forms.
<tns:requestCategoryDefs>
<tns:requestCategoryDef id="requestcategory_guides_launchpad"
name="${requestcategory_guides_launchpad}">
<avccom:requestDef id="hello-world" name="Guide In Form">
<avccom:allowedRoles>
<avccom:role>abAdmin</avccom:role>
<avccom:role>abDeveloper</avccom:role>
<avccom:role>loanreps</avccom:role>
</avccom:allowedRoles>
...
The settings made by users in this dialog do not affect permissions for accessing guides in the Forms pane.
An application can have more than one .avcconfig file. For example, you may have a second one that defines permissions for information in the Reports pane.
The order in which the Process Server uses the information in .avcconfig files is alphabetical. This means that the elements in one file can overwrite elements in another. You can see this order by selecting Catalog | Resources | Central Configs from within the Process Console. If one of your files is inadvertently overriding another, you will need to change the file's name to change the execution order.
Deploying the project
This topic describes how you deploy the sample application.
Setting Up the Database (Guide Designer Host Provider Only)
The sample application uses the embedded Process Server database that ships with Process Developer. If you are using this database, it is set up for you. If you wish to use an external database, you will need to do the following to use the new JNDI data source:
- 1. Configure your Process Server with an additional JNDI data source.
- 2. Deploy the DDL provided with the sample.
- 3. Update the PDD for the dbHostEnvironmentRuntime.
Setting Up the Server
The steps for setting up the server are as follows:
- 1. Start the embedded Process Server. This is described in the Process Developer help.
- 2. Right click on the .bprd file (for example, ae-db-cloudprovider.bprd) and choose Execute from the context menu.
- 3. Update the URN mapping. Set aeHostEnvironmentRuntime to dbHostEnvironmentRuntimeService.
Using the Sample Host Provider
This topic describes running the guides within the sample projects.
Running the Sample Guides
Run the sample guides as follows:
- 1. Navigate to http://localhost:8080/activevos-central in your browser.
- 2. Log in as loanrep1/loanrep1.
- 3. Choose Forms from the left navigation pane.
- 4. Click on the Published Guide Designers folder.
- 5. Choose one of the sample guides.
- 6. After the guide loads, follow its prompts.
Mobile Guide Usage
To convert any guide to a mobile guide, begin by changing the theme to "Smartphone" in the Guide Properties dialog. The size difference between the screen and a phone could mean that you may have to rearrange and perhaps simplify steps.
Customizing the Sample Host Provider
This section discusses customizations that you can make to the sample project. They demonstrate how you define a new type that provides links to a mapping service such as Google Maps. The first step is defining a JavaScript renderer and defining a custom data type. (Rendering is the application of a friendly user interface for the task's interface input and output messages.) Next, modify the project's metadata files that allow these additions to be discovered.
Note: The Process Server executes your project's .avcconfig files in alphabetical order. You can see this order by selecting Catalog | Resources | Central Configs from within Process Console. If one of your files is inadvertently overriding another, you will need to change the file's name to change the execution order.
Note: When implementing a custom renderer, you must add the ae-sf-renderer-container class to the root element (that is, to the <div>) of your renderer. If you do not, your interface will open in a new window.
Custom Type Example
Creating a custom data type requires that the new type be defined in a metadata file and a renderer be defined to display it at both design- and runtime.
In the example, {$sample.project}/config/MapItRenderer.js renders an HTML anchor with the text "Map It" and the href of the anchor is a URL to a mapping service configured in the datatype options.
Code Example: Renderer JavaScript
(function($) {
activevos.util.createAvosPackage("my.custom.namespace");
function MyCustomRenderer(aDataValueCollection) {
this.renderField = function(aContainerElement,
ajQueryContext, aFieldName, aFieldDataValue) {
// do something
};
};
my.custom.namespace.MyCustomRenderer = MyCustomRenderer;
})(jQuery);
This example is a skeleton for a custom renderer and it only requires that the renderField function be implemented. The second line defines a unique package name or namespace for the renderer; this is similar to a package name in Java.
The lines shown in bold begin the definition of the custom renderer function. It accepts an argument (shown in the next example) that contains all of the data for the screen. It also defines the renderField property, which is also a function and which renders the data. The renderField arguments are the HTML elements that contain your custom rendered field, the jQuery context, the field name being rendered, and the field value (see the AeScreenFlowDataValue example later in this topic).
Code Example: AeScreenFlowDataValuesCollection Function
function AeScreenFlowDataValuesCollection(){
/**
* @returns {Array} list of AeScreenFlowDataValue objects.
*/
this.getDataValues = function() {};
/**
* @returns {boolean} true if named data value holder
* exists.
*/
this.hasDataValue = function(aName) {};
/**
* Returns a type by name or null if not found.
* @param {String}: aName name of data value
* @returns {AeScreenFlowDataValue}; the data value or null
* if not found.
*/
this.getDataValue = function(aName) {};
}
Code Example: AeScreenFlowDataValue Function
function AeScreenFlowDataValue(aType, aName, aValue, aRenderingTypeName) {
/**
* Gets the rendering type name. If the rendering type is not
* set, it returns the type.
*/
this.getRenderingTypeName = function() {};
/**
* Gets the name of the field.
*/
this.getName = function() {};
/**
* Gets the value of the field.
*/
this.getValue = function() {};
/**
* @returns {AeDataOptions} Collection of AeOption objects.
*/
this.getOptions = function() {};
/**
* Returns option value.
* /
this.getOptionValue = function(aName) {};
/**
* @returns {boolean} true if field is readonly.
*/
this.isReadOnly = function() {};
}
After you define the renderer, you can define the custom type. The {$sample.project}/config/custom-types.xml sample project defines a new type named mapit. It is bound to the MapitRenderer.js custom renderer. To enable this type for the sample application, uncomment the type element.
Using JavaScript Libraries
When a custom renderer uses a JavaScript library, it can import it dynamically instead of including it within an avcconfig file. For example, you could load a library named dataTable as follows:
var loadDataTablePlugin = $.dataTable ? null :
myProject.loadScript(/path/to/datatable/js/file, $);
$.when(loadDataTablePlugin).done( function() {
// Use dataTable here}
);
Customizing an Entity
After creating the custom types and renderers, you need to make them available for your host application. The project does this by using the mapit type in the custom contacts entity to provide a Google Map for the contact. In the {$sample.project}/host_env/contacts_detail.xml file, uncomment the field definition for Full Address.
Code Example: Full Address Field Definition
<host:field label="Full Address" name="FullAddress"
readonly="true" required="false" type="mapit">
<host:options>
<host:option name="mapping-provider"
hide="true">http://www.bing.com/maps/default.aspx?q=</host:option>
</host:options>
...
The mapping-provider attribute's value was changed to use Microsoft Bing as the mapping provider instead of Google Maps. The mapping-provider option is hidden so that guide developers cannot edit it. If the hide attribute was set to false or removed, guide developers could change the mapping-provider in the guide designer.
After altering the entity definition, redeploy the sample project using the packaged BPRD file, as follows:
- •Navigate to the guide designer and open the Sales Call Follow up guide.
- •Open the Click continue after your verification step and add a read-only field for Full Address.
- •Save and publish the guide.
After you launch the updated guide, a new Map It link appears that opens a new browser tab when clicked.
Validating Fields
A render class can implement the validateField JavaScript function to validate data. This function is called when the user presses an action button.
This function's definition is:
validateField(aFieldDataValue, aJQueryContext)
where:
- •aFieldDataValue: An AeScreenFlowDataValue instance.
- •aJQueryContext: A jQuery object to be used as context for validation. Any jQuery plugins imported through .avcconfig are available here.
Here's an example:
this.validateField = function(aFieldDataValue, aJQueryContext) {
var $ = aJQueryContext;
var salutation = aFieldDataValue.getValue().salutation;
if ( salutation.name.$t === 'chester'){
var errorMsg = "Cant equal chester";
return { result: false, message: errorMsg};
}
return { result: true };
}