Embedded Guide Step
To better orchestrate and manage your business processes, you can design guides that embed other guides, similar to how you would create a subprocess that is called from another process.
For example, suppose there are a set of steps associated with entering client information. If there are different ways that your users interact with clients and many need to enter client information, you could group these client information steps into their own guide. Now, whenever a guide needs to enter client information, it just "embeds" the guide. This also means that all embedding guides use the same steps
Using an embedded guide has several advantages, including these:
- •Avoids Repetition: If you place commonly used patterns in a separate guide, you can save time and create other efficiencies if you place the discrete set of steps into a guide that can be embedded and reused in other guides. When you change the embedded guide, you can easily make those changes available to all guides that use it.
- •Clarifies Design: Embedding can make your design look simpler. Removing steps and placing them into an embedded guide means that the embedding object only shows one step rather than all of the steps. This can simplify the diagram on the canvas. Also, if a problem occurs in the ways steps occur, embedding can make it easier to locate a problem.
- •Clarifies Logic: If there are many steps that need to operate on other objects, this allows you to create logical chunks of work that each apply to different objects (such as opportunities and leads). This decreases the complexities of working with multiple object types in a single guide.
You handle the data received from a guide and the data that can get sent back to it using the Input and Output fields defined in the guide properties.
Embedding and Embedded Field Relationships
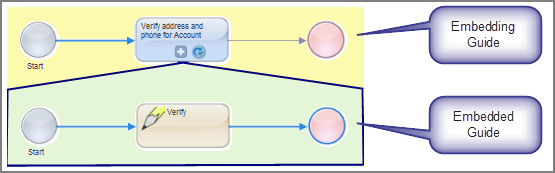
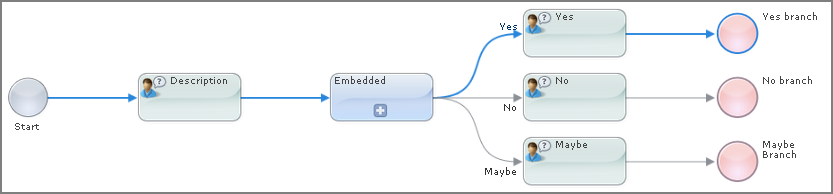
When you publish an embedding guide or process, the embedded object appears within the embedding object, as shown below.
- •An embedded guide, like all guides, has a set of outcomes. When you embed a guide, the outcomes from that guide become different branches of the embedding guide. This means that the embedded guide's outcomes are treated as if they were the answers from the previous step. More precisely said, the Guide Designer creates a branch for each of the embedded guide's outcomes.
For example, suppose the embedded guide has three outcomes: "Yes", "No", and "Maybe". After you embed the guide, the designer adds three branches to the embedding guide, one for each outcome:
- •Many guides receive data from the embedding process and return results, so be sure to define the required fields.

Notice the relationship of field information in these two dialogs.
After one process or guide is embedded in the other, the fields within the embedded object are available in the embedding object.
However, these fields only become available in the steps following the embedded step.
Multiple Embedding Guides
Suppose you have three guides whose names are guide 1, guide 2, and guide 3. Also, guide 1 embeds guide 2 and guide 2 embeds guide 3. In this case, guide 1 does not see the fields in guide 3. If you need to access these fields, add output fields to guide 1 that have the same name as the fields in guide 3.
An Embedded Example
The first topic in the following example shows the implementation of a simple guide embedded within the guide discussed in the second topic. The actions performed by these guides are:
- 1. Create a Screen Step that is just a placeholder so that the example does not immediately jump into the embedded guide. (This is done for this example, A guide could jump directly into an embedded guide.)
- 2. Execute the embedded guide, passing it a number.
- 3. Within the embedded guide, enter data.
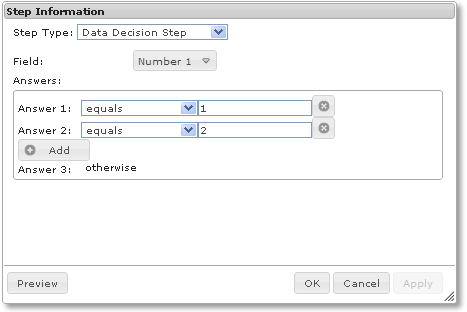
- 4. A Data Decision Step routes the guide to an End/Milestone Step based on the passed in number.
- 5. The embedding guide displays the values entered in Step 3.
Embedded Guide Example
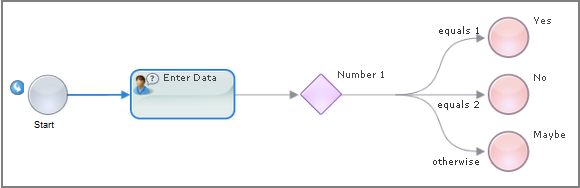
The following illustration shows the design of this example's embedded guide.
The Embedded Guide step within the embedding guide asks the user to enter a number. Based on the value of this number, the guide chooses one of the three branches.
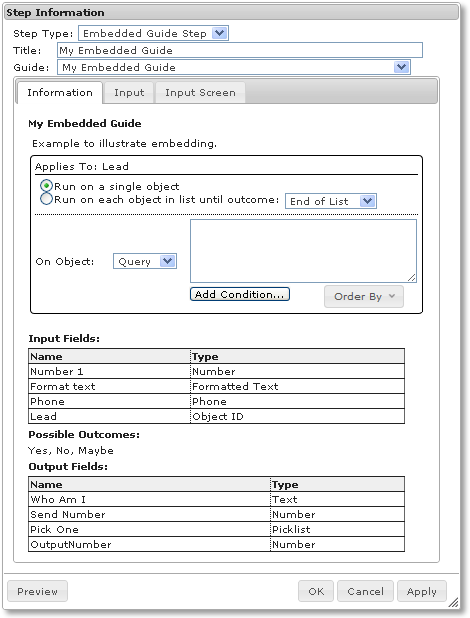
You must define fields for all the values sent to the embedded or embedding guide in the guide properties.
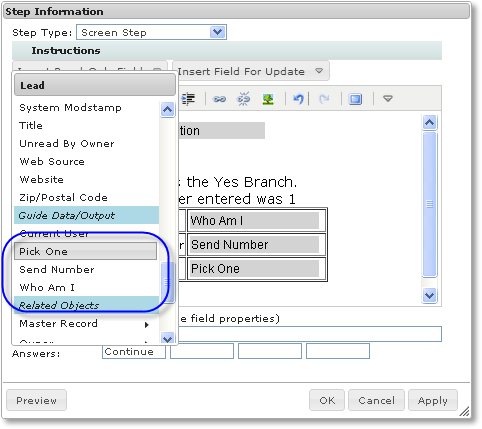
Here, four fields are declared. One is an input field and the others are output fields. These fields are available in all steps within the embedded guide.
Input fields are meant to be read. That is, a guide places data into an input field and this data is read by the embedded guide. If, however, the embedded guide changes the value of an input field, this change is seen by the embedding guide.
An output field does not exist until it is set to a value within an embedded guide. For example, if the fifth step in a guide is an embedded step, output fields are invisible in the first five steps. However, they are visible beginning at the sixth step.
For more information on selections you make in the
Type column see
Introduction to Data Types and Field Properties.
These fields are used in the following Screen Step:
The table contains the fields set in the Guide Fields tab. Select the fields to insert in the step from the insert lists.
Here, no object fields display because the Applies To field was set to * Any *. This means that the embedded guide does not have access to any of the fields within any objects. If this guide needed access to object fields, you will need to select the object in the Applies To list or pass them to the guide as input fields.
The step following this data decision step uses the value placed in the Number 1 field to choose the guide's outcome.
Creating an Embedding Guide
This topic show how to create a small embedding guide; that is, it describes creating a guide into which another guide will be embedded. Here is the definition of this guide:
The steps within this guide perform the following actions:
- 1. Display a step that describes what is about to happen. This step has no content. Instead, it just has text that gives instructions. After users read the instructions, they press a button and move to the Embedded step.
- 2. The user types a number within the Embedded step, the embedded step executes, and then returns.
- 3. The embedded branch's End/Milestone Step dictates the path that this guide takes.
- 4. The guide ends with its own End Step/Milestone Step.
In this example, the embedding guide acquires information from the embedded guide. This means that you will need to know the following about the embedded guide:
- •Its input fields
- •Its output fields
- •Its possible outcomes
The steps displays the following properties:
Look at the sections of this dialog:
- •My Embedded Guide is the name of this guide. This guide applies to Leads, which means this embedded guide has access to Lead information. (Using the controls within the Applies To area is discussed later in this topic.)
- •The Input Fields area shows that you need to add four fields. These four fields appear on all insert fields picklists.
Note: If the embedding guide passes a field as input, an update to it within this embedded guide also updates the field in the embedding guide once the embedded guide finishes.
- •The Possible Outcomes area shows you the outcomes that can be assigned to end steps within the embedded guide. Each outcome has its own branch in the embedding step in the same way that each answer within a screen step has its own branch.
- •The Output Fields area identifies the information that the embedded guide returns to the embedding guide. All steps after the Embedded Guide step (in the embedding guide) will see these fields. Said in a slightly different way, when you access fields in any step before the Embedded Guide step, you will not see any output fields. However, they are shown in field picklists and can be used after the embedded step finishes.
In the Embedded Guide step, if you select Screen as the source of the "Number 1" input field, Process Designer adds a "Number 1" button to the input screen so that you can add it in the Input Screen.