Exercises
The exercises in this part are used with Lesson 1 of this tutorial.
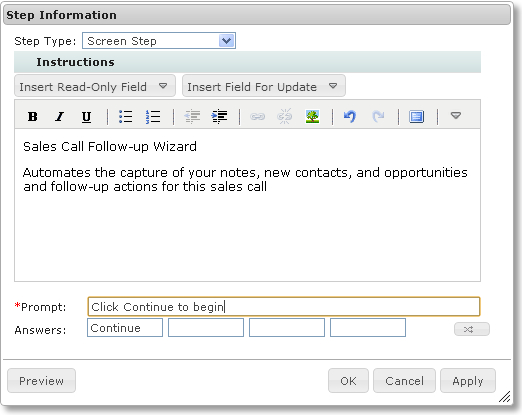
Exercise 1: Adding the Click continue to begin Screen Step
While many guides begin with a Service Call step, many more begin with a Screen Step that explains what the guide does. In the exercise, you will add a screen step before the Create new contact Service Call step.
The way in which you insert a step before another step is to select the step (here it is Create new contact) and then press the Insert button on the menu bar.
Now create a screen step that looks like this:
Note: For information on using this toolbar, see Using the Guide Designer Editor elsewhere in this help.
The beginning of your guide should look like this after you insert this screen step:
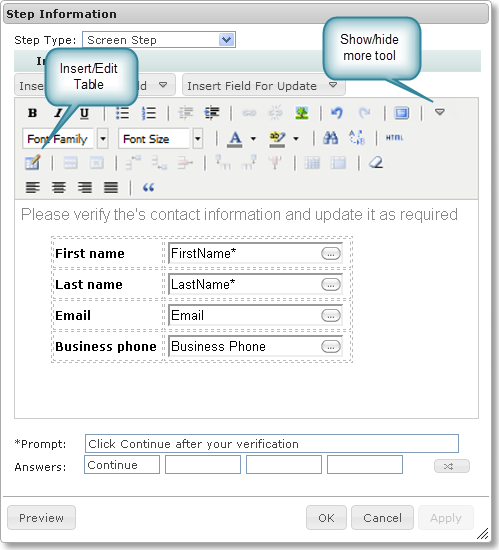
Exercise 2: Adding the Click continue after your verification Step
Place this screen step immediately before the Create new contact step. Do this by selecting this step and then clicking the Insert button.
A new untitled step is created. Click on it and create a screen step that resembles the following figure. Here are some hints:
- •Click the Show/hide more tools button. Three additional rows of buttons appear.
- •Click the Insert/Edit Table button and inset a table that has two columns and four rows.
- •Use the Insert Field For Update picklist to insert the four fields.
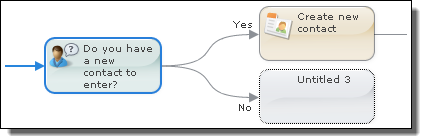
Exercise 3: Adding the Do you have a new contact to Enter? Step
Place this screen step immediately before the Create new contact step. Do this by selecting this step and then clicking the Insert button.
A new untitled step is created. Click on it and create a screen step that resembles the following figure. Here are some hints:
- •Use a table to position elements.
- •Use the Insert Read-only Field picklist to insert the Contact List field. The Guide Designer displays this field in gray and tells you that it is an output field.
It is extremely important that you type the answers in the order shown in this dialog. When you insert a step that will have branches before another step, the Guide Designer sets the step immediately after this one as the top branch.
If you had entered them in a different order, the No branch would point to the Create new contact step.
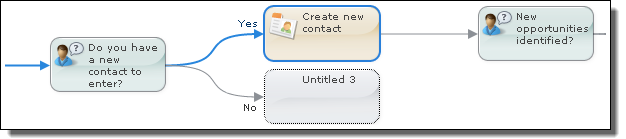
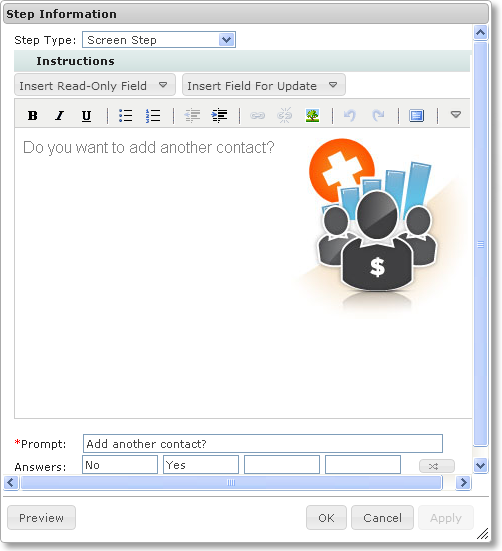
Exercise 4 Do you want to add another contact Screen Step
Place this Screen Step immediately before the New opportunities identified step. Do this by selecting this step and then click the Insert button.
A new untitled step is created. Click on it and create a screen step that resembles the following figure. Again, it's important to type the answers in the order shown here.
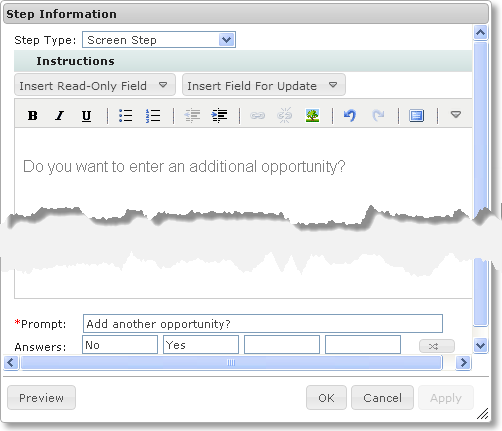
Exercise 5: Adding the Add another opportunity Screen Step
A new untitled step is created. Click on it and create a screen step that resembles the following figure. Again, it's important to type the answers in the order shown here.
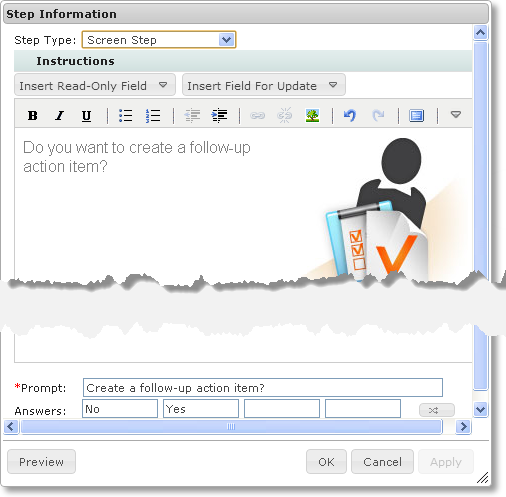
Exercise 6: Adding the Create a follow-up action item step
Place this screen step immediately before the Done End Step. Do this by selecting this step and then clicking the Insert button. As before, pay attention to the order in which the answers are entered.
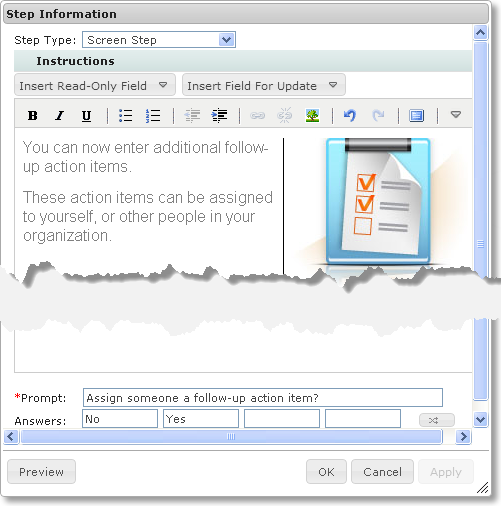
Exercise 7: Adding the Assign someone a follow-up action item
Select the newly created untitled step and click on it. Create a screen step that looks as follows:
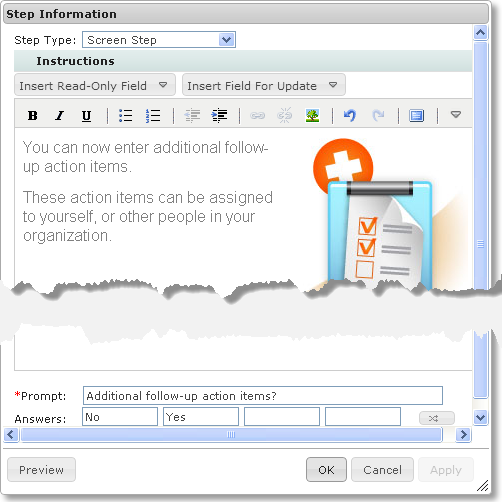
Exercise 8: Adding Additional Follow-up Actions Items
Now for the last screen step. Select the untitled step created by the previous exercise, and edit it to look like the screen step in the following figure.
The No branch will be an End Step. Rather than directly entering it, select the End Step crated a few exercises ago, select the Copy button in the toolbar, select the untitled step at the end of the No branch, then select the Paste button.
The Designer lets you copy (or cut) steps and entire trees.