Handling Data
Inserting Fields Using Picklists
There are many places where you add or use field names.
When a user runs a guide, Process Designer replaces the field with the value within the object. For example, if an Account Type field was inserted and the Account Type is "Grade 1", users will see "Grade 1" instead of the field name when they are running the guide.
Three kinds of lists exist in steps:
- •Read-Only Field: A read-only field is a field whose value cannot be changed. You can tell that it is read-only field because it displays in gray.
The text in front of the field was added as descriptive text in front of the field. If you didn't add a description, the user might not know what information was being displayed.
Note: When an object ID is placed in a canvas as a read-only field or put into a column in a table, it displays as a link to the object. If you want to show the object ID's value, insert it into a text field as "{!Id}".
- •Editable Field: An editable field lets the user see the current value of the field as well as modify its value.
Click the "
..." button to see a field properties dialog. For more information, see
Introduction to Data Types and Field Properties.
Autogenerated Fields
A field can be virtual; that is, the object has a field that is actually a composite key or a composite field. When Guide Designer displays the name of this virtual and autogenerated field, it displays it as "Object_name" + "_IID".
Entering Fields as Text
You can enter text and the value of a field as the information you type in text boxes such as the one in the following.
To specify a field value, choose Content as the Source and then click the small icon to the right of the text box. From the list of fields that displays, select the field you want to enter. If you know the name of the field, you can also type it in the text box as {$name_of_field}.
This example shows the values of four fields from the current object as the Content for the Description field.
You can add other text to display with the field values. For example, you could specify:
The name is: {$name}
Related Object Fields
Many of the objects within your application have relationships to other objects. For example, in a CRM application such as Salesforce, cases are related to the account and contact objects. An account is related to opportunities, cases, expense reports, and so on.
Note: You only see related objects and their fields if these relationships exist. If specific objects were created for your application, these relationships may not exist.
When you set the type of object that the guide or process Applies To, the fields associated with that object and any related objects are available for your application.
This list shows a Lead object associated with other objects. Those objects are associated with others. In this example, the Converted Account object has a set of Related Objects, including an Owner. The Owner also has related objects:
Setting Data in Steps
Some steps that you will create ask users to enter information before the step's actions occur. Examples include Service and Create. In contrast, other steps already have the information they need when they begin executing. If the step has the information it needs, the action occurs automatically and the user doesn't see it. Instead, the user sees the step that follows. Although this topic uses a Create step as an example, there is no difference setting data in other kinds of steps
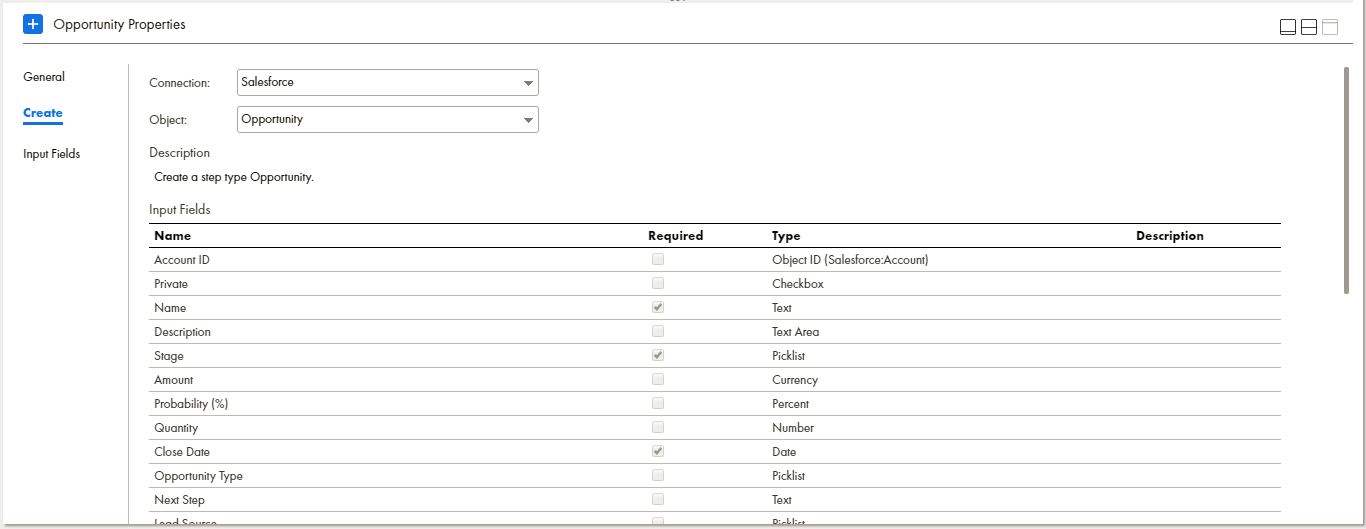
In the step properties section, you can see information about the fields associated with the action or object. If an entity or object is not selected, no data appears in the Information tab.
This section lists all of the fields that can supply data when this step creates an opportunity object. The fields that you will actually be using are named and set within the Input tab.
Setting Source Values
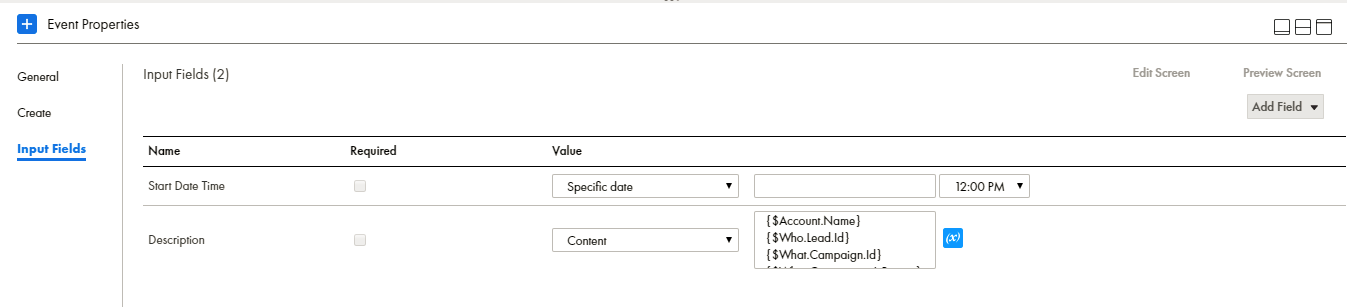
You can tell Guide Designer about the source of the values that will be assigned to a field. The following figure shows part of a Create step where fields have different sources:
Setting Source Values: Content
A Content source is one in which the person designing the guide is deciding the value that is passed as input to a step. For example, you could use Content to set the Description field of a Create step creating an event to "Demonstrate the product" rather than requiring the guide's user to provide the description.
Sometimes, you want to create content that contains text and field values. For example, you could have a "mailing" field that contains a person's name and address. You would add this information by including field strings.
Click the (x) icon to see a list if fields.
After you select a field, Process Designer places a field code into the text box at the cursor's position. You can individually select as many fields as you need; however, you can only select one item at a time.
Here's an example:
You can also add text to this inserted field indicator. For example, In front of {$Account.name}, you could type "Name: ".
When Process Designer executes this step, it replaces each field indicator with the text extracted from the field.
Setting Source Values: Field
If you select Field for the Source, Process Designer displays a collapsed list to the right. You can now select the field whose value Process Designer will write into the object when this step executes. As with other places where you select fields, the bottom of the picklist may show related objects whose fields can be used.
Setting Source Values: Formula
Fields that take numeric input fields can use a formula to set a value. For example, you can use this with the Assignment step to add a number to an existing field. Use numeric operators such as +, -, *, div, and mod to perform an operation upon fields.
You can also use any XQuery function within a formula. (These are defined at
http://www.w3.org/TR/xpath-functions-30/.)
Evaluation Notes
Process Designer evaluates formulas as you might expect. Note that:
- •$Field1.Field2.Field3 is pre-processed to de-reference down to the contents of Field3 and would bind the contents to its value.
- •Special characters in field names are removed. Fields that start with numbers are given an "x" prefix.
- •If $Account is a by-value object, you must use an XPath path expression to get at its contents; for example, $Account/Owner/Name.
- •Object lists should be sequences containing either ID values (for by-reference object lists) or the XML representation of the records. For example, two object lists can be appended using the following expression: ($a,$b).
- •Object references within a list are separated by semi-colons; for example, (a; b; c).
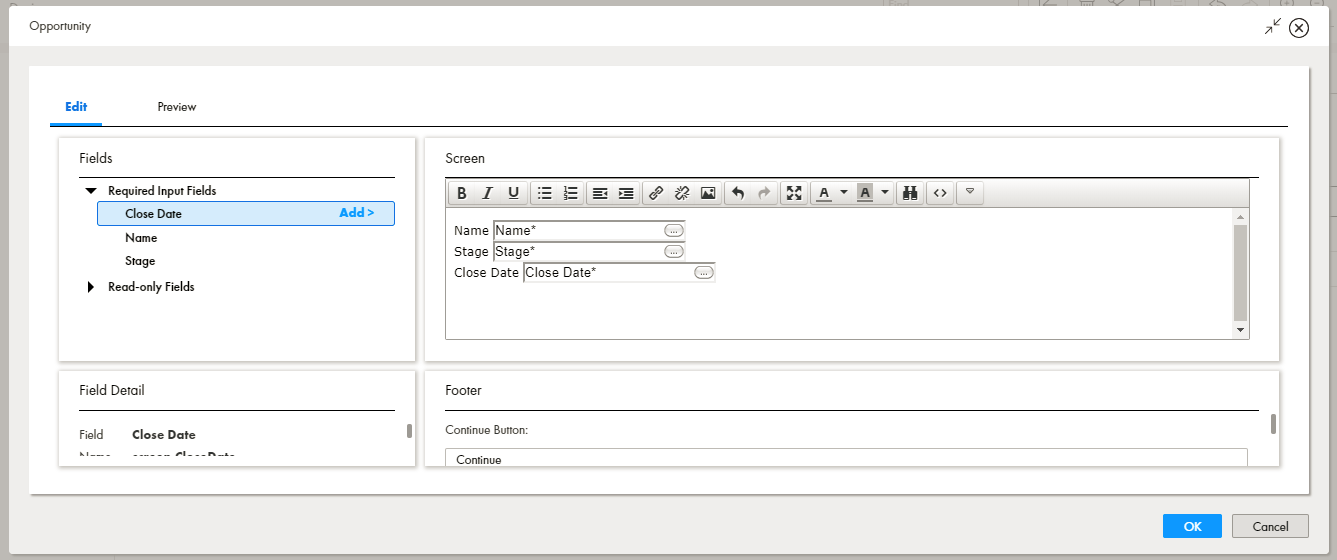
Setting Source Values: Screen
If you select Screen for the Source, the end user provides data for this field. This means that you must add a field to the step's Input Screen tab so that the guide's user can type information. In the following example, the source on the Input tab for three fields was set to Screen:
Note: The text you enter will look better if placed in tables.
Like all fields, you can click within it to display a properties dialog.