Configure Access to Enterprise Data Catalog
In Axon, you can configure Enterprise Data Catalog parameters from the Admin Panel. You must have the Super Admin profile to perform this task. After you configure the parameters, you can test the connectivity to Enterprise Data Catalog to ensure the entered parameters are correct.
After you install Axon, you can configure Enterprise Data Catalog parameters from the Admin Panel in the following scenarios:
- •You did not select advanced configuration during Axon installation.
- •You want to update the connection settings for Enterprise Data Catalog after the installation.
1. From the Axon toolbar, click the Admin Panel menu item under your user name.
2. In the menu on the left, under the Customize & Configure category, click System Settings.
3. In the Group list, select Enterprise Data Catalog.
4. Click Edit, and configure the following properties:
Property | Description |
|---|
Enterprise Data Catalog Server Host | URL of the Enterprise Data Catalog service in the following format: http(s)://<host_name> or http(s)://<IP_address> |
Enterprise Data Catalog Server Port | Port number of the Enterprise Data Catalog service. |
Enterprise Data Catalog Server Login User Name | User name to log in to Enterprise Data Catalog server. |
Enterprise Data Catalog Server Login Password | Password to log in to Enterprise Data Catalog server. |
Enterprise Data Catalog Server Login Namespace | User security domain of Enterprise Data Catalog server |
Enterprise Data Catalog Resource Name | Name of the resource created in Enterprise Data Catalog that connects to your Axon application. |
Axon Super Admin Email | Required. The email address of the SuperAdmin user responsible for onboarding discovered objects. |
Automatically Accept Lineage Recommendations | Create attribute links automatically based on the lineage recommendations from Enterprise Data Catalog. If you do not select this option, you can manually create links later from the lineage recommendation notifications. |
Enable Lineage Recommendation Notifications | Send notifications for the recommended attribute relationships based on the lineage in Enterprise Data Catalog. |
Default Glossary | The default glossary name that you want to associate with the objects onboarded from Enterprise Data Catalog. Axon uses this default glossary if you choose to not onboard objects with associated glossaries to a System object. |
Automatically Delete Attribute Relationships | Automatically deletes attribute relationships that are no longer valid if a linked physical field is deleted from Enterprise Data Catalog. This deletion applies to attribute relationships that are automatically created based on the lineage recommendations from Enterprise Data Catalog. |
View Custom Attributes for Physical Fields | View custom attributes for physical fields from Enterprise Data Catalog. |
Restrict Object Access Based on Enterprise Data Catalog | Restrict access to resources in Axon based on the access permissions to the assets in Enterprise Data Catalog. If you do not select this option, you can access all the assets in Axon irrespective of the access permissions to the assets in Enterprise Data Catalog. The default value is "False." Note: The access permission for a user from Enterprise Data Catalog is retrieved based on the email address. Ensure that the email filtering option is enabled in Enterprise Data Catalog. For more information, refer to Informatica 10.4.1 Enterprise Data Catalog User Guide . |
Configure Timeout Period for Enterprise Data Catalog API | The maximum time period in seconds that Axon waits for the Enterprise Data Catalog API to respond. |
Enterprise Data Catalog Server Proxy Host | The proxy host name for the Enterprise Data Catalog server. For more information on configuring the proxy parameters, contact Informatica Global Customer Support. |
Enterprise Data Catalog Server Proxy Port Number | The proxy port number for the Enterprise Data Catalog server. For more information on configuring the proxy parameters, contact Informatica Global Customer Support. |
5. To test the connectivity to Enterprise Data Catalog, click Test Connection.
If all the parameters are correct, you can view that the connection is successful. If any parameter is incorrect, the connection fails and an error message appears.
Note: You cannot test the connectivity for the Enterprise Data Catalog proxy parameters.
6. Click Save.
7. In the Linux environment, run the following command to clear the Axon cache and restart the necessary services:
sh <INSTALLATION_DIR>/axonhome/third-party-app/scripts/paramsync
When you run the paramsync script, Axon restarts the HTTPD, Memcached, and email notification services.
Note: When you clear the cache and restart the Axon services, the Axon web interface might be disrupted for some users that are logged into Axon. Informatica recommends that you update the cache after you save your changes in all the System Settings pages. Additionally, perform this action during a maintenance period when very few users are using Axon.
Catalog Notifications
If the relationships between attributes are created or deleted, Axon sends notifications to stakeholder based on the configuration of Enterprise Data Catalog properties in the Admin Panel.
Created Link Notifications
Axon sends email and interface notifications to the stakeholders based on configuration of the Automatically Accept Lineage Recommendations and Enable Lineage Recommendation Notifications options on the Admin Panel.
The following table describes the different combination of the values based on which Axon sends lineage notifications:
Automatically Accept Lineage Recommendations | Enable Lineage Recommendation Notifications | Notifications |
|---|
True | True | Data Steward receives email and interface notifications about the automatically created relationships. |
True | False | Data Steward receives email and interface notifications about the automatically created relationships. |
False | True | Data Steward receives email and interface notifications about the lineage recommendations. |
False | False | Axon does not send any notification. |
Deleted Link Notifications
Axon sends email and interface notifications about the deleted links to the stakeholders based on configuration of the Automatically Delete Attribute Relationships and Enable Lineage Recommendation Notifications options on the Admin Panel.
The following table describes the different combination of the values based on which Axon sends link removal notifications:
Automatically Delete Attribute Relationships | Enable Lineage Recommendation Notifications | Notifications |
|---|
True | True | Links are automatically deleted and the Data Set stakeholder receives email and interface notifications about the deleted links. |
True | False | Links are automatically deleted and the Data Set stakeholder receives email and interface notifications about the deleted links. |
False | True | Links are not deleted and the Data Set stakeholder receives email and interface notifications about the relationships that are not valid. |
False | False | Links are not deleted and Axon does not send any notification. |
Configure Custom Resource Types
In Axon, you can view custom resource types from Enterprise Data Catalog. For more information on custom resources, refer to Informatica® Catalog Administrator Guide.
To view a custom resource type, perform the following steps:
- 1. Create a file with the name custom_edc_fields.yml in the following location:
<INSTALLATION_DIR>/axonhome/axon/src/Diaku/EIC/EICBundle/Resources/config/queries/custom
- 2. Use the following syntax to configure the parameters in the custom_edc_fields.yml file:
EDC_FIELDS :
<FIELD_UNIQUE_NAME> :
classType : "<Class Type for the field>"
label : "<Unique label for the field>"
parentClassType : "<Parent Class Type for the field>"
parentIconFileName : "<Generic icon for the parent file name>"
- To start configuring the parameters for a field in a custom resource type in the custom_edc_fields.yml file, ensure that you start with the EDC_FIELDS : parameter. In FIELD_UNIQUE_NAME, enter a unique name for the field in Enterprise Data Catalog resource that you want to display in Axon. Within FIELD_UNIQUE_NAME, configure the following custom resource type parameters :
Parameter | Description |
|---|
classType | Required. The class type of the Enterprise Data Catalog field. |
label | Required. A unique label that you want to see in the Axon interface for this field. |
parentClassType | Required. The parent class type of the Enterprise Data Catalog field. |
parentIconFileName | Optional. The generic icon that you use for the parent file name. |
To configure multiple custom resource types, create a separate section for each field.
- 3. Before you deploy the configuration on the Axon server, validate the file using a YML validator tool.
- 4. In the Linux environment, run the following command to clear the Axon cache and restart the necessary services:
sh <INSTALLATION_DIR>/axonhome/third-party-app/scripts/paramsync
- When you run the paramsync script, Axon restarts the HTTPD, Memcached, and email notification services.
Note: When you clear the cache and restart the Axon services, the Axon web interface might be disrupted for some users that are logged into Axon. Informatica recommends that you update the cache after you save your changes in all the System Settings pages. Additionally, perform this action during a maintenance period when very few users are using Axon.
Whenever you modify the custom_edc_fields.yml file, make sure that all Axon users clear their browser cache before they use Axon.
Example
The following sample file contains a field with parameters configured for a custom resource type:
EDC_FIELDS :
RELATIONAL_COLUMN :
classType : "com.ldm.custom.relational.column"
label : "RELATIONAL_COLUMN"
parentClassType : "com.ldm.custom.relational.table"
parentIconFileName : "dbcolumn"
In the example, the file starts with the EDC_FIELDS : parameter. The RELATIONAL_COLUMN field shows the configured parameters.
Configure Data Onboarding Rules
You can configure data onboarding rules to include or exclude objects that are onboarded from Enterprise Data Catalog to Axon. You must be an Admin or SuperAdmin user to configure data onboarding rules.
When you create, edit, and delete a data onboarding rule from the Admin Panel, Axon records the activity in Admin logs.
Creating a Data Onboarding Rule
Configure data onboarding rule parameters to apply filters while data is onboarded from Enterprise Data Catalog to Axon.
1. From the Axon toolbar, click your user name and click Admin Panel.
2. From the navigation pane, click Operational Management > Data Onboarding Rules.
You can view the list of existing rules.
3. To create a data onboarding rule, click Create.
4. In the Definition section, enter a name and description for the data onboarding rule.
The Name and Description fields are required.
5. In the Rules for Onboarding section, configure the following properties:
- Context
- Specify the context based on which you want the objects to be onboarded from Enterprise Data Catalog to Axon. You can select the parent, type, or path. Parent refers to the parent of a physical field. Type refers to the class type of a physical field. Path refers to the location of a physical field.
- Regular Expression
- Enter a regular expression to specify a pattern based on which you want the objects to be onboarded from Enterprise Data Catalog to Axon. The regular expression that you enter is case-sensitive.
To know more about the regular expressions that you can use, see
Supported Characters in Regular Expressions.
Note: If you want to enter the slash (/) in a regular expression, ensure that you first enter the backslash (\) followed by the slash (/). For example, if you select Path, enter CMAXON\/AXON_CUSTDATA in the regular expression field.
- Action
- If you want to add more rows, click +. If you want to delete rows, click -.
If you add multiple rows in the Rules for Onboarding section, the data is onboarded based on the combination of all the conditions that you specified in the rows.
6. In the Onboarding Rule Configuration section, select the following options:
- Requires an Associated Glossary
- If you select this option, the objects are onboarded to an Axon system only if a physical field or data domain is linked to a glossary. If you do not select this option and if a physical field is not linked to a glossary or data domain in Enterprise Data Catalog, the default glossary that is configured in the Admin Panel is used for automated onboarding of objects.
- Marked as a Key Data Element
- If you select this option, the objects are onboarded to an Axon system only if a physical field or data domain is connected to a glossary that is a key data element. If you select this option and if the default glossary configured in the Admin Panel is used for onboarding, the default glossary has to be a key data element.
- Marked as a Certified Object
- If you select this option, the objects are onboarded only if a physical field is marked as a certified object in Enterprise Data Catalog.
- Confidence Score (50 - 100)
- Enter the confidence score threshold value based on which you want to onboard the object from Enterprise Data Catalog. You can enter a value from 50 to 100. The default confidence score value is 95%.
If you want to onboard the values of the Accepted field, you can set the confidence score as 100 while configuring the onboarding rule.
If you want to onboard the values of the Inferred field with the data match of 100% on Enterprise Data Catalog and Accepted field, set the confidence score as 95 while configuring the onboarding rule.
- The confidence score value is applicable if the Requires an Associated Glossary option is selected. If the Requires an Associated Glossary option is not selected, the onboarded attribute has 100% confidence score.
7. In the Onboarding section, configure the following properties:
- Name
- Select the name that you want to use for the onboarded attribute. You can choose to use the glossary or physical field name. The default value is "Use Glossary Name."
- Description
- Select the description that you want to use for the onboarded attribute. You can choose to use the glossary or physical field description. The default value is "Use Glossary Description."
8. Click Save and Close.
You can view the onboarding rule that you created.
Data Onboarding Rule Examples
You can configure data onboarding rule parameters, such as regular expressions, metadata, and glossary requirements. Based on the rule configuration, the data sets and attributes are onboarded from Enterprise Data Catalog to Axon systems.
Consider the following examples for onboarding rules:
Specify a Parent Name
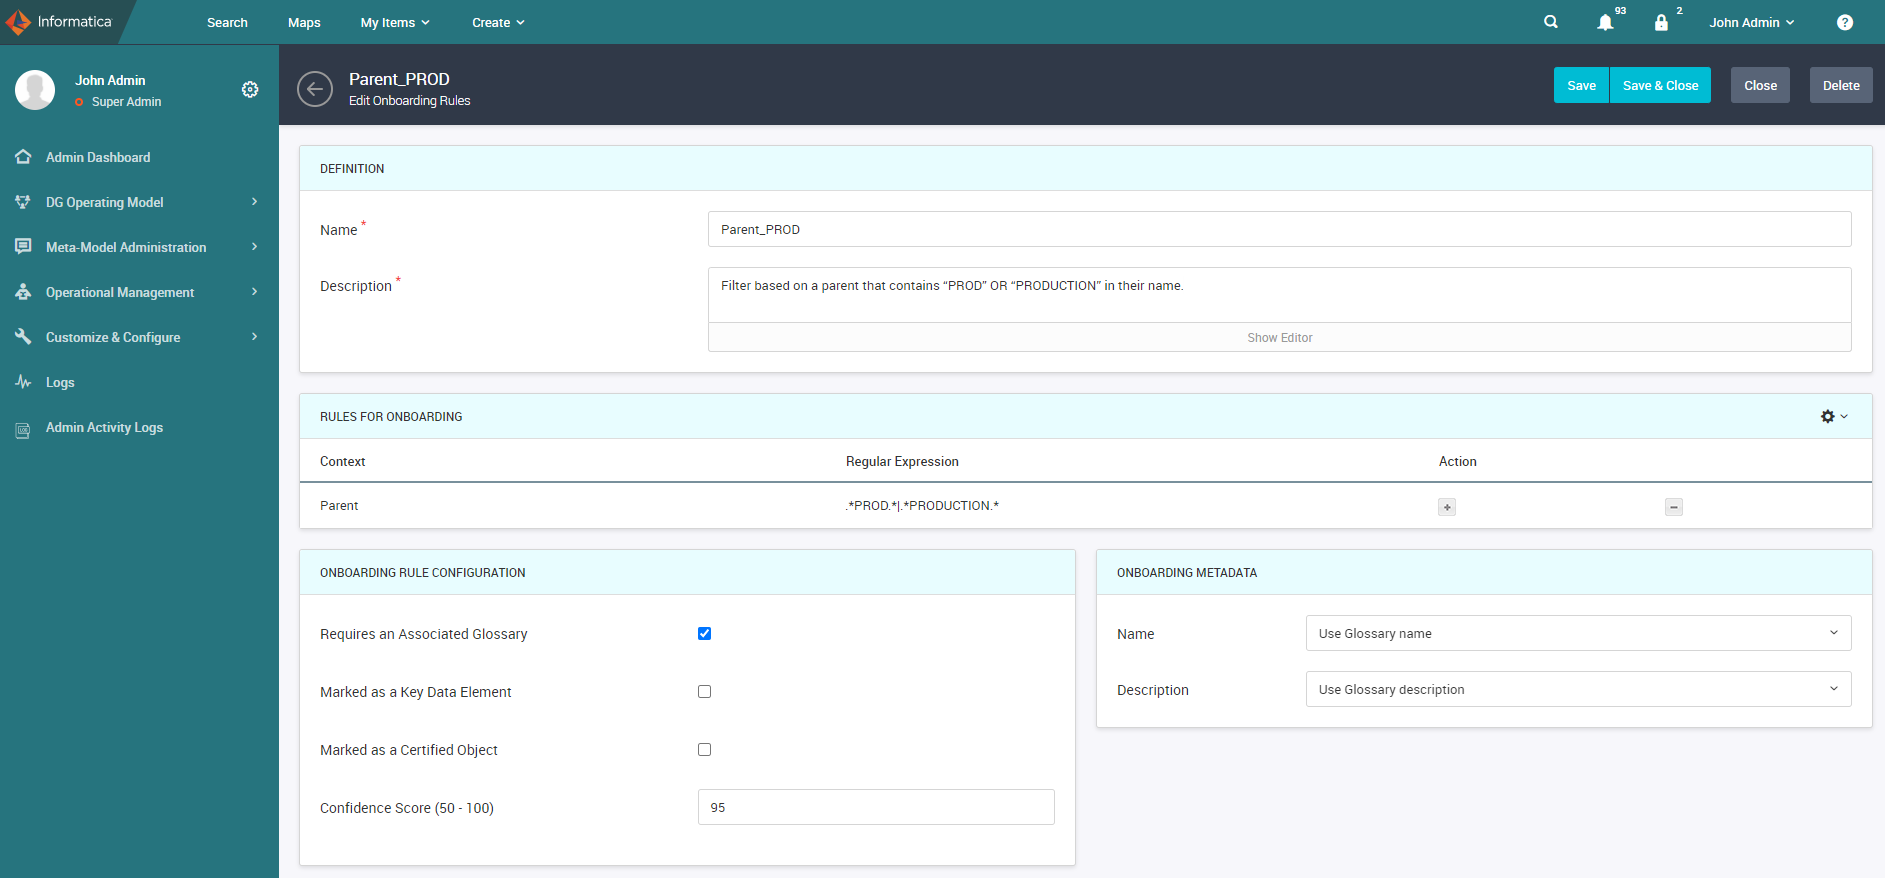
The following image shows a sample onboarding rule with a regular expression for filtering objects based on a specific parent name:
Consider that you want to filter onboarding of objects based on the parent that contains "PROD" or "PRODUCTION" in the name. In this example, the onboarding rule has the following filter criteria:
- •Context is "Parent" to find the parent with the name .*PROD.*|.*PRODUCTION.* specified in the regular expression.
- •A glossary association is required for a physical field in Enterprise Data Catalog.
- •Confidence score threshold value must be 95%.
- •Onboarded attributes must have the name same as the glossary name and the description same as the glossary description.
Based on the rule configuration, the filter is applied on physical fields with the parent that has "PROD" or "PRODUCTION" in the name. During onboarding process, the job checks whether the physical fields are associated to a glossary and then attribute is onboarded with the glossary name and description.
To know more about the regular expressions that you can use, see
Supported Characters in Regular Expressions.
Specify One or More Schemas Within a Resource
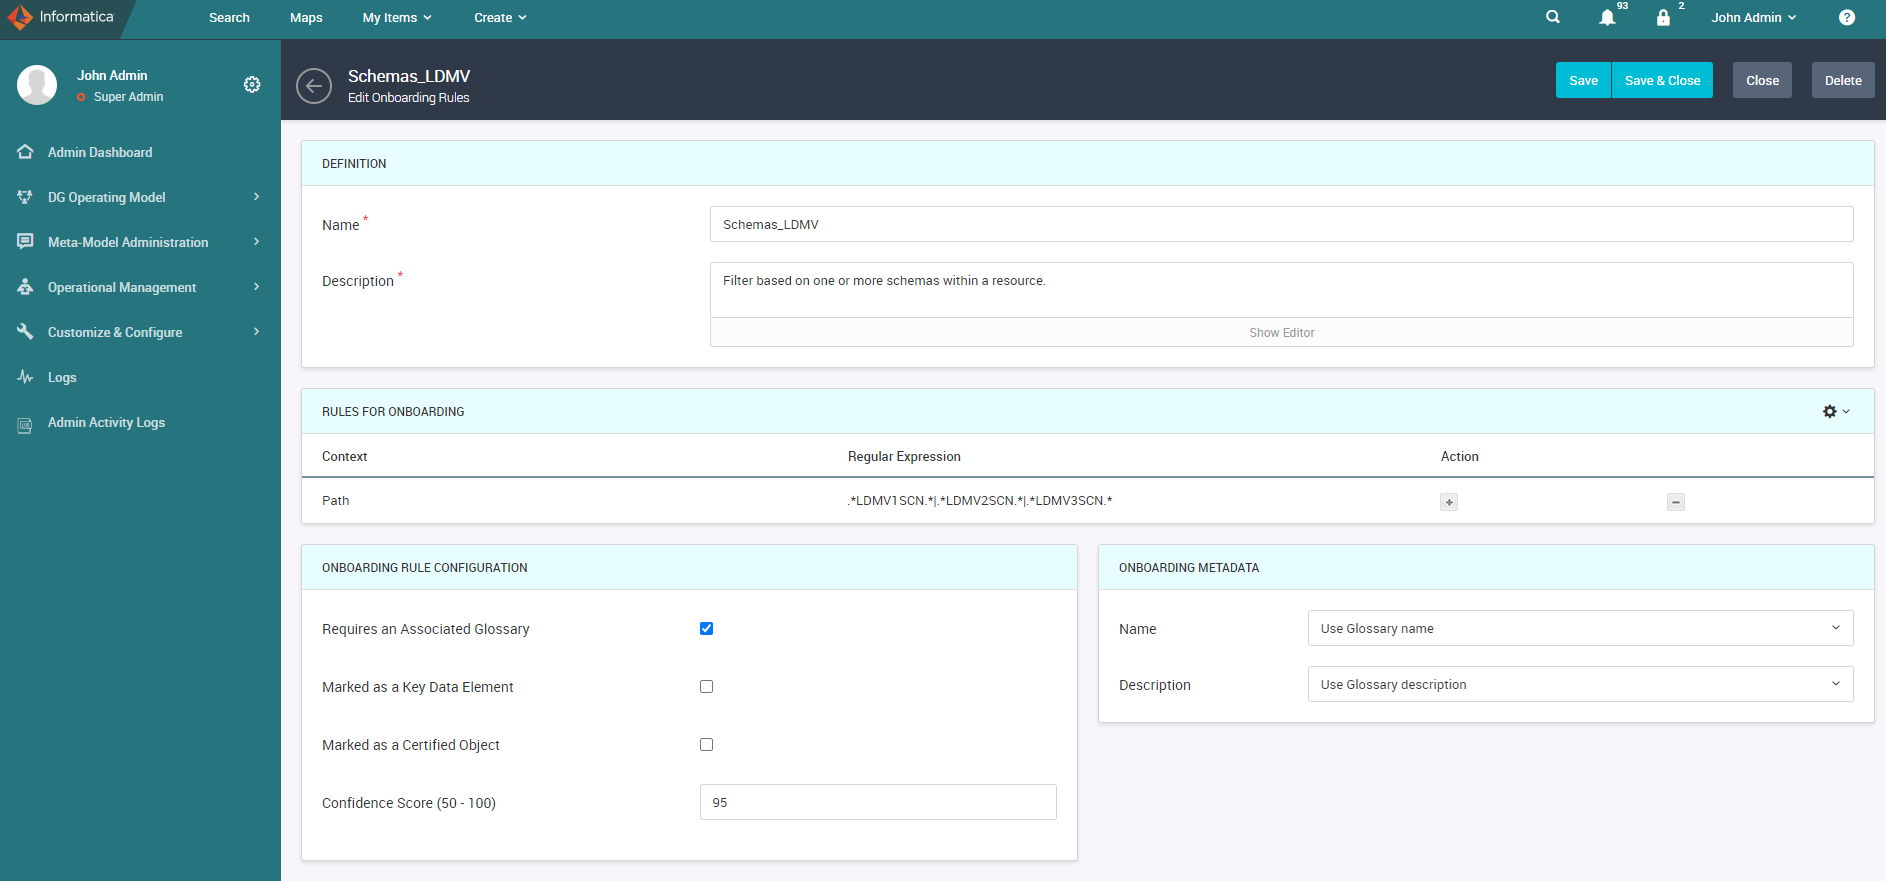
The following image shows a sample onboarding rule with a regular expression for filtering objects based on one or more schemas within a resource:
Consider that you want to filter onboarding of objects based on one or more schemas, such as LDMV1SCN, LDMV2SCN, or LDMV3SCN, within a resource. In this example, the onboarding rule has the following filter criteria:
- •Context is "Path" to locate the schemas with names .*LDMV1SCN.*|.*LDMV2SCN.*|*.LDMV2SCN.* specified in the regular expression.
- •A glossary association is required for a physical field in Enterprise Data Catalog.
- •Confidence score threshold value must be 95%.
- •Onboarded attributes must have the name same as the glossary name and the description same as the glossary description.
Based on the rule configuration, the filter is applied on resources that contain schema names, such as LDMV1SCN, LDMV2SCN, or LDMV3SCN. During onboarding process, the job checks whether the physical fields are associated to a glossary and then data is onboarded with the glossary name and description.
Specify a Schema and Type
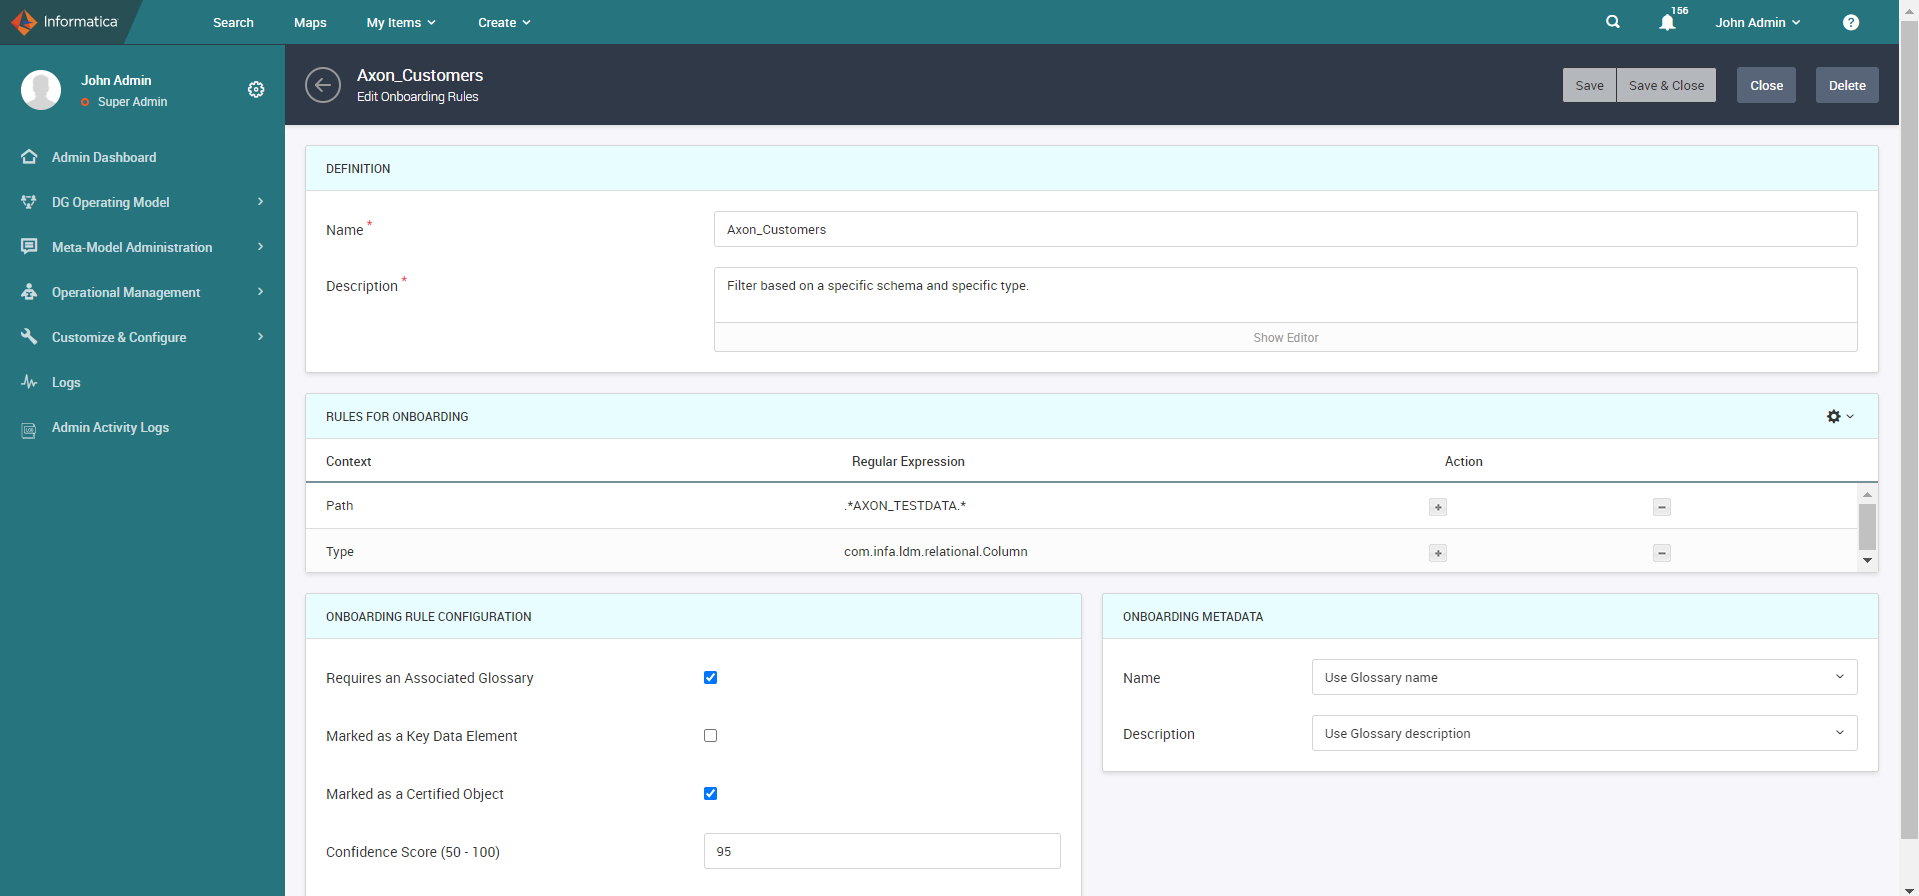
The following image shows a sample onboarding rule with a regular expression for filtering objects based on a specific schema and type:
Consider that you want to filter onboarding of objects based on the schema name "AXON_TESTDATA" and physical field of Column type. In this example, the onboarding rule has the following filter criteria:
- •Context is "Path" to locate the schema with name .*AXON_TESTDATA.* specified in the regular expression.
- •Context is "Type" to search for physical field of type com.infa.ldm.relational.Column specified in the regular expression.
- •A glossary association is required for a physical field in Enterprise Data Catalog.
- •Physical fields must be certified objects in Enterprise Data Catalog.
- •Confidence score threshold value must be 95%.
- •Onboarded attributes must have the name same as the glossary name and the description same as the glossary description.
Based on the rule configuration, the filter is applied on resources that contain the schema name "AXON_TESTDATA" and the physical field of type "com.infa.ldm.relational.Column". During onboarding process, the job checks whether the physical fields are marked as certified objects and associated to a glossary in Enterprise Data Catalog. Then, data is onboarded with the glossary name and description.
Specify a Parent Name and Schema
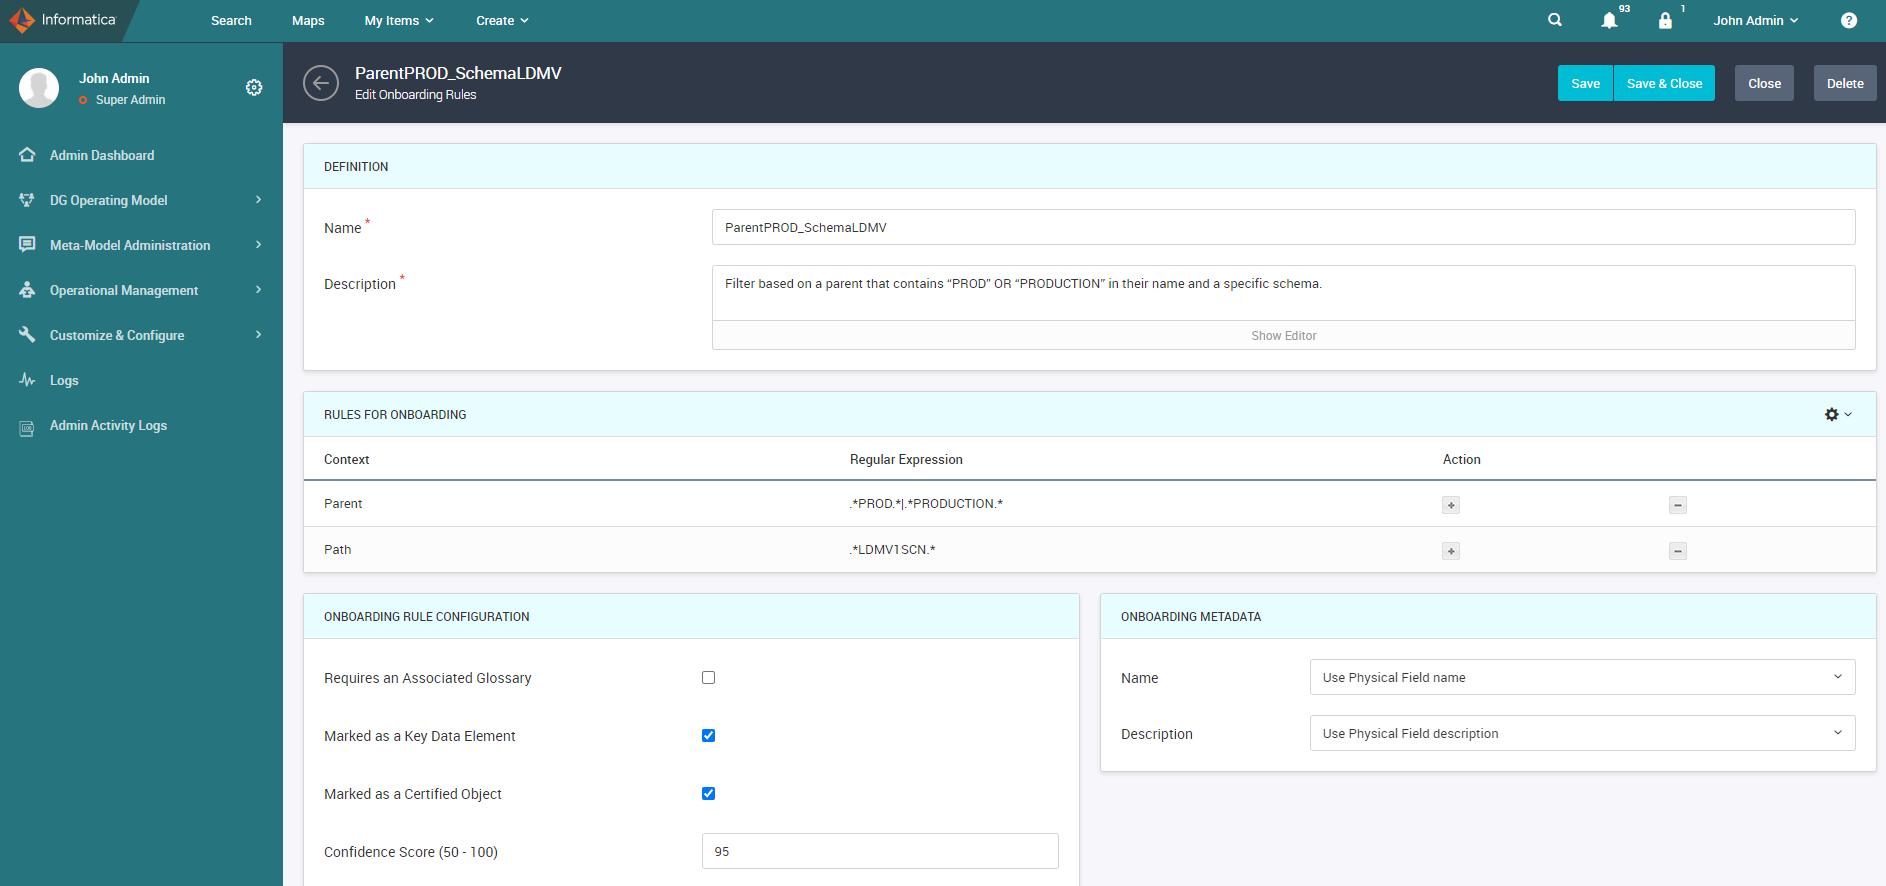
The following image shows a sample onboarding rule with a regular expression for filtering objects based on a specific parent name and schema:
Consider that you want to filter onboarding of objects based on the parent that contains "PROD" OR "PRODUCTION" in the name and schema name "LDMV1SCN." In this example, the onboarding rule has the following filter criteria:
- •Context is "Parent" to find the parent with the name .*PROD.*|.*PRODUCTION.* specified in the regular expression.
- •Context is "Path" to locate the schema with name .*LDMV1SCN.* specified in the regular expression.
- •Physical fields must be certified objects in Enterprise Data Catalog.
- •The glossary that is used for onboarding process must be a key data element.
- •Confidence score threshold value must be 95%.
- •Onboarded attributes must have the name same as the physical field name and the description same as the physical field description.
Based on the rule configuration, the filter is applied on resources that contains schema name LDMV1SCN and the physical fields with the parent that has "PROD" or "PRODUCTION" in the name. During onboarding process, the job checks whether the physical fields are marked as certified objects in Enterprise Data Catalog. Because the physical field to glossary association is not required for onboarding process, the default glossary specified in the Admin Panel is used for onboarding objects if there are no glossaries associated to physical fields. If the default glossary is a key data element, then data is onboarded with the physical field name and description.
Supported Characters in Regular Expressions
You can use the following characters in the regular expression that you define in a data onboarding rule:
Character | Function |
|---|
$ | Matches the end of the input. |
(?:x) | Matches the value "x" but does not remember the match. |
(x) | Matches the value "x" and remembers the match. |
* | Matches zero or any number of occurrences of the preceding element. For example, xy*z matches "z", "xz", "xyz", and "xyyz". |
+ | Matches 1 or any number of occurrences of the preceding element. For example, xy+z matches "xyz", "xyyz", and "xyyyz". |
. | Matches any single character except for newline characters. |
? | Matches zero or one occurrence of the preceding element. For example, flavo?r matches both "flavour" and "flavor" but it does not match "flavoour". |
[\b] | Matches a backspace. |
[^abc] | Matches anything that is not enclosed in the brackets. |
[abc] | Matches any of the enclosed characters. You can create range of characters using the hyphen (-) character, such as A-Z (A to Z). In character sets, special characters, such as ., *, and +, do not have any special meaning. |
\ | - - Indicates that the next character must not be literally interpreted. For example, the character "w" is interpreted as match the character "w". If you use "\w", it matches an alphanumeric character including the underscore (_).
- - Indicates that a metacharacter must be literally interpreted. For example, the "." metacharacter indicates to match any single character but with a new line. If you use "\.", it matches the dot (.) character.
|
\0 | Matches a null character. |
\b | Matches a word boundary. Boundaries are determined when a word character is neither followed nor preceeded by another word character. |
\B | Matches a non-word boundary. Boundaries are determined when two adjacent characters are word characters or non-word characters. |
\cX | Matches a control character. The character "X" must be included within A to Z. |
\d | Matches a digit character. For example, you can enter [0-9] or [0123456789]. |
\D | Matches a non-digit character. For example, you can enter [^0-9] or [^0123456789]. |
\s | Matches a single white space character. This includes a space, tab, form feed, and line feed. |
\S | Matches anything other than a single white space character. It matches anything other than a space, tab, form feed, and line feed. |
\t | Matches a tab. |
\w | Matches any alphanumeric character including the underscore (_). For example, it matches [A-Za-z0-9_]. |
\W | Matches anything other than an alphanumeric character including the underscore (_). For example, it matches [^A-Za-z0-9_]. |
^ | Matches the beginning of the input. |
x(?!y) | Matches the character "x" only if "x" is not followed by character "y". |
x(?=y) | Matches the character "x" only if "x" is followed by character "y". |
x|y | Matches either the character "x" or "y". |
{n,m} | Matches the preceding character at least "n" times and at the most "m" times. If the values of "n" and "m" are zero, they are omitted. |
{n} | Matches the preceding character exactly n times. |
Connect to an SSL-Enabled Enterprise Data Catalog Instance
To connect Axon to an SSL-enabled instance of Enterprise Data Catalog, you must upgrade cURL and the related libraries after you install Axon. If you do not upgrade, objects might not appear in Axon facets..
You must have the following library versions running on your Linux system:
- •cURL version 7.29.0 or higher
- •Network Security Services (NSS) version 3.21 or higher
To check the existing versions of cURL and NSS libraries, run the following command:
curl --version
To upgrade the cURL and NSS libraries to the latest versions, run the following commands:
yum upgrade curl
yum upgrade nss


