1. In Informatica Cloud home page, click Configure.
2. The drop-down menu appears, select Connections.
3. The Connections page appears.
4. Click New to create a connection.
5. The New Connection page appears.
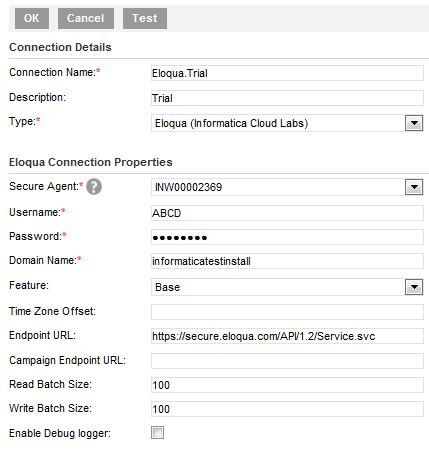
6. Specify the following details.
Connection Property | Description |
Connection Name | Enter a unique name for the connection. |
Description | Provide a relevant description for the connection. |
Type | Select Eloqua from the list. |
Secure Agent | Select the appropriate secure agent from the list. |
Username | Enter username provided in Enabling Eloqua API for the Connector. |
Password | Enter password provided in Enabling Eloqua API for the Connector. |
Domain Name | Enter relevant domain that provides access to Eloqua application. |
Feature | Select a feature from the list of available features in Eloqua. When no feature is selected, by default “Base” is selected. |
Time Zone Offset | Enter time zone in Eloqua System relative to GMT. Refer Understanding the Time Zone Offset. |
End-point URL | Enter end-point URL. When you do not enter the end-point URL for Base, Form and DataCardSet, the end-point URL defaults to ‘https://secure.eloqua.com/API/1.2/Service.svc? Wsdl’. |
Campaign End-point URL | When you select the campaign feature, enter the Eloqua API endpoint URL for Campaign feature. |
Read Batch Size | Enter Eloqua read Batch Size. The default size is 50. The maximum Read batch size value is 200. |
Write Batch Size | Enter Eloqua Write Batch Size. The default size is 100. |
Enable Debug Logger | Tick the checkbox to enable logging. |
7. Click Ok to save the connection.