Configuring Amazon Redshift ODBC Connection
You can set the pushdown optimization for the ODBC connection type that uses Amazon ODBC Redshift drivers to enhances the mapping performance. You must create a data source name in the ODBC datasource administrator.
After you create an Amazon Redshift ODBC connection, select the value of the Pushdown Optimization property as Full or To Source in the session properties. You can check the session log to verify that the pushdown optimization has taken place.
Amazon Redshift supports Amazon ODBC Redshift drivers on Windows and Linux systems. You must install the Amazon ODBC Redshift 64-bit driver based on your system requirement.
Configuring Amazon Redshift ODBC Connection on Windows
Before you establish an ODBC connection to connect to Amazon Redshift on Windows, you must configure the ODBC connection.
Perform the following steps to configure an ODBC connection on Windows:
1. Download the Amazon Redshift ODBC drivers from the AWS website.
You must download the Amazon Redshift ODBC 64-bit driver.
2. Install the Amazon Redshift ODBC drivers on the machine where the Secure Agent is installed.
3. Open the folder in which ODBC data source file is installed.
4. Run the odbcad32.exe file.
The ODBC Data Source Administrator dialog box appears.
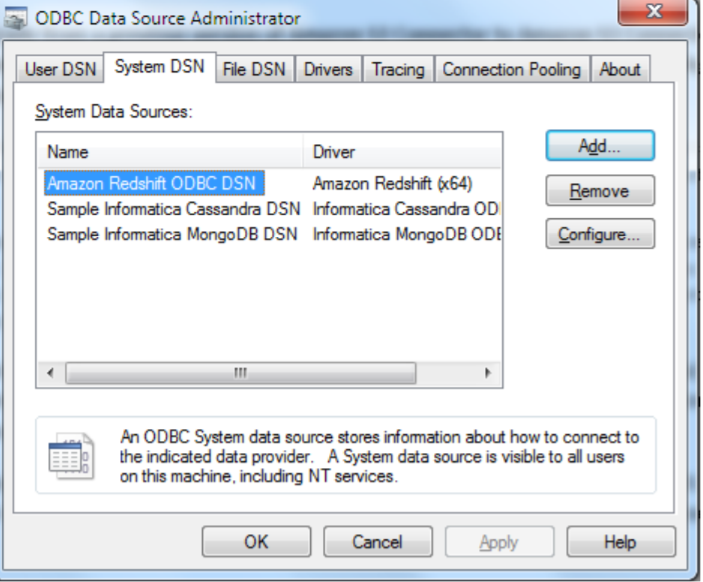
5. Click System DSN.
The System DSN tab appears. The following image shows the System DSN tab on the ODBC Data Source Administrator dialog box:
6. Click Configure.
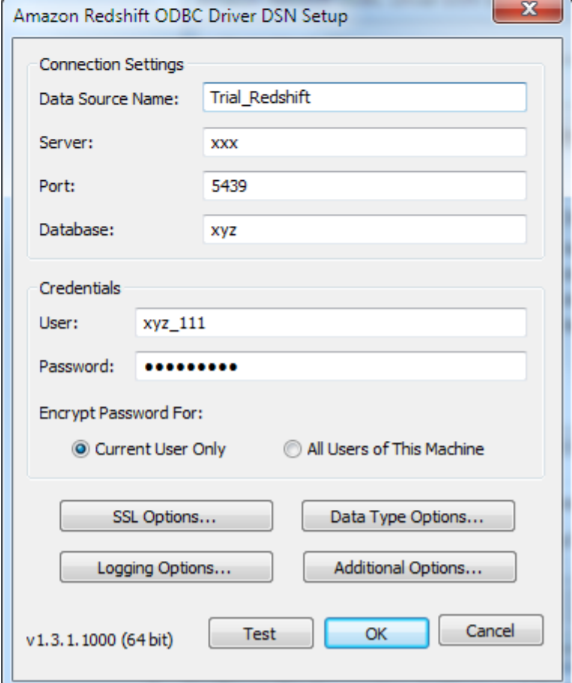
The Amazon Redshift ODBC Driver DSN Setup dialog box displays. The following image shows the Amazon Redshift ODBC Driver DSN Setup dialog box where you can configure the Connection Settings and Credentials section:
7. Specify the following connection properties in the Connection Settings section:
Property | Description |
|---|
Data Source Name | Name of the data source. |
Server | Location of the Amazon Redshift server. |
Port | Port number of the Amazon Redshift server. |
Database | Name of the Amazon Redshift database. |
Note: You must specify the Server, Port, and Database values from the JDBC URL.
8. Specify the following credentials in the Credentials section:
Property | Description |
|---|
User | User name to access the Amazon Redshift database. |
Password | Password for the Amazon Redshift database. |
Encrypt Password For | Encrypts the password for the following users: - - Current User Only
- - All Users of This Machine
Default is Current User Only. |
9. Click Test to test the connection in the Amazon Redshift ODBC Driver DSN Setup box.
10. Click OK.
The Amazon Redshift ODBC connection is configured successfully on Windows.
After you configure the Amazon Redshift ODBC connection, you must create an ODBC connection to connect to Amazon Redshift.
For more information about how to create an ODBC connection to connect to Amazon Redshift, see
Creating an ODBC ConnectionConfiguring Amazon Redshift ODBC Connection on Linux
Before you establish an ODBC connection to connect to Amazon Redshift on Linux, you must configure the ODBC connection.
Perform the following steps to configure an ODBC connection on Linux:
1. Download the Amazon Redshift ODBC drivers from the AWS website.
You must download the Amazon Redshift ODBC 64-bit driver.
2. Install the Amazon Redshift ODBC drivers on the machine where the Secure Agent is installed.
3. Configure the odbc.ini file properties in the following format:
[ODBC Data Sources]
driver_name=dsn_name
[dsn_name]
Driver=path/driver_file
Host=cluster_endpoint
Port=port_number
Database=database_name
4. Specify the following properties in the odbc.ini file:
Property | Description |
|---|
ODBC Data Sources | Name of the data source. |
Driver | Location of the Amazon Redshift ODBC driver file. |
Host | Location of the Amazon Redshift host. |
Port | Port number of the Amazon Redshift server. |
Database | Name of the Amazon Redshift database. |
Note: You must specify the Host, Port, and Database values from the JDBC URL.
5. Run the following command to export the odbc.ini file.
Export ODBCINI=/<odbc.ini file path>/odbc.ini
6. Restart the Secure Agent.
The Amazon Redshift ODBC connection on Linux is configured successfully.
After you configure the Amazon Redshift ODBC connection, you must create an ODBC connection to connect to Amazon Redshift.
For more information about how to create an ODBC connection to connect to Amazon Redshift, see
Creating an ODBC ConnectionCreating an ODBC Connection
You must create an ODBC connection to connect to Amazon Redshift after you configure the ODBC connection.
Perform the following steps to create an Amazon Redshift ODBC connection on the Connections page:
1. On the Informatica Cloud page, click Configure > New Connection.
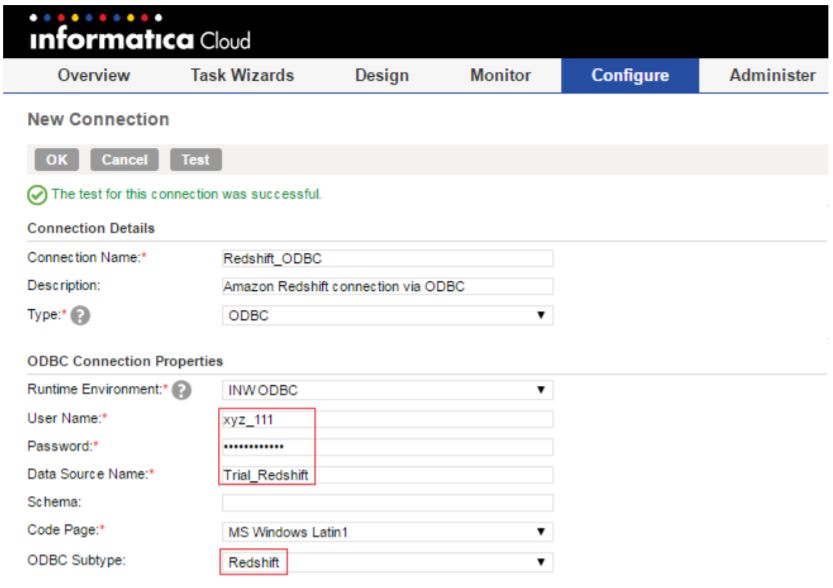
The New Connection page appears. The following image shows the New Connection page:
2. Configure the following connection details in the Connection Details section:
Property | Description |
|---|
Connection Name | Name of the ODBC connection. |
Description | Description of the connection. |
Type | Type of the connection. Select the type of the connection as ODBC. |
3. Configure the following connection details in the Connection Properties section:
Property | Description |
|---|
Runtime Environment | The name of the runtime environment where you want to run the tasks. |
User Name | User name of the Amazon Redshift account. |
Password | Password for the Amazon Redshift account. |
Data Source Name | Enter the name of the ODBC data source name that you created for the Amazon Redshift database. |
Schema | Amazon Redshift schema name. |
Code Page | Select the code page that the Secure Agent must use to read or write data. |
ODBC Subtype | Enter the value of the ODBC Subtype field as Redshift. |
The Amazon Redshift ODBC connection is created successfully.


