1. In Informatica Cloud home page, click Configuration.
The drop-down menu appears.
2. Select Connections.
The Connections page appears.
3. Click New to create a connection.
The New Connection page appears.
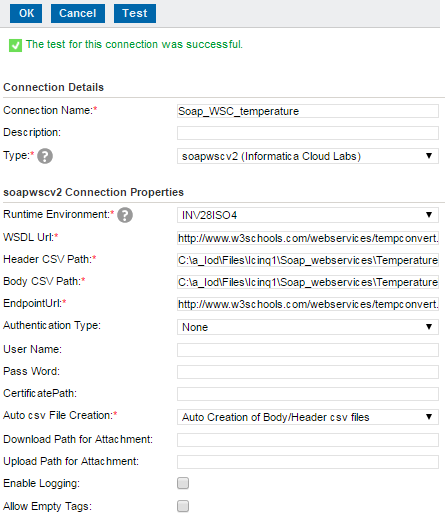
4. Specify the following details.
Note: The length of the WSDL URL and endpoint URL fields in Connection tab is increased to 500 characters.
Connection Property | Description |
|---|---|
Connection Name | Enter a unique name for the connection. |
Description | Provide a relevant description for the connection. |
Type | Select Web Services from the list. |
Secure Agent | Select the appropriate Secure Agent from the list. |
WSDL URL | Enter the WSDL URI or URL. See Troubleshooting Web Services. |
Header CSV path | Enter the Secure Agent server path where header* CSV Files will be created. |
Body CSV path | Enter the Secure Agent server path where body* CSV Files will be created. |
Endpoint URL | Enter the Web Service endpoint URL, where the request will be served. |
Authentication Type | Select the type of authentication from the list of authentication available. |
User Name | Enter the username required for authentication. |
Password | Enter the password. |
Certificate Path | Enter the certificate path only when you use WSSE Digital Signature Authentication. |
Auto CSV file creation | Select Auto Creation of Body/Header CSV files (Automatic creation of CSV files) or Manual Creation of Body/Header CSV files (You manually create the CSV files). See Web Services Connection Guidelines. |
Download path for attachment | Enter the local directory path in which all the files will be downloaded. |
Upload path for attachment | Enter the local directory path from which all the files will be uploaded. |
Enable Logging | Select the checkbox to enable logging. |
Allow Empty Tags | Select to allow empty tags in the SOAP requests. |
Note: The supported authentication types are described in the following table:
Authentication Types | Description |
|---|---|
None | No Authentication required. |
Basic Authentication | Basic Authentication required. |
WSSE UserToken Authentication | User token authentication required. |
WSSE Digital Signature Authentication | SSL certificate based authentication required. |
5. Click Test to evaluate the connection.
Note: When you test the connection, a sample CSV template with CSV-header is created in the respective directory paths. A configuration file is also generated in the body CSV file path named config.properties. The file contains the following fields with the default values:
- - Field-1: HirerachyLen = 40
- - Field-2: FieldLen= 20
In configuration file, you can use RepeatingChildLevels to control the number of sub-childs with same tag name.
HierarchyLen is used to define the length allocated to the shortened hierarchy name. FieldLen is used to define the length allocated to the end tag name. You can modify the value of the fields based on the requirement. The sum of the two fields should not be greater than 60.
When you modify the values in the configuration file, you need to regenerate the Body, Header and Mapping CSV files. To regenerate the files, delete the existing files in the respective directories and click Test.
The Documents folder is also generated in the same folder path. The Documents folder contains mapping CSV files for each operation. The mapping CSV files consist the mapping between the shortened name and the complete hierarchy navigation as mentioned in the WSDL. The following figure describes the mapping CSV files.

6. Select the Manual Creation of Body/Header CSV files in the Auto CSV file Creation field after all the required CSV files are generated.
This selection offers better performance when you run the Data Synchronization task.
7. Click OK to save the connection.
For more information, see Web Services Connection Guidelines