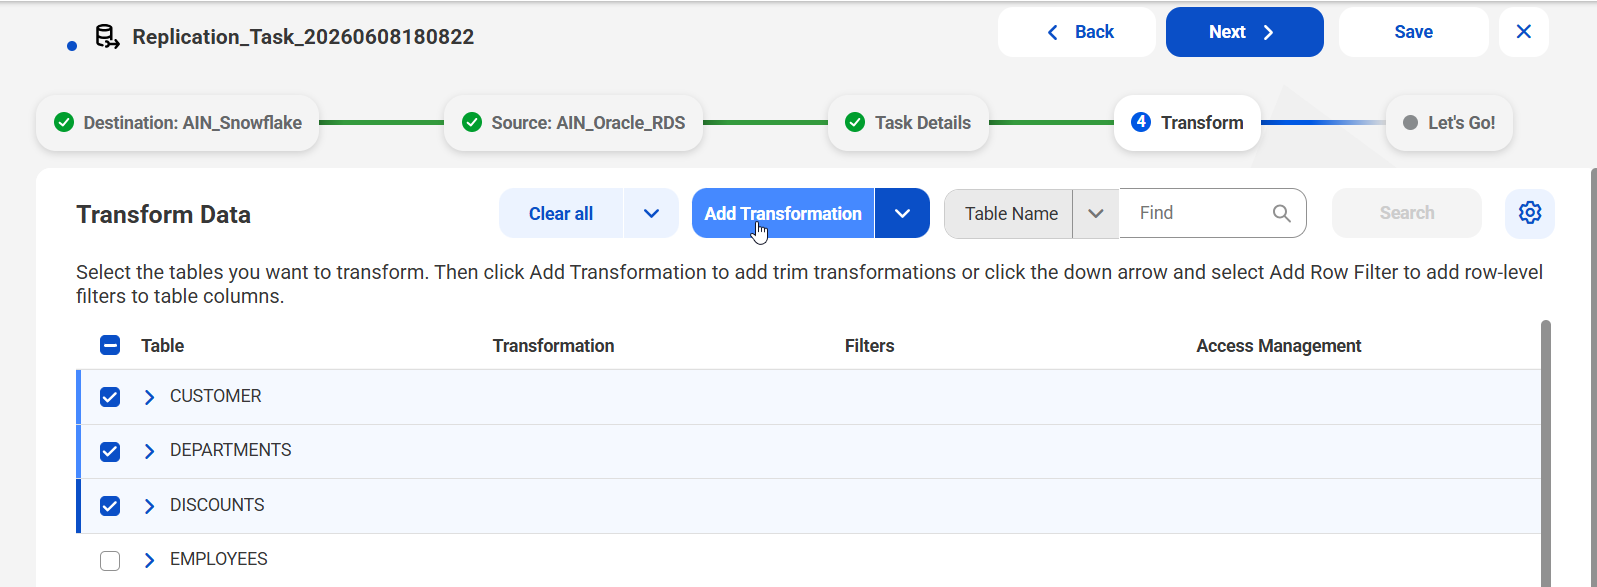
1On the Transform Data page, select the tables and columns to which you want to assign a transformation.
You can use the Find box to search for items based on table name or column name. Select Table Names or Columns next the Find box and then enter all or part of the name in the box. If found, the string is highlighted in the names of the listed items.
2To add a trim transformation, click Add Transformation (not the down-pointing arrow next to it).
Note:
You can apply trim transformations and row-level filters to the same tables and columns.
The How do you want to transform your data? dialog box appears.
3Click the + (Add a new row) icon to add a row. Then, in the Transformation Type list, select one of the following options:
- - Trim Left. Trim spaces to the left of character column values.
- - Trim Right. Trim spaces to the right of character column values.
- - Trim. Trim spaces to the left of and to the right of character column values.
Click the Save icon to add the entry.
4Click Next to go to the Summary tab where you can review your transformation settings.
5If the settings are correct on the Summary tab, click Save to save them and return to the initial Transform Data page.
6To add another trim transformation type for a different table or set of tables, repeat steps 1 through 5.
When you return to the initial Transform Data page, the list shows the tables to which the trim transformations were applied. For example:

Tip:
You can remove a transformation assignment on the Transform Data page. Select the table with the unwanted transformation and click Clear All.
7To add row-level filters to tables and columns, select the tables and then click the down arrow next to Add Transformation and select Add Row Filter.
The Add Row Filter option is available only for Db2 for i, Db2 for LUW, Db2 for z/OS, Microsoft SQL Server, Oracle, and SAP HANA source tables. The task can use any load type.
The How do you want to filter your data? dialog box appears.
8Select the table and filter type to apply the filter conditions.
- aSelect a table that you want to assign a filter to.
- bSelect one of the following filter types:
- ▪ Basic
- ▪ Advanced
The default option is Basic.
9To add a Basic filter, complete the following substeps:
- aClick the + (Add a new row) icon to add a row.
- bUnder Column Name, select a column.
- cUnder Operator, select an operator type to use with the value.
- dUnder Value, select or enter a value, depending on the column type. Then click the Save icon on the right end of the row to save the condition.
- eClick Validate to test the syntax of the specified condition.
- fTo add another Basic condition for the same column or a different column in the table, repeat steps a through e.
- gClick Save to validate and save the changes.
- hWhen done defining Basic filter conditions, click OK to return to the Transform Data page.
Columns with unsupported data types for row filtering are marked as "Not supported."
For example, the following image shows a basic filter with conditions set for two columns:
The following table describes the values that are valid for each column data type supported for filtering:
Column data type | Description |
|---|---|
INTEGER | Enter a numeric value. You can use "+" and "-" only once before the number. The value must be between -2147483648 and 2147483647. |
LONG | Enter a numeric value. You can use "+" and "-" only once before the number. The value must be between -9,223,372,036,854,775,808 and 9,223,372,036,854,775,807. |
BIGINT | Enter a numeric value. You can use "+" and "-" only once before the number. Maximum length is 50 digits. |
BIGDEC | Enter a numeric value. You can use "+" and "-" only once before the number. A decimal is allowed. Maximum length is 50 digits. |
STRING | Enter text. |
DATE | Use the date picker to select the date. |
TIME | Enter the value in the format HH:MM:SS.MS, with milliseconds being optional and up to a maximum length is 9 digits. For example, 13:14:15.123456789 |
DATETIME | Use the date picker to select the date and time. |
OFFSET_DATETIME | Use the date picker to select the date, time, and time zone. |
Note:
Database Ingestion and Replication does not support BOOLEAN, BINARY, BLOB, CLOB, and graphic column data types.
The AND operator is used to combine the multiple conditions.
10To define an Advanced filter that consists of multiple conditions combined with the AND or OR operator, manually enter the conditions in the box.
Note:
If you entered a Basic filter conditions for a column and then switched to the Advanced filter, the Basic condition is displayed so that you can add to it to make a more complex filter.
- aUnder Column Name, select a column and click the > arrow.
- bIn the Filter Condition box, type one or more conditions for the selected column. Manually enter conditions using the supported syntax and the appropriate operators, which can vary based on the column data type. You can also nest conditions using parentheses. See Syntax for row-level filtering. When done, click the Save icon on the right end of the row to save the advanced filter.
- ▪ Database Ingestion and Replication does not support BOOLEAN, BINARY, BLOB, CLOB, and graphic column data types.
- ▪ All date, time, and datetime values are matched against the source date and time. Time changes between Daylight Saving Time and standard time are not accommodated.
- cClick Validate to test the syntax of the specified conditions.
- dClick Save to validate and save the changes and then click OK to return to the Transform Data page.
The column name appears in the Filter Condition box.
Note:
For combined load tasks, do not include columns that you expect will be updated during CDC processing. If the column is updated, it might become ineligible for replication and cause unpredictable results. In this case, you'd need to Resync the job.
The following table describes the values that are valid for each column data type supported for filtering:
Column data type | Description |
|---|---|
INTEGER | Enter a numeric value. You can use "+" and "-" only once before the number. The value must be between -2147483648 and 2147483647. |
LONG | Enter a numeric value. You can use "+" and "-" only once before the number. The value must be between -9,223,372,036,854,775,808 and 9,223,372,036,854,775,807. |
BIGINT | Enter a number value. You can use "+" and "-" only once before the number. Maximum length is 50 digits. |
BIGDEC | Enter a numeric value. You can use "+" and "-" only once before the number. A decimal is allowed. Maximum length is 50 digits. |
STRING | Enter an input attribute in single quotes ('). |
DATE | Enter the value in the format YYYY-MM-DD. Enter the input attribute in single quotes ('). |
TIME | Enter the value in the format HH:MM:SS.MS, with milliseconds (MS) being optional and up to a maximum length is 9 digits. Enter the input attribute in single quotes ('). For example, 13:14:15.123456789 |
DATETIME | Enter the date and time in the following format: YYYY-MM-DDTHH:MM:SS:MS For example, 2024-12-31T03:04:05.123456789 Enter the input attribute in single quotes ('). |
OFFSET_DATETIME | Enter the date, time, and time zone in the following format: YYYY-MM-DDTHH:MM:SS.MS+05:00 For example, 2024-03-15T10:03:04.123456789+05:00 Enter the input attribute in single quotes ('). |
Notes:
Note:
Switching from Advanced to Basic filter type after creating or editing an Advanced filter condition, deletes all changes to the filter condition, even if you saved it.
Note:
Do not modify any column included in the filter after the task has been deployed. If you do so, the row-level filtering might not work properly.
The Filters column on the Transform Data page shows the applied filters as hyperlinks. Clicking the link opens the selected filter in edit mode. Tables with an advanced filter display Advanced next to their filter conditions in the Filters column.
11To configure Access Management, select the tables to which you want to apply data access policies and then click the down arrow next to Add Transformation and select Access Management.
Note:
The Access Management option is available only for SQL Server source tables and only if a feature flag is set for your organization. If Access Management isn't available, contact Informatica Global Customer Support to request access.

The Access Management dialog box appears.
12To add data access policies, configure the following fields:
Field | Description |
|---|---|
Consumer | The role of the user accessing the data, defined within Data Governance and Catalog. This role applies to all tables in the database ingestion and replication task. |
Usage | Identifies the usage context within which the user intends to use the data. Users create and manage usage contexts in Data Governance and Catalog. |
Consistency Seed | Provides a value that represents the rule logic that the transformation applies to the data element classification. A consistency seed ensures that a rule's behavior for a data element classification will be consistent for the same consistency seed value, usage context, and user across all tasks. For example, you can ensure that a rule always replaces the last name "Smith" with "Abcd." If you want consistent tokenization between different Access Managenent transformations, insert the same consistency seed in other Access Managenent transformations. If you don't want consistent tokenization between different Access Managenent transformations, generate a unique seed. |
Connection | Defines the connection used to retrieve the related data catalogs and data assets scanned by the Data Governance and Catalog scanners from the database referenced by this connection. By default, this is the same connection used to access the source tables in the configured database ingestion and replication task. |
Catalog | Specifies the particular catalog within the collection of catalogs scanned by the Data Governance and Catalog scanners from the database referenced by the connection. This catalog is used to perform matching against the source tables to identify the corresponding data assets. By default, the most recently scanned catalog is selected. |
The default data assets are displayed for all the tables you selected for the Access Management transformation in the previous step.
Using the associated connection and catalog, default data assets are retrieved by performing an exact match between the source table names and the cataloged data asset names. If a corresponding data asset is not found, either because the source table was not scanned or the data asset name does not exactly match the source table, the missing asset will be indicated with a red vertical line. You can select the Show Missing Data check box to filter and display only those source tables that do not have a corresponding data asset.
Click OK to return to the Transform Data page.
The Access Management column on the Transform Data page shows the selected data assets against every table as hyperlinks. Clicking the link opens the selected data asset in edit mode.
On the Transform Data page, clicking the Clear All button at the top right hand corner removes all filters, including trim transformations, row-level filters, and access management policies from the selected tables.
13When done, click Next.