Installing the client modules
Installing the client modules
To install new modules, mount Product 360 - Media Manager Volume0 from the file server on your workstation and then follow the instructions below for your operating system.
If you are installing new client modules or updating the version, you must re-activate Product 360 - Media Manager. For more details, refer to Activating Product 360 - Media Manager, defining volumes & setting up Funcd.
Under Windows
On Volume0 on your file server, switch to the directory opasdata/update/win/oclnt (or MAIN_DVD\setup\HMM\update\win\oclnt).
Run OPAS_cln.exe.
Follow the subsequent instructions.
Enter host string for your database:
Oracle: //databaseserver:port/instance (i.e. //192.168.100.65:1521/hmm)
MSSQL Server: For MSSQL the host string has to start with MSSQL and it has to be defined as an ODBC connection in the register User DSN. (i.e. MSSQL_HMM)
Type in your workstation number (i.e. the last 3 digits of your IP address)
Start the Administration module using Program Files > Informatica Media Manager > Administration.
Confirm all messages e.g. not mounted volumes.
Perform the activation; refer to Activating Product 360 - Media Manager, defining volumes & setting up Funcd .
You can log in using the user name admin and the password sys.
Change the administrator password as soon as possible.
Now make the local settings. For more details, refer to Product 360 - Media Manager Configuration.
Under Macintosh
On Volume0 on your file server, switch to the directory opasdata/update/osx.
Mount the image IMM.install.dmg.
Run the Product 360 - Media Manager package installer.
Follow the subsequent instructions.
Start the Administration module using Applications > Informatica Media Manager > Administration.
Enter host string for your database:
Oracle: //databaseserver:port/instance (i.e. //192.168.100.65:1521/hmm)
MSSQL Server: For MSSQL the host string has to start with MSSQL and it has to be defined as an ODBC connection in the register Systen DSN. (i.e. MSSQL_HMM)
Type in your workstation number (i.e. the last 3 digits of your IP address)
Perform the activation.
You can log in using the user name admin and the password sys.
Change the administrator password as soon as possible.
Now make the local settings. For more details, refer to Product 360 - Media Manager Configuration .
Installing and setting up the ODBC connection under Macintosh
Product 360 - Media Manager supports access from OSX to a MSSQL database via the ODBC Drivers Single-Tier (Lite Edition) (Release 6.1) by OpenLink.
The ODBC driver licenses are not included in the Product 360 - Media Manager license.
Installation
On Volume0 on your file server, switch to the directory opasdata/update/osx.
Mount the image mv16mzzz.dmg.
Install the package OpenLink-SQLServer-Lite.mpkg following the instructions on the screen.
If the SQLServerLiteInstaller was started by the package installer the license file can be chosen.
Otherwise the license file Licensfile has to be copied to the directory /Library/Application Support/openlink/bin.
Setup
Start the program OpenLink ODBC Administrator located in the directory Utilities within the Applications directory.
Switch to the tab System DSN and click Add.
This action requires administrative privileges.
Select OpenLink SQL Server Lite Driver (Unicode) V.6.X.
Enter a DSN name.
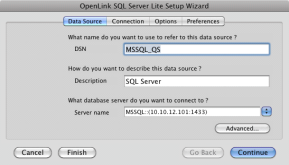
The DSN name must begin with MSSQL_.
Click Advanced.
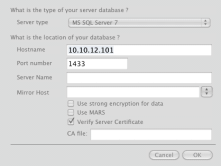
Select MS SQL Server 7 as Server type.
Enter the hostname and port and click OK.
Apply the following settings to the tabs:
Tab Connection: Leave all settings and click Continue.
For all other tabs apply the settings displayed on the following screenshot.
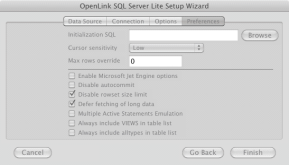
Click Finish.