Comparision of characteristic values
In following comparison between characteristic values is described only for items to make the documentation more readable. Please note, that the same feature is also provided in the standard Product 360 for products and variants as well.
Comparing characteristic values
When comparing items with each other or with different versions of themselves, a compare view will be opened which allows the comparison of different attributes of the selected items but also of their characteristic values. Characteristic values can be compared in the Web client as well as in the Desktop client. Furthermore, you can create a template for the Flex UI which also allows the comparison of characteristic values. Generally, you can compare characteristic values of the same entity with each other or with themselves in different versions.
Compare view for characteristic values
To compare items of different versions or to compare different items of the same entity with each other, the following section describes in detail how such comparisons can be generated using the compare view provided.
Compare multiple items
By selecting two or more items and selecting the Compare with each other option, a comparison view will be created.
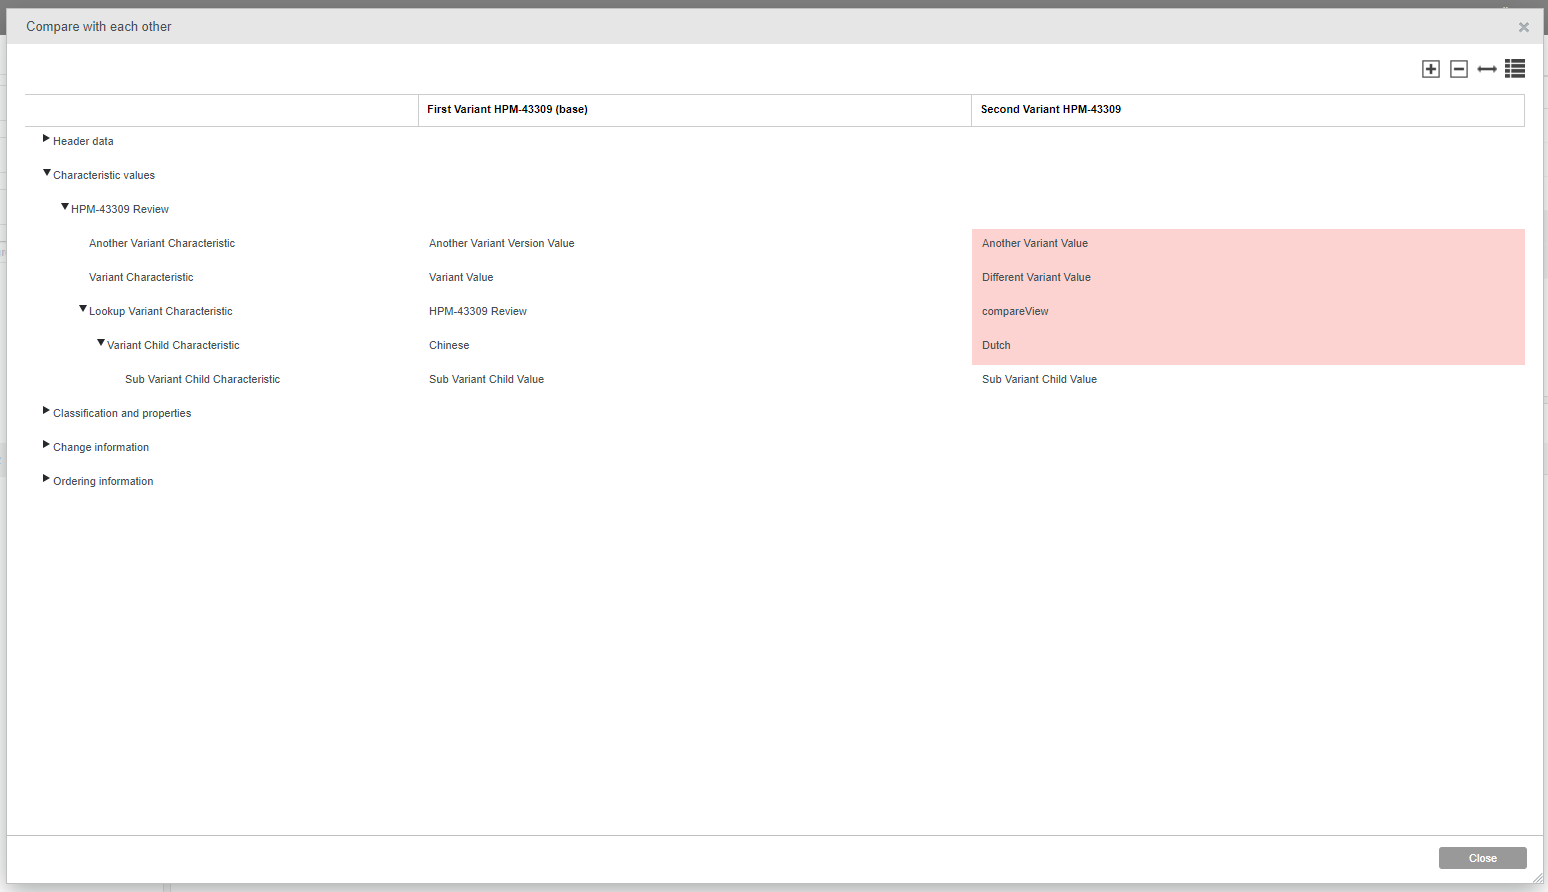
Characteristic values can be compared by opening the characteristic values element. Differences between characteristic values are highlighted in red.
Compare an item in different versions
If an item contains multiple versions of itself and you wish to compare those, the comparison view can also be used. Just like before, you can selected the item you wish to compare and select the Compare to <versionName> option.
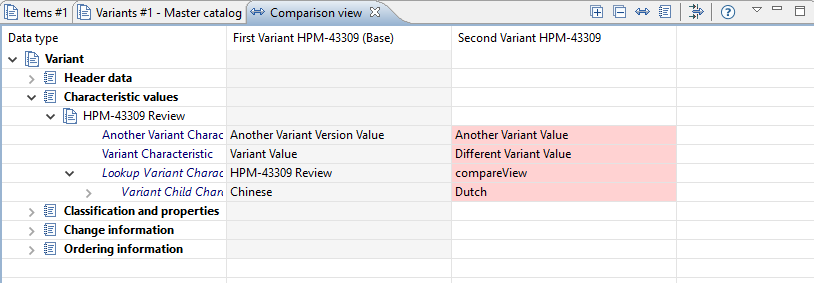
Just like when you compare multiple objects with each other, you can open the characteristic value element and view the differences between the versions. As before, differences are highlighted in red.
Compare view for characteristic values in Flex UI
The Flex UI additionally grants you the ability to compare characteristic values between each other. Like before, characteristic values of the same entity as well as different versions of a characteristic value can be compared with each other. This section now gives you an example on how to configure the Flex UI and how to handle the result.
Creating a Flex UI example template
For the comparison of characteristic values in the Flex UI, a Flex UI template is required. To create such a template we use the example provided at the Web Configuration documentation located at Installation and Operation/ Configuration/ Web Configuration/ Task UI and Dashboard/Compare View. In this example, we want to create a Flex UI template that allows the comparison between different item characteristic values and of one item characteristic value and its different versions.
First you need to create a new Flex UI template inside the Desktop client and configure the entity data type required for your comparison. In this example we want to compare objects of entity data type item.
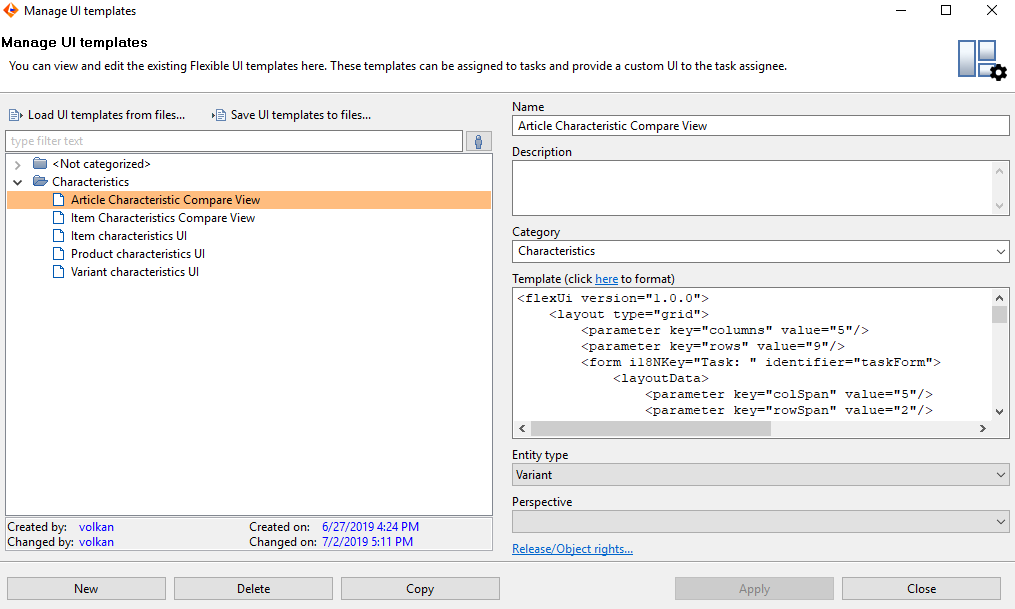
Now we want to adjust the Flex UI template in a way that we can compare the requested elements as described above.
<flexUi version="1.0.0"> <layout type="grid"> <parameter key="columns" value="5"/> <parameter key="rows" value="9"/> <form i18NKey="Task: " identifier="taskForm"> <layoutData> <parameter key="colSpan" value="5"/> <parameter key="rowSpan" value="2"/> <parameter key="collapsible" value="true"/> <parameter key="collapsed" value="true"/> </layoutData> <header headerStrategy="taskActionsHeader"/> <fieldFormDefinition rootEntity="Task"> <column> <fieldGroup> <field identifier="Task.Name"/> <field identifier="Task.Description"/> <field identifier="Task.CreationUser"/> <field identifier="Task.CreationDate"/> </fieldGroup> </column> <column> <fieldGroup> <field identifier="Task.User" optionGroup="assignee"/> <field identifier="Task.UserGroup" optionGroup="assignee"/> <field identifier="Task.Supplier" optionGroup="assignee"/> <field identifier="Task.Substitute"/> <field identifier="Task.Responsible"/> </fieldGroup> </column> <column> <fieldGroup> <field identifier="Task.EscalationDate"> <validator type="com.heiler.ppm.web.common.ui.form.validation.InFuture"/> </field> <field identifier="Task.Deadline"> <validator type="com.heiler.ppm.web.common.ui.form.validation.InFuture"/> </field> <field identifier="Task.FinishEstimate"> <validator type="com.heiler.ppm.web.common.ui.form.validation.InFuture"/> </field> <field identifier="Task.Template"/> </fieldGroup> </column> </fieldFormDefinition> </form> <group identifier="Item details"> <layoutData> <parameter key="colSpan" value="5"/> <parameter key="rowSpan" value="7"/> </layoutData> <parameter key="direction" value="Horizontal"/> <list i18NKey="Items" identifier="TaskItems" pageSize="20"> <layoutData> <parameter key="collapsible" value="true"/> <parameter key="collapsed" value="false"/> <parameter key="sizeRatio" value="2"/> </layoutData> <listenFor source="Task" type="initialEvent"/> <header headerStrategy="taskActionsHeader"/> <listModelDefinition rootEntity="Article"> <field caption="Image" identifier="ArticleMediaAssetDocument.ImageIdentifier" sortable="true" width="40"> <logicalKey identifier="ArticleMediaAssetDocumentType.LK.Type" value="Standard image"/> <logicalKey identifier="ArticleMediaAssetDocumentType.LK.Language" value="${user.language}"/> <logicalKey identifier="ArticleMediaAssetDocumentType.LK.Quality" value="originalimage"/> </field> <field identifier="Article.SupplierAID" sortable="true"/> <field identifier="Article.CurrentStatus" sortable="true" width="180"/> <field identifier="ArticleLang.DescriptionShort" sortable="true"> <logicalKey identifier="ArticleLangType.LK.Language" value="${user.language}"/> </field> </listModelDefinition> </list> <component i18NKey="Compare Articles with each other" identifier="compareWithEachOther" rootEntity="Article" type="compare"> <listenFor source="TaskItems" type="selectionEvent"/> <parameter key="enableRefreshButton" value="true"/> <parameter key="mode" value="EACH_OTHER"/> <header headerStrategy="compareHeader"/> </component> <component i18NKey="Compare Articles with different revisions" identifier="compareWithRevision" rootEntity="Variant" type="compare"> <listenFor source="TaskItems" type="selectionEvent"/> <parameter key="enableRefreshButton" value="true"/> <parameter key="mode" value="REVISION"/> <header headerStrategy="compareHeader"/> </component> </group> </layout></flexUi>To view the associated items, we need to create a form element which displays these items on the left side. This enables us to select the items to be compared. With help of this element, we can now add both components required for the comparison. The first component <compareWithEachOther> enables us the comparison between two or more items. The second <compareWithRevision> component provides the ability to compare the value of an item with its different versions. Saving this template in the Desktop client gives us the ability to open the Flex UI in the Web client.
Compare View in Flex UI
With a Flex UI template created which provides the ability to compare items and their different versions with each other, we are now able to use the Flex UI itself for comparisons. To do so, select one or more items in the structure group tab, use the Actions button at the top and select the template you created to compare your selected items.
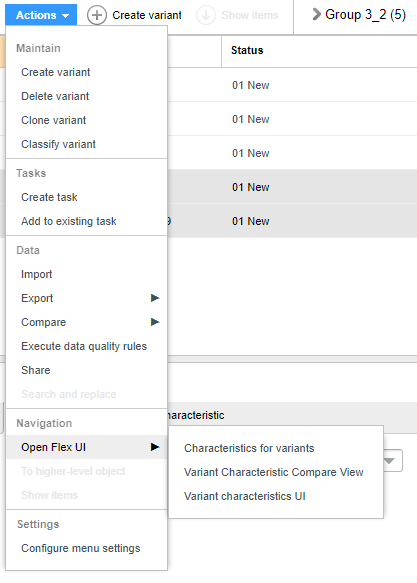
The Flex UI opens up and allows you to select the items required for your comparison.
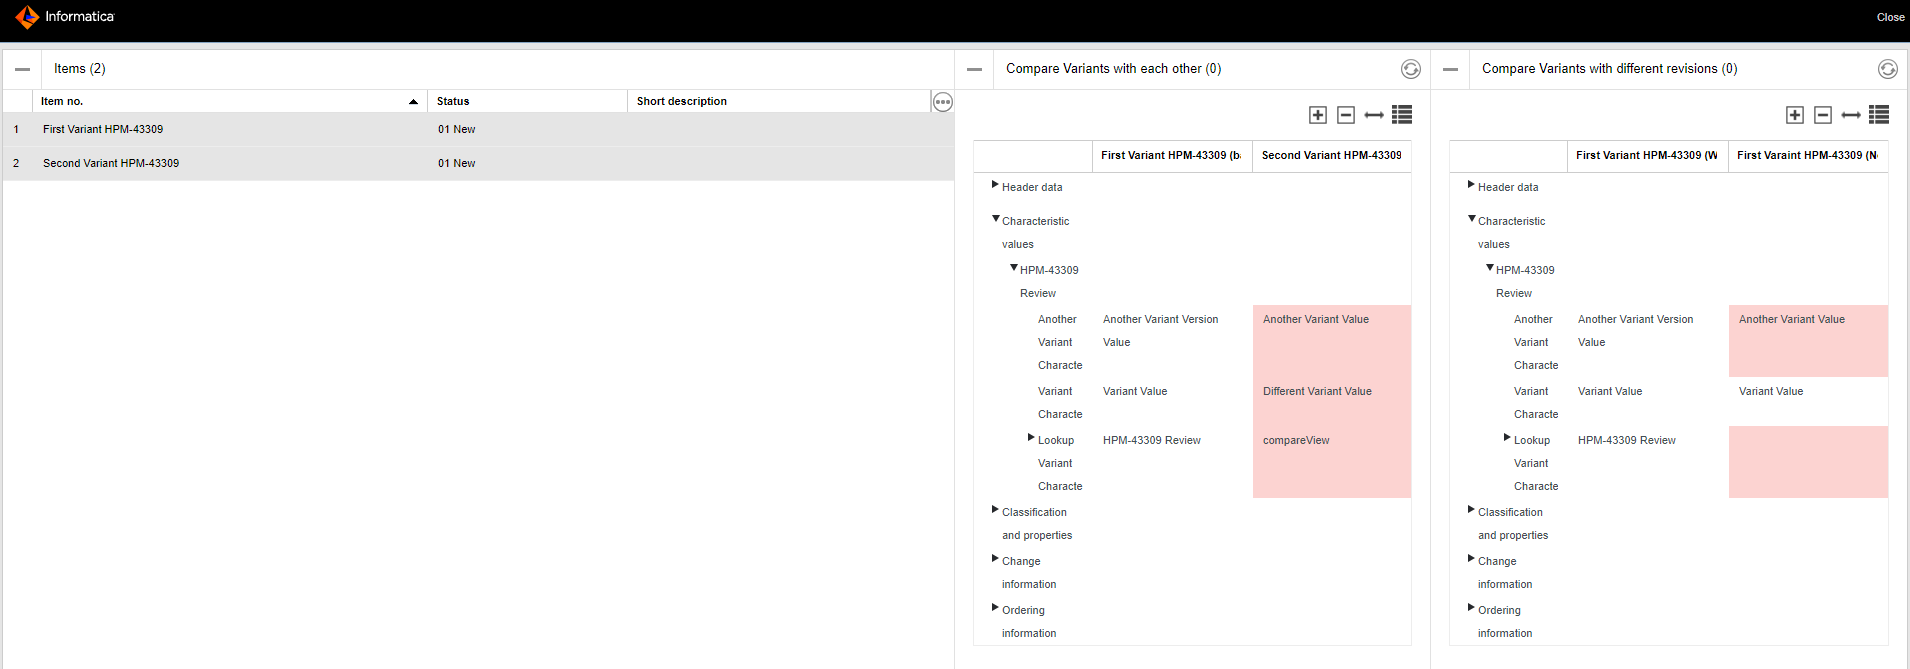
On the left hand side you can see your previously selected items. The right hand side displays the components required for the comparisons. Just like before, differences between different versions and item characteristic values are highlighted in red.