Server Installation
This page describes how the Informatica Product 360 application server is installed using the Control Center application. The application server already contains the web and service api interfaces. This documentation is valid for single as well as multi-server installations.
Prerequisite
Before you can start with this chapter, you need to have finished the following parts:
Product 360 Core Database
The Server Database manual describes how to initially setup or update the Product 360 server database schemas for a new release.
OS User Permissions
Windows
The user who installs the MDM Product 360 needs to have local administrative permissions. Also the service user for the Control Center needs to be an administrator on all cluster nodes, otherwise he will not be able to automatically install the application server services there.
Create Control Center Service User
Open Start > All Programs > Administrative Tools > Computer Management > Local Users and Groups > Users > New User ...
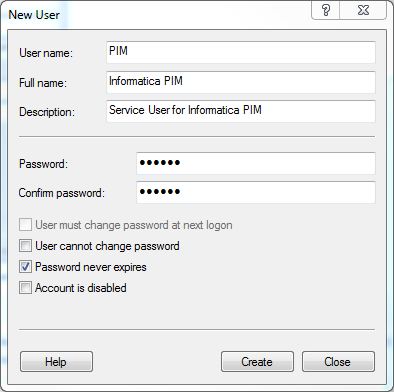
Create a new user account for the service (e.g. PIM).
In case the host machines are part of a domain, we recommend to use a special domain user for the following steps, rather than creating you're own local user.
Please contact your network administration department so they create this service user for you.
Open Start > All Programs > Administrative Tools > Local Security Policy > Local Policies > User Rights Assignment.
Assign the "Lock pages in memory" privilege to the PIM user.
Linux
The user who installs the MDM Product 360 needs to have the right to install services.
The user running the MDM Product 360 server needs a valid locale. Please check with the following command if a locale is set for your user:
http://man7.org/linux/man-pages/man1/locale.1.html#EXAMPLE
localeIf no valid locale is set then you can set it with the following command.
export LANG = en_us.utf-8An invalid locale can lead to a server crash when executing data quality rules.
Create Control Center Service User
To create a new user account for the service (e.g. PIM), use either the graphical tool of your distribution or a command line tool like adduser.
The user needs to have the right to start a service otherwise it is not possible to start the application server using Control Center.
Default Product 360 Server Ports
If possible use the default ports for the installation, only change the ports if they are already bound by another application in your company.
|
Port |
Protocol |
Product 360 Module |
|
1712 |
tcp |
Desktop connection. This port is used to connect the Desktop Client and Server. The used protocol is an internal low-level protocol, optimized for high performance throughput. |
|
1512 |
http |
Web Server Port (Jetty) which is used for the Web Client as well as the Service API or file transfer. |
|
1812 |
tcp |
Data Grid communication. Needed for the synchronization heartbeat of the cluster. For data synchronization the Hazelcast framework is used. Hazelcast itself uses a dynamic range of outgoing ports determined by the OS for communication between nodes. |
|
55555 |
tcp |
Default Java Management Extensions Port which is needed to attach troubleshooting and tuning tools. |
|
61616 |
tcp |
The port for the message queue connection. |
|
25 |
smtp |
Product 360 Server is capable to send e-mails in various functional areas, for this it needs access to an smtp e-mail server |
|
445 and 139 |
smb and tcp |
Windows file share ports for the media asset file communication when used with the Product 360 Media Manager module |
Encryption of secure information
Product 360 supports the encryption of secure information like passwords in configuration files. The encryption will be executed only if your secure information in the configuration files is enclosed by the marker [_to_encrypt_].
So, if you want to have e.g. the password "MyPassword" encrypted in a configuration file just use the marker before and after the password like this: [_to_encrypt_]MyPassword[_to_encrypt_].
For example:
# INFA BPMinfa.bpm.base.url = <ENTER THE INFA BPM BASE URL HERE>infa.bpm.workflows.path = services/RESTinfa.bpm.user = <ENTER THE AUTHENTICATION USER HERE>infa.bpm.password = [_to_encrypt_]MyPassword[_to_encrypt_]<network> <node identifier="audit-server" host="localhost" port="2801" username="Administrator" password="[_to_encrypt_]MyPassword[_to_encrypt_]"/></network>Usage of AES-256 cryptographic algorithm to encrypt/decrypt secure information
Product 360 provides a default implementation for the encryption of secure information with an internal and securely stored Key using AES-256.
For sophisticated deployments we recommend to integrate wit Encryption Key Management solutions like Amazon AWS or Azure KeyVault and use the API we offer to send and receive data for encryption to these key stores securely
Large memory pages under linux
In order to use large memory pages (which is enabled by default, see JVM parameter XX:+UseLargePages in wrapper.conf), you may have to change the operating system configuration as described in the following article:
https://www.oracle.com/technetwork/java/javase/tech/largememory-jsp-137182.html
Control Center
The Control Center is the central application for installation and operation of the Product 360 server cluster. It must also be used for single server installations.
The Control Center must be installed on every node in the cluster. We strongly recommend to install all nodes absolutely identical, this prevents deployment failures and is the fastest way to setup the cluster.
First Node
Download and Extract Binaries
Select one of your servers in the cluster to be the first node of your system. The installation will be done on this node and after that copied to all other nodes.
Extract the Control Center package PIM_8.0.5.00_<revisionNumber>_clusterix_win64.zip resp. PIM_8.0.5.00_<revisionNumber>_clusterix_linux64.tgz from the Core archive
Extract the file on the master node into a directory, e.g. C:\Informatica\PIM (=<PIM ROOT>).
The directory structure should look like this: <PIM ROOT>\clusterix and not like this <PIM ROOT>\PIM_8.0.5.00_<revisionNumber>_clusterix_win64/clusterixMake sure that the Control Center service user has full permissions on the <PIM ROOT> and all children.
Configure Control Center
If you want to encrypt the passwords used in the configuration files please refer to chapter Encryption of secure information in the Server Installation manual. The passwords marked as to encrypt will be encrypted during the start of Control Center service.
The clusterix configuration folder contains the folders clusterix and HPM.
Only ClusterixConfig.xml and NetworkConfig.xml are distributed from the clusterix folder to the servers.
All files in the HPM folder are completely distributed to the servers.
All files in the configuration/HPM folder of the server are replaced by the deployed files. So it's important to modify the files only here and not on any server separately.
Open the file <PIM ROOT>\clusterix\configuration\clusterix\ClusterixConfig.xml in an editor and adjust the properties as described below.
Note
This file will be copied during "Update Configuration" process to PIM Server configuration folder and port and clusterixLogin will be used for communication from PIM Server to Control Center.
|
Property Name / Attribute |
Description |
Example |
|
port |
The HTTP port which should be used for the Control Center Web UI. |
9000 |
|
clusterixHttpsConfiguration |
||
|
enabled |
Enables HTTPS for Control Center Web UI. |
false |
|
httpsPort |
The HTTPS port which should be used for the Control Center Web UI. |
443 |
|
keyStoreFile |
The full path to the keystore file. |
D:/Development/com.heiler.ppm.communication2/testdata/keystore.jks |
|
keyStorePassword |
The password of the keystore file. |
|
|
clusterixLogin |
||
|
user |
The username which must be used for access to the Control Center. |
clusterix |
|
password |
The password to use for the Control Center. |
|
|
hpmLogin |
||
|
user |
The username of the Product 360 user which has Service API access permissions. |
rest |
|
password |
The password of the Product 360 user. |
|
![]() Important Notice: When using HTTPS for the Control Center, make sure that your certificate is trusted! To do so follow these steps:
Important Notice: When using HTTPS for the Control Center, make sure that your certificate is trusted! To do so follow these steps:
export your certificate from your wanted keystore file by using this command in your java home path:
keytool -export -keystore fullPathToYourKeystoreFile -alias yourChosenAlias -file certificateName.cer
import your exported certificate into the cacerts file at yourJREHomePath \lib\security by using the following command: keytool -keystore cacerts -importcert -alias yourChosenAlias -file certificateName.cer
restart your system
=> to simplify this process, you can use an external tool named "portecle".
Configure Application Server Cluster
Open the file <PIM ROOT>\clusterix\configuration\clusterix\NetworkConfig.xml in an editor and adjust the mandatory properties. Add node elements for each node in the cluster.
See the Server Configuration for details on all properties you can adjust in this file. For ease of the installation, we only have a subset of the available settings here.
Ports must be open!
All communication ports which are defined in the NetworkConfig.xml must be open for all servers in the cluster. Especially the data-grid as well as the hlr-tcp port. In case the servers can't reach each other, they will not throw an error as they will just assume to be the first one in the cluster to be started. You might not even immediately recognize that the servers do not work as a real cluster together. In case you want to check if the servers are really connected as a cluster you can check the log file of the second server during startup. Every server which starts up will try to connect to the other servers which are already running, if successful he will log that.
This is a typical log of the first server which starts:
INFO | jvm 1 | 2021/12/10 12:19:22 | 12:19:22,114 INFO [ServerInitializer 2] [ClusterService] [Myserver1]:1802 [P360] [3.12.1]INFO | jvm 1 | 2021/12/10 12:19:22 |INFO | jvm 1 | 2021/12/10 12:19:22 | Members {size:1, ver:1} [INFO | jvm 1 | 2021/12/10 12:19:22 | Member [Myserver1]:1802 - c82f2563-d8e4-40da-9830-1ef53bf8ed3a thisINFO | jvm 1 | 2021/12/10 12:19:22 | ]All subsequent servers should have the already started servers in the members array.
|
Element/Attribute |
Description |
Example/Default |
|
network |
Root element of the network configuration, contains one or more nodes |
|
|
node |
Represents a server node in the cluster |
|
|
identifier |
Unique identifier of the node within the network. See -Dppm.nodeIdentifier command line argument below! |
product360-server1 |
|
host |
The host name / IP address this node runs on. Note: Do not use localhost or similar addresses. The host name or IP address in this attribute must be visible from all nodes in the cluster. In case the server has the CLIENTS_SERVER role, it also must be visible from the desktop clients. Please use only CAPITAL LETTERS for the host name |
|
|
default-role mandatory attribute |
Default role(s) each server node must have at start time. Available roles are CLIENTS_SERVER, JOB_SERVER and MQ_CONSUMER_SERVER. Currently the server roles can not be modified during runtime of the server, but this might change in the future. |
CLIENTS_SERVER, JOB_SERVER and MQ_CONSUMER_SERVER |
|
node/web |
Web relevant protocol settings (either HTTP or HTTPS) |
|
|
useHttps |
Enables/disables the SSL protocol. Default is false - in case you want to enable it, you need to provide a valid SSL certificate and use the https element. See Server Configuration for details |
false |
|
node/web/http |
HTTP specific settings |
|
|
port |
HTTP port to be used for the web server |
1512 |
|
node/data-grid |
Settings for the distributed data grid |
|
|
port |
Port to be used for the data grid connection. |
1812 |
|
node/internal/hlr-tcp |
Settings for the internal communication protocol |
|
|
port |
Port for incoming / outgoing connections regarding internal communication |
1712 |
|
node/snmp |
Settings for the SNMP protocol communication |
|
|
oid |
Object id of the node in the cluster. Each node must have a unique oid. |
1.1 (first node) |
Install Control Center Service
Windows
Install Control Center as service by running the script <PIM ROOT>\clusterix\install.cmd
Open Start > All Programs > Administrative Tools > Services
Make sure that the startup type is "Automatic"
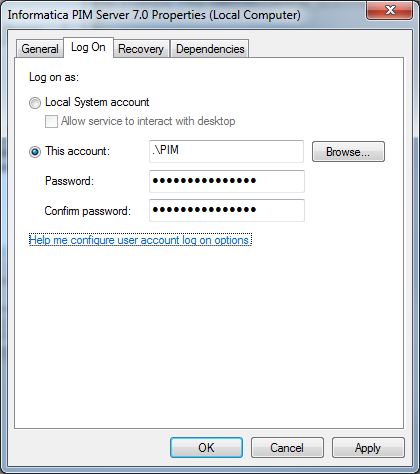
Modify the service's properties so that it uses the Control Center Service user.
Start the service Informatica Product 360 Control Center
Linux
If you do not want to run the Control Center as root you have to edit the script <PIM ROOT>/clusterix/service/clusterix.sh and change the line
#RUN_AS_USER=
to
RUN_AS_USER=<USERNAME>whereby <USERNAME> is the name of the Control Center Service User
Install Control Center as service by running the script <PIM ROOT>/clusterix/install.sh
Start the service Informatica Product 360 Control Center by starting the service via
service Product_360_ControlCenter_1.0 start
Validate Control Center Installation
Note
Make sure that JavaScipt is enabled in your browser. Currently Internet Explorer is not supported with the Control Center.
Verify the installation of Control Center by opening the web interface on the first node (usually http://<ServerName>:9000). Replace 9000 with the port you used in the ClusterixConfig.xml. Login with the user name and password specified in the ClusterixConfig.xml file.
Click on the Monitoring tab and open the Network tree to the left. Check that the all configured nodes of the cluster are shown under Application Server
The web interface with two configured nodes should look like this:

Distribute Control Center on Remaining Nodes
Copy the folder <PIM ROOT>\clusterix of the first node to each remaining node of the cluster (including all the configurations which should be identical on all machines).
Install and start the Control Center service on each machine (like described above).
Validate the installation on each of the machines by opening the Control Center web interface
Application Server
Binaries
Extract the server installation package from the Core download archive. The package name is PIM_8.0.5.00_<revisionNumber>_server_win64.zip resp. PIM_8.0.5.00_<revisionNumber>_server_linux64.tgz.
Hint
Do not unzip the PIM_8.0.5.00_<revisionNumber>_server_win64.zip resp. PIM_8.0.5.00_<revisionNumber>_server_linux64.tgz file!
Configuration
All configuration for the application servers must be done only on one node and will automatically be distributed to all other nodes in the cluster.
If you want to encrypt the passwords used in the configuration files please refer to chapter Encryption of secure information in the Server Installation manual. The passwords marked as to encrypt will be encrypted if you save the configuration file or before the distribution of configuration take place.
If you want to connect the P360 Server to an Oracle Database via TCPS, please refer to chapter "How to configure a secure database connection for Product 360 Server" in the "Server Configuration" manual.
We will only touch the minimally needed properties for the installation in this section, please find a detailed description of all properties in all configuration files on the Server Configuration page.
General Server Settings (server.properties)
File: <PIM ROOT>\clusterix\configuration\HPM\server.properties
The following properties needs to be adjusted at least. In case of an integration with Informatica MDM or Informatica BPM you will need to adjust additional properties in this file. Please see the corresponding documentation for this.
|
Property |
Description |
|
File Transfer Settings Is is crucial for multi-server deployments that all servers can access the same file storage and the same directories in there. For example, it might be that Server A uploads files to the import area in the file storage, but Server B is executing the import for this. So Server B needs to have the identical file access then Server A.The currently available default implementation for the file storage is SMB which uses the SMB protocol to access the files. Please note that the file transfer from the Desktop Client is done using HTTP only. |
|
|
filestorage.dir.shared |
Folder which has to be accessible by each Product 360 server. In case of a single server system, the folder does not have to be a shared one. In case of multi-server you might want to use a common file store with an SMB share or some kind of Network storage on which every server node has access. |
|
Customer license key |
|
|
license.customer.file.local |
Local path to the license file. Please contact the Informatica Product 360 Partner Management to obtain a license file. |
|
license.customer.key |
Appropriate customer key (in case of multiline keys, use backslash at the end of the line) |
|
Repository Settings |
|
|
repository.default.language |
The default language of the repository regarding all language specific aspects like e.g. default logical key language. Possible values: Key synonyms of the corresponding language entries defined in the repository enumeration "Enum.Language", e.g. "de" or "en_US" - default is German, if property does not exist. Note: The repository language MUST NOT be changed as soon as entity data such as items/products/variants or structures/structure groups have been created and exist in the database. In such a situation, the stability of the system can no longer be guaranteed since logical key fields most likely will contain null values. |
|
Database settings for Microsoft SQL Server and Oracle Please visit the corresponding database setup settings in the chapter "Provide database connection settings" of the page "Server Database" which are also for server installation. |
|
Startup parameters (_environment.conf)
File: <Product 360 ROOT>\clusterix\configuration\HPM\_environment.conf
|
Parameter |
Description |
Default/Example |
|
MEM_MAX |
Change this parameter to the maximum heap space for the Java VM. Never configure more than the physically available memory of the machine. |
e.g. 16384M for 16 GB Heap Space |
|
NAME_SHORT, NAME_LONG, JMX_PORT and SERVER_IDENTIFIER will be adjusted automatically by the Control Center during the installation with the settings specified in the configuration files of Control Center. |
||
License
Create a new folder underneath the file storage root folder which has been provided by the filestorage.dir.shared property called license.
Copy the license file to this folder.
Installation
Open the Control Center Interface using your local browser. Connect to the node on which you adjusted the application server configurations.
Open the Deployment tab.
In the "Installation Files", press the upload button and select the application server archive. The archive has to stay zipped. Click on upload to upload the installation file.
After the upload has been completed, select the application server archive in the widget and press the Install button.
The installation process will automatically copy the installation archive to all server nodes.
The archive will be extracted to <PIM ROOT>\server.
Configuration files will be copied and adjusted accordingly.
Finally, the Windows/Linux service will be installed on the remote machines.If the Control Center service user does not have sufficient rights to install a service you have to install the service manually by executing
<PIM ROOT>\server\install.cmd (Windows) resp. sudo <PIM ROOT>/server/install.sh (Linux)
Linux: If the Product 360 server should not run as root, the user can be specified in <PIM ROOT>/server/service/pimserver.sh and change the line
#RUN_AS_USER=
to
RUN_AS_USER=<USERNAME>whereby <USERNAME> is the name of the Product 360 Service UserSwitch to the Monitoring tab and select the server(s) you want to start. Press the Start Server button.
The Server States will move from STOPPED to STARTING and finally RUNNING
Since the application server needs to have full access to the file share, it is necessary to also adjust the windows service of the application server to use the service user we defined for the Control Center service and make sure that this user has full access on the file share.
Enable Monitoring in Control Center
To be able to see all the statistical data for all servers you need to have a user in your Product 360 system who has Service login permissions and all process planning permission.
You can create this user using the Desktop Client. The user name and password should have been already defined in the ClusterixConfig.xml file, make sure the new user has the same name and password.
Validate Installation
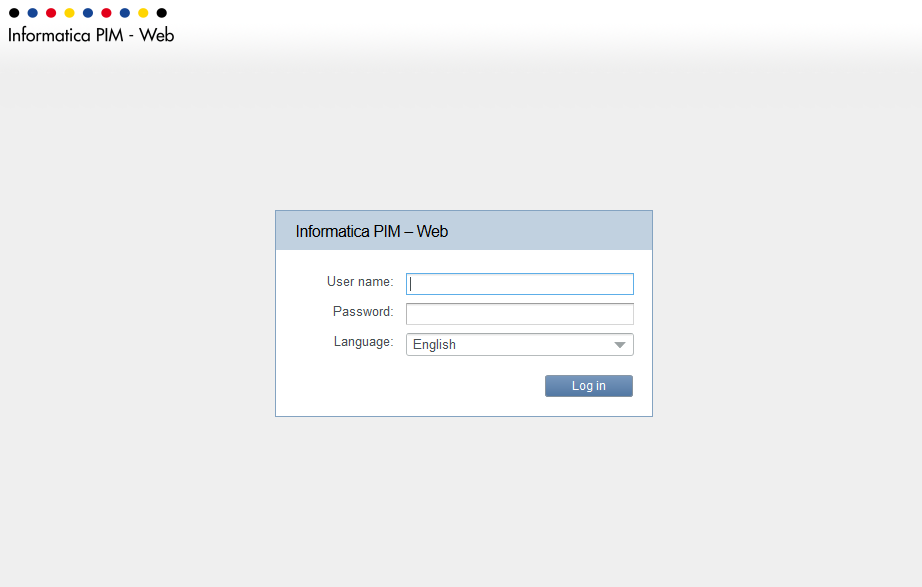
When you finished the installation of a single server (or a cluster), you can easily validate if everything is up and running by opening the Informatica Product 360 Web interface.
By default, the web client is reachable via the following url: http://hostName:1512/pim
Media Asset Provider
In order to work with multimedia documents such as images, videos and documents the Product 360 application server needs a media asset provider. If not configured otherwise, it is pre-configured with it's build-in provider (aka Classic Provider, HLR). The build-in provider is merely a simple directory based storage for multimedia documents with limited capabilities regarding image processing etc. Informatica recommends to always use the Media Manager module since it provides a richer set of functionalities.
Media Manager Provider
Please see separate instruction for the Media Manager Integration
Classic Provider
The Classic Provider is only supported for Windows operating system!
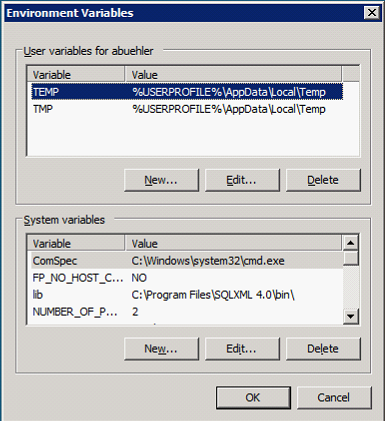
GraphicsMagick for Classic Provider
The Classic Provider uses GraphicsMagick for processing preview images. This 3rd party tool which is located on the 3rd party archive cd must be installed separately. Classic Provider works with Version GraphicsMagick 1.3.14-Q16 (32 bit for Windows) (other Versions are not tested and are not recommended to be used!). You can find the needed version (GraphicsMagick-1.3.14-Q16(32 bit for windows) ) on the 3rd party archive cd, install it according to it's own installation instructions. See the Configuration Manual for more information about all possible configuration parameters.
GraphicsMagick uses the TEMP and TMP environment variables to work with temporary files. Unfortunately it does not support whitespaces in the paths to those temporary folders. Therefore you need to adjust the TEMP and TMP variables to have no whitespaces in them (take care about the %USERPROFILE% variable - it might contain whitespaces!).