SAML Configuration
This guide describes the necessary steps to configure Product 360 Supplier Portal for usage with SAML Single Sign On.
Overview
SAML Roles
The SAML specification defines three roles:
the Principal (typically a user)
the Identity Provider (IdP) e.g. Active Directory Federation Services (AD FS), OKTA or Shibboleth
and the Service Provider (SP), in our case the Product 360 Supplier Portal
This section describes all steps necessary to setup Single Sign On (in short SSO) via SAML for the Product 360 Supplier Portal.
If you want to know more about what SAML is, documentation can be found on the official SAML documentation pages provided by the OASIS consortium.
In general, the term "Service Provider" can be replaced with "Product 360 Supplier Portal" and the term "User agent" can be replaced with "Browser" in case of web based SSO scenarios.
Single Sign On flow
Product 360 Supplier Portal supports two general ways for Single Sign On: Service Provider initiated and Identity Provider initiated Single Sign On.
In addition to that, Supplier Portal also supports Single Sign On for all user roles: Supplier users or Broker users maintained only in Supplier Portal and Portal administrators that are maintained in the Product 360 Server.
Single Sign On Initiation
Service Provider initiated
In this scenario
the principal requests a service from the service provider (e.g. access to a web resource within the Product 360 Supplier Portal).
Before providing this resource to the principal the service provider redirects user authentication (AuthRequest) to the identity provider.
In case the user is not yet authenticated at the Identity Provider, the IdP requests credentials from the user, e.g. by presenting a login form for the username and password.
Once the authentication has been finished, the IdP provides an identity assertion (SAML assertion) for the principal.
On basis of this assertion, the service provider can make a decision to provide the resource to the principal or not, i.e. checking authorization of the principal for the resource.
If the authorization check passes, the SP then provides the initially requested resource.
Identity Provider initiated
In this scenario, there is no initial authentication request from the SP. Instead, the IdP provides links to certain SP resources. IdP initiated Single Sign On is started when the user clicks on such a link.
The user has already accessed the IdP's web user interface and is authenticated.
In that interface the user clicks on a link to access a resource of the SP.
The SP directly receives an identity assertion for the principal and information about the requested resource.
On basis of this assertion, the service provider can make a decision to provide the resource to the principal or not, i.e. checking authorization of the principal for the resource.
If the authorization check passes, the SP then provides the initially requested resource.
Role specific process
In Product 360 Supplier Portal it is possible to activate Single Sign On only for Supplier/Broker users or only for Portal administrators or for all roles. This may require specific configuration preparations for user or supplier creation. For details about this see section 'Automatic user and supplier creation on successful authentication' below.
System architecture
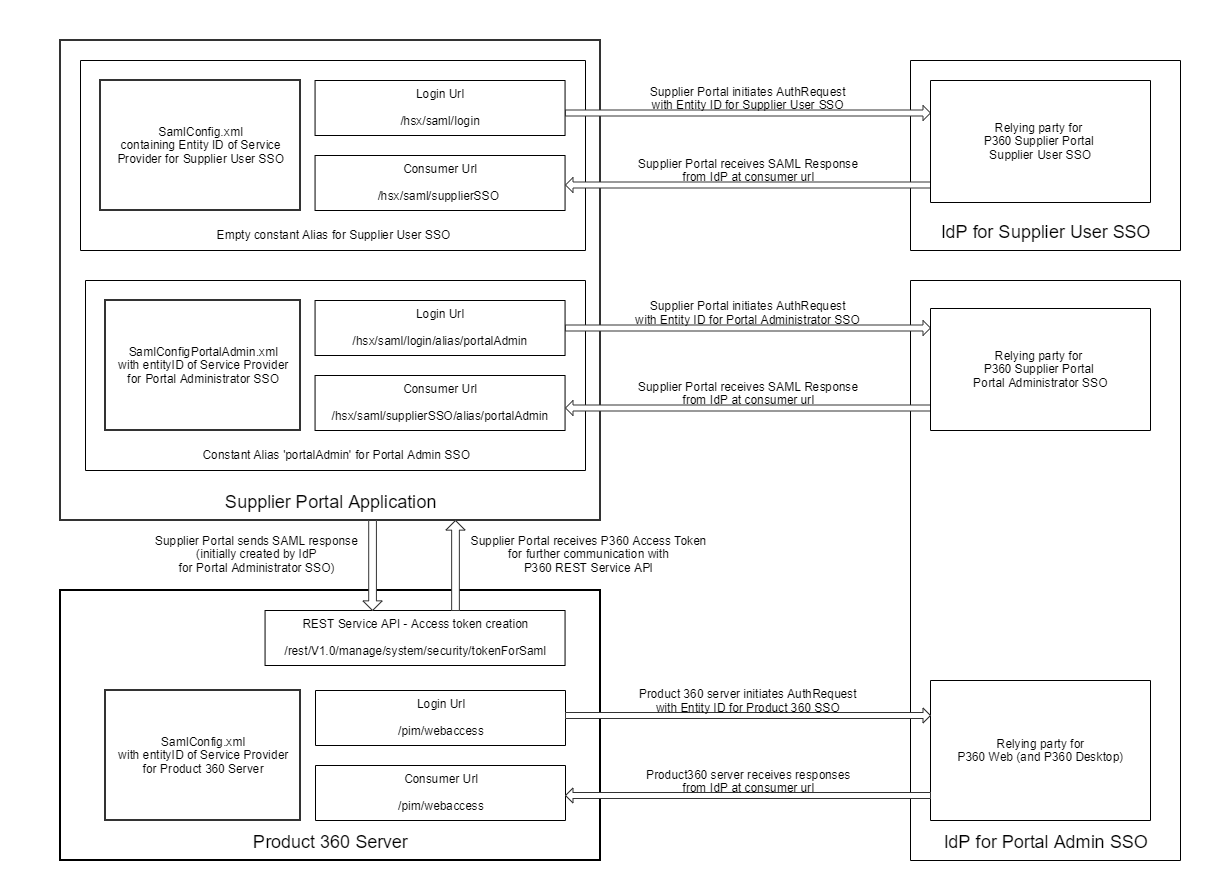
Product 360 Supplier Portal acts as two relying parties (service providers): A Supplier User SSO relying party (for Supplier/Broker users) and a Portal Administrator SSO relying party (respectively service provider and entityID).
In the case of Portal Administrator SSO also Product 360 Server acts as a relying party resp. service provider (for more information on SAML configuration for Product 360 Server see chapter "Server Configuration" of the Installation and Configuration guide and there ".Copy of SAML Configuration 1 v8.1.1"). In this scenario the authenticated portal administrator not only has to be logged into the Product 360 Supplier Portal, but also into the Product 360 Server, in order to be able to authenticate when executing REST calls (e.g. for syncing catalog/supplier information from Product 360 Server). Therefor Product 360 Supplier Portal sends the SAML Response (initially created by the IdP for Portal Administrator SSO) to the Product 360 Server and receives an access token for authentication against Product 360 Server in further REST calls.
For Portal Administrator SSO it is mandatory, that the relying party for Product 360 Supplier Portal Portal Administrator SSO and the relying party for Product 360 Server are configured on the same IdP.
Also the same certificates and keys have to be used for these two relying parties, so that Product 360 Server is also able to validate the SAML Response, which was initially created for the relying party of Product 360 Supplier Portal Portal Administrator SSO.
This also means that Saml must be set tot active and keystore properly defined on the Product360 Server.
The relying party for Suplier Portal Supplier User SSO can either be configured on the same IdP as the relying party for Supplier Portal Portal Administrator SSO, or on a different IdP.
Product 360 Supplier Portal has two different login and consumer urls, one for Supplier User SSO and one for Portal Administrator SSO. Also the SAML configuration for these two cases are located in different XML files (SamlConfig.xml and SamlConfigPortalAdmin.xml) .
Security in Product 360 Supplier Portal SAML support
HTTP communication security is ensured by using SSL for the communication between the IdP and SP (Tomcat https support)
Messages can be signed and encrypted to ensure message-level security. This includes:
signing of AuthRequest message by the SP
signing of SAML Assertions by the IdP
encryption of SAML Assertions by the IdP
When the IdP is signing the assertion, the Product 360 Supplier Portal can verify that it was issued by exactly this IdP using the IdP's public X509 certificate.
Optionally supplying Product 360 Supplier Portal with a public X509 certificate and private key allows Product 360 Supplier Portal, as the SP, to sign outgoing AuthRequests to the IdP, as well as decrypt assertions from the IdP.
Product 360 Supplier Portal signs outgoing messages to the IdP with the SHA1 hashing algorithm. Product 360 Supplier Portal supports incoming messages from the IdP signed with the SHA1 or SHA256 hashing algorithms.
Product 360 Supplier Portal can decrypt assertions from IdP, encrypted with AES-128, AES-256, or Triple DES encryption algorithms.
Passwords are never transmitted as part of a SAML authentication request or response. Responses only contain the username and (optionally) any additional metadata (username, domain, email, etc.) that was configured by the IdP administrator. The optional information can be used for automatic user creation.
Preparation steps
Certificate keystores
For AD FS, it is necessary to have HTTPS enabled. Therefore you need a keystore file, which has to be provided for each node.
Product 360 Supplier Portal currently operates only on JKS format keystores. The JKS format is Java's standard "Java KeyStore" format, and is the format created by the keytool command-line utility. This tool is included in the JDK.
Each entry in a keystore is identified by an alias string. In order to avoid issues related to the case sensitivity of aliases, it is not recommended to use aliases that only differ in the use of small and capital letters.
To setup SAML support in Product 360 Supplier Portal we will need to start with creating the keystores for the different X509 certificates which will be needed for transport and message level security. If there is no SSL connection used within your Product 360 Supplier Portal yet, you will need to setup an initial keystore.
Create new certificate and keystore
To create a new JKS keystore from scratch, containing a single self-signed Certificate, execute the following command from a terminal command line:
keytool -genkey -alias [your alias] -keyalg RSA -keystore c:\path\to\your\desired\.keystore -keysize 2048This command will create a new file under the specified (-keystore parameter) location. You will also need to reflect this new location in the Product 360 tomcat server.xml file in the <Connector> element.
After executing this command, you will be prompted for the keystore password. You will also need to specify the keystore password in the server.xml file in the <Connector> element, as described in the Setup HTTPS/SSL.
<Connector port="9443" protocol="org.apache.coyote.http11.Http11NioProtocol" maxThreads="150" SSLEnabled="true" scheme="https" secure="true" clientAuth="false" sslProtocol="TLS" URIEncoding="UTF-8" keyAlias="tomcat" keypass="secret" keystoreFile="C:\PIM\SP\configuration\.keystore" keystorePass="heiler" />Next, you will be prompted for general information about this certificate, such as company, contact name, and so on. This information will be displayed to users who attempt to access a secure page in your application, so make sure that the information provided here matches with what they will expect.
Finally, you will be prompted for the key password, which is the specific password for this certificate (as opposed to any other certificates stored in the same keystore file). You need to specify the key password as well as the specified alias (-alias parameter) in the appropriate use case (HTTPS, SAML signing, SAML encryption) and their configuration files (e.g. server.xml, see above).
If everything was successful, you now have a keystore file with a certificate that can be used by your Product 360 Supplier Portal.
Import existing certificate into keystore
If you already have a CA certificate (=certificate obtained by a Certificate Authority), you can import it into your local keystore. First of all you have to import a so called Chain Certificate or Root Certificate into your keystore. After that you can proceed with importing your CA certificate.
Download a Chain Certificate from the Certificate Authority you obtained the certificate from.
For Verisign.com commercial certificates go to: http://www.verisign.com/support/install/intermediate.html
For Verisign.com trial certificates go to: http://www.verisign.com/support/verisign-intermediate-ca/Trial_Secure_Server_Root/index.html
For Trustcenter.de go to: http://www.trustcenter.de/certservices/cacerts/en/en.htm#server
For Thawte.com go to: http://www.thawte.com/certs/trustmap.html
Import the Chain Certificate into your keystore:
keytool -import -alias root -keystore c:\path\to\your\desired\.keystore -trustcacerts -file c:\path\to\your\trustcacertFileNameFinally you can import the CA certificate:
keytool -import -alias https -keystore c:\path\to\your\desired\.keystore -file c:\path\to\your\certificateFileNameExport existing certificate's public keys for metadata usage
For the SAML metadatas you will need the public keys in a readable format. In order to get them execute the following commands from command line:
keytool -export -file c:\mycertificate.cert -alias samlEncryptionCert -keystore c:\path\to\your\desired\.keystorekeytool -printcert -rfc -file c:\mycertificate.cert > c:\mycertificate.txtImport of Single Sign On relevant keystore entries from Product 360 Server
When activating Single Sign on for Portal administrators, please keep in mind that Product 360 Supplier Portal also authenticates against the same IdP which is used for Single Sign On.
Since Product 360 Supplier Portal does not have access to the keystore of Product 360 Server it is required to reuse those keystore entries from Product 360 Server in the keystore used for Product 360 Supplier Portal.
IdP Configuration
The concrete configuration steps for the IdP highly depend on the IdP implementation (like AD FS, OpenAM or Shibboleth). But in general the following points have to be considered here:
Create relying party(s) representing Product 360 Supplier Portal. For Supplier User SSO and Portal administrator SSO seperate relying parties are needed.
Define unique entityID(s), for Supplier User SSO and Portal adminstrator SSO, which you then use in the Product 360 Supplier Portal Configuration files (see chapter "Add SAML relevant configuration files")
The assertion consumer server location in the IdP corresponds to the assertionConsumerServiceLocation defined in SamlConfig.xml resp. SamlConfigPortalAdmin.xml plus /<applicationRoot>/saml/supplierSSO (for Supplier user SSO) resp. /<applicationRoot>/saml/supplierSSO/alias/portalAdmin (for Portal Administrator SSO),
e.g. for Supplier User SSO: https://pim.informatica.com/hsx/saml/supplierSSO
e.g. for Portal administrator SSO: https://pim.informatica.com/hsx/saml/supplierSSO/alias/portalAdmin
please keep in mind that the assertionConsumerServiceLocation in both config files SamlConfig.xml resp. SamlConfigPortalAdmin.xml is still only the base app url, e.g. https://pim.informatica.com/hsx.
Use or create public certificates and private keys appropriate to them used in the Product 360 Supplier Portal keystore.
For Portal Administrator SSO it is mandatory to use the same certificates for the Portal Administrator relying party of Product 360 Supplier Portal as used for the relying party of Product 360 Server (see chapter "Server Configuration" of the Installation and Configuration guide and there ".Copy of SAML Configuration 1 v8.1.1").
If you use
Active Directory Federation Services (AD FS), you might have to explicitely enable the usage of one certificate for multiple relying parties. Here you can find more information about this:
https://support.microsoft.com/en-us/help/2877424/update-enables-you-to-use-one-certificate-for-multiple-relying-party-trusts-in-an-ad-fs-2.1-farm
If possible, use the URL-provided SP metadata of Product 360 Supplier Portal, in order to retrieve SAML metadata information of Product 360 Supplier Portal (configuration, certificates etc...):
e.g. forSupplier User SSO: https://pim.informatica.com/hsx/saml/metadata
e.g. for Portal administrator SSO: https://pim.informatica.com/hsx/saml/metadata/alias/portalAdmin
As an alternative you can generate your metadata file with the following online tool: https://www.samltool.com/sp_metadata.php
Ensure that SAML assertions contain the mandatory SAML attributes defined in the chapter "SAML attributes". Optionally map also the not-mandatory SAML attributes.
Configuring SAML for Product 360 Supplier Portal
Activate SAML
Activate SAML for Product 360 Supplier Portal by adding the samlSSO spring profile to the JVM arguments list.
Windows
Call the configure script:
<SUPPLIER PORTAL INSTALLATION ROOT>/configure.batAdd samlSSO spring profile to the spring.profiles.active argument:
-Dspring.profiles.active=samlSSO
Linux
Edit your tomcat.sh shell script:
<SUPPLIER PORTAL INSTALLATION ROOT>/tomcat/bin/tomcat.shAdd the spring.profiles.active argument with the samlSSO profile included (see line 11 below as an example):
....exportCATALINA_OPTS="-Dcatalina.home=$CATALINA_HOME-Dcatalina.base=$CATALINA_HOME-Djava.endorsed.dirs=$CATALINA_HOME/endorsed-Djava.io.tmpdir=$CATALINA_HOME/temp-Djava.util.logging.manager=org.apache.juli.ClassLoaderLogManager-Djava.util.logging.config.file=$CATALINA_HOME/conf/logging.properties-Dhsx.configurationArea=$HSX_CONFIG_AREA-Dlogback.configurationFile=$HSX_CONFIG_AREA/logback.xml-Dspring.profiles.active=samlSSO-XX:MaxPermSize=512m".....
Configure keystore settings in configuration.properties
Edit your configuration.properties to conform to your created Keystore Settings:
################################################################################### Keystore settings# Defines the file location of the keystore to usekeystore.location = file:c:/temp/.keystore# Defines the password of the keystore defined via ${keystore.location} propertykeystore.password = heilerAdd SAML relevant configuration files
The current SAML implementation requires the IdP to deliver the username (without domain or email extension) in the NameID attribute.
After having https enabled and a keystore configured, the SamlConfig.xml resp. the SamlConfigPortalAdmin.xml have to be configured.
Both xml files have the same schema, but their values differ to reflect the different SSO scenarios for the different user roles.
If Single Sign On for Supplier users is desired, configuring the SamlConfig.xml in Supplier Portal file is mandatory.
If Single Sign On for Portal administrators is desired, configuring the SamlConfigPortalAdmin.xml file in Supplier Portal is mandatory. Here it is also mandatory to activate SSO in Product 360 Server and adjust the SamlConfig.xml file in Product 360 Server. See chapter "Server Configuration" of the Installation and Configuration guide and there ".Copy of SAML Configuration 1 v8.1.1".
SamlConfig.xml and SamlConfigPortalAdmin.xml
Create a new SamlConfig.xml respectively SamlConfigPortalAdmin.xml file in your configuration folder. Adapt it to fit to your needs, add the alias and password of your key and enable SAML.
If you want to use different keys for signing and encryption, you have to create multiple keys in the keystore. The following example assumes the use of the same keys for signing and encryption.
<samlConfig xmlns:xsi="http://www.w3.org/2001/XMLSchema-instance" xsi:noNamespaceSchemaLocation="SamlConfig.xsd"> <logoutUrl>https://idpserver/login.html</logoutUrl> <active>true</active> <idpMetadata> <metadataLocation forceAuthRequestsSigned="false" disregardSslCertificate="false">idp-metadata.xml</metadataLocation> </idpMetadata> <spMetadata> <assertionConsumerServiceLocation>https://supplierPortal.informatica.com</assertionConsumerServiceLocation> <signingKey password="secret" alias="localhost"/> <encryptionKey password="secret" alias="localhost"/> <entityId>spEntityID</entityId> <wantAssertionsSigned>true</wantAssertionsSigned> </spMetadata></samlConfig>Active
Defines whether SAML shall be used to initiate automated SAML Single Sign On if the user is not logged in yet.
|
Type |
Required |
Default |
|
Boolean |
yes |
false |
LogoutUrl
Defines the URL which the user will be redirected to after logout. Most typically this is an URL where a user may login to the application IdP initiated.
In case the element does not exist or the value is empty, the user is redirected to the default Product 360 Supplier Portal login page.
|
Type |
Required |
Default |
|
String or URL |
no |
Product 360 Supplier Portal login page |
DefaultUserGroup
This element is only meaningful for portal admin user SSO.
When a portal admin user has been authenticated via SAML and there is no matching user with the same name in Product 360 Server the user will be created on the fly. In this case it is mandatory to provide a default user group here, which the newly created portal admin user will be assigned to in Product 360 Server. A matching user group with this name has to exist in Product 360 Server.
A guideline which user rights requirements the user group for Portal Admin Users has to fulfill can be found in the chapter "Item Editor Configuration" in the general documentation "Supplier Portal Configuration".
|
Type |
Required |
Default |
|
String |
not required as per schema definition, but required in SamlConfigPortalAdmin.xml, in case Portal administrator SSO is active |
- |
SpMetadata
Required element defining all Service Provider relevant settings.
|
Sub element/Attribute |
Type |
Required |
Default |
Description |
entityId |
String |
yes |
- |
An entity ID is a globally unique name for a SAML entity, in this case a Service Provider (SP), in concrete the Supplier Portal.The entityId defined will be used for communication between IdP and SP. In case the SamlConfigPortalAdmin.xml is configured for Portal administrator SSO, then the entityId must differ from the entityId in the SamlConfig.xml of Product 360 Server and also from the entityId in the SamlConfig.xml of Product 360 Supplier Portal. |
assertionConsumerServiceLocation |
URL |
yes |
- |
Describes the endpoint to which SAML responses are sent by the IdP. Add only your Supplier Portal URL for example: https://localhost:9443/hsx. SAML relevant url path extensions are added by internal framework. |
signingKey |
- |
yes |
- |
The signing key is used to establish a trusted handshake between SP and IdP (authentication). In case the SamlConfigPortalAdmin.xml is configured for Portal administrator SSO, the same signing key as defined in the SamlConfig.xml in Product 360 Server must be used. |
alias |
String |
yes |
- |
Alias for the key used for signing. |
password |
String |
yes |
- |
Password for accessing the key defined by the alias. |
encryptionKey |
String |
yes |
- |
The encryption key is used to decrypt data received by IdP (data was encrypted by the SPs corresponding public key). In case the SamlConfigPortalAdmin.xml is configured for Portal administrator SSO, the same encyrption key as defined in the SamlConfig.xml in Product 360 Server must be used. |
alias |
String |
yes |
- |
Alias for the key used for signing. |
password |
String |
yes |
- |
Password for accessing the key defined by the alias. |
wantAssertionsSigned |
Boolean |
yes |
true |
Flag indicating (to the IdP) whether Product 360 Supplier Portal requires signed assertions. As signing of assertions is the recommended option, the default value is true. |
IdpMetadata
Required element defining all Identity Provider relevant settings.
|
Sub element/Attribute |
Type |
Required |
Default |
Description |
metadataLocation |
URL or relative path in configuration folder |
yes |
idp-metadata.xml |
Provides information about the IdP.
Please note that if an URL with https is used and "disregardSslCertificate" is set to false, you have to ensure that the certificate presented by the IdP to access the metadata is trusted by Product 360 Supplier Portal. This is done by adding the certificate to the Product 360 Supplier Portal keystore (see above how to add trusted certificates). |
In case the SamlConfigPortalAdmin.xml is configured for Portal administrator SSO, the same metadata location as defined in the SamlConfig.xml in Product 360 Server must be used.
disregardSslCertificate
Booleannofalse
Indicating whether the servers SSL certificate should always be accepted regardless of whether it is valid.
This flag is only relevant if the element value contains a https URL.
forceAuthRequestsSigned
Booleanno-
You can force your Product 360 Supplier Portal to add a signature to the AuthRequest by adding the forceAuthRequestsSigned flag to true.
In case the SamlConfigPortalAdmin.xml is configured for Portal administrator SSO, the same setting as defined in the SamlConfig.xml in Product 360 Server must be used.
Identity Provider metadata
The IdP metadata usually can be received over an URL provided by the IdP, which already contains all necessary information you need to know about your IdP. This includes certification information as well as endpoints etc.
The following URL fragments show the metadata URL patterns for the most common IdP implementations:
Microsoft AD FS
https://idpserver/FederationMetadata/2007-06/FederationMetadata.xmlShibboleth
https://idpserver/idp/shibbolethOpenAM
http://openamserver/openam/saml2/jsp/exportmetadata.jsp?entityid=entityIDPlace your idp-metadata.xml into the the Product 360 Supplier Portal configuration folder or the defined location within your SamlConfig.xml.
In case your IdP does not provide any metadata you need to generate the idp-metadata.xml file, the relevant information can be generated with the help of https://www.samltool.com/idp_metadata.php.
Within the metadata file you need to provide the URL to your IdPs SingleSignOnService location which accepts POST requests. (The example URL schema matches Shibboleth IdP.)
<?xml version="1.0"?><md:EntityDescriptor xmlns:md="urn:oasis:names:tc:SAML:2.0:metadata" entityID="idpEntityID"> <md:IDPSSODescriptor WantAuthnRequestsSigned="false" protocolSupportEnumeration="urn:oasis:names:tc:SAML:2.0:protocol"> <md:SingleSignOnService Binding="urn:oasis:names:tc:SAML:2.0:bindings:HTTP-POST" Location="https://idpserver/idp/profile/SAML2/POST/SSO" /> </md:IDPSSODescriptor></md:EntityDescriptor>Information security
Signing of AuthRequest (SP -> IdP)
If your IdP requires signed AuthRequest you need to enable this within Product 360 Supplier Portal. Therefor you have different options.
If your idp-metadata.xml is located in the local configuration folder of Supplier Portal, the WantAuthRequestsSigned parameter can be set to true:
<md:IDPSSODescriptor WantAuthnRequestsSigned="true" ...>If you use the URL based metadata provider for referencing the IdP metadata, you can force your Product 360 Supplier Portal to add a signature to the AuthRequest by adding the forceAuthRequestsSigned flag to true:
<?xml version="1.0" encoding="UTF-8"?><samlConfig xmlns:xsi="http://www.w3.org/2001/XMLSchema-instance" xsi:noNamespaceSchemaLocation="SamlConfig.xsd"> ... <idpMetadata> <metadataLocation forceAuthRequestsSigned="true">https://idpserver/metadata/idp-metadata.xml</metadataLocation> </idpMetadata> ...</samlConfig>Additionally you need to provide an X509 certificate in your keystore and refer to it over the alias and password attribute in the <signingKey> element within the spMetadata section of your SamlConfig.xml.
While the SAML metadata specification does not require the WantAuthRequestSigned parameter within the IDPSSODescriptor, some IdP Implementations might not set it explicitly, but nevertheless require a signature.
Signing of SAML Assertions (IdP -> SP)
The SAML metadata specification defines a parameter for requesting an IdP to sign the SAML Assertions. To enable Product 360 Supplier Portal to require signature validation on assertion level, you need to set the WantAssertionsSigned parameter in SamlConfig.xml (resp. SamlConfigPortalAdmin.xml) to true.
<samlConfig xmlns:xsi="http://www.w3.org/2001/XMLSchema-instance" xsi:noNamespaceSchemaLocation="SamlConfig.xsd"> ... <spMetadata> ... <wantAssertionsSigned>true</wantAssertionsSigned> ... </spMetadata></samlConfig>The signature of the assertion will be verified by Product 360 Supplier Portal against the public key of the X509 certificate within your idp-metadata.xml.
<?xml version="1.0"?><md:EntityDescriptor xmlns:md="urn:oasis:names:tc:SAML:2.0:metadata" entityID="idpEntityID"> <md:IDPSSODescriptor WantAuthnRequestsSigned="false" protocolSupportEnumeration="urn:oasis:names:tc:SAML:2.0:protocol"> ... <md:KeyDescriptor use="signing"> <ds:KeyInfo xmlns:ds="http://www.w3.org/2000/09/xmldsig#"> <ds:X509Data> <ds:X509Certificate>MIIDZzCCAk+gAwIBAgIEFuHJDDANBgkqhkiG9w0BAQsFADBkMQswCQYDVQQGEwJE RTEQMA4GA1UECBMHR2VybWFueTENMAsGA1UEBxMEU3RndDERMA8GA1UEChMIV2lu ZG93czcxDTALBgNVBAsTBFBPSU0xEjAQBgNVBAMTCWxvY2FsaG9zdDAeFw0xNTEw MDIxMjA2NDFaFw0xNjA5MjYxMjA2NDFaMGQxCzAJBgNVBAYTAkRFMRAwDgYDVQQI ... </ds:X509Certificate> </ds:X509Data> </ds:KeyInfo> </md:KeyDescriptor> ... </md:IDPSSODescriptor></md:EntityDescriptor>Encryption of SAML Assertions (IdP -> SP)
JCE issues with strong cryptographic algorithms
Due to import control restrictions of some countries, the version of the JCE policy files that are bundled in the Java Runtime Environment, or JRE(TM), 8 environment allow "strong" but limited cryptography to be used. This means, if your IdP uses a strong cryptographic algorithm like AES-256, you will need to replace your Java Runtime's JCE policy files. Otherwise you will run into errors in SAML message decryption, saying you are using an illegal key size.
See http://www.oracle.com/technetwork/java/javase/downloads/jce8-download-2133166.html for details.
If your IdP supports assertion level encryption and the encryption is active, you must provide your encryption public key X509 certificate within the metadata, that is provided to the IdP. The IdP will use this public key to encrypt the SAML assertion and only the owner of the corresponding private key can encrypt the assertion.
If Product 360 Supplier Portal receives an encrypted assertion, it will try to decrypt the assertion with the configured private key which is referenced by the <encryptionKey> in the SamlConfig.xml resp. SamlConfigPortalAdmin.xml.
<?xml version="1.0" encoding="UTF-8"?><samlConfig xmlns:xsi="http://www.w3.org/2001/XMLSchema-instance" xsi:noNamespaceSchemaLocation="SamlConfig.xsd"> ... <encryptionKey password="secret" alias="encryption"/> ...</samlConfig>Signing of Provider Metadata
It is possible to sign the metadata itself to verify its validity. For that a
<ds:Signature xmlns:ds="http://www.w3.org/2000/09/xmldsig#">element is used. It contains information typically needed for signatures like digest and signature value, used algorithm and a certificate.
See https://www.w3.org/TR/xmldsig-core2/ for further detailed information.
In order for Supplier Portal to verify the signature of IdP metatadata, the corresponding certificate has to be
provided by the IdP team
added to the cacerts file of the Java used by Supplier Portal.
keytool.exe -importcert -file"{cert}"-keystore"<JAVA_HOME>/jre/lib/security/cacerts"-alias"{alias}"-storepass {keystorePassword}
If during startup of the Supplier Portal server an error occurs while reading the metadata the cause can be outdated data inside the <ds:Signature> element or a wrong signature.
So ensure to get updated idp metadata and certificate from the IdP team.
In case the metadata is for an IdP and the IdP metadata is maintained as local metadata file on the Supplier Portal server, then the <ds:Signature> element provided by the IdP team can be completely commented out if not needed.
The local metadata file is unlikely to be tampered with and commenting out might comes in handy in case of signature deployment problems that could lead to errors mentioned before.
Automatic user and supplier creation on successful authentication
When the user authentication is successful, but the authenticated user and/or supplier does not exist yet in Product 360 Supplier Portal and/or Product 360 Server, a new user and/or supplier must be created with the credential information provided by the SAML response.
Automatic user/supplier creation differs for the particular user roles in Product 360 Supplier Portal.
Portal administrator
On successful authentication, a Portal administrator will be automatically created in Product 360 Supplier Portal and Product 360 Server if not yet existent. Therefor the unique user name from the SAML assertion subject element "NameID" is used. In Product 360 Server the user will be created as external user and will be assigned to the user group in Product 360 Server, which is defined by the element defaultUserGroup in the Supplier Portal's SamlConfigPortalAdmin.xml file.
The user creation also takes additional optional attributes from the Assertions in the SAML Authentication Response (see chapter "SAML attributes" for more details). The synchronization of the attributes will be done only for the creation process and they will not be updated in case if the user already exists.
Broker
Broker users are also able to logon via SAML. Precondition is an existing broker user in the Supplier Portal. New brokers have to be created manually by a Portal administrator.
Supplier user
There are two supplier creation modes "Automatic" and "Manual" creation.
In both cases the email address is mandatory. The user will be identified and created with the attribute value from the attribute "NameID", which must be a unique value to identify the user.
Automatic supplier creation
To activate the "Automatic" supplier creation you need to set the saml.supplierCreationStrategy to AUTOMATIC in your configuration.properties file.
################################################################################### Saml settings# Define the strategy for creating a supplier, if SAML authentication is used.## Options are AUTOMATIC, APPROVAL_WORKFLOW:# - AUTOMATIC: Supplier and supplier users will be created automatically.# - APPROVAL_WORKFLOW: Supplier and supplier users will be created with the registration workflow.saml.supplierCreationStrategy=AUTOMATICAutomatic creation means, that all the relevant user and supplier information is taken from the SAML assertion's attributes. When the supplier doesn't yet exist, the first successful login will create a new supplier named after the SAML attribute "SupplierName" (see chapter "SAML Attributes") and a new user with the SUPPLIER_ADMIN role and username named after the SAML attribute "emailaddress". Subsequent user authentication with different users but same supplier name will create additional users with role SUPPLIER_USER under the same supplier. The supplier creation also includes the creation of a default catalog for this supplier. The name of the newly created catalog can be influenced by the registrationCustomization.defaultCatalogName entry in the configuration.properties file:
################################################################################### Customization Settings# The pattern {SupplierName} is going to be replaced by the supplier's name on runtime.registrationCustomization.defaultCatalogName={SupplierName} - default CatalogManual supplier creation (approval workflow)
To activate the "Manual" supplier creation you need to set the saml.supplierCreationStrategy to PORTAL_WORKFLOW in your configuration.properties file.
################################################################################### Saml settings# Define the strategy for creating a supplier, if SAML authentication is used.## Options are AUTOMATIC, APPROVAL_WORKFLOW:# - AUTOMATIC: Supplier and supplier users will be created automatically.# - APPROVAL_WORKFLOW: Supplier and supplier users will be created with the registration workflow.saml.supplierCreationStrategy=APPROVAL_WORKFLOWManual creation means, while authentication needs to create an new supplier which does not exists yet, we will kick of an asynchronous approval workflow, which notifies an portal administrator to handle this registration manually and approve the present supplier (assign an appropriate supplier and catalog). The workflow will also take the SAML attributes like "SupplierName", "NameID", etc. into account to create and assign the appropriate supplier and user. The first user of a supplier will be assigned to the SUPPLIER_ADMIN role, while subsequent users of the same supplier will be assigned to the role SUPPLIER_USER.
SAML attributes
The user and supplier creation takes the following information from the assertions in the SAML authentication response.
Given name
|
Value of element attribute "name" in SAML Attribute |
http://schemas.xmlsoap.org/ws/2005/05/identity/claims/givenname |
|
Mapped to User data |
First name |
|
Mandatory |
No |
|
Comment |
An attribute may contain a list of values. |
Last name
|
Value of element attribute "name" in SAML attribute |
http://schemas.xmlsoap.org/ws/2005/05/identity/claims/surname |
|
Mapped to user data |
Last name |
|
Mandatory |
No |
|
Comment |
An attribute may contain a list of values. |
|
Value of element attribute "name" in SAML attribute |
http://schemas.xmlsoap.org/ws/2005/05/identity/claims/emailaddress |
|
Mapped to user data |
|
|
Mandatory |
No for Portal Admin Users Yes for Supplier Users |
|
Comment |
An attribute may contain a list of values. |
Supplier name
|
Value of element attribute "name" in SAML attribute |
|
|
Mapped to user data |
Supplier name |
|
Mandatory |
No for Portal Admin Users Yes for Supplier Users, if the user
|
|
Comment |
An attribute may contain a list of values. In case the supplier is newly created, then the supplier name will also be used as supplier identifier. |
Product 360 Supplier Portal Tomcat load balancing
For the usage of SAML in combination with a load balancer in a multi-server setup, there are some additional settings that have to be made on the load balancer and SAML configuration.
Supplier Portal configuration
In the load balancing scenario you need to use the same Encryption and Signing certificates for all your cluster instances, as well as the same entityId in each SamlConfig.xml resp. SamlConfigPortalAdmin.xml.
Your IdP will only see the load balancer as a communication peer - the Supplier Portal cluster instances behind it are hidden from the IdP.
All your Supplier Portal cluster instances need to act as one host for the IdP, so they all need to return the same assertionConsumerServiceLocation which redirects to the load balancer.
Modify all your Supplier Portal cluster instances SAMLConfig.xml resp. SamlConfigPortalAdmin.xml, when using an HTTP-based metadata provider:
Redirect to the load balancer:
<assertionConsumerServiceLocation>https://loadbalancerhost/hsx</assertionConsumerServiceLocation>Use the same entityID and same signing and encryption keys:
<signingKey password="heiler" alias="signing" /><encryptionKey password="heiler" alias="encryption" /><entityId>supplierPortalEntityID</entityId>Use the same keystore (signing, encryption keys) for all your Supplier Portal cluster instances.
Enable the additional spring profile named "loadBalancer", which tells the Supplier Portal to rewrite request url form IdP with the load balancer URL.
Windows
Call the configure script:
<SUPPLIER PORTAL INSTALLATION ROOT>/configure.batAdd additionally to the samlSSO the loadBalancer profile to spring.profiles.active argument:
-Dspring.profiles.active=samlSSO,loadBalancer
Linux
Edit your tomcat.sh shell script:
<SUPPLIER PORTAL INSTALLATION ROOT>/tomcat/bin/tomcat.shAdd additionally to the samlSSO the loadbalancer profile to spring.profiles.active argument (see line 11 below as an example):
....exportCATALINA_OPTS="-Dcatalina.home=$CATALINA_HOME-Dcatalina.base=$CATALINA_HOME-Djava.endorsed.dirs=$CATALINA_HOME/endorsed-Djava.io.tmpdir=$CATALINA_HOME/temp-Djava.util.logging.manager=org.apache.juli.ClassLoaderLogManager-Djava.util.logging.config.file=$CATALINA_HOME/conf/logging.properties-Dhsx.configurationArea=$HSX_CONFIG_AREA-Dlogback.configurationFile=$HSX_CONFIG_AREA/logback.xml-Dspring.profiles.active=samlSSO,loadBalancer-XX:MaxPermSize=512m".....
Edit your configuration.properties to modify your load balancer settings within in the Loadbalancer settings section.
################################################################################### Loadbalancer settings# Overrides request attributes with values of the load-balancer or reverse-proxy in front of the local application# The settings help to provide correct redirect URls and verify destination URLs during SAML processing. To activate the SAML loadbalancer # scenario you additionally need to add the 'loadBalancer' profile to the active spring profiles as an JVM argument.# override the request schema to http or httpsloadbalancer.schema = https# Context path must be set and start with a forward slashloadbalancer.contextPath = /hsx# override your server name loadbalancer.serverName = localhost# override the server portloadbalancer.port = 443IdP configuration
On IdP side, it is necessary to have the load balancer set as assertion consumer service for the Supplier Portal relying party. The assertion consumer service location URL is then the same as already adjusted in the assertionConsumerServiceLocation in the SamlConfig.xml. (see above).
When you are not using the URL-based metadata fetching mechanism on IdP side, you need to manually modify the assertion consumer service location to point to the load balancer location.
Load balancer configuration
The following steps need to be done either for Apache or IIS to handle load-balancing for the Supplier Portal.
Apache and Tomcat load balancing
Additionally to the default load balancing scenario for the Supplier Portal
Apache and Tomcat load balancing without SAML (see Supplier Portal Load Balancer Setup )
you need to do the following steps to handle SAML Authentication over your Apache load balancer (Tested with Apache httpd 2.4.18):
Edit the Apache configuration file httpd.conf: Activate the SSL module additionally to the other modules. (For the usage of SSL (https) in your load balancer (Apache), stick to the official Apache documentation)
LoadModule ssl_module modules/mod_ssl.soLoadModule proxy_connect_module modules/mod_proxy_connect.soLoadModule proxy_http_module modules/mod_proxy_http.soLoadModule proxy_module modules/mod_proxy.soLoadModule slotmem_shm_module modules/mod_slotmem_shm.soLoadModule lbmethod_byrequests_module modules/mod_lbmethod_byrequests.soLoadModule proxy_balancer_module modules/mod_proxy_balancer.so...<IfModule ssl_module>Include conf/extra/httpd-ssl.confSSLRandomSeed startup builtinSSLRandomSeed connect builtin</IfModule>...Check that the Listen statement listens to the appropriate SSL port (default 443):
Listen443There needs to be a virtual host matching your load balancer and the SSL port, the example below defines a virtual host supporting SSL and the additional directives necessary for SAML support:
Example virtual host configuration<VirtualHost*:443>ServerName loadBalancerSSLEngine onSSLCertificateFile "D:/certs/cert.pem"SSLCertificateKeyFile "D:/certs/pk.pem"SSLProxyEngine OnProxyPreserveHost On#optional for disabling certificate validation for testing purpose#SSLProxyVerify off#SSLProxyCheckPeerCN off#SSLProxyCheckPeerName off<Proxybalancer://supplierclusterSSL>BalancerMemberhttps://supplierPortalCluster1:9443route=server1BalancerMemberhttps://supplierPortalCluster2:9443route=server2ProxySet stickysession=JSESSIONID|jsessionid</Proxy>ProxyPass /hsxbalancer://supplierclusterSSL/hsxstickysession=JSESSIONID|jsessionidProxyPassReverse /hsxbalancer://supplierclusterSSL/hsxstickysession=JSESSIONID|jsessionid</VirtualHost>
The most important additional directives to be configured are listed below:
|
Directive |
Explanation |
SSLProxyEngine On |
Support SSL proxy |
ProxyPreserveHost On |
Preserve host name on proxy requests (required for successful validation of SAML requests/responses) |
SSLCertificate... |
Either SSL Certifcate or SSLCACertificates which where defined here, need to be trusted by the IDP to successfull handle an SAML authentication. |
Microsoft IIS and Tomcat load balancing
You need to do the following steps to handle SAML Authentication over your IIS load balancer (tested with IIS and ARR on windows 2012 R2 server).
Additionally to the default IIS load balancing settings you need to take care of the following settings for the Supplier Portal:
Install Application Request Routing and URL Rewriting on your IIS server.
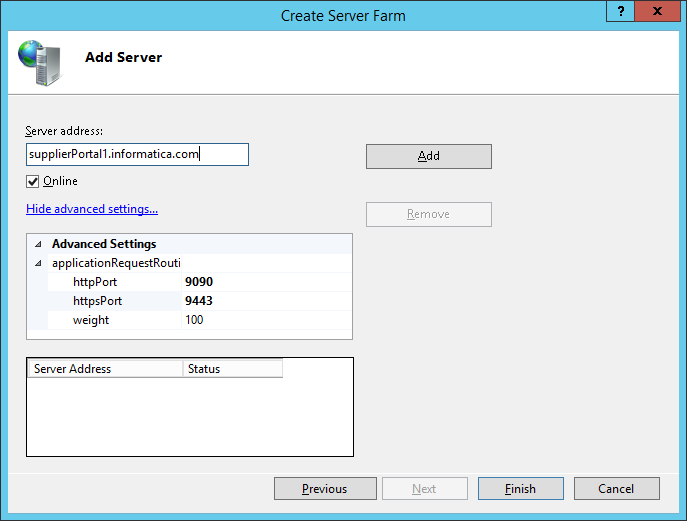
Create server farm with the appropriate Supplier Portal server instances (especially with their appropriate port settings, which are configured in your supplier portal configuration.properties file). Add HTTP and HTTPS ports of the supplier portal instance:
Confirm the automatic creation of URL rewrite rules or create them yourself in case you need any special rewrite rules:

 IMPORTANT: Activate Client Affinity on the Server Affinity Settings. This will map an client to an supplier portal instance, which will be needed for session stickiness:
Session lifetimes
There are a several token or session lifetimes that have to be considered when setting up SSO for Supplier Portal. There is no specific recommendation for the IdP side session lifetimes, but for the Product 360 applications the following requirements must be met:
PIM Server Access Token Lifetime > PIM Server Session Lifetime > PIM Supplier Portal Session Lifetime
A preconfigured Product 360 installation package already has the required default values, so typically nothing has to be done. But keep this requirement in mind in case it is desired to change any of the lifetimes.
|
Token name |
Default value |
Configurable |
Description |
|
PIM Server Access Token |
One day (86400 seconds) |
via preference in plugin_customization.ini: com.heiler.ppm.webservice.server/accessTokenExpirationTime.SAML |
Access Token created to make Service API calls on behalf of the Portal Admin user. |
|
PIM Server Session |
3 hours |
No |
Used when issuing a Rest Service API call with certain credentials. |
|
PIM Supplier Portal Session |
120 minutes |
in web.xml: |
Login token for the Supplier Portal application. |