Supplier Portal Configuration
In this manual, configuration settings for Product 360 - Supplier Portal are described.
Configuration Setup and General Description
All configuration properties can be defined in a single property file - the path of the configuration file is defined in the settings of your application server and is passed as argument to the Product 360 - Supplier Portal war file. The default is <P360_SUPPLIER_PORTAL_INSTALLATION_ROOT>/configuration directory in the Product 360 - Supplier Portal installation package.
Please keep in mind, that every 'properties' file (ending with *.properties) will be read and all contained properties will be imported (e.g. if you have a copy of the configuration.properties file which also ends with *.properties and its properties are changed, this could lead to unpredictable property values of the Product 360 - Supplier Portal system).
Therefore it is highly recommended to have only one properties file in the configuration folder.
The application has to be restarted on the application server in order to have changes take effect. It is recommended to always restart the Tomcat instead of restarting the webapp only. This is to avoid PermGen Out of Memory errors.
The configuration file itself contains properties following the standard "key: value" pattern.
If a configuration property is not set in the configuration properties file, the default value from the war file is taken.
Property Description
The following tables contain a complete list of all properties available in Product 360 - Supplier Portal, grouped by functionality. Each property is described with further explanation and examples.
If a property uses cron expressions, you can have a look at http://www.quartz-scheduler.org/documentation/quartz-1.x/tutorials/crontrigger for further information.
|
|
|
|
database.type |
Database type, see http://activiti.org/userguide/#supporteddatabases oracle mssql h2 Default: mssql |
|
database.name |
MSSQL: Name of the created database e.g. database.name=hsx_1.4 Oracle: SID or ServiceName of the Oracle DB e.g. database.name=XE If you want to use the ServiceName it is required to adjust the database.url.oracle parameter as well. Default: database.name=hsx_1.4 |
|
database.server |
Hostname of the database serverDefault: database.server=localhost |
|
database.port |
Port number of the database server Default: MSSQL defaul is database.port=1433 If you want to connect P360 Supplier Portal to an Oracle Database via TCPS, please refer to chapter "How to configure a secure database connection for Product 360 Supplier Portal" in the "Supplier Portal Configuration" manual. |
|
database.username |
User name for the database connection |
|
database.password |
Password for the database connection |
|
database.systemUser |
Only for ORACLE Database Installation. User which has the permission to create other users/tablespaces, is needed only to run the database e.g. database.systemUser=SYSTEM |
|
database.systemUser |
Only for ORACLE Database Installation. password for the above specified database system user |
|
database.data.dir |
Specifies the operating-system path to the database data file. |
|
database.data.size |
Oracle: Specify the size of the database data tablespace file in bytes. Use K, M, G, or T to specify the size in kilobytes, MSSQL:
Is the initial size of the database data file. The kilobyte (KB), megabyte (MB), gigabyte (GB), or terabyte (TB) suffixes can be used.
Default:
database.data.size=128MB |
|
database.data.size.growth |
Oracle:
specify the size in bytes of the next increment of disk space to be allocated automatically MSSQL: Specifies the growth increment of the databases data file. It is the amount of space added to the database data Default: database.data.size.growth=64MB |
|
database.log.dir |
Only for MSSQL Database Installation. Specifies the operating-system path to the database log file. |
|
database.log.size |
Only for MSSQL Database Installation.
Is the initial size of the database log file. The kilobyte (KB), megabyte (MB), gigabyte (GB), or terabyte (TB) Default: database.log.size=128MB |
|
database.log.size.growth |
Only for MSSQL Database Installation. Specifies the growth increment of the databases log file. It is the amount of space added to the database log file Default: database.log.size.growth=64MB |
|
database.temp.dir |
Only for ORACLE Database Installation. Specifies the operating-system path to the database temporary tablespace file. |
|
database.temp.size |
Only for ORACLE Database Installation. Specify the size of the database temporary tablespace file in bytes. Use K, M, G, or T to specify the size in kilobytes, Default: database.temp.size=128MB |
|
database.temp.size.growth |
Only for ORACLE Database Installation.
specify the size in bytes of the next increment of disk space to be allocated automatically when more extents are required. Default: database.temp.size.growth=64MB |
|
database.index.dir |
Only for ORACLE Database Installation. Specifies the operating-system path to the database index tablespace data file. |
|
database.index.size |
Only for ORACLE Database Installation. Specify the size of the database index tablespace data file in bytes. Use K, M, G, or T to specify the size in kilobytes, Default: database.data.size=128MB |
|
database.index.size.growth |
Only for ORACLE Database Installation.
specify the size in bytes of the next increment of disk space to be allocated automatically when more extents are required. Default: database.data.size.growth=64MB |
|
database.url |
JDBC database URL connection string. Generally starts with "jdbc:". Examples: jdbc:oracle:thin:@databaseServer:1521:sid jdbc:jtds:sqlserver://databaseServer:1433;DatabaseName=HENRI jdbc:h2:~/.hsp/database/dev;FILE_LOCK=NO´ Default: automatically set though database.type declaration. ${database.url.${database.type}} |
|
database.url.oracle |
If you want to use Oracle's ServiceName please adjust this setting to jdbc:oracle:thin:@${database.server}:${database.port}/${database.name} Default: jdbc:oracle:thin:@${database.server}:${database.port}:${database.name} |
|
database.driverClassName |
Java class name of the JDBC driver to use. See the JDBC driver manual for details. Supported values are: oracle.jdbc.driver.OracleDriver net.sourceforge.jtds.jdbc.Driver org.h2.Driver Default: automatically set though database.type declaration. database.driverClassName=${database.driverClassName.${database.type}} |
|
persistence.xmlLocation |
Location pointing to the Hibernate XML configuration file. Example: file:///C:/Informatica/SupplierPortal/configuration/persistence-mssql.xml Default: persistence.xmlLocation=file:///${hsx.configurationArea}/persistence-${database.type}.xml where ${hsx.configurationArea} and ${database.type} are variables which get replaced on runtime. |
|
persistence.unitName |
Name of the Hibernate persistence unit. Same as defined in persistence.xml. Example default Default: default |
|
Database connection pool settings |
Settings for the database connection pool. Typically, Supplier Portal doesn't execute expensive and long lasting operations on database level (import jobs are handled in Product 360 server). # Maximum number of active connections that can be allocated at the same time # The SQL query that will be used to validate connections from this pool before returning them to the caller. |
|
|
|
|
import.autoImportDefault |
Configures the default auto import policy.
Default: MANUAL_IMPORT |
|
import.automaticImportExecutionDelay |
Can be configured at supplier level to trigger an import after a successful test run. |
|
restartUploadWizardWhenFinished |
Configures what happens to suppliers once they finished uploading their data. |
|
|
|
|
hpm.restUri |
REST base URL to Product 360 - Server. For host name and web server port see your Product 360 - Server configuration. Example: http://hpmServer:1501/rest |
|
hpm.systemUserName |
Internal HPM user name that is used to trigger Product 360 - Server communication (e.g. start a test run) for supplier users. |
|
hpm.systemUserPassword |
Internal Product 360 - Server user password |
|
hpm.requestChunkSizeInBytes |
Chunk size in bytes for HTTP file transfer to Product 360 - Server. Example value: 1048576 Default: 1048576 |
|
hpm.webClientUri |
Base URL of the Product 360 - Web. Only used if permission.itemeditor is true. Example: http://hpmserver:1501/pim/webaccess |
|
hpm.embedded.itemeditor |
Global switch to enable/disable embedded item editor view. |
|
|
|
|
hmm.restUri |
REST base URL to Product 360 - Media Manager. |
|
hmm.requestChunkSizeInBytes |
Chunk size in bytes for HTTP file transfer to Product 360 - Media Manager. Example value: 1048576 Default: 1048576 |
|
|
|
|
mail.enabled |
Global switch to enable/disable mail functionality (boolean value). Default: false |
|
mail.protocol |
Mail protocol as passed to javax.mail. Example value: smtp Default: smtp |
|
mail.serverHost |
Mail server host. Example value: smtp.company.com |
|
mail.serverPort |
Mail server port. Example: 25 Default: 25 |
|
mail.senderAddressDefault |
The default sender address for mails. Will be used and displayed as mail sender. Has to follow a valid email pattern. admin@company.com |
|
mail.username |
User name if the mail server demands authentication. Can be empty otherwise. |
|
mail.password |
User password for mail server authentication. |
|
mail.templateFolderPath |
Directory which contains mail templates that overwrite the default templates provided within the war file. Default: file:///${hsx.configurationArea}/mailTemplates/ |
|
|
|
|
fileStorageService.rootDirectory |
Folder pointing to the root directory for all binary files. Default: C:/Informatica/PIM/SupplierPortal/filestorage |
|
|
These settings are only needed if no Product 360 - Media Manager is available. Instead, a file based file share adapter can be configured To enable the FileShare Adapter it is necessary to start Supplier Portal with the profile fileshareAdapter. See chapter 'Start Supplier Portal with additional Spring Profiles' below. |
|
fileshare.adapter.home.dir |
Path to the Digital Asset Management System (DAM) home folder where the media assets from Product 360 - Supplier Portal shall be sent to. Examples: C:/Informatica/PIM/SupplierPortal/DAM Default: C:/Informatica/PIM/SupplierPortal/DAM |
|
fileshare.adapter.supplier.subfolder |
Create a supplier sub-folder. If true, a sub-folder for the specific supplier (if not already existing) will be created in the DAM home folder. Default: true |
|
fileshare.adapter.catalog.subfolder |
Create a catalog sub-folder. If true, a sub-folder of the supplier folder (if not already existing) will be created. Default: true |
|
fileshare.adapter.unzip.images |
If true, the media archive will be unzipped before it is uploaded to the specific folder. Default: false |
|
fileshare.adapter.post.copy.step |
If defined, a batch script is called after the previous upload steps are completed. C:/Informatica/PIM/SupplierPortal/bin/MyBatchScript.bat |
|
|
These settings apply to both Product 360 - Supplier Portal and FileShareAdapter. |
|
mam.mapping.available |
Allows to hide the special MAM mapping to upload images. If false, this mapping will not be shown, Default: true |
|
mam.mapping.name |
The name of the MAM mapping. This is displayed to the supplier user in the first step of the upload process. Default: Media Assets |
|
mam.mapping.text |
A longer description text for the MAM mapping. Default: Use this mapping to provide your media files. |
|
mam.mapping.datasource.name |
The name of the first and only mapping datasource. Default: Zipped media files |
|
mam.mapping.datasource.text |
A longer description text for the mapping datasource. Default: A zip archive containing all media assets. |
|
|
|
|
i18n.defaultUiLocale |
Default locale of the system in JAVA syntax. This value is used as default for new users. Example value: en_US Default: en_US |
|
i18n.availableUiLocales |
List of all available locales in JAVA syntax, separated by comma. Example value: de_DE,en_US Default: de_DE,en_US |
|
i18n.defaultDataLocale |
The default language (locale) that is used for language specific data, f.e. catalog names. The format is ISO 3166-1 alpha-2. Default: en_US |
|
i18n.availableDataLocales |
The languages (locales) that are used for language specific data, f.e. all languages for which catalog names are maintained. The format is ISO 3166-1 alpha-2. Default: de_DE,en_US,fr_FR,ru_RU,nl_NL,sv_SE,fi_FI,es_ES,no_NO |
|
|
|
|
synchronizePendingImportRunJob.trigger.cronExpression |
Timer settings for the Product 360 - Server sync job following the cron expression pattern. 0,10,20,30,40,50 * * * * ? Default: # Run every 10 seconds 0,10,20,30,40,50 * * * * ? |
|
synchronizePendingImportRunJob.lockAtMost (since 8.1.1) |
Defines how long (in ms) the job lock should be kept in case the machine which obtained the lock died before releasing it. |
|
removeOldImportFiles.trigger.cronExpression |
Timer settings for the old import files cleanup job following the cron expression pattern. 0,10,20,30,40,50 * * * * ? Default: # run every night at 01:00 a.m. 0 0 1 * * ? |
|
removeOldImportFiles.lockAtMost (since 8.1.1) |
Defines how long (in ms) the job lock should be kept in case the machine which obtained the lock died before releasing it. |
|
removeOldImportFiles.productFiles.olderThan |
Configuration of the import files cleanup job Default: 365 |
|
removeOldImportFiles.mediaFiles.olderThan |
Configuration of the import files cleanup job Remove all media data import files older than x days Default: 365 |
|
|
|
|
hostAdressWithAppRoot |
An URL pointing to the root of the web app. This URL is used in mails that contain a link to the application. If you are using SAML authentication and the property: saml.supplierCreationStrategy is set to APPROVAL_WORKFLOW, Example value: http://hsxServer:9090/hsx/html/ Default: http://127.0.0.1:9090/hsx/html |
|
resetPasswordRedirectTargetUrl (since 8.1.0.01) |
Defines a destination URL to which a user gets redirected after reseting a password. It's an optional setting and in default its left EMPTY so that users get logged-in with the new password and redirected onto the Supplier Portal dashboard. In case of a customized "reset password" workflow this could be changed and the confirmation button after setting a new password redirects to a different URL. In this case the user is NOT logged in automatically and instead redirected to the configured URL. Example value: http://example:8080/landingPage.html Default: <empty> |
|
logoutUrl (since 8.1.0.02) |
Defines a destination URL to which a user gets redirected after logout and timeout. It's an optional setting and in default its left EMPTY. By default the user gets redirected to the Supplier Portal login page. It is possible to enable the logout URL only for specific user roles. The logout redirect is only active if the current user matches at least one of the defined user roles of property logoutUrlActiveRoles. If Supplier Portal runs with SAML active and user is also logged in via SAML authentication, this property is not used. The logoutUrl defined in the SamlConfig.xml is used for SAML logged in users. Example value: http://www.informatica.com Default: <empty> |
|
logoutUrlActiveRoles (since 8.1.0.02) |
Defines a list of user roles to enable the logout redirect defined in property logoutUrl. Property is only relevant if logoutUrl is defined and Supplier Portal runs without SAML. Example value: ROLE_SUPPLIER_USER,ROLE_SUPPLIER_ADMIN,ROLE_BROKER_USER,ROLE_PORTAL_ADMIN Default: ROLE_SUPPLIER_USER,ROLE_SUPPLIER_ADMIN,ROLE_BROKER_USER |
|
|
|
|
content.filter.enabled |
Global switch to enable/disable content filtering of all uploaded files. If enabled, the parameter content.filter.accepted.mime.types provides a white list of all accepted file types. Default: true |
|
content.filter.accepted.mime.type |
List of accepted mime types for content filtering of uploaded files. Default:application/xml, |
|
|
|
|
image.resize |
The width uploaded user avatar images will be resized to. Default: 256 |
|
image.resize.height |
The height uploaded user avatar images will be resized to. Default: 256 |
|
|
|
|
Default values for mail notifications of new feed messages Supplier: |
|
|
feednotification.supplier.USER_REQUEST |
Notify if new user message has been committed to the timeline that is visible for that supplier (boolean value). |
|
feednotification.supplier.USER_REGISTRATION |
Notify if a new user has registered for that supplier (boolean value). |
|
feednotification.supplier.TEST_RUN_COMPLETE |
Notify if a test run has been completed for that supplier (boolean value). |
|
feednotification.supplier.IMPORT_RUN_COMPLETE |
Notify if an import run has been completed for that supplier (boolean value). |
|
Default values for mail notifications of new feed messages |
|
|
feednotification.portal.USER_REQUEST |
Notify if a new user message has been committed to the timeline (boolean value). |
|
feednotification.portal.USER_REGISTRATION |
Notify if a new user has registered to the portal (boolean value). |
|
feednotification.portal.TEST_RUN_COMPLETE |
Notify if a test run has been completed (boolean value). |
|
feednotification.portal.IMPORT_RUN_COMPLETE |
Notify if an import run has been completed (boolean value). |
|
feedfilter.type |
Default filter settings for all users. |
|
|
|
|
remove.feeds.older.than |
Configuration of the timeline cleanup job. Remove all feeds older than x days. Example value for 1 year: 356 Default: 365 |
|
removeOlderFeedsJob.trigger.cronExpression |
Cron trigger when this job should run following the cron expression pattern. Example value for every night at 2 a.m.: 0 0 2 * * ? Default: # run every night at 02:00 a.m. 0 0 2 * * ? |
|
removeOlderFeedsJob.lockAtMost (since 8.1.1) |
Defines how long (in ms) the job lock should be kept in case the machine which obtained the lock died before releasing it. |
|
|
|
|
workflowCleanupJob.maxAgeInWeeks |
Configuration of the workflow cleanup job. This job removes old workflow instances that have not Example value for 2 weeks: 2 Default: 2 |
|
workflowCleanupJob.trigger.cronExpression |
Cron trigger when this job should run following the cron expression pattern. Example value to run every night at 3 a.m.: 0 0 3 * * ? Default: # run every night at 03:00 a.m. 0 0 2 * * ? |
|
workflowCleanupJob.lockAtMost (since 8.1.1) |
Defines how long (in ms) the job lock should be kept in case the machine which obtained the lock died before releasing it. |
|
workflowCleanupJob.processDefinitionKeys |
The workflow names that should be considered when searching for unfinished running workflow instances. <process id="invitation" name="invitation"> If you add new workflows and want unfinished instances to be cleaned up, add the workflow name to this list. Default: invitation,importIntoHpm |
|
|
|
|
global.permission.itemeditor |
Global switch to enable/disable item editor functionality. New suppliers (invited or registered) get this value as default. It can be changed in the UI for each supplier separately by the portal administrator.
Default: RESTRICTED |
|
global.permission.suppliertasks |
Global switch to enable/disable the access to tasks assigned to Supplier Organization from Supplier Portal.
Default: DISABLED |
|
permissions.portalAdmin |
Defines a comma separated list of permissions which will be assigned to the portal admin role on startup. Possible values are:
Default: INVITE_SUPPLIER,VIEW_IMPORT_MANAGER,MANAGE_SUPPLIER_USER,MANAGE_SUPPLIER,START_DRY_RUN,MANAGE_BROKER_USER To get more detailed information on how to handle role permissions see the Customize User Interface. |
|
permissions.supplierAdmin |
Defines a comma seperated list of permissions which will be assigned to the portal admin role on startup. Possible values are:
Default: START_DRY_RUN,MANAGE_SUPPLIER_USER To get more detailed information on how to handle role permissions see the Customize User Interface. |
|
permissions.broker |
Defines a list of permissions which will be assigned to the broker role on startup. Possible values are:
Default: START_DRY_RUN |
|
invitation.link.hash.validity.duration.hour |
Defines expiration time of (re)set password link in hours. Default is two hours. |
|
urlToken.maxAge |
For url token authentication. Defines the time slot after that an issued token expires. Default: 60 |
|
|
|
|
license.maximumActiveUsers |
The number of total active supplier users allowed. If more users are created (e.g. during invitation or registration), Default: 50 |
|
|
|
|
uiCustomizaton.file |
Defines the location ui customization file that allows to contribute new ui elements. Default: file:///${hsx.configurationArea}/uiCustomization.json |
|
dataModelCustomization.file |
Defines the location of the custom fields file that allows to contribute additional data model fields. Default: file:///${hsx.configurationArea}/dataModelCustomization.json |
|
registrationCustomization.defaultCatalogName |
Defines the name of the default catalog which is created while activating a supplier over Supplier Hub. Default: {SupplierName} - default Catalog |
|
workflows.customizationFolderPath |
Location of the folder containing customized workflows. Default: file:///${hsx.configurationArea}/workflows/ |
|
|
|
|
keystore.location |
Defines the file location of the keystore to use |
|
keystore.password |
Defines the password of the keystore defined via ${keystore.location} property |
|
wrongLogin.maxAttempts (since 8.2) |
Maximum number of wrong logins are that allowed per Supplier Portal server.If the number is reached the user gets locked for the duration specified by the property wrongLogin.lockDuration. This affects all types of users. After restarting the server the user is unlocked again.Please note that the login attempts are not synced between multiple Supplier Portal servers. If the login requests are distributed to different Supplier Portal servers it is possible that a the user gets locked after (wrongLogin.maxAttempts * number of servers) attempts. |
|
wrongLogin.lockDuration (since 8.2) |
Defines the duration in minutes how long the user gets locked after user reaches the defined maximum number of wrong logins (wrongLogin.maxAttempts). |
|
|
|
|
loadbalancer.schema |
Defines the file http transport protocol schema, either http or https |
|
loadbalancer.contextPath |
The supplier portal context path must be set and start with a forward slash Default: /hsx |
|
loadbalancer.serverName |
The load balancer server name |
|
loadbalancer.port |
The load balancer server port |
|
saml.supplierCreationStrategy |
Define the strategy how to create suppliers, if SAML authentication is used. Possible values are:
Default value is AUTOMATIC |
|
|
|
|
global.permission.ECCnetAccess (since 8.0.6.01) |
Global switch to enable/disable the ECCnet access from Supplier Portal.
Default: DISABLED |
|
atmosphere.enabled |
Can be used to turn push notifications off. Turn it off in case of issues in the network infrastructure, like proxies which are not deal with long running requests correctly. |
|
atmosphere.defaultTransport |
Default transport mode for server-side push notifications. Only applies, if atmosphere.enabled is true. |
|
atmosphere.fallbackTransport |
Fallback transport mode for server-side push notifications. Only applies, if atmosphere.enabled is true. |
|
|
|
|
job.threadPoolSize |
Set the Job Frameworks thread pool size. Default: 10 |
|
job.threadNamePrefix |
Set the job frameworks thread name prefix. Default: JobThread |
|
job.defaultLockAtMostFor |
Scheduled (like import job synchronization,etc) jobs get locked to be sure to execute them only once at the same time. Default: 15 |
|
|
|
|
cookie.secure |
Indicates to the browser whether the cookie should only be sent using a secure protocol, such as HTTPS. Default: false |
|
|
|
|
security.httpHeaders.xframeoptions |
If set, an X-Frame-Options response header will be set in all http responses to prevent the application being embedded in other sites for security reasons. Please note, that this will break existing functionality in Supplier 360. Details: https://tools.ietf.org/html/rfc7034 Supported values: DENY, SAMEORIGIN, ALLOW-FROM Default: <empty> |
|
security.httpHeaders.Strict-Transport-Security |
If set, an HTTP Strict Transport Security (HSTS) response header will be set in all http responses. HTTP Strict Transport Security defines a mechanism enabling web sites to declare themselves accessible only via secure connections and/or for users to Details: https://tools.ietf.org/html/rfc6797 Default: <empty> |
|
security.httpHeaders.Content-Security-Policy |
If set, an Content Security Policy (CSP) response HTTP header will be set in all http responses. Content Security Policy (CSP) is an added layer of security that helps to detect and mitigate certain types of attacks, including Cross Site Scripting (XSS) and data injection attacks. Please note, that using the 'script-src' directive will break existing functionality in Product 360 Supplier Portal. Details: https://tools.ietf.org/html/rfc7762 Default: <empty> |
|
security.httpHeaders.X-Content-Type-Options |
If set, an X-Content-Type-Options response HTTP header will be set in all http responses. The X-Content-Type-Options response HTTP header is a marker used by the server to indicate that the MIME types advertised in the Content-Type headers should not be changed and be followed. Details: https://developer.mozilla.org/en-US/docs/Web/HTTP/Headers/X-Content-Type-Options Supported values: nosniff Default: <empty> |
|
security.httpHeaders.X-XSS-Protection |
If set, an X-XSS-Protection response HTTP header will be set in all http responses. The HTTP X-XSS-Protection response header is a feature of Internet Explorer, Chrome and Safari that stops pages from loading when they detect reflected cross-site scripting (XSS) attacks. Details: https://developer.mozilla.org/en-US/docs/Web/HTTP/Headers/X-XSS-Protection Default: <empty> |
|
security.httpHeaders.Referrer-Policy |
If set, an referrer policy response HTTP header will be set in all http responses. Please note, that this could break existing functionality in Product 360 Supplier Portal. Details: https://www.w3.org/TR/referrer-policy/ Supported values: no-referrer, no-referrer-when-downgrade, same-origin, origin, strict-origin, origin-when-cross-origin, strict-origin-when-cross-origin, unsafe-url Default: <empty> |
Item Editor configuration
To use the Product 360 Web Item Editor functionality as Product 360 Supplier Portal Item Editor you need to setup special Product 360 Core users which handle the item editor scenario.
Follow the next subsections how to create these item editor users and appropriate user groups which include the minimal set of action rights that are needed for the Product 360 Supplier Portal Item Editor use case.
There are 3 different kinds of Product 360 Core Users for different Product 360 - Supplier Portal use cases:
Product 360 Supplier Portal System User
This system user is used to authenticate REST requests at Product 360 - Server which are triggered by suppliers (or Product 360 - Supplier Portal background jobs).
Product 360 Supplier Portal Administrator Users
For all actions in Product 360 - Supplier Portal triggered by a portal administrator, the corresponding credentials of the named user are used at the REST interface.
In order to have an easily maintainable system, it is recommended to create a user group (with the minimal set of common rights) and to assign it to the Product 360 Supplier Portal System User and Product 360 Supplier Portal Administrator Users.
If object rights are used for an object, please keep in mind that all other users implicitly don't have any rights for it. Thus if an object like a supplier, catalog or mapping shall be used in Product 360 - Supplier Portal context (e.g. for the supplier list, to perform uploads, etc.) the corresponding user group for Product 360 - Supplier Portal MUST have full object rights on that object as well.
Create required Users and Groups within Product 360 - Desktop
Create Product 360 Supplier Portal Administrator Users Group
The Product 360 Supplier Portal Users Group needs at least the following action rights to perform the basic actions in Supplier Portal web application:
Rights group
Permission
Mandatory
Note
Catalogs
Supplier catalogs, general access
Yes
General
Service Login
Yes
Company Management
Company Management, general access
Yes
Items
Items, general access
Yes
Items
Create Items
Yes
Items
Create Prices
Yes
Items
Create Prices (in the past)
Yes
Items
Delete item
Yes
Items
Delete prices
Yes
Items
Delete prices (in the past)
Yes
Items
Edit items
Yes
Items
Edit prices
Yes
Items
Edit prices (in the past)
Yes
Items
View prices
Yes
Import
Perform import
Yes
Suppliers
Supplier Management, general access
Yes
Suppliers
Edit suppliers
Yes
Structures
Structures, general access
Yes
Structure groups
Structure groups, general access
Yes
Users
Users, general access
Yes
Create Product 360 - Supplier Portal Item Editor User Group
If not already exists, create a new Product 360 Core User Group, which manages the Product 360 Supplier Portal Item Editor permission within Product 360 Core.
The Product 360 Supplier Portal Item Editor Users Group needs the following rights:
Action rights
Rights group
Permission
Mandatory
Note
Web Permissions
Log in (Web)
Yes
Web Permissions
Classify objects (Web)
No
Catalogs
Supplier catalogs, general access
Yes
Structures
Structures, general access
Yes
Structure groups
Structure groups, general access
Yes
Items
Items, general access
Yes
Items
Edit items
Yes
Item search
Item search management, general access
Yes
Products
Product management, general access
Yes
Products
Edit products
Yes
Variants
Variant management, general access
Yes
Only in 3 tier product paradigm to classify in structure tree.
Variants
Edit variants
Yes
Only in 3 tier product paradigm to classify in structure tree.
Tasks
Task management, general access
Yes
Tasks
Edit tasks
No
Document management
Document management, general access
No
Only for assignment and upload of media attachments
Document management
Create documents
No
Only for assignment and upload of media attachments
Document management
Create document categories
No
Only for assignment and upload of media attachments
Document management
Edit document categories
No
Only for assignment and upload of media attachments
Multimedia attachments
Add multimedia attachments
No
Only for assignment and upload of media attachments
Merge
Merge, general access
No
Merge
Perform Merge
No
Since Product 360 8.1 it is possible to allow the assignment of Supplier Organizations to tasks setup in the system.
The Supplier Organizations that are configured to work with tasks can access them similarly as their general catalog data by the item editor integration.
For this setup at least the field rights for the 'Tasks' data range have to be considered.Field rights
Data range
Field
Mandatory
Note
Tasks
Start date (visible + editable)
Yes
Tasks
Estimated start date (visible + editable)
Yes
Tasks
Anticipated completion on (visible + editable)
Yes
Tasks
Progress (visible + editable)
Yes
Tasks
Completed on (visible + editable)
Yes
Item
Item no. (visible + editable)
Yes
Item
GTIN (visible + editable)
Yes
Item
Status (visible + editable)
Yes
Field group "Header data"
Interface visibility
Category
Name
Mandatory
Note
Item
Select the tabs you want to show
optional
Following rights, permissions and interface visibility MUST be REVOKED:
Interface visibility
Category
Name
Note
Context
Context visibility: Entire Context selection area
Action rights
Rights group
Permission
Note
Flexible UI
Access Flexible UI
Flex UIs are not supported in context of supplier tasks.
Field rights
Data range
Field
Note
Tasks
Revoke all Tasks related field rights NOT listed as mandatory in the previous section.
All other Action rights, field rights and all Interface visibility of type 'Web List Definition' and 'Web Tab' not mentioned above have to be defined individuality depending on the scenario and requirements of the project and the individual use case scenarios.
Here detail tabs, displayed columns and other UI elements needed for the business use case are to be considered.
For example, if you want to display the short description in the item list view, you have to check the box in the field permissions of the short description for visible.
Create Product 360 - Supplier Portal Item Viewer User Group
If not already exists, create a new Product 360 Core User Group, which manages the Product 360 Supplier Portal Item Viewer permission within Product 360 Core.
The Product 360 Supplier Portal Item Viewer Users Group needs the following rights:
Action rights
Rights group
Permission
Mandatory
Note
Web Permissions
Log in (Web)
Yes
Catalogs
Supplier catalogs, general access
Yes
Structures
Structures, general access
Yes
Structure groups
Structure groups, general access
Yes
Items
Items, general access
Yes
Item search
Item search management, general access
Yes
Products
Product management, general access
Yes
Variants
Variant management, general access
Yes
Only in 3 tier product paradigm to classify in structure tree.
Since Product 360 8.1 it is possible to allow the assignment of Supplier Organizations to tasks setup in the system.
The Supplier Organizations that are configured to work with tasks can access them similarly as their general catalog data by the item editor integration.
For this setup at least the field rights for the 'Tasks' data range have to be considered.Field rights
Data range
Field
Mandatory
Note
Tasks
Start date (visible)
Yes
Tasks
Estimated start date (visible)
Yes
Tasks
Anticipated completion on (visible)
Yes
Tasks
Progress (visible)
Yes
Tasks
Completed on (visible)
Yes
Item
Item no. (visible)
Yes
Item
GTIN (visible)
Yes
Item
Status (visible)
Yes
Field group "Header data"
Interface visibility
Category
Name
Mandatory
Note
Item
Select the tabs you want to show
optional
Following permissions, rights and interface visibility MUST be REVOKED:
Interface visibility
Category
Name
Note
Context
Context visibility: Entire Context selection area
Action rights
Rights group
Permission
Note
Flexible UI
Access Flexible UI
Flex UIs are not supported in context of supplier tasks.
Field rights
Data range
Field
Note
Tasks
Revoke all Tasks related field rights NOT listed as mandatory in the previous section.
All other Action rights, field rights and all Interface visibility of type 'Web List Definition' and 'Web Tab' not mentioned above have to be defined individuality depending on the scenario and requirements of the project and the individual use case scenarios.
Here detail tabs, displayed columns and other UI elements needed for the business use case are to be considered.
For example, if you want to display the short description in the item list view, you have to check the box in the field permissions of the short description for visible.
Create Product 360 Supplier Portal System User
Fill in the user details, keep attention to the following details:
the Active checkbox must be checked.
Authentication mode has to be set to "Internal"
Add User to the created Product 360 Supplier Portal Administrators User Group
Add Product 360 Core Users as Product 360 Supplier Portal Administrator
Create a new Product 360 Core user or choose an existing Product 360 Core user to add to the Product 360 Supplier Portal Administrator User Group
Fill in the user details, keep attention to the following details:
the Active check-box must be checked.
Add User to the created Product 360 Supplier Portal Administrators User Group.
Setup Product 360 - Web Users and Permissions for Product 360 Supplier Portal Item Editor/Viewer
The item management within Product 360 - Supplier Portal uses the Product 360 - Web functionality. There a two different use cases within Product 360 - Supplier Portal to take into account.
Product 360 Supplier Portal Item Editor:
which means, suppliers are able to edit items within the Product 360 - Supplier Portal.
Product 360 Supplier Portal Item Viewer:
which means, suppliers don't have the ability to edit item data within the Product 360 - Supplier Portal.
Both users need to be referenced by the webfrontend.properties file of the Product 360 server in order to be used by the system as default system users for Item Editor access through the Supplier Portal.
Create Product 360 Supplier Portal Item Editor System User
Fill in the user details, keep attention to the following details:
the Active checkbox must be checked.
Authentication mode has to be set to "Internal"
Add User to the created Product 360 Supplier Portal Item Editor User Group.
Create Product 360 Supplier Portal Item Viewer System User
Fill in the user details, keep attention to the following details:
the Active checkbox must be checked.
Authentication mode has to be set to "Internal"
Add User to the created Product 360 Supplier Portal Item Viewer User Group
Setup Post Export Step
The Product 360 Supplier Portal Post Export Step introduces the possibility for Product 360 Core users to send selected catalog data to a specific
supplier within Product 360 Supplier Portal. For more information about the Product 360 Supplier Portal Post Export Step see this page.
To configure the communication from Product 360 - Server to Product 360 Supplier Portal just make sure you set the following properties in the
<P360_SERVER_INSTALLATION_ROOT>\server\configuration\HPM\hsx.properties
|
|
|
|
hsx.enabled |
Enable the Product 360 - Server-> Product 360 - Supplier Portal communication hsx.enabled=true |
|
hsx.server |
The Product 360 - Supplier Portal tomcat application server host name. e.g. hsx.server=localhost |
|
hsx.port |
Port of the Product 360 - Supplier Portal application. e.g. hsx.port=9090 |
|
hsx.login.name |
e.g. hsx.login.name=hsx |
|
hsx.login.password |
Password of the above portal administrator. e.g. hsx.login.password=pass |
|
hsx.rest.uri |
e.g. hsx.rest.uri=http://localhost:9090/hsx/rest/ |
Network setup
Setup HTTPS/SSL Security
When configuring Product 360 Supplier Portal for production usage, setting up https security is mandatory. Otherwise all user credentials will be send as plain text through the internet. There are two scenarios, how security can be ensured:
Setup a Reverse Proxy that transparently forwards all requests to the Supplier Portal server. SSL certificates are installed on the Reverse Proxy.
Install SSL certificates directly on Supplier Portal Server.
A combination of both is possible, too.
When using a proxy don't forget to configure the externally visible URLs in the configuration file. This URL is used in emails that are sent by the application.
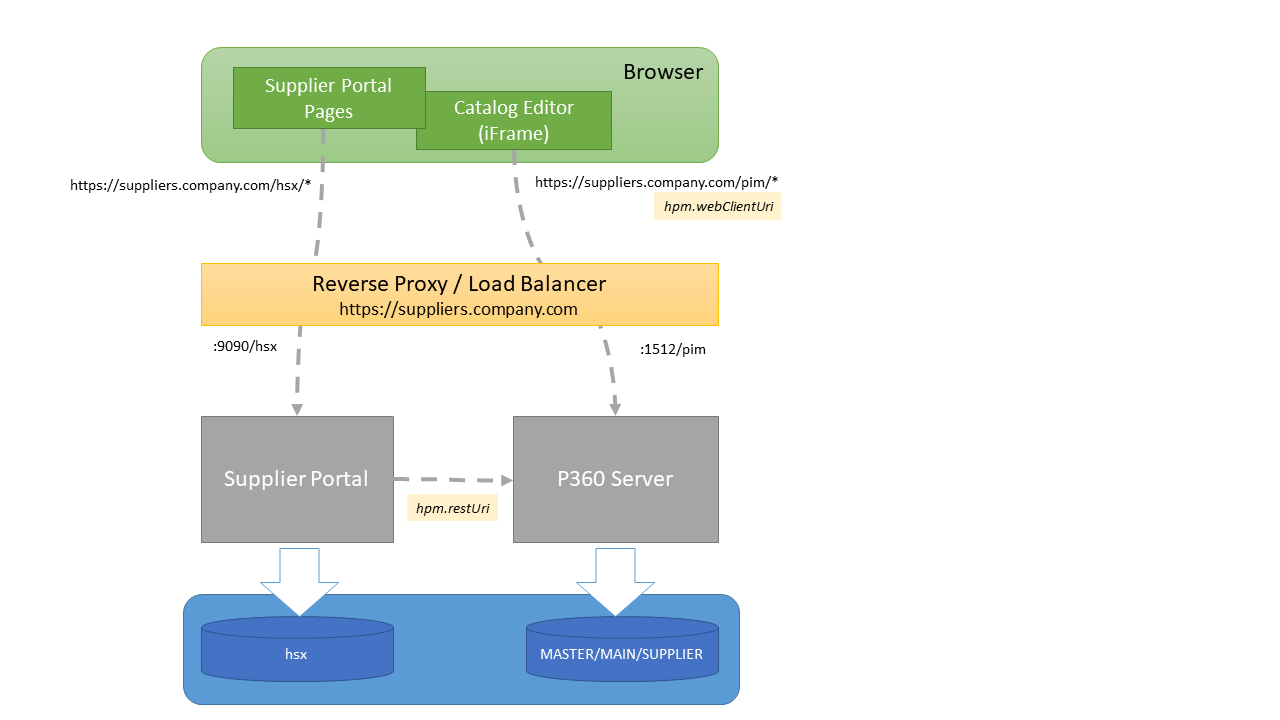
Setup a Reverse Proxy
A proxy may optionally be used to handle incoming requests from outside and redirect them into the internal network. Please note, that the Product 360 server needs to be configured at the same proxy to enable the catalog editor functionality (suppliers that can view/edit their catalog data directly). The catalog editor is a stripped down Product 360 web interface that is loaded within an iFrame at the supplier users Browser. The property hpm.webClientUri needs to be adjusted to point to the externally visible Product 360 Web UI endpoint.
Product 360 - Supplier Portal has been tested together with Apache HTTP 2.2. The Apache can be used as:
Reverse proxy that transparently handles incoming requests and redirects them into the internal network
Load balancer to distribute requests to multiple Product 360 - Supplier Portal installations
Storage for SSL certificates
Configuring a reverse proxy is as simple as open the httpd.conf of the Apache installation and add the following lines:
# Load the needed mod_proxy modulesLoadModule proxy_module modules/mod_proxy.soLoadModule proxy_connect_module modules/mod_proxy_connect.soLoadModule proxy_http_module modules/mod_proxy_http.so#Reverse Proxy Supplier PortalProxyPass /hsx http://<balancerhost>:<port>/hsxProxyPassReverse /hsx http://<balancerhost>:<balancerport>/hsxConfigure Support for X-Forward-* headers
When acting as a reverse proxy, Apache http and IIS automatically rewrite both incoming and outgoing urls. However, some Load Balancers like Amazon ELB cannot rewrite all outgoing urls (see https://aws.amazon.com/de/premiumsupport/knowledge-center/redirect-http-https-elb/). The latter is needed for redirecting the user to the main page after successful login (app server sends a 302 redirect to Browser). In this case, the url is returned as Location header in the http response. If the app server is accessed with http only and the proxy uses https the Browser will not redirect to a http address for security reasons.
In case the proxy sets X-Forward-* headers in the requests to the app-server (like Amazon ELB), Apache Tomcat needs to be configured to process these headers. This can be done by extending the server.xml configuration file and adding the RemoteIpValve. Example:
<Valve className="org.apache.catalina.valves.RemoteIpValve" internalProxies="192\.168\.1\.\d{1,3}" remoteIpHeader="x-forwarded-for" remoteIpProxiesHeader="x-forwarded-by" protocolHeader="x-forwarded-proto" />
Note: internalProxies is the IP address of the Load Balancer as seen by the Tomcat. The value should be in the form of a regular expression (in the syntax supported by java.util.regex)
More information: http://stackoverflow.com/questions/5741210/handling-x-forwarded-proto-in-java-apache-tomcat and https://tomcat.apache.org/tomcat-9.0-doc/api/org/apache/catalina/valves/RemoteIpValve.html .
Configure HTTP Strict-Transport-Security (HTST) response header
Please note, that a https setup is required to use HTTP Strict-Transport-Security (HTST) response header for Supplier Portal.
HTST needs to enabeld with in the <HSX_Install>\tomcat\conf\web.xml file.
Enable the following existing blocks and adjust to your needings.
... <filter> <filter-name>httpHeaderSecurity</filter-name> <filter-class>org.apache.catalina.filters.HttpHeaderSecurityFilter</filter-class> <init-param> <param-name>hstsMaxAgeSeconds</param-name> <param-value>31536000</param-value> </init-param> <async-supported>true</async-supported> </filter>...... <!-- The mapping for the HTTP header security Filter --> <filter-mapping> <filter-name>httpHeaderSecurity</filter-name> <url-pattern>/*</url-pattern> <dispatcher>REQUEST</dispatcher> </filter-mapping>...For general details about HTTP Strict-Transport-Security (HTST) please refer to https://developer.mozilla.org/en-US/docs/Web/HTTP/Headers/Strict-Transport-Security.
Configure CORS header
The CORS headers are realized by a default http filter of Apache Tomcat. CORS headers can be enabled in the <HSX_Install>\tomcat\conf\web.xml file.
The following sample adds a minimum configuration and define a valid origin with http://supplierportal:9090
Adjust this sample to your needings. For details please refer to https://tomcat.apache.org/tomcat-8.5-doc/config/filter.html#CORS_Filter.
... <filter> <filter-name>CorsFilter</filter-name> <filter-class>org.apache.catalina.filters.CorsFilter</filter-class> <init-param> <param-name>cors.allowed.origins</param-name> <param-value>http://supplierportal:9090</param-value> </init-param></filter>...... <filter-mapping> <filter-name>CorsFilter</filter-name> <url-pattern>/*</url-pattern></filter-mapping>...Set secure flag for cookies
Please note, that a https setup is required to set the secure flag for cookies in Supplier Portal.
The secure flag indicates to the browser the cookie should only be sent using a secure protocol, such as HTTPS.
The secure flag needs to enabled with in the <HSX_Install>\tomcat\conf\web.xml file.
Enable the following existing blocks and adjust to your needings.
... <!-- ==================== Default Session Configuration ================= --> <!-- You can set the default session timeout (in minutes) for all newly --> <!-- created sessions by modifying the value below. --> <session-config> <session-timeout>30</session-timeout> <cookie-config> <http-only>true</http-only> <secure>true</secure> </cookie-config> </session-config>...Additionally the secure flag needs to enabled with in the <HSX_Install>\configuration\configuration.properties file.
... ################################################################################### Cookie settings# Indicates to the browser whether the cookie should only be sent# using a secure protocol, such as HTTPS. # cookie.secure = true...Install SSL certificates on Supplier Portal Server directly
It is possible to setup SSL security on the Supplier Portal server, too. This is useful, if the connection between the Reverse Proxy and the Supplier Portal should be encrypted and secured, too. However, when using a Load Balancer, SSL certificates need to be installed and maintained on all machines.
To enable https, open the file <HSX_Install>\tomcat\conf\server.xml. Please find or extend a block similar to this one:
<Connector port="9443" protocol="org.apache.coyote.http11.Http11NioProtocol" SSLEnabled="true" maxThreads="150" scheme="https" secure="true" clientAuth="false" sslProtocol="TLS" URIEncoding="UTF-8" keystoreFile="C:/Users/sroeck/.keystore" keystorePass="password" />The specified port is the one that needs to be configured within the Reverse Proxy/Load Balancer. KeystoreFile is pointing to the location of the SSL certificate.
Please refer to the Tomcat documentation for more information about available options.
Setup Secure Connection between Supplier Portal and Product 360 Server
Customers sometimes require to not only encrypt http traffic between Browser and Application Server but also all internal http messages, e.g. between Supplier Portal and Product 360 Server. To implement this:
Configure https on the Product 360 Server as described here
Specify the configured https url within Supplier Portal, e.g.
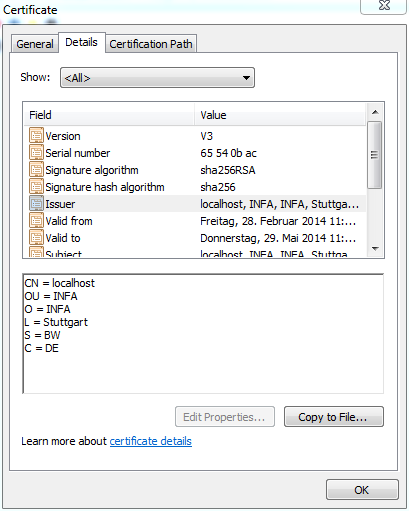
hpm.restUri=https://localhost:8443/restSome notes on testing with self-created SSL certificates:
SSL handshake checks the server's identity. If the identity cannot be matched, you'll receive the following exception: java.security.cert.CertificateException: No name matching. To fix this, make sure the certificate's CN matches the host name of the destination server, e.g. "localhost" (more info).
Self-Created certificates are not trusted by default. To make your local keystore trusted, start Supplier Portal with the following JVM arguments (more info):
-Djavax.net.ssl.trustStore=C:/Users/sroeck/.keystore// path to keystore-Djavax.net.ssl.trustStorePassword=password// keystore password
Multiserver Setup
Supplier Portal may be setup as a multiserver system including load balancing. There a some things to consider concerning configuration of the servers and the loadbalancers.
Property configuration
Also for all properties that define access to files make sure that the same folder is used across all servers. This is generally done by using shared folders and UNC path as in this example:
fileStorageService.rootDirectory=//ServerName/ShareFolderIf there is a load balancer setup for several Product 360 servers, the url for the service api requests and the web client have to be set to the loadbalancer as well:
hpm.restUri=http://pimLoadbalancer/resthpm.webClientUri=http://pimLoadbalancer/pim/webaccessSetup Reverse Proxy and Load Balancer
When using Apache HTTP 2.2 as reverse proxy and load balancer for multiserver scenarios, the httpd.conf file must be additonally modified for load balancing purposes:
# Load the needed mod_proxy modulesLoadModule proxy_module modules/mod_proxy.soLoadModule proxy_connect_module modules/mod_proxy_connect.soLoadModule proxy_http_module modules/mod_proxy_http.so<IfModule log_config_module>...LogFormat "%h %l %u %t %{ms}T \"%r\" %>s %b \"%{JSESSIONID}e\"" combined...</IfModule>#Reverse Proxy Supplier PortalProxyPass /hsx http://<balancerhost>:<port>/hsx stickysession=JSESSIONID|jsessionidProxyPassReverse /hsx http://<balancerhost>:<balancerport>/hsx stickysession=JSESSIONID|jsessionid#Use sticky sessions, identify servers via route parameter<Proxy balancer://<balancerhost>> BalancerMember http://<supplierserver1>:<server1port> route=server1 stickysession=JSESSIONID|jsessionid BalancerMember http://<supplierserver2>:<server2port> route=server2 stickysession=JSESSIONID|jsessionid ProxySet stickysession=JSESSIONID|jsessionid</Proxy>The route parameter also requires to setup the tomcat servers accordingly. That means using the same route id in the engine parameter in the server.xml of the respective Tomcat configuration.
This would be an example configuration for the server <supplierserver1>:
<Engine name="Catalina" defaultHost="localhost" jvmRoute="server1">For further information consider the Apache web server documentation.
<Valve className="org.apache.catalina.valves.RemoteIpValve" internalProxies="192.168.1.XXX" remoteIpHeader="x-forwarded-for" remoteIpProxiesHeader="x-forwarded-by" protocolHeader="x-forwarded-proto" />
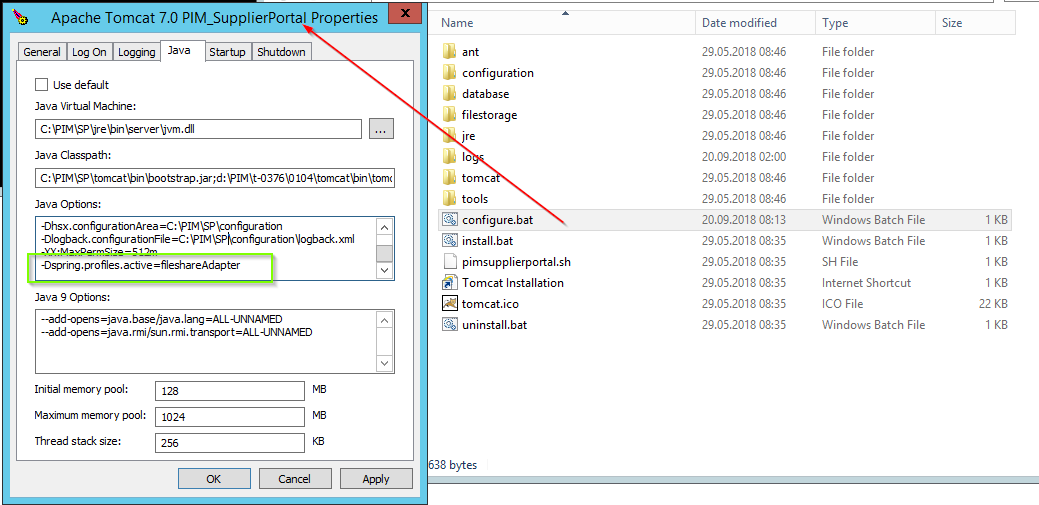
Start Supplier Portal with additional Spring Profiles
To enable some additional functions it is necessary to launch Supplier Portal with an additional Java Option. This Java Option is called -Dspring.profiles.active
It is necessary to add the Java Option to the Tomcat Properties. You can open the Tomcat Properties via the <P360_SUPPLIER_PORTAL_INSTALLATION_ROOT>/configure.bat.
The following sample enables the fileshare adapter.
If you want to use more than 1 profile please use comma (,) to separate them. Please be aware that the profiles are case sensitive.