Export post-processing
Introduction
This document is intended for consultants which want additional information about how export post-processing steps work resp. how additional steps can be implemented. The reader should be familiar with the export and its capabilities and functions.
This document contains more technical details which are useful for a deeper understanding of export post-processing. In addition it describes the interfaces needed for implementation of export post-processing steps and contains some useful hints on how to use these interfaces.
What is "Export post-processing"?
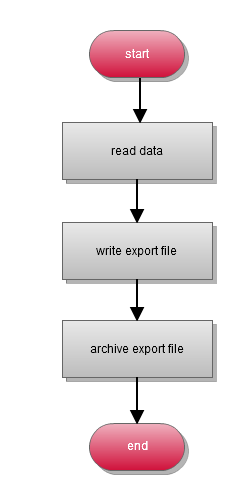
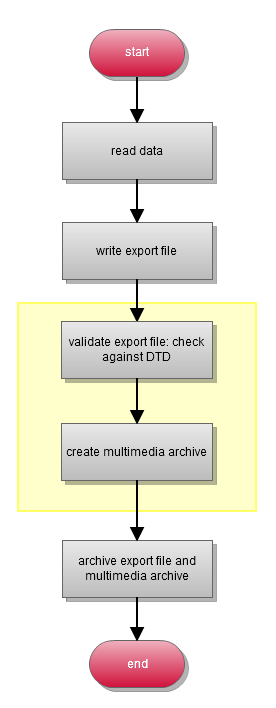
During a simple export process an export file is created and archived on the export file server. To create a BMEcat file, images have to be exported also, the BMEcat file should be checked prior to transmission. For this, a post processing of the export file is needed.
|
Example: simple export process |
Example: export with post-processing |
|
|
|
Export post-processing is always required if you need to manipulate the export files after the export process, or if external systems should be addressed. Export post steps can check the exported files, manipulate it, enrich it with other data, transfer it to third party systems, ... The generation of the image archive is run by an export post step.
You can assign any number of export post steps to an export process. These steps are executed in the given order.
Export post-processing step examples
There're some post steps that provide many of the required post-processing features. Some examples are listed below.
File attachment export
If you have to export file attachments, the export post step "File attachment export" is used. It requests multimedia file information from media asset provider using data gathered during the export, copies the multimedia archive in the export directory, logs file information.
Copy files
The two export post steps "Copy export file" and "Copy multimedia archive" copy the export files or the image archive into a specified directory.
Validate XML file(s)
To check XML files for validity, the export post step "Validate XML file(s)" is used. It performs validation against the DTD or XSD file specified in the generated file and logs all errors in the export log.
XSL transformation
If your exported XML file has to be transformed into another format or structure, you can use the "XSL Transformation" step. This post export step can execute a XSL transformation with a given XSL style sheet. The export file will be transformed and replaced by the new file(s).
Currently we support XSLT 2.0. Furthermore, the export file name is available in the XSL stylesheet as parameter "filename".
Add file
With this export post step, any additional file will be added. This file is archived with the export files, and can be downloaded later.
A typical use case is the preview generation. Using this export post step, you can add all the required static files like images, css files, etc.
Export post-processing steps in GUI
In the P360 desktop UI you can assign export post steps to export templates. Their order and names can be changed. The multiple assignment of an export post step can be useful, but it is important that every associated export post step has a unique, meaningful name. Allowed values for parameters are not only static values (suitable for parameter's data type) but also variables that have been defined for the template.
Export post steps log their results to the export log.
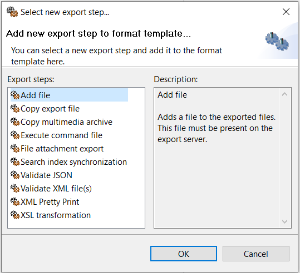
Add a new post step to the export template
You can choose the new post step from the list of available post steps.

Multiple post step assignment
If you assign a post step multiple time, unique names are created.
Use variable as post step parameter value
If there're variables defined in the export template having appropriate datatype, you can use it as post step parameter value
Export protocol
Each post step logs its result to the export protocol, the executing post step manager logs start and end time as well as duration of post-processing.
How does export post-processing work?
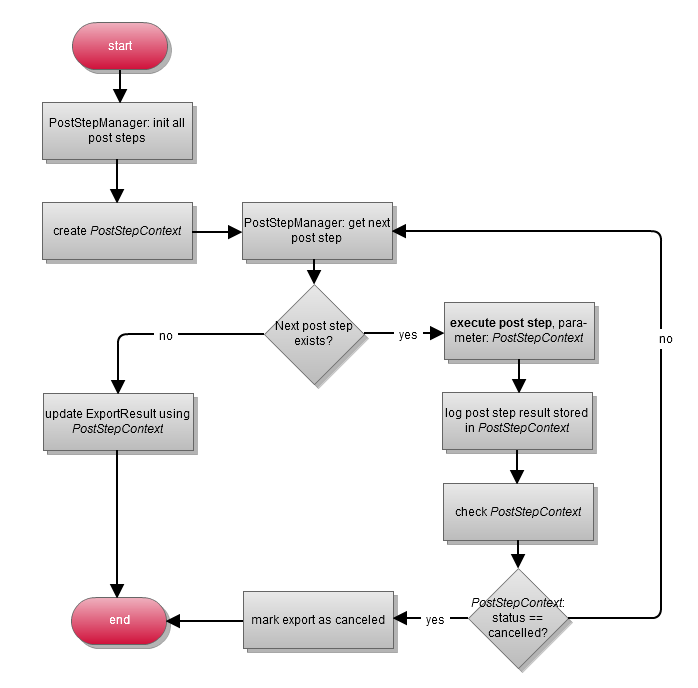
The following diagram shows how export post-processing works in general.

As you can see, export post-processing is the sequential execution of export post steps.
Which information is available?
During export post-processing there's an ExportPostStepContext object containing all information regarding
Export files
Multimedia archive
Exported objects of used dataproviders
Each post step can use this context information to get required data, e.g. export path, file encoding, ...
Which information should be changed/added?
Usually, each post step should log its result to the context object. The calling PostStepManager adds these results to the export protocol.
How to implement a post-processing step
In order to implement specific requirements, you usually need to create an additional post step.
Interfaces
The following interfaces are used in post export context. Most of it are used by the framework to provide context-specific data.
ExportPostStep
Each export post step has to implement this interface.
ExportPostStepFileManager
If an export post step works with a file as parameter it should implement this interface too. The framework provides several features that facilitate file handling for export post steps:
store files potentially needed as parameter values on the file server in an own directory
UI for basic file management (upload, download, delete)
Check file parameter values during validation
The following export post steps implement this interface:
Add file / Datei hinzufügen
Execute command file / Kommandodatei ausführen
Validate XML file(s) / XML-Datei(en) validieren
XML Pretty print
ExportPostStepContext, ExportAssortmentsData, ExportFilesData
Objects of these types are available in post step context. There's no need to implement one of these interfaces.
Implement a post-processing step
To implement an own post-processing step you have to implement the ExportPostStep interface and contribute it to the exportPostStep extension point.
Identifier, name, description
Each implementation needs a unique identifier, and a human-readable name and description.
Parameters, Init
The getParameters function returns the list of parameters ( ValueDescriptor) provided by the post step. Its similar to the parameters of dataproviders.
@Override public ValueDescriptor[] getParameters() { ValueDescriptor[] parameters = new ValueDescriptor[1]; parameters[ 0 ] = new ValueDescriptor() { @Override public String getIdentifier() { return PARAMETER1_IDENTIFIER; } @Override public String getName() { return Messages.getString( "ExecCommand.param1Name" ); //$NON-NLS-1$ } @Override public String getDescription() { return Messages.getString( "ExecCommand.param1Description" ); //$NON-NLS-1$ } @Override public DataType getDataType() { return DataTypeFactory.getInstance() .getDataType( DataType.DATATYPE_STRING ); } @Override public boolean isMandatory() { return true; } }; return parameters; }The init function is called with a list of parameter values corresponding to the list of parameters returned by the getParameters function. The init function should check the given parameter values and initialize the post step with these values. It should not execute time-consuming operations since its called by UI also to apply values and to adjust UI elements.
@Override public boolean init( ValueObject[] input ) throws IllegalArgumentException, CoreException { if ( input == null || input.length < 1 ) { throw new IllegalArgumentException(); } // check parameter if ( input[ 0 ].getValue() instanceof String && StringUtils.isNotEmpty( ( String ) input[ 0 ].getValue() ) ) { this.stringMember = ( String ) input[ 0 ].getValue(); } // do some checks if ( /* any condition */ ) { // ok this.member2 = anyValue; this.isInitialized = true; } else if ( /* another condition */ ) { this.isInitialized = false; } else { // error! String message = Messages.getString( "errorMessage" ); //$NON-NLS-1$ IStatus status = StatusUtils.createError( ExportCorePlugin.PLUGIN_ID, message, null ); throw new CoreException( status ); } return this.isInitialized; }Execute
This function implements the functionality executed during export post-processing. It should use the internal values set during initialization. Runtime information can be retrieved from the context.
Each post step should log its result. This can be accomplished in two ways:
Use a addResult function of the exportPostStepContext to log the single result
@Override public ExportPostStepContext execute( ExportPostStepContext context ) throws IOException { if ( !this.isInitialized ) { // log error result String message = Messages.getString( "CopyFile.errorStepNotInitialized" ); //$NON-NLS-1$ context.addResult( context.getActualPostStepName(), IStatus.ERROR, message ); return context; } if ( /* any condition */ ) { // ... do something // log "work done" String message = getMessageSingleFileCopied( sourceFile ); context.addResult( context.getActualPostStepName(), IStatus.INFO, message ); } else { // log "some exception" String message = Messages.getString( "CopyFile.protocolError.executionNotSuccessfull" ); //$NON-NLS-1$ context.addResult( context.getActualPostStepName(), IStatus.ERROR, message ); } return context; }Add information to the ProblemLog of the exportPostStepContext
If there're many information to be logged by a post step the ProblemLog has to be used to log the Problems
@Override public ExportPostStepContext execute( ExportPostStepContext context ) throws Exception { // ... ProblemLog problemLog = context.getProblemLog(); while( /* condition */ ) { IStatus status = executeAFunction(); ProblemParam problem = ProblemLogFactory.createProblem( status ); problemLog.log( problem ); } // ... }Contribution
Make the post step available for the system: contribute it to the exportPostStep extension point.
<plug-in> <extension point="com.heiler.ppm.export.core.exportPostStep"> <exportPostStep available="com.heiler.ppm.export.core.poststep.example.TestPostStepAvailableTester" class="com.heiler.ppm.export.core.poststep.example.TestPostStep" name="TestPostStep"> </exportPostStep> </extension></plug-in>Since HPM 7.0: It's possible to deactivate an export post step by the property available (see line 4). This class have to implement the interface ExportPostStepAvailabilityTester.
Export files and export post steps
Each export process stores the created data file(s) in a temporary local directory. Export post steps can access that directory and the data files.
At the very end, the files will be archived. That means all files will be transferred to the file server and deleted from the local temporary directory.
How can I access the exported files?
The list of exported files can be accessed by the ExportPostStepContext given to the execute function.
@Override public ExportPostStepContext execute( ExportPostStepContext context ) throws Exception { // ... String[] sourceFileNames = context.getExportFilesData() .getExportFileNames(); if ( sourceFileNames != null && sourceFileNames.length > 0 ) { String sourcePathName = context.getExportFilesData() .getExportPath(); File sourcePath = new File( sourcePathName ); File sourceFile = null; for ( String sourceFileName : sourceFileNames ) { sourceFile = new File( sourcePath, sourceFileName ); // ... copy the file to another location } String message = Messages.getString( "myPoststep.message.result" ); //$NON-NLS-1$ context.addResult( context.getActualPostStepName(), IStatus.INFO, message ); } else { String message = Messages.getString( "myPoststep.error.noFileInfo" ); //$NON-NLS-1$ context.addResult( context.getActualPostStepName(), IStatus.ERROR, message ); } return context; }How can I add/remove an export file?
You can add or remove an export file using the ExportPostStepContext.
@Override public ExportPostStepContext execute( ExportPostStepContext context ) throws Exception { // ... String[] sourceFileNames = context.getExportFilesData() .getExportFileNames(); if ( sourceFileNames != null && sourceFileNames.length > 0 ) { for ( String sourceFileName : sourceFileNames ) { if ( StringUtils.contains( sourceFileName, "marker_for_deletion" ) ) { // delete the export file context.getExportFilesData() .deleteExportFile( sourcePathName ); } } } // create another file // ... // add it to the list of export files context.getExportFilesData().addExportFile( fileName, fileEncoding ); // ... }
