SNMP Monitoring
SNMP Monitoring feature will be available with the version 8.0.03.00
Overview
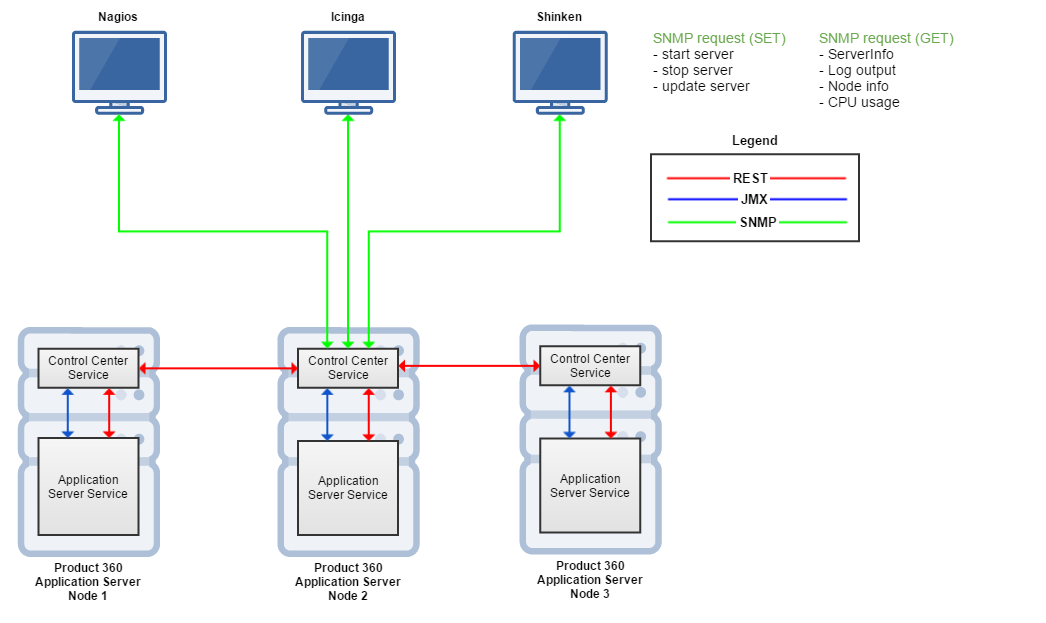
The SNMP capable tools like Icinga, Nagios or others connect to a single Control Center service on any of the application server nodes. All control center services are connected with each other and therefore are able to provide the monitoring data for all the nodes in the Product 360 application server cluster. Communication between the Control Center services is based on REST, the communication between the Control Center service and it's Application Server Service is done using REST and JMX.
Default Configurations
The system controller is delivered with standard configurations. Therefore these configurations can be modified in the configuration files.
Agent
By default an SNMP agent is accessible through the port 161.This port number is also used by the system controller as default configuration.
The system controller supports only communication using SNMP Version 3.
The default protocol used by the system controller for communication through SNMP is UPD.
Every notification is disabled by default except notification about the server status (STOPPED, STOPPING, and STARTING, RUNNING)
Network Management Station
The control center provides by default configurations for a single Network Management Station (single monitoring). This station includes an SNMP manager in order to send SNMP request and receives traps. The Network Management Station is located by default on the same host where the control center is running and traps are sent to the port 162.
The default configuration of the Network Management Station offers 2 default users: one with a lower security level for sending GET request and receiving traps and the second user with a higher security level for sending both SET (start, stop and update server) and GET request and receiving traps. One of theses users has the default username controller, the password controller and uses the authentication protocol SHA. The second user has the default username Administrator, the password Administrator and a private password Administrator and uses the authentication protocol SHA and the private protocol AES. To perform server remote control, users with this security level should be used.
Managed Objects
Every managed object is enabled by default to the managed server and a trap is send once by events like Server STOPPED, STOPPING, STARTING, RUNNING. If you want traps to be sent by other events you should configure it(see section managed objects configuration).
OID Configuration
The generated OID configuration of each managed object is the result of the concatenation of the enterprises OID, the server OID and the location of the objects value in the MIB. By default of the enterprise OID is .1.3.6.1.4.1.200. The part iso.org.dod.internet.private.enterprise(.1.3.6.1.4.1) is the prefix. The number 200 represents the default enterprise identifier. Please change the 200 to your standard enterprise Id. If you don't have an enterprise identifier, please visit the link http://pen.iana.org/pen/PenApplication.page to request a unique identifier for your enterprise. Each managed server has an OID. If your environment has 2 servers, the first will have the OID 1.1 and the second 1.2. If you already have an SNMP Agent in your system
that uses those OID, you should provide another to prevent MIB conflicts. (See section Modifying configuration)
Generation of OID configuration
At the program start a file is generated within the configuration directory with the name "oid-data-config.properties". At the first successful connection of the system controller with each managed server a section is added to this file with the generated managed object OIDs. This operation is done for all managed servers. The generated OID are also reachable through SNMP by requesting the server description using the description OID. Each server has its description OID. It is found in the oid-data-config.properties.
Server Remote Command
All servers can be started, stopped or updated remotely using the remote command OID. To perform this operation you need a user that has the security level 2. The default remote command OID is .1.3.6.1.4.1.200.3. This OID is generated and is found in the servers description. The value expected for this object is a string that uses the following syntax: command (start/stop/update) +","+SERVER IDENTIFIER (e.g. pim-server1) +","+MODE (kill, grace). The argument MODE is needed just to stop the operation. All given arguments should be separated by a semicolon. Errors in system controller during remote command operations are notified to Network Management Stations via traps. The trap OID of this error is a concatenation of the generated remote command OID and the sub string .1. If the generated remote command OID is .1.3.6.1.4.1.200.3 the trap error Id will be .1.3.6.1.4.1.200.3.1. This information is useful for reading traps.
Trap
The trap is generated to announce an event. The generated traps by the Control Center uses a structure. It is a list of information about the event. The first element of this list represents the affected server and the second describes the event. The third element is the event level (Critical, Warning, and Ok) and the last the system time. The event level is used for management application to represent services with different colors (red, yellow and green) depending on the event level. For Monitoring Applications like Icinga or Nagios this level is represented by digits from 0 to 2 with following meanings:
0 = OK
1 = Warning
2 = Critical
Let us take an example. If at 7:55 the system detects that the server identified by PIM-SERVER1 is stopped. It will send the Trap with following information [PIM-SERVER1, STOPPED, 2, 7:55]. If 5 minutes after the stop the system detects that this is running (maybe the system administrator has start it after the event), a trap will be sent with following information [PIM-SERVER1, RUNNING, 0, 8:00]. Every trap has an OID. But all trap for the same event has the same OID. For each managed object the generated OID is used both for querying objects value via SNMP and for sending traps.
E.g. if the generated OID for the managed object serverStatus of the server identified by PIM-SERVER1 is .1.3.6.1.4.1.200.1.1.2.1 and the notification is enabled, all Trap notifications about this object will be sent using the same OID. The information about the structure of the trap sent and its OID are useful because you will need these for translation the trap and submit the result to the Network Management Station via passive check.
Enable SNMP
To enable SNMP, go to the configuration directory and find the file NetworkConfig.xml.
Edit this file as follow:
Go to the xml element "snmpdataconfigfile"
Remove the line which says : "<!-- settings for snmp"
Also remove the line below the xml element "snmp", which says "-->"
Save the file
Now find the ClusterixConfig.xml in the same directory and edit that file as follow:
Again remove the line that says: "<!-- settings for snmp"
Also remove the line at the bottom below the xml element "NetworkManagementSystems" that says " -->"
Save the file and restart the application
Run application
After successful start of the Application, you should see the message Agent access x.x.x.x:yyy where x.x.x.x is the IP address of the host on which the agent is running and yyy the port number on which it is reachable. If this message appears, the system controller
is ready for monitoring.
Modifying configurations
Change the agent's port
Use the VM argument -Dclusterix.snmp.port to change the agent's port. E.g. to set the port to 165 set the argument as follows -Dclusterix.snmp.port=165.
Network Management Station
Change the Trap receiver's port
Go to the configuration directory
Find the file ClusterixConfig.xml
Open it and go to the XML- root tag NetworkManagementSystems ->Inside this tag you will see a XML-tag with the name NetworkManagementSystem
Find his XML- element <port>162</port>
Change 162 to the port number you wish to assign.
Save the file and restart the application
Change the host address
Go to the configuration directory
Find the file ClusterixConfig.xml
Open it and go to the XML- root tag NetworkManagementSystems.
Inside this tag you will see a XML- tag with the name NetworkManagementSystem
Find his XML- element <host>127.0.0.1</host>
Change 127.0.0.1 to the IP address of your management station.
Save the file and restart the application.
Change user credentials
Go to the configuration directory
Find the file ClusterixConfig.xml
Open it and go to the your Network Management System definition
Go to the root element Users
Inside this tag you will see a XML- tag with the name User
Go to a user definition and edit his properties:
you want to change the username, find the XML-Element <name>admin</name>
Change admin to a preferred username.
If you want to change the password, find the XML-Element In the XML-Element <password>Informatica</password> Change Informatica to a preferred password. If you want to change the private password, and the XML element In the XML element <privatePassword>Informatica</ privatePassword> Change Informatica to your preferred private password.
At the moment, the private password is encrypted using the Advanced Encryption Standard with a 128 bit key.
Add a user to the Network Management System configuration
Go to the configuration directory
Find the file ClusterixConfig.xml
Open it and go to the your Network Management System definition Go to the XML- root Users
Inside this tag you should find a XML- tag with the name User
Duplicate a user definition and edit the properties as explained above. Leave the XML element privatePassword, and privateProtocol blank (<privatePassword> </ privatePassword>, <privateProtocol></ privateProtocol>) if the user you want to add belongs to the security level 1.
Save the file and restart the application.
Remove a user from the Network Management System configuration
Go to the configuration directory
Find the file ClusterixConfig.xml
Open it and go to the your Network Management System definition
Go to the XML - root Users
Inside this tags you will see a XML- tag with the name User
Remove the tag of the user you want to delete to your system.
Save the file and restart the application. Please note that the SNMP Agent needs at least one user with security level 2 to start.
Change OID Configuration
Server OID
1. Go to the configuration directory
2. Find the file NetworkConfig.xml
3. This file contains the Network configuration of all managed server. Each managed server is represented by an XML-tag node.
4. Find the node of the server which the configuration should be edited.
5. Find the XML-Element <snmp oid=1.1>
6. Replace 1.1 with the Id you want. Please note that the Id consists of separated numbers.
7. Save the file and restart the application.
Enterprise OID
The enterprise OID entry is found in the Object configuration file of each server.
Go to the configuration directory
Find the file NetworkConfig.xml .This file contains the Network configuration of all managed server. Each managed server is represented by the XML-tag node.
Find the node-definition of the server which the configuration should be edited.
Find the XML-Element <snmpdataconfigfile name="file name">
Check the assigned file name and remember it
Look this file in the configuration directory and open it
Go to the XML-tag general
Edit the XML-element enterprise(change the last number of the property id (200) to your enterprise ID)
Save the file and restart the application.
Modifying Managed Object configuration
Go to the configuration directory and find the file NetworkConfig.xml
This file contains the Network configuration of all managed server. Each managed server is represented by the xml-tag node.
Find the node-definition of the server for which configurations are to be edited.
Find the xml-Element <snmpdataconfigfile name=file name>
Check the assigned file name and remember it
Look for the file in the configurations directory and open it
Go to the XML-tag rest for rest managed objects and jmx for jmx managed objects:
Enable/disable a managed object
Check the property append
Set the value of this property to true to enable the object or false to disable the object.
Attention: Enabling/disabling objects is a critical operation because it affects all your monitoring system configurations (your management application and the system controller) if you already had a running monitoring solution. After this operation all or some managed objects become a new OID depending on their position in the oid-config-file. Please compare the new generated OID of each managed object with the OID you previously configured in your monitoring application to be sure that it is the same. If it is not the same use the new generated OID of the object. Otherwise you can have the following problems/errors in your monitoring application:
Some OID are not found (If you disabled managed objects)
Some OID are found but their value belong to another objects.
Enable/disable notification for a managed object
This works if the property append is set to true
Check the property notification_enabled
Set the value of this property to true to enable notification or false to disable the notification.
Customizing notification for a managed object
This works if the properties append and notification are set to true.
If the property type equals to String, assign a value to the property pattern. This represents the value you expected for this managed object. If another value is found over the time, a Trap-notification will be send to all register Network Management Station (see section Network Management Station above) with the actual value of the object.
If the value of the property type different to String (e.g. int or long).Please assign a range to the property range This represents the possible values you expect for the managed object over the time.
Note: if a value is found over the time, that do no belong to the range, a notification will be send register Network Management Stations with the actual value of the object. To give the range follow the syntax [+min value+.. +max value +]. The bracket [ ] means that the minimal and the maximal value belong to the range. Attention: if you have a syntax error during range configuration or the value you assigned to min is greater than the value of max the system controller will start but the configured notification will be ignored. Please check the log file for error description.
Add notification to managed object
You can add notifications to every managed object you want. But be sure that append is set to true.
To add a notification, add the following property to the managed object: notification_enabled=true.
If this object has the type String adds the property pattern=The expected value of this object otherwise adds the property rang= [min...max] (see section customizing notification for a managed object above).
Advanced configuration
Multiple Monitoring
The standard configuration allows the system controller to send trap just to one Network Management Station. To enabled multiple monitoring do the following:
Go to the configuration directory
Find the file ClusterixConfig.xml
Open it and go to the XML- root NetworkManagementSystems .In this tag you will see a XML- tag with the name NetworkManagementSystem
Duplicate this tag and edit like explained above (see section Network Management Station).
Save the file and restart the application. Every Trap will be sent to all Network Management Stations listed in this configuration file. If a trap is send to a Network Management Station and a acknowledge is not received, the trap will be send twice. If the second trap is lost, an error will be log.
Add a new Managed objects
This works just for the JMX communication.
Go to the configuration directory and find the file NetworkConfig.xml. This file contains the Network configuration of all managed server. Each managed server is represented by the xml-tag node.
Find the node-definition of the server which the configuration should be edited.
Find the xml element <snmpdataconfigfile name=file name>
Look the assigned file name and remember it
Look this file in the configuration directory and open it
Go to the XML-tag JMX
Duplicate a JMX-Object definition
Edit as follow
Object name: set the MBean Object Name. You can use the JConsole Widows (see http://docs.oracle.com/javase/tutorial/jmx/remote/jconsole.html) to have the right name of the MBean Object.
Element name: set the attribute name of the MBean Object to query.
Set the type of this attribute as showed in the JConsole Windows. Note: If the type is String you cannot have the graphic visualization of this object in your Network Management Station. It is done just for performance data.
Set access to read_only or read_write depending on your choice. Note that if you set the access type to read_write the value of this object can be change via SNMP-Set request. And you should need specials rights for this.
Set append to true to enable the managed object.
Add notification as explained in the section "Add notification" above if you need any
Save the file and restart the application.
Note: If the given MBean object name of the managed object that you try to add or the MBean attribute you query does not exists or is not correctly spelled, the managed object will be ignored and an error will be log.
Add/remove managed Server
Go to the configuration directory and find the file NetworkConfig.xml. This file contains the Network configuration of all managed server. Each managed server is represented by a xml-tag node.
Duplicate a node-definition and edit it as follow:
Go to his xml element JMX and give the port number of this server
Go to his XML-element OID and give an SNMP OID to this server (e.g 1.3)
Go to the XML-element snmpdataconfigfile and replace the file name with snmp-data3.xml
Duplicate a snmp-data-denition file and rename it (e.g snmp-data3.xml)
Configure managed objects as explained above
Save the file and restart the application.
A new managed server is added to your system controller and you can query the value of the managed object and receiving traps using the generated OIDs.