Adding a Link Between Activities
Add a link between two activities to control the order of execution of the activities. You can add a link with a transition condition or without one.
For more information, see:
Adding a Link with no Transition
Add a simple link from a source activity to a target activity to require the source to finish successfully before the target executes.
- 1. Ensure that two activities are on the Process Editor canvas that you want to link.
- 2. Select the source activity and then use Shift + selectto select the target activity.
- 3. Select the Link toolbar button or select Link Activities from the right mouse menu of one of the activities.
- 4. Process Developer names the link L1. You can double-click the link to open the Transition Builder dialog.
- 5. In the Properties view, you can rename the link, if desired.
Tip: You can use the BPMN Edge tool in the Palette, if desired. To do so, select the tool and then select the source activity. Connect the link to the target, as shown on the left in the illustration. Select the Select tool to turn off the Edge tool.
Adding a Link with a Transition Condition
Add a link with a transition condition based on the completion of the source activity. The condition must evaluate to a Boolean true before the target activity can begin.
- 1. Complete the steps for drawing a link, described in Adding a Link with no Transition.
- 2. Select a link and double-click it. Alternately, in the Properties view, click the Dialog (...) Button next to Transition Condition.
- 3. Build an XPath (or other language) expression, as described in Using the Expression Builder.
The following illustration shows an example of condition that prevents an activity from executing if an amount is too large.
In this example, the parameters refer to a BPEL process variable holding data from a WSDL message. For more information, see
Variables.
Linking Activities
You can link any two activities; however, you should use a gateway to clarify the intended purpose of linking. In the following illustration, the construct on the left shows using a gateway and adding a label to describe the transition condition on the link.
On the right side, is a receive linked to two activities. Note that a transition condition is indicated by a mini-gateway diamond; however, you can add a label here as well.
Using the Add Link Dialog
Select the target activity for the link and add a transition condition, if desired.
To add a link between two activities you can do one of the following:
- •Select a source activity and then select a target activity. Select the Link toolbar button to create the link. You can also select multiple activities and the links are created in the selection order. See Adding a Link Between Activities for details.
- •Use the Link tool in the Palette. See the tip in Adding a Link Between Activities for details.
- •Use the Add Link dialog
To use the Add Link dialog:
- 1. Select an activity on the Process Editor canvas. For example, select a Receive or a sequence.
- 2. From the right-mouse menu, select Link (or Add > Link).
- 3. Fill in the Add Link dialog as follows:
- a. In the Name field, accept the default or type in a more meaningful link name.
- b. In the Target field, select the Dialog (...) Button.
- c. In the Select Link Target Node dialog, select the target activity for the link, and click OK.
- d. If desired, add a Transition Condition for the link by double-clicking the link or by selecting the Dialog button in Properties view to open the Transition Builder. See Adding a Link with a Transition Condition for details.
- e. Select OK on the Add Link dialog.
Link Examples
The following illustrations show some ways you can use links.
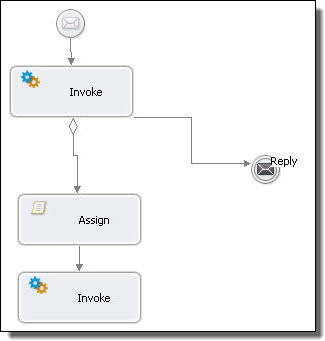
Example 1
In the first example, the second sequence executes if the link evaluates to true; otherwise, the reply executes.
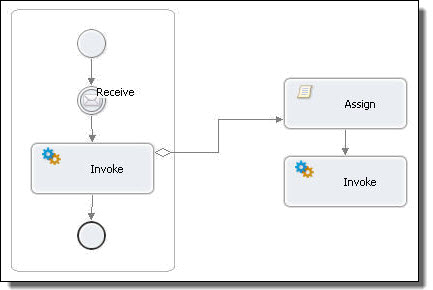
Example 2
In the following example, a scope is running in parallel with a sequence. An activity in one sequence has a link to an activity in the other sequence.