Creating a Process Central Configuration File
The Process Central Web application contains Forms, Tasks, and Reports that you configure for navigation.
A basic configuration file resides in Process Server to provide the initial configuration for navigation filters. You can view the file from the Catalog Resources page of the Process Console.
You can create additional configuration files that customize the navigation filters, on a user by user or group by group basis, and also describe the forms and reports to be deployed.
You can also replace the basic configuration file with your own file in Process Server. All elements from the basic configuration file are required, and by default the basic file is deployed. Your modifications override the basic settings.
To create an Process Central Configuration (.avcconfig) file
- 1. Select File > New > Central Configuration.
- 2. Accept the default location and filename for the file or modify them. The default location is the deploy folder, and the filename is based on the project name.
The file opens in an XML editor, and the main sections of the file are commented out. See Editing Tips below for help in editing the file.
Overview of Configuration File Sections:
Section | Configuration filters you can add |
|---|
| - - Items in the Role drop-down
- - Items in the Show drop-down
- - Folder names in the Tasks list
- - Show or hide folders based on users and groups (allowed roles)
- - Custom column names for tasks
- - Task list filtering
|
| - - Folder names in the Forms list or Reports list
- - Show or hide folders based on users and groups (allowed roles)
|
Localization | |
Contributions to Process Central, Forms and Tasks | Create your own scripts, CSS, and other elements. Specify them in the <centralIncludes> section. For details, see Including Your Own Styles Scripts and Meta Data for Process Central. |
Editing Tips:
Configuring Form Filters
The Forms section of the Process Central configuration file configures the following:
- •Folder name to add under the Forms category
- •Form name to add to the folder
- •Description of the form to display in the work area
- •Location and name of the form to be deployed
- •Restricted access to the form for named user roles
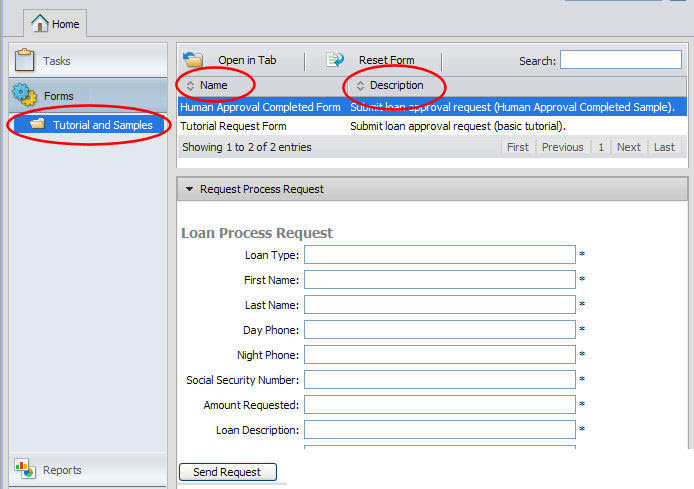
Here is an example of a configuration in Process Central showing a custom folder containing two forms.
Fill in the values as shown in the following example:
<tns:requestCategoryDefs>
<tns:requestCategoryDef id="loans_category"
name="Loan Approval">
<avccom:requestDef id="loan_request"
name="Customer Request Form">
<!-- Use this section only to restrict access to requests.
Delete it if not used.
<avccom:allowedRoles>
<avccom:role>FILL_IN_ROLE_1</avccom:role>
<avccom:role>FILL_IN_ROLE_2</avccom:role>
</avccom:allowedRoles>
-->
<avccom:description>
Submit a request for loan approval.
</avccom:description>
<avccom:formLocation>
project:/tutorial/form/request/loanRequest.html
</avccom:formLocation>
</avccom:requestDef>
</tns:requestCategoryDef>
</tns:requestCategoryDefs>
Configuring Reports Filters
You can design Business Intelligence and Reporting Tools (BIRT) reports in Process Developer and deploy them for display in Process Central as well as in the Process Console. For details, see
Process Server and Process Central Reports.
The Reports section of the Process Central configuration file configures the following:
- •Folder name to add under the Reports category.
- •Report name to add to the folder.
- •Description of the report to display in the work area.
- •Location and name of the report to be deployed.
Tip: If you want to view some standard reports, look in the Process Console.
- •Location and name of an optional HTML file created for the Preview area.
- •Restricted access to the report for named user roles.
Fill in the values as shown in the following example:
<tns:reportCategoryDefs>
<tns:reportCategoryDef id="loans_category"
name="Loan Approval">
<avccom:reportDef id="loan_report"
name="Loan Approval Report">
<!-- Use this section only to restrict access to reports.
Delete it if not used.
<avccom:allowedRoles>
<avccom:role>FILL_IN_ROLE_1</avccom:role>
<avccom:role>FILL_IN_ROLE_2</avccom:role>
</avccom:allowedRoles>
-->
<avccom:description>
Loan Application Approvals By Month
</avccom:description>
<avccom:formLocation>
project:/tutorial/reports/loansReport.rptdesign
</avccom:formLocation>
<avccom:formPreview>
project:/tutorial/form/preview/loanRptPreview.html
</avccom:formPreview>
</avccom:reportDef>
</tns:reportCategoryDef>
</tns:reportCategoryDefs>
Including Your Own Styles Scripts and Meta Data for Process Central
In a new avcconfig file, there is a section where you can specify your own CSS files, scripts, and meta data for use in Process Central.
Instead of linking in CSS, scripts, and meta data in form and tasks, you reference it from a .avcconfig file in the <centralIncludes> section.
The <centralIncludes> section can include the following elements that are common <head> element in a XHTML file:
- • <script>. Add a reference to a JavaScript or other script that contains the functions you want to use in request and task forms. The syntax in <centralIncludes> is, for example:
<script xmlns="http://www.w3.org/1999/xhtml" | type="text/javascript" src="myJquery.script.js"/>
You can also use inline scripts, such as <script xmlns="http://www.w3.org/1999/xhtml" type="text/javascript"> var my_String = "Hello";
- • <meta>. Add meta data keywords. The syntax is, for example:
<meta xmlns="http://www.w3.org/1999/xhtml" name="keywords" content="some keyword,another keyword" />
- •<style>. Use inline styles, such as <style xmlns="http://www.w3.org/1999/xhtml" type="text/css">p {background-color: yellow}</style>
- •<link>. Style sheet link. See example below.
When you create a new avcconfig file, by default, only one section of the file is generated:
<tns:centralIncludes>
<link xmlns="http://www.w3.org/1999/xhtml" href="../example.css" rel="stylesheet" type="text/css">
</tns:centralIncludes>
To use your own style sheet:
- 1. If desired, review the default Process Central CSS files. To do this, open Process Central and view the Page Source. Find the section of the source file linking to the CSS files and select a link. The style sheet for basic UI styles for fonts and colors is ae-avc.css.
- 2. If desired, copy styles from ae-avc.css or other CSS and make your own modifications.
- 3. In forms and tasks, use the class names from the CSS file, as desired.
- 4. Deploy your CSS file.
- 5. In an avcconfig file, add the name of the CSS in the <tns:centralIncludes> section and deploy the config file. For example:
<link xmlns="http://www.w3.org/1999/xhtml"
href="../example.css" rel="stylesheet" type="text/css">
Where the href path can be one of the following:
- - relative path to this avcconfig file within your project
- - full project:/path/to/file
- - Absolute URL, such as http://domain:port/myCSS.css