Creating a Process Deployment Descriptor File
A Process Deployment Descriptor (.pdd) file describes the information required for a process to execute in the Process Server environment. If you are deploying a process to a production server, you can specify process version and other details to override the server defaults.
A Process Deployment Descriptor (.ppd) file describes the information required for a process to execute in the Process Server. This information includes partner link details, persistence and versioning information, process directives and indexed properties as well as other details. In each step of the procedure below, there are links to the relevant help topics for the deployment details to add.
To create the process deployment descriptor file:
- 1. In Process Developer, select File > New > Deployment Descriptor.
- 2. Select a folder and a process deployment descriptor filename, if you want to change the defaults.
- 3. Select a BPEL file to be described, and select Finish to open the PDD Editor.
- 4. Select General options. For details see General Deployment Options.
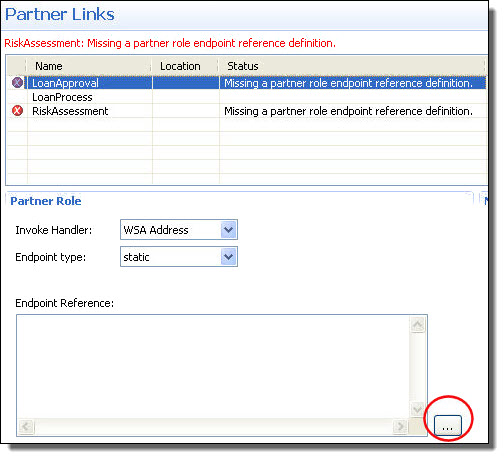
- 5. Fill in the Partner Links tab for each partner link as follows.
- a. Select a partner link from the list.
- b. If the partner link has a Partner Role defined, select the Endpoint Type for the partner link, and optionally, select an Invoke Handler. For explanations and examples of Endpoint Types, see Partner Role Endpoint Types. For explanations of Invoke Handlers, see Partner Role Invoke Handlers. For WS-Policy details, see Endpoint References and WS-Policy.
- c. If the Endpoint Type is Static, see the notes below.
- d. If the partner link has a My Role defined, select the Binding style and Service Name. Optionally, you can specify Allowed Roles. For explanations of these properties, see My Role Binding, Service Name, and Allowed Roles Options. To add WS Policy assertions to a My Role partner link, see Adding Policy Assertions.
- 6. For Process Server, define Indexed Properties, if desired. An indexed property is a variable property that is populated with the variable (or variable part) value during process execution. In the Process Console, you can select indexed properties as a search filter for process instances. In addition, you can use indexed properties for the event tracking. For details, see Adding Indexed Properties.
For details on adding Human Tasks Logical People Groups, refer to Human Tasks elsewhere in this help.
Notes for Static Endpoint Type:
- •For flexibility, you can specify the address as a URN rather than a URL, supplying WSA Address for the Invoke Handler. For details, see Specifying a Replaceable URN/URL for an Endpoint Reference.
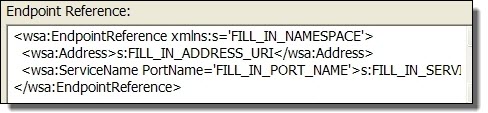
- •If the WSDL does not include bindings, WS Addressing elements are added with placeholders, as the following example shows. You can edit the placeholders on the Partner Links tab. For more information, see Using the PDD Editor Source View.
- •If you want to select a different service, you can. See Selecting a Service for a Deployment Descriptor Partner Link for details.
- •To add WS-Policy policy assertions, see Adding Policy Assertions.
General Deployment Options
If you are deploying a process to a production server, you can specify process version and other details to override the server defaults.
During the creation of the Process Deployment Descriptor file, you can select deployment options for new and running versions. If you do not change any settings, the server uses the defaults, as described below.
Process Logging
By default the Process Server generates an execution log for running processes. You can enable this setting to override the engine default, and then view or download an execution log for a running or completed process. An execution log provides start/end times for activity execution and other details, and helps you troubleshoot faulted processes. The logging levels are:
- •System Default. Setting that is enabled in the Process Console that applies to all processes without a Process Logging override. The server is set to Execution by default.
- •None. No logging occurs as processes run. Performance is enhanced with logging disabled.
- •Full. All execution statements are logged, including the Will Not Execute statements for deadpath activities. For example, all fault handling statements that are not executed are logged.
- •Execution (default). All execution statements are logged, except for Will Not Execute statements. Using this setting instead of Full can greatly decrease the size of the log file.
- •Execution with Data. All execution statements are logged, except for Will Not Execute statements, including variable, expression, and partner link data. Using this setting can greatly increase the size of the log file.
Process Persistence
Persistence refers to storage of active processes deployed to a server. When a process runs on the Process Server, all state and variable data is stored in the server database by default. However, for performance reasons and database size considerations, you may want to set a lower level of persistence.
If your process uses a wait activity or a retry policy, you must select the Persist or Full level.
You can make persistence setting selections as follows. Your selection is validated when you save the PDD.
Setting | Description | Restrictions |
|---|
Full | The default setting. For each process instance, all state information is stored for a running, faulted, and completed process. In the event of a server failure, a running process can be fully recovered. The recovery is possible because Process Server maintains journaling (a journal of the changes intended for the database) for this setting. | If the process uses a WS-RM invoke handler for a partner role or a WS-Reliable Messaging policy assertion on a my role, you must select this setting. For details, see Partner Role Invoke Handlers and WS-Reliable Messaging. |
Persist | Same storage setting as Full, but without journaling. A running process is suspended. The process is recoverable if the system goes down, but needs to be looked at since no journaling was done, so recovery marks this type as suspended. This is the minimum persistence level to support Suspend on Uncaught Fault (see Suspending a Process Programmatically with a Suspend Activity). | Cannot select this setting if the process uses WS-Reliable Messaging. If you reach the Activity Execution Limit set in the Tenant Detail and persistence is not set to this minimum level, the Suspend on Uncaught Fault flag is ignored and the process is terminated. |
Final | Stores only the final state of the process (completed or faulted) and process variables. On a server failure, a running process is terminated. This setting makes fewer database writes than the settings above, but allows you to view a graph of the process on the Active Processes detail page in the Process Console, where you can see the execution path and final values of process variables. A process runs only in memory, and the server property called Process Idle Timeout has no effect on this persistence level. | For Final, Brief, and None, the process cannot contain the following constructs: - - Wait activity
- - Multiple receive activities
- - People activity (on-premises only)
- - Process event handler
- - Process:Subprocess invoke handler
- - WS-RM invokes
|
Brief | This is the minimum level for process logging (described in the section above), but does not allow for viewing a graph of the active process. Stores only the start and completion times as well as final state (completed or faulted). Stores state and process variables only if the process faults. A process runs only in memory, and the server property called Process Idle Timeout has no effect on this persistence level. | See Final. |
None | No process information is stored in the server database when a process terminates. The process instance is not listed in the Process Console's Active Processes page. | See Final. |
Group
You can assign a group name to one or more processes. The group name is a selection filter for viewing a list of deployed or active processes in the Process Console.
Suspend on Uncaught Fault
According to the WS-BPEL 2.0 specification, a process with an uncaught fault must exit. However, you can suspend this process on an uncaught fault to perform process exception management, if desired.
You can make selections as follows:
System Default | The current engine setting for all processes. The default engine setting is to disable suspension on uncaught fault. |
False | Do not allow this process to suspend on an uncaught fault. The process will terminate abnormally. This setting overrides the engine setting. |
True | Suspend this process on an uncaught fault to put it in a suspended-faulting state. You can then perform process exception management on the faulting process, followed by retrying or completing the faulting activity or scope. This setting overrides the engine setting. For details, see Process Exception Management. |
Suspend on Invoke Recovery
For invoke activities that do not complete due to the node failure, you can suspend the process upon recovery. The process is suspended at the pending invoke, and you can perform process exception management, is desired.
You can make selections as follows:
System Default | The current engine setting for all processes. The default engine setting is to disable suspension upon process recovery when there is a pending invoke. |
False | Do not allow this process to suspend at a pending invoke after process recovery. The process will terminate abnormally. |
True | Suspend this process on recovery when there is a pending invoke to put it in a suspended state. You can then perform process exception management on the process, followed by retrying or completing the invoke. This setting overrides the engine setting. |
Process Instance Retention
Once you deploy a process to the Process Server, and begin to execute it, the completed and faulted process instances are stored in the Informatica Business Process Developer database. Process Server administrators can delete old processes from the database on an automatic schedule, based on the number of days, hours or minutes you want to retain old processes before deleting them.
You can specify how many days (or hours or minutes) to retain a completed or faulted process in the Informatica Business Process Developer database by adding a retention number in the PDD. This number can be modified for the process in the Process Console.
If you don't specify a value for retention, the default engine value is applied to the process. This value is relevant only if automated database maintenance is enabled.
Versioning
Note that only one version of a process can create new process instances.
Process Version | By default, the Process Server auto-increments the version number for new versions. Auto-incrementing is based dropping the minor version number and incrementing the major version number by one. For example, 1.5 becomes 2.0. To define your own version number for this process, type in a number, such as 1.5. |
Online Date | If the online (effective) date is blank or in the past, then the process immediately becomes the online (current) version. The online version for a given process is the one capable of creating new process instances. If the date is in the future, the server makes this version the online version when the effective date arrives. If you intend to deploy your process to a server in a different time zone, be sure to edit the deployment descriptor file to include a time zone expression. For details, see What is Process Versioning. |
Offline Date | If the offline (expiration) date is blank, then the process will not go offline. Providing an offline date is useful if you want the process to run for a limited period of time. An offline process version cannot create new process instances, but running process instances complete normally. You can specify an offline date. If you intend to deploy your process to a server in a different time zone, be sure to edit the deployment descriptor file to include a time zone expression. For details, see What is Process Versioning. |
Running Process Disposition | By default, the all process instances are maintained. The default value of Maintain Version allows process instances created under previous versions to run to completion when this version becomes online. You can select Migrate Version to convert process instances running against an earlier version to use the new version. Be sure to check the Server Log for warnings that are generated if an incompatibility occurs. Select Terminate to terminate processes running under previous versions on the offline date of the new version, regardless of whether or not the process instances are complete. |
If you do not change the defaults, the
.pdd file does not include any version details. To add or change version details, see
Using the PDD Editor Source View.
Partner Role Invoke Handlers
A Process Deployment Descriptor (.pdd) file describes the information required for a process to execute in the Process Server environment.
By default, the Process Server invokes an endpoint by looking up the service name in the WSDL to find the endpoint (for example, the <soap:address>) and using the standard engine invocation framework. You can select a different invocation method by making one of the following selections:
Invoke handler | Invokes an endpoint based on: |
|---|
WSA Address | URL in the <wsa.Address> field of the PDD file. For details, see Selecting a Service for a Deployment Descriptor Partner Link. Note that you can provide a URN and then map the URN to a URL in the Process Console. For details, see Specifying a Replaceable URN/URL for an Endpoint Reference. |
WSDL Service Port | URL in the Service's port section of the WSDL file. Select this to use the service address as is; that is, the engine only looks at the WSDL's service port at runtime. No changes are allowed to the service address. See Selecting a Service for a Deployment Descriptor Partner Link. |
WSRM:Address | Same as address above, except that the messages are sent using the WS-Reliable Messaging protocol. Select this handler if you will attach the reliable messaging policy assertion, described in WS-Reliable Messaging. An addressable ReplyTo endpoint is required. |
EJB Service (on-premises only) | Deployed JARs, WSDL, and other resources created from an EJB Interface. Note that an EJB Service cannot be used on Apache Tomcat. It is supported on other application servers. For details, see Creating a Java Interface. |
Java Service | Deployed JARs, WSDL, and other resources created from a Java Interface. For details, see Creating a Java Interface. |
JMS Service | For details, see Using a Java Messaging Service Invoke Handler. Note that an addressable ReplyTo endpoint is required. |
REST Service | For details, see Using a REST-based Service. |
System Service | Partner role based on one of the System Services, such as Server Log Service, Email Service, Identity Service, Reporting Service, Shell Command Invoke Service, Data Access Service and Using a REST-based Service. |
Process | BPEL process and PDD located in a workspace project and deployed to the same server as the calling process. For details, see Creating a BPEL Process as a Service for Another BPEL Process. To select a process, see Select Process Service. Note: Select this option when deploying to Informatica Cloud. |
Process:Subprocess | BPEL process and PDD located in a workspace project and deployed to the same server as the calling process. The process is a subprocess; that is, it is eligible for compensation within the enclosing scope of the calling process. For details, see Creating a BPEL Process as a Service for Another BPEL Process. To select a process, see Select Process Service. |
EJB Wrapper | Custom EJB you have written, packaged and deployed to A Process Server that supports EJBs. You can specify the JNDI location of the EJB as well as the query string required to invoke the endpoint. For details, see EJB/Java Invoke Handler Properties Dialog. |
Java Wrapper | Custom Java class you have written, packaged and deployed to the server. You can specify the fully qualified class name for the Java class as well as the query string required to invoke the endpoint. For details, see EJB/Java Invoke Handler Properties Dialog. |
Partner Role Endpoint Types
A Process Deployment Descriptor (.pdd) file describes the information required for a process to execute in the Process Server environment. When creating the .pdd file, you must select an endpoint type for each partner role defined in a partner link.
During the creation of the Process Deployment Descriptor file, you must select an endpoint type for each partner role defined in a partner link. An endpoint type is a binding property that indicates how to communicate with the Web service the process interacts with. The different types give you control over specifying services you work with now and in the future. For example, you can "hard-code" a service binding by making it static, or you can select more versatile options for changing and adding new service partners dynamically without redeploying the process.
The endpoint types are defined in the following table.
Endpoint Type | Description |
|---|
Dynamic | Indicates that the service location (that is, the endpoint reference) is provided dynamically within the BPEL process. The location must be assigned dynamically within a Copy Operation of an Assign activity. |
Principal | This selection is deprecated as of Version 9. The selection remains in place for legacy processes that use a partner definition file. Indicates the endpoint reference is determined based on the value of the authenticated principal that sends the request to the BPEL process. In this configuration, it is assumed that service endpoints for the BPEL process are secured. When a message arrives on one of these endpoints, the authenticated user's principal (typically their username) is used as a lookup in Process Server. The server determines the proper endpoint to use based on the principal and the partner link type being invoked. The principal endpoint type provides the security of knowing whom you are dealing with and the flexibility of being able to configure the endpoints independently from the process and its deployment. The use of principal implies an asynchronous conversation since it is used to populate the partner role used for a callback. The pattern is a Receive-Invoke where the partner link is the same for both activities. The process declares both the myRole and partnerRole attributes for the partner link. The receipt of the data for the Receive activity result in the partner link's partner endpoint reference being initialized with the callback from the partner definition file. |
Static | Indicates the endpoint information is defined in the deployment descriptor file and is used for all invocations of the partner link. Note: Select this option when deploying to Informatica Cloud. |
If the partner service requires authenticated access, see
Endpoint References Requiring Credentials for Access.
Select Process Service
Use this dialog to select a service
If you are invoking the endpoint as a BPEL process or subprocess, you can complete the Select Process Service dialog as follows:
- 1. Ensure that the PDD file of the BPEL process you want to select is in a Workspace project.
- 2. Browse to the PDD file and select it.
- 3. Select a Service Name. This is the name of one of the services associated with My Role partner links in the PDD file.
For information on choosing a process or subprocess, see Creating a BPEL Process as a Service for Another BPEL Process.
EJB/Java Invoke Handler Properties Dialog (on-premises only)
A custom invoke handler bypasses the standard Informatica Business Process Manager invocation framework. The standard framework invokes a partner service by packaging a message into a SOAP request and sending it over the HTTP protocol to the designated service endpoint address.
A custom invoke handler bypasses the standard Business Process Manager invocation framework. The standard framework invokes a partner service by packaging a message into a SOAP request and sending it over the HTTP protocol to the designated service endpoint address. You can create a different invocation mechanism by implementing an interface in the Web service input/output library.
Assuming you have written a custom invoke handler, you can complete the Invoke Handler Properties details in the PDD editor by filling in details for one of the following:
- • EJB
An EJB invocation is appropriate only for Process Servers capable of handling EJBs. For an EJB invocation, specify the JNDI location of the EJB as well as the query string required to invoke the endpoint. For example:
Name: ejb/jndiLocation/MyInvokeHandler
Query String:
invokeHandler=
"ejb:AeApproverInvokeHandler?type-namespace=
http://tempuri.org/services/loanapprover&
type-localpart=approvalMessage&maxLoan=1000000"
- • Java
For a Java class invocation, specify the fully qualified class name for the Java class as well as the query string required to invoke the endpoint. For example:
Name: java.org.ActiveVOS.rt.axis.bpel.MyInvokeHandler
Query String: parameter=someValue
invokeHandler=
"java:org.activebpel.rt.axis.bpel.AeTestInvokeHandler?
type-namespace=
http://localhost:8080/active-bpel/services/OrderIdService&
type-localpart=getNextOrderIdResponse&
getNextOrderIdReturn=wsio-109"
Be sure to package and deploy the invoke handler to the server.
My Role Binding Service Name and Allowed Roles Options
A Process Deployment Descriptor (.pdd) file describes the information required for a process to execute in the ActiveVOS server environment. When creating the .pdd file, you must select a binding style and service name for each service partner link of my_role type.
During the creation of the Process Deployment Descriptor file, you must select a binding style and service name for each service partner link of my_role type.
The binding styles are the standard SOAP styles of RPC (remote procedure call) and Document, and there are custom styles called Unpublished and Policy Driven.
Select the style that is appropriate for the simple, schema, or complex message variable manipulated by your service's operation:
- •A Document Literal invocation means the entire SOAP message consists simply of a single entity that is an XML document. This invocation is equivalent to a binding style of document/literal.
- •An RPC Encoded invocation means that the body of a SOAP request has an outer element that matches the operation name and contains inner elements each of which maps to a parameter of the operation.
- •An RPC Literal invocation means that the body of a SOAP request has an outer element that matches the operation name and each inner part points to a schema type definition that describes the content of that part. RPC is the binding style and literal is the use.
- •An Unpublished invocation bypasses the standard invocation framework. The primary reason for deploying with the unpublished binding is to take advantage of facilities offered by the application server with regard to securing or managing the Web service. Instead of using the built-in mechanism provided by Process Developer for service publication, you can control the publication of your services through an invocation such as J2EE for Web Services (WS4EE). Also, Process Developer system services are specified as unpublished.
- •A Policy Driven invocation means that the specific facilities used for handling SOAP requests are determined at deployment by the policy assertions attached to the myRole endpoint. For example, services that support WS-Reliable Messaging protocol can select Policy Driven as the binding style and include an WS-Reliable Messaging policy. At deployment, if the service cannot determine the binding style from the policy assertions, an error is thrown.
- •The Service Name is the name of the endpoint that Process Server creates for the BPEL process. This name can match the address in the binding section of the WSDL file, or any name desired. By default, the service name is based on the port type associated the partner link.
- • Allowed Roles is optional and specifies one or more security roles that an authenticated user must have in order to communicate with the BPEL process. If the application server is not configured with security. the allowed roles field is ignored. Refer to your application server documentation on how to secure individual web applications.
Note: You must complete this field when deploying a process to Informatica Cloud. if you do not specify at least one role, no one will be able to access the process.
You can also add policy assertions to the my role partner link, as described in
Adding Policy Assertions.
Selecting a Service for a Deployment Descriptor Partner Link
Select a service containing the binding information for the endpoint reference. Select the Policy Assertions tab to add one or more policy assertions for the endpoint reference.
Selecting a Service for a Deployment Descriptor Partner Link
During the creation of the Process Deployment Descriptor file, you must select an endpoint type for each partner role defined in a partner link. If you select a static type, to "hard-code" a service binding, you can select the service to use.
By default, the binding information from the imported WSDL is used, if only one matching service binding exists. However, if you want to bind to a different service, click (...) to choose another service.
The WSDL you select must be in the workspace registry and must contain binding information.
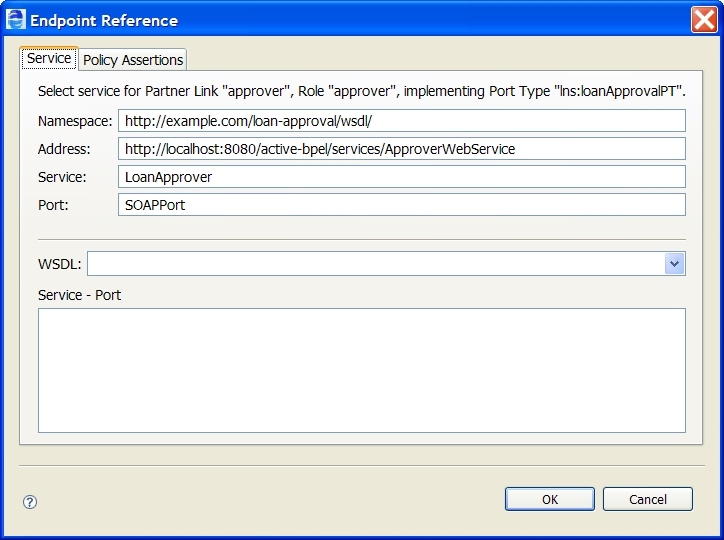
In the Endpoint Reference dialog that appears, do one of the following:
- •Select a WSDL from the picklist. When a matching service appears, select it to fill in the namespace, address, service, and port in the text boxes above. The following example shows a selected service:
- •Manually fill in the namespace, address, service, and port for the service if the binding information does not exist
- •If you selected WSDL Service Port for the Invoke Handler, you cannot edit the service information. At runtime, the WSDL Service definition is always used.
See
Creating a Process Deployment Descriptor File for details on opening the New Deployment Descriptor dialog.
Using SOAP 1.1 or 1.2 Port Binding
As of version 7 of Process Server, support for both SOAP 1.1 and SOAP 1.2 is enabled. You can select a service containing a port binding of SOAP 1.2. If no port is specified in the service, the binding defaults to document literal and SOAP 1.1.
Note that all My Role services are deployed with both SOAP 1.1 and SOAP 1.2 bindings. Clients that want to take advantage of SOAP 1.2 can address http://[host:port]/active-bpel/services/soap12/[myRoleService.wsdl].
Adding Policy Assertions
Select a service containing the binding information for the endpoint reference. Select the Policy Assertions tab to add one or more policy assertions for the endpoint reference.
The WS-Policy specification allows Web service providers and clients to express a broad range of capabilities, requirements, and preferences in a standard way through policy assertions. If desired, you can add one or more policy assertions to the partner link's endpoint reference section of a process deployment descriptor file.
You can add a policy assertion to both the Partner Role partner link and the My Role partner link in the Deployment Descriptor wizard.
Many policy assertions specify both an inbound and outbound direction.
- •An inbound assertion governs messages received by the BPEL process, such as messages for receives and replies from invoked services.
- •An outbound assertion governs messages sent by the process, such as requests to an invoked service and replies matching receives.
Policy assertions apply to static endpoint references for partner roles in the PDD wizard. For a dynamic endpoint reference, you can manually add the details to the appropriate copy operation in an assign activity.
The supported policy assertions are described in the following table:
Policy | Description |
|---|
WS-Security Policy Assertions |
|---|
| Credentials required for access to a serve |
| Describes the parts of a SOAP message to encrypt |
| Describes the parts of a SOAP message to sign with an XML Signature, using an X.509 Certificate token |
| Adds a <Timestamp> element to the SOAP header of a message |
Other Policy Assertions: |
| Describes when and how many times to retry an invoked service that does not reply |
| A My Role policy assertion that directs the Process Server to use WS-Addressing to transmit replyTo endpoint references during transmissions to the Partner Role partner link |
| Specifies that a partner link participates in an industry-standard protocol that supports guaranteed delivery of messages |
JMS Delivery Options (Partner Role-- Informatica Process Developer only) | |
| Used for REST-based invocations |
| Used for REST-based invocations |
| The Security Assertions Markup Language (SAML) is an OASIS standard that enables loosely coupled and federated identity integration. |
| Provide fine-grained validation of WSDL messages for a partner link to enable faster processing |
| Set an amount of time to wait for a specific Web service to time out |
Invoke Recovery (Partner Role) | Select whether to suspend a process with a pending invoke when the process recovers from a failed server |
| Explicitly add addressing to invokes |
| Applicable for a my role partnerlink to refer to a WSDL binding instead of RPC or Document |
| A workaround for suppressing schema validation in SOAP messages, useful for dealing with legacy services that cannot handle xsi:type attributes |
| For subprocess invoke only. Add a user name to stand for the process initiator. Useful for a subprocess that contains a People activity that can request the name of the process initiator. |
To add one or more policies to a partner link
- 1. In the Deployment Descriptor wizard, navigate to the Partner Links page. See Creating a Process Deployment Descriptor File for details on opening the New Deployment Descriptor dialog.
- 2. For a partner role partner link, select static as the Endpoint Reference Type.
- 3. Select the Dialog button at the end of the Endpoint Reference text box.
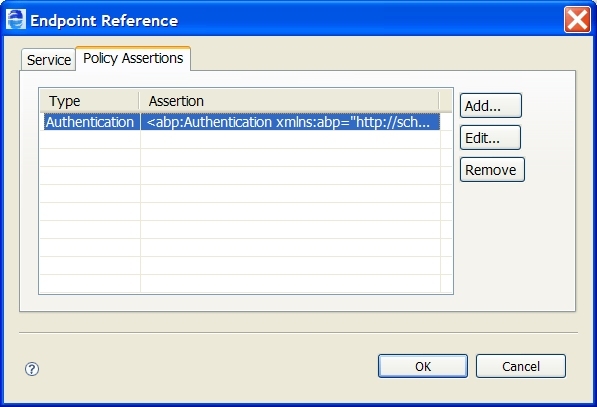
- 4. Select the Policy Assertions tab, as shown here.
- 5. Select the Add button to open the Policy Assertion dialog.
- 6. From the Policy Template list, select the policy you wish to add, and fill in all the required information. For details, select a name from the supported policies listed at the top of this topic.
- 7. Select OK.
- 8. Select Add again to add additional policies.
- 9. Add My Role policy assertions by doing the following:
- a. Select a My Role partner link.
- b. Select the My Role Policy tab.
- c. Select applicable policies, as described above, for the My Role service.
Authentication
Select this policy assertion as described in
Adding Policy Assertions.
This policy describes the HTTP credentials required for access to a service.
Inbound authentication is for messages received for My Role services and for replies from invoked Partner Role services. Outbound authentication is for replies from My Role services and messages sent to invoked Partner Role services.
Set the following parameters:
Outbound Authentication Policy |
Username | Name of the user authorized to access the service |
Password | Password for the authorized user |
Preemptive HTTP Credentials | Preemptive authentication sends basic authentication credentials without being challenged by the remote host. Care must be taken to ensure that this option is only used to communicate over secure channels to prevent unnecessary disclosure of user credentials |
Send wsse:UsernameToken in Header | If checked, credentials are sent as a OASIS WS-Security UsernameToken element in the SOAP Header. To include a Nonce (a nonce is an arbitrary number used only once in a cryptographic communication) with the UsernameToken, add a <abp:HashPassword/> child element to the PDD file in the PDD editor after finishing the wizard. A Nonce is used to increase the authentication security by disallowing a string to be repeated. See the example below. A wsse:UsernameToken header can be sent unencrypted and unsigned, provided that it is the only security policy in effect for the invoke. Otherwise, the UsernameToken header is signed and encrypted, which requires that you have a certificate keystore configured. |
Use Cleartext Password | Select this option to store the authorized user's password in clear text in the PDD. The password is visible and readable in the PDD file. |
Inbound Authentication Policy |
Require UsernameToken when receiving messages | Select this to require authentication on messages received by a My Role or Partner Role service |
Example:
<wsa:EndpointReference xmlns:wsa="http://www.w3.org/2005/08/addressing"
xmlns:soapenv="http://schemas.xmlsoap.org/soap/envelope/"
xmlns:xsd="http://www.w3.org/2001/XMLSchema"
xmlns:ns5="http://www.example.org/Hello/"
xmlns:xsi="http://www.w3.org/2001/XMLSchema-instance">
<wsa:Address>http://localhost:8081/active-bpel/services/Hello</wsa:Address>
<wsa:Metadata>
<wsa:ServiceName PortName="HelloSOAP">ns5:Hello</wsa:ServiceName>
<wsp:Policy xmlns:wsp="http://schemas.xmlsoap.org/ws/2004/09/policy"
xmlns:abp="http://schemas.active-endpoints.com/ws/2005/12/policy">
<abp:Authentication direction="out">
<abp:User>aeadmin</abp:User>
<abp:Password>yH6CJei+D+s=</abp:Password>
<abp:HashPassword/>
</abp:Authentication>
</wsp:Policy>
</wsa:Metadata>
</wsa:EndpointReference>
Encryption
Select this policy assertion as described in
Adding Policy Assertions.
An encryption policy describes the parts of a SOAP message to encrypt, in compliance with the processing rules of the XML Encryption specification [XMLENC].
Each specified original element or element content in the message is removed and replaced by the resulting encrypted element.
- •Inbound encryption is for messages received for My Role services and for replies from invoked Partner Role services. It indicates that the My Role partner role accepts encryption and will de-encrypt messages received.
- •Outbound encryption is for replies from My Role services and messages sent to invoked Partner Role services.
Set the following parameters:
Encryption Parts Attributes |
alias | Optional keystore alias used to retrieve the key for encryption. The default is the alias specified in the crypto properties file. |
Content Name | Message part or element to be encrypted |
Content Namespace | Target namespace of the message part or element |
Example
<abp:EncryptionParts alias="keystore_alias">
<abp:Element
namespace="http://docs.oasis-open.org/wss/2004/01/
oasis-200401-wss-wssecurity-secext-1.0.xsd"
name="UsernameToken"/>
</abp:EncryptionParts>
As a message consumer, Process Server service endpoints accept and consume messages that conform to options deemed allowable under WS-I guidelines. As a message producer, Process Server supports only the recommended algorithms, references and identifiers.
The following algorithms are used within the data encryption of SOAP messages. Additional algorithms will likely be added and supported in future releases, based on WS-I recommendations and customer demand.
The supported token types are as follows:
- • X.509 Token
Direct Binary Reference (send and receive): Preferred method, used where possible.
Issuer Serial (send and receive): Preferred external reference method if direct not possible.
X509 Identifier (receive only)
Subject Key Identifier (receive only)
Embedded Token References (receive only)
- • Symmetric Data Encryption Algorithms:
http://www.w3.org/2001/04/xmlenc#tripledes-cbc (send and receive)
http://www.w3.org/2001/04/xmlenc#aes128-cbc (receive only)
http://www.w3.org/2001/04/xmlenc#aes256-cbc (receive only)
- • Asymmetric Key Transport Algorithms:
http://www.w3.org/2001/04/xmlenc#rsa-1_5 (send and receive)
http://www.w3.org/2001/04/xmlenc#rsa-oaep-mgf1p (receive only)
- • Signature Digest Algorithm:
http://www.w3.org/2000/09/xmldsig#sha1 (send and receive)
- • Signature Algorithm:
http://www.w3.org/2000/09/xmldsig#rsa-sha1 (send and receive)
- • Cannonical XML Transform Algorithm:
http://www.w3.org/2001/10/xml-exc-c14n# (send and receive)
Engine-Managed Correlation
Select this policy assertion as described in
Adding Policy Assertions.
There are two ways that Process Server can correlate messages that are received by a BPEL process: correlation sets and engine-managed correlation policy assertions. A correlation set uses message properties defined within a WSDL and BPEL process. Engine-managed correlation relies on WS-Addressing references in the SOAP header of a message to correlate a received message with the correct process instance.
If you use engine-manage correlation, you need only specify a policy assertion on a My Role partner link. Select a My Role partner link that is associated with a Partner Role in the same partner link. The engine-managed correlation policy assertion directs the Process Server to use WS-Addressing to transmit replyTo endpoint references during transmissions to the partner.
Policy Assertion Example
<myRole allowedRoles="" binding="RPC"
service="ManagedCorrelationServiceA">
<wsa:Metadata>
<wsp:Policy xmlns:abp="http://schemas.
active-endpoints.com/ws/2005/12/policy"
xmlns:wsp="http://schemas.xmlsoap.org
/ws/2004/09/policy">
<abp:engineManagedCorrelationPolicy/>
</wsp:Policy>
</wsa:Metadata>
</myRole>
How Partner Services Handle Engine Managed Correlation Messages
Often a partner service implemented the WSA SOAP Binding details to automatically handle engine managed correlation messages. The service extracts information from the SOAP header and uses it to reply back to Process Server.
The message Process Server sends to the service is constructed similarly to the following example. Note that the SOAP header contains a <wsa:ReplyTo> element including a <wsa:ReferenceProperties> element containing the conversation Id for the correlation:
Outbound Message from Process Server
<soapenv:Envelope xmlns:soapenv="http://schemas.xmlsoap.org
/soap/envelope/" xmlns:xsd="http://www.w3.org/2001
/XMLSchema"
xmlns:xsi="http://www.w3.org/2001/XMLSchema-instance">
<soapenv:Header>
...
<wsa:ReplyTo xmlns:abx="http://www.activebpel.org/bpel/extension"
xmlns:wsa="http://schemas.xmlsoap.org/ws/2003/03/addressing">
<wsa:Address>http://localhost:8080/active-bpel/services
/ManagedCorrelationServiceA</wsa:Address>
<wsa:ReferenceProperties>
<abx:conversationId>1:/process/partnerLinks
/partnerLink[@name='requestPLT']
</abx:conversationId>
</wsa:ReferenceProperties>
</wsa:ReplyTo>
...
</soapenv:Header>
<soapenv:Body>
...
</soapenv:Body>
</soapenv:Envelope>
When a service receives a message, it should extract the SOAP header <wsa:ReferenceProperties> and reply with a similarly formatted SOAP header. If the service you are calling is not replying as expected, use the following example to understand the expectations of Process Server for receiving an engine managed correlation message.
Inbound Message Process Server Expects
<soapenv:Envelope xmlns:soapenv="http://schemas.xmlsoap.org
/soap/envelope/" xmlns:xsd="http://www.w3.org/2001
/XMLSchema"
xmlns:xsi="http://www.w3.org/2001/XMLSchema-instance">
<soapenv:Header>
...
<abx:conversationID
xmlns:abx="http://www.activebpel.org/bpel/extension">
1:/process/partnerLinks/partnerLink[@name='requestPLT']
</abx:conversationId>
...
</soapenv:Header>
<soapenv:Body>
...
</soapenv:Body>
</soapenv:Envelope>
For details on correlation sets, see
Correlation.
HTTP Transport
HTTP Transport
Select this policy assertion as described in
Adding Policy Assertions.
You can add this policy to a Partner Role. It is not applicable for a My Role. Depending on the REST service requests from the process, you may wish to set one or more of the HTTP transport sender timeout values.
Note: This policy currently works only in conjunction with REST-enabled processes.
Client Connection Timeout | The timeout until a connection is established. A value of zero means the timeout is not used. Zero is the default. |
Connection Pool Manager Timeout | Set the connection acquisition timeout value. The default is not defined. |
Socket Timeout | The default socket timeout (SO_TIMEOUT) in milliseconds that is the timeout for waiting for data. A timeout value of zero is interpreted as an infinite timeout. This value is used when no socket timeout is set in the HTTP method parameters. |
TCP no delay | Enable, if used. The TCP no delay parameter controls TCP (Transmission Control Protocol) packet batching. The default value is 1, which means that TCP packets are not batched. Determines whether Nagle's algorithm is to be used. (The Nagle's algorithm tries to conserve bandwidth by minimizing the number of segments that are sent.) To decrease network latency and increase performance, Process Server disables Nagle's algorithm (by enabling TCP_NODELAY). Data is sent earlier, at the cost of an increase in bandwidth consumption and number of packets. |
Redirect with GET | Instruct the browser to load a different page using an HTTP GET request. |
XML MIME Types | To interpret data correctly, add additional MIME types, such as image/svg+xml. |
Invoke Recovery
Select this policy assertion as described in
Adding Policy Assertions.
When a server goes down and then comes back online, Process Server recovers and resumes active processes automatically. However, for a pending invoke activity, you may want to suspend the process to inspect whether the service partially or fully completed its operation. In the Process Console, you may wish to manually restart the suspended process using the input message data.
If a server terminates unexpectedly, processes may be executing. Because they may not have saved process state to the database, the server must execute parts of a process to bring it back to the state it was in. Journal entries record the steps between process state being saved, and they are re-played during recovery. When a failure occurs, another node in the cluster may attempt to recover the process after a designated grace period.
You can add a policy assertion to the endpoint reference for the partner role of the partner link associated with an invoke activity to specify whether to suspend the process if that invoke activity is in a pending (executing) state during process recovery.
Select a setting for suspend process:
- •Default. If this optional attribute is not present, then invoke recovery handling is specified by the Suspend process on invoke recovery setting on the Engine Properties tab of the Engine Configuration page.
- •True. Suspend a process when a pending invoke is found during process recovery
- •False. Do not suspend a process when a pending invoke is found during process recovery.
JMS Delivery Options
Select this policy assertion as described in
Adding Policy Assertions.
For details on JMS Messaging, delivery options, and examples of adding attributes to delivery options, see
Using a Java Messaging Service Invoke Handler.
Message Validation
Select this policy assertion as described in
Adding Policy Assertions.
By default, the Process Server engine validates the data loaded into process variables against the WSDL schema prior to process execution. This validation property is a global setting that can be disabled/enabled in the Process Console.
If desired, you can add a policy assertion to an endpoint reference for fine-grain control of message validation. The policy assertion overrides the global setting in the engine.
By disabling message validation, you are enabling faster processing. However, be aware that there are many cases where invalid data can be introduced into the process that will not be caught unless you provide fault handling or validate activities. With message validation enabled, the process will throw a fault if invalid data is detected.
Select one of the following:
- •None. Message validation is disabled.
- •Both. Message validation is enabled for input and output messages.
- •In. Message validation is enabled for input messages.
- •Out. Message validation is enabled for output messages.
REST Enabled
Select this policy assertion as described in
Adding Policy Assertions. You can set this policy on a My Role partner link to provide a REST binding.
This policy provides a context path for the partner link. The context value of the REST-enabled policy is the value used to lookup the process and partner link names registered with the deployment manager.
On deployment, a My Role partner link containing a REST Enabled policy registers the mapping between the REST path and the process and partner link names.
The Usage and Description fields are optional. You can add the BPEL process name in the Description field and add REST service parameters in the Usage field.
If you fill in these fields for your REST-enabled processes, you can then retrieve a list of deployed REST services, listed by BPEL process and the details you added in the Usage field.
For example, at runtime, the following request URL returns a list of services that have included a description and optionally usage parameters:
http://localhost:8080/active-bpel/services/REST?
REST: Disabling Following HTTP Redirects
To disable following HTTP redirects received from REST services, the following policy directive can be added.
followRedirects="false"
Do this by adding this attribute to the policy element in the PDD or when setting up a dynamic endpoint reference as follows:
xmlns:soapenv="http://schemas.xmlsoap.org/soap/envelope/"
xmlns:xsd="http://www.w3.org/2001/XMLSchema"
xmlns:xsi="http://www.w3.org/2001/XMLSchema-instance">
<wsa:Address>http://localhost:8080/path</wsa:Address>
<wsa:Metadata>
<wsp:Policy
xmlns:wsp="http://schemas.xmlsoap.org/ws/2004/09/policy"
xmlns:abp="http://schemas.active-endpoints.com/ws/2005/12/policy">
<abp:HTTPTransportOptions followRedirects="false"/>
</wsp:Policy>
</wsa:Metadata>
</wsa:EndpointReference>
No UI support for setting this directive exists.
Retry
Select this policy assertion as described in Adding Policy Assertions.
This policy describes when and how many times to retry an invoked service that does not reply.
During process execution, an invoked service can not reply, and, assuming that the service responds with a fault, you can specify how you want to handle the faulting execution.
You can specify the relatively simple policy that the server automatically retries the invocation a certain number of times.
Alternately, you can create a BPEL process to handle retries. For details, see Retry-Policy Service.
Add the retry attributes as follows:
Assertion parameter | Description | Default |
|---|
Interval | Amount of time in seconds to wait between retries | None. You must add a value. Ignored if a service name is specified. |
Attempts | Number of times to retry the service | None. You must add a value. Ignored if a service name is specified. |
Service | Name of a service implemented by the process. The service is a BPEL process based on a required WSDL operation. | If you specify a service, the attempts and interval values are ignored. |
faultList | Faults to include for retries | All faults are retried |
faultExclusionList | Faults to exclude for retries | |
On Failure | The state for an invoke activity when the retries are exhausted: Faulted (the default) or Suspended. | Fault |
XML Syntax
<abp:retryPolicy attempts="xsd:int"?
interval="xsd:int"?
service="NCName"?
faultList="QNameList"?
faultExclusionList="QNameList"?
onFailure="fault"/>
Example 1: Policy with a service and fault list:
<wsa:EndpointReference
xmlns:s="http://www.activebpel.org/services/retrytests">
<wsa:ServiceName PortName="retrytesterServicePort">
s:retryTesterService</wsa:ServiceName>
<wsp:Policy
xmlns:wsp="http://schemas.xmlsoap.org/ws/2002/12/policy"
xmlns:abp="http://schemas.active-endpoints.com/ws
/2005/12/policy">
<abp:retry service="retryCheckerService">
faultList="{http://xml.apache.org/axis/}*
{http://www.active-endpoints.com/2004/06/bpel
/extensions/}*
{http://www.activebpel.org/services
/retrytests}*"/>
</wsp:Policy>
</wsa:EndpointReference>
Example 2: Policy with attempts and fault exclusion list:
<wsa:EndpointReference
xmlns:s="http://www.activebpel.org/services/retrytests">
<wsa:ServiceName PortName="retrytesterServicePort">
s:retryTesterService</wsa:ServiceName>
<wsa:Metadata>
<wsp:Policy
xmlns:wsp="http://schemas.xmlsoap.org/ws/2002/12/policy"
xmlns:abp="http://schemas.active-endpoints.com/ws/
2005/12/policy">
<abp:retry interval="1" attempts="3">
faultExclusionList="{http://xml.apache.org/axis/}*"/>
</wsp:Policy>
</wsa:Metadata>
</wsa:EndpointReference>
Run As User
Select this policy assertion as described in Adding Policy Assertions.
This policy is applicable only to the process and subprocess invoke handlers, described in Partner Role Invoke Handlers. Use this policy assertion to override the default value of process initiator.
By default, a process instance is associated with a user role called process initiator. Process Server populates the identity of process initiator with the Process Server credentials of the calling process, if the server is secured, or with anonymous, if the server is not secured.
The Run As user value is a string. It does not need to be an actual user from your Identity service.
SAML
Select this policy assertion as described in
Adding Policy Assertions.
The Security Assertions Markup Language (SAML) is an OASIS standard that enables loosely coupled and federated identity integration. SAML standardizes how identity-related security information can be communicated between policy domains.
SAML assertions are usually transferred from identity providers (the my role partner link) to service providers (the partner role partner link). Assertions contain statements that service providers use to make access control decisions.
SAML 1.1 and 2.0 are the currently supported versions. For details about SAML, refer to OASIS Security Services (SAML) TC at www.oasis-open.org.
Direction | - - Out. Typically selected for Partner Role partner links. Messages sent to partner service will be trusted messages
- - In. Typically selected for My Role partner links. Messages sent back to the process from partner service are accepted as trusted messages
- - Both can be needed when the transport mechanism is other than SOAP over HTTP, such as SOAP over JMS. Send and receive trusted messages.
|
Version | SAML Version to use |
Subject Name | (Optional) For outgoing messages, add a subject to indicate the the user associated with the identity information. For example, you can enter the distinguished name from your LDAP service. |
Confirmation Method | For outgoing messages, select a method: - - sender-vouches: If trust is already established with a SSL certificate, then a digital signature is not required, and you can use sender-vouches.
- - holder of key: If trust has not been established, you can select holder of key to indicate that the proof of trust is sent through digital signatures within the assertion itself.
|
Authentication Method | For outgoing messages, select a method used to authenticate the subject (to determine if the information in the assertion refers to the party making the current request). The default is urn:oasis:names:tc:SAML:1.0:am:unspecified. For details about using the other options, refer to the SAML Specification at the address given in the introduction of this topic. |
Send WS-Addressing Headers
Select this policy assertion as described in
Adding Policy Assertions.
You can add this policy assertion to a partner role partnerlink. The policy is an extension element to allow endpoints to explicitly declare if addressing should be used when making requests. Addressing is automatically added to invokes if you add this policy.
For more information, see http://www.w3.org/TR/ws-addr-metadata/#indicatinguse.
Signature
Select this policy assertion as described in
Adding Policy Assertions.
A signature policy describes the parts of a SOAP message to sign with an XML Signature, using an X.509 Certificate token to allow for verification and trust of the signed information.
- •Inbound signature is for messages received for My Role services and for replies from invoked Partner Role services. It indicates that the My Role partner role accepts signed message content and will verify the signature.
- •Outbound signature is for replies from My Role services and messages sent to invoked Partner Role services.
Set the following parameters:
SignatureParts alias | Optional keystore alias used to retrieve the key to sign. The default is the alias specified in the crypto properties file. |
Content Name | Message part or element to be signed |
Content Namespace: | Target namespace of the message part or element |
Example
<abp:SignatureParts alias="keystore_alias">
<abp:Element
namespace="http://docs.oasis-open.org/wss
/2004/01/oasis-200401-wss-wssecurity-secext-1.0.xsd"
name="UsernameToken"/>
</abp:SignatureParts>
As a message consumer, Process Server service endpoints accept and consume messages that conform to options deemed allowable under WS-I guidelines. As a message producer, Process Server supports only the recommended algorithms, references and identifiers.
The following algorithms are used for signing SOAP message parts.
- • X.509 Token
Direct Binary Reference (send and receive): Preferred method, used where possible.
Issuer Serial (send and receive): Preferred external reference method, if direct not possible.
X509 Identifier (receive only)
Subject Key Identifier (receive only)
Embedded Token References (receive only)
- • Signature Digest Algorithm:
http://www.w3.org/2000/09/xmldsig#sha1 (send and receive)
- • Signature Algorithm:
http://www.w3.org/2000/09/xmldsig#rsa-sha1 (send and receive)
- • Cannonical XML Transform Algorithm:
http://www.w3.org/2001/10/xml-exc-c14n# (send and receive)
Suppress xsi:type
Select this policy assertion as described in
Adding Policy Assertions.
You can add this policy assertion to either a partner role partner link or a my role partner link to suppress xsi:type attributes in SOAP messages.
Enabling this policy assertion effectively disables schema validation on messages for an invoke or receive since they cannot be validated without the type attributes.
This policy assertion should only be used as a workaround for legacy services that cannot deal with xsi:type attributes and cannot be fixed or upgraded.
Timestamp
Select this policy assertion as described in
Adding Policy Assertions.
This assertion adds a
<Timestamp> element to the SOAP header of a message as defined by the OASIS WS-Security 1.0 specification. Usually, a timestamp is signed, as described in the
Signature policy assertion.
The Time To Live attribute indicates the limit on receiver side that the timestamp is validated against.
The Direction attribute indicates whether the timestamp is validated only at the invoked service, only on the server, or both. The values can be in (server), out (invoked service), or both.
Web Service Timeout
Select this policy assertion as described in
Adding Policy Assertions.
For performance reasons, a reply activity matching a receive, as well as synchronous invokes, are timed out if they do not execute on Process Server within 10 minutes. If you are receiving timeout errors, you can specify a greater amount of time to wait before a process is timed out due to a reply or synchronous invoke activity not executing within 10 minutes. The default is 600 seconds.
Enter a time out value in seconds. A value of zero indicated unlimited wait time.
WS-Reliable Messaging
Select this policy assertion as described in
Adding Policy Assertions.
The WS-Reliable Messaging policy assertion specifies that a partner link participates in an industry-standard protocol that supports guaranteed delivery of messages.
The OASIS business standards consortium's WS-Reliable Messaging standard provides a protocol for the guaranteed delivery of messages. Process Server supports this standard, allowing BPEL processes to use the protocol to identify, track, and manage the reliable delivery of messages.
Process Server implementation of reliable messaging is based on the following description.
After sending a message, Process Server waits for the amount of time set in the Acknowledgement Interval to get an acknowledgement message. If Process Server times out and has not received an acknowledgement, the Process Server waits for the amount of time set in the Base Retransmission Interval before resending. If the sequence has not completed within the amount of time set in the Inactivity Timeout, Process Server considers the sequence terminated.
Add the WS-Reliable Messaging attributes as follows:
Assertion parameter | Description | Default |
|---|
Acknowledgement Address | Address to be used for acknowledgements | http://schemas.xmlsoap.org/ws/2004/08/addressing/role/anonymous This address represents the anonymous role as defined by WS-Addressing and indicates that acknowledgements are sent synchronously. |
My Role binding | SOAP binding style that this partner link uses. Specify the binding shown on the Partner Links page of the PDD wizard. | Document Literal |
Inactivity timeout | The amount of time the Process Server waits before a sequence is considered terminated. This can be set to a relatively long period of time. | 240000 (In milliseconds) |
Base transmission interval | The amount of time Process Server waits before resending an unacknowledged request. | 20000 (In milliseconds) |
Acknowledgement interval | The amount of time Process Server waits before a message is considered unacknowledged. This is usually a relatively short value. | 10000 (In milliseconds) |
WSDL Binding Reference
Select this policy assertion as described in
Adding Policy Assertions.
You can select the binding style of Policy-Driven for a my role partner link and then select this option to refer to a WSDL binding for service binding details.
Type in a Namespace URI and the associated binding details. Or select a WSDL located in the Workspace with matching binding details.
Adding Indexed Properties
Add indexed properties for use in quickly finding certain processes running on the server.
An indexed property is a process variable property that is populated with the variable (or variable part) value during process execution. If you add indexed properties to the PDD, on the Process Console, you can select indexed properties as a search filter for process instances.
Also you can use indexed properties to define a business process event. For details, see
Business Event Processing.
For example, you can find all faulting processes where the customerId is 101. In this example, the indexed property name is customerId and is based on a process variable of type string. "101" is the data value at the time the process is suspended.
Indexed properties allow for fast searching of important data items at runtime.
Add indexed property details as follows:
Name | Indexed property name. This name appears in the Indexed Property list in the Process Console. |
Type | Select the property type from: boolean, date, double, string. Match the type to the variable, part or query value |
Variable Path | Full process variable path. Select from the picklist, or select the Dialog button to open the Find a BPEL Variable dialog. If you have a long list of variables, the dialog is more convenient. |
Part | Process variable part for message type variables |
Query | Process variable part detail (optional) |
Viewing References
The References tab of the PDD Editor displays the resources in use in the deployment descriptor. When you deploy the PDD, the BPEL process and all resources listed on this tab are deployed to the server.
Eventing tab of the PDD
People tab of the PDD
For details, see the Human Task sections in this help.
Using the PDD Editor Source View
The Process Deployment Descriptor editor validates the .pdd file against a schema. If the editor detects errors, it generates errors in the Error Log when you save the file.
You may wish to edit the file in the Source tab, which is a text editor, for convenience. For example, you can specify actual endpoint locations for each Web service, or you type in a URN.
To add static endpoint references:
- 1. For each partner link, do the following:
- - Replace FILL_IN_NAMESPACE with the target namespace from the WSDL file where the partner link type is defined.
- - Replace FILL_IN_ADDRESS_URI with the URI of the service as specified in the <service> section of the WSDL file for the service. Alternately, you can specify a URN, as described in Specifying a Replaceable URN URL for an Endpoint Reference.
- - Replace FILL_IN_PORT_NAME with the service port name as specified in the <service> section of the WSDL file for the service.
- - Replace FILL_IN_SERVICE_NAME with the service name as specified in the <service> section of the WSDL file for the service.
- 2. Save the file.
Tips for using the PDD Editor Source tab:
- •Be sure to check the Error Log for a list of errors and warnings.
- •You can display line numbers in the editor, if desired. Right-mouse click in the Source view to select Preferences. Enable Show line numbers and other Text Editor preferences as desired.