Defining an Activity and Its Properties
You can select and drag any palette item to the Process Editor canvas.
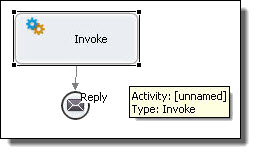
With the activity in focus on the Process Editor canvas, you can set property values in the Properties view. Be sure to select the activity, as shown on the right, and not the bordered sequence, as shown on the left.
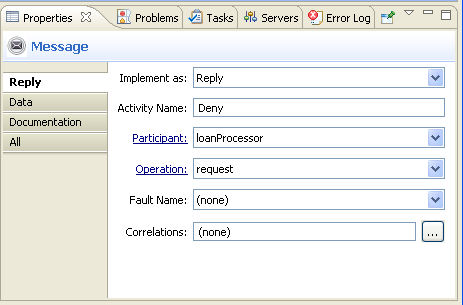
This illustration shows an example of the basic activity properties. The example activity is a reply.
Note that the BPMN construct selected is a Message throw event implemented as a Reply.
Select the All tab in the Properties view to display all the properties for an activity. The All tab contains the standard properties for all activities. In the illustration below, basic and advanced properties are displayed.
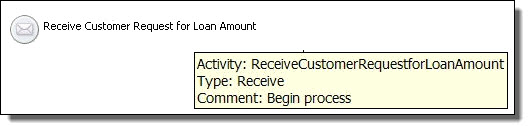
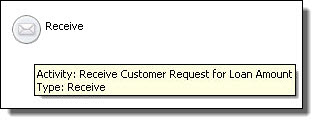
When your mouse hovers over an activity icon, you see property details for the activity. The following illustration shows an example.
For more information, see:
Selecting Values for Activity Properties
When you add an activity to the Process Editor canvas, the Properties view displays all of the valid properties for it. Some properties are activity-specific, and some are standard for all activities.
For example, the Create Instance property is valid only for a receive or pick activity. The Copy Operation is valid only for the assign activity.
You assign values to properties as follows:
- •For Activity Name, there are several choices. See Selecting Activity Labels.
- •For list-valued properties, such as Variable, select from the list.
- •For building a complex property, such as for Correlation Sets, click the Dialog (...) Button.
Selecting Activity Labels
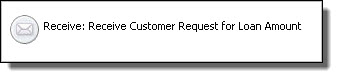
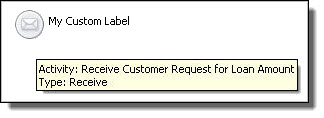
When you add an activity to the Process Editor canvas, it is labeled with the activity type. For example, a receive activity is labeled Receive. You can make the label more meaningful by adding a name or description. You can also add a name but display only the type to preserve screen real estate.
The following examples show some labeling choices. Notice that you can keep the label short, if desired, and then use hover help to display details.
Activity Type: Name | Activity Type | Custom Label |
Create a label in one of the following ways:
- •Edit the activity label directly on the Process Editor canvas or fill in Activity Name in the Properties view
- •Select a label type from the Label property
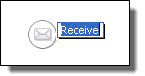
To edit the activity label:
- 1. In the Process Editor canvas, click in the activity label. The label field changes to an edit field, as shown.
- 2. Type in a label that is the same as an activity name. You can include spaces or special characters.
Select the label type from the Label field in Properties view as follows:
Activity Name or Type | By default, the type is displayed. If you add a name, the name is displayed and is editable on the canvas. |
Activity Name | This is for display purposes only. It can include spaces and special characters, and is editable on the canvas. It does not export with the BPEL XML. |
Activity Type | The best choice to preserve screen real estate. The Type is not editable on the canvas. |
Activity Type: Name | Meaningful label, but is not editable on the canvas. |
Custom | Type text in the Custom Label field |
Standard Properties for Activities
The following table shows standard properties for all activities. The table does not include activity-specific properties, which are discussed under each activity.
Attribute | Description |
|---|
Suppress Join Failure | |
Join Condition | |
Comment | |
Documentation | |
Execution State | |
Extension Attributes and Elements | |
The Suppress Join Failure, Join Condition, and Extension properties appear in the Properties view when you select the All tab on the Properties view.
Adding a Background Color
To enhance a diagram's meaning, you can add color to the following activities:
- •Any bordered activity. Bordered activities are in the Tasks drawer of the BPMN palette.
- •Collapsed Scope. Collapse a scope by right-mouse clicking on it and selecting Collapse Container. A scope is referred to as an embedded subprocess in the BPMN palette, in the Control Flow drawer.
- •Collapsed fault, event or compensation handlers
Creating an Activity by Starting with a WSDL Interface
Select the activity type to create. Select Receive-Reply to create a matching Reply for the Receive. To activate the OnMessage activity, drop the Operation Wizard icon onto a Pick activity. For an OnEvent, drop the Wizard onto a process or scope Event handler. Select a fault name declared in the referenced WSDL file. Select an existing fault variable or create a new one. Select No Variable to use a message part for the activity.
Process Developer has a shortcut for you to create activities for an executable process. You can create a Web interaction activity by selecting an operation from the Participants or Interfaces view and completing a wizard.
For a key productivity starting point, see Using the Participants View.
Starting with a Partner Link Type Definition
If your WSDL file does not yet include partner link type definitions, you can select an operation from a port type.
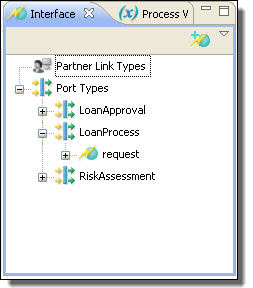
- 1. Display the Partner Link Type element from a WSDL. The illustration shows an example of the loanProcess port type prior to the partner link type creation.
- 2. Select an operation to receive from, reply to, or invoke.
- 3. Drag the operation to one of the following locations:
- - Anywhere on Process Editor canvas to create a receive, reply, reply with fault, or invoke
- - Inside a scope on the Process Editor canvas if you want to create scope-level partner links or variables
- - Pick activity to create an onMessage and/or Reply
- - Event handler to create an onEvent and/or Reply
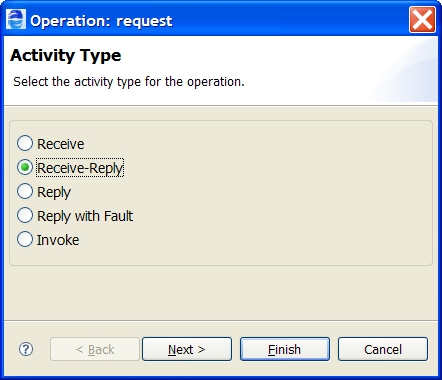
The list that appears on the Activity Type page varies depending on the location on which you dropped the operation. The following illustration shows the activities for a process or scope-level location, not for a pick activity or event handler. The Receive-Reply combination is listed because the WSDL operation has both input and output messages. Similarly, a Reply with Fault is listed because a fault is declared for the WSDL operation.
- 4. Select the activity type. As a shortcut, you can select Receive-Reply to set up matching activities at the same time. Click Next.
If you are creating a Reply with Fault, see Creating a Reply with Fault.
- 5. Accept an existing process-level or ancestor scope partner link you have already defined in your process, if available, or type in a new one. A partner link identifies the roles played by the process and service. If you are creating a new partner link inside a scope, you can select Enclosing Scope for the declaration of the Location, making the partner link locally available only, instead of globally available to the process. Click Next.
You can edit the partner link and other wizard information after you have finished the wizard.
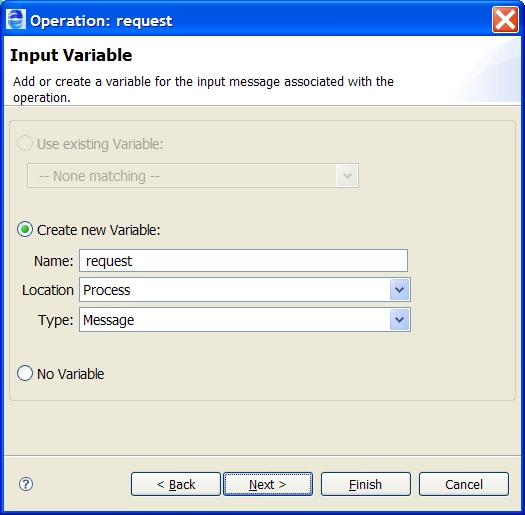
- 6. Choose one of the following for the input variable, and then click Next:
- - Use an existing variable name associated with the operation's input message
- - Type in a new name for the input variable in your process. Select the Location for the declaration: Process or Enclosing Scope. Specify the variable type: Message or Element. If the variable is a message type with a single part defined by an element, you can select Element.
- - Select No Variable if the variable is for an empty message or you want to create a fromPart or toPart for the activity. See From Variable to Part for details.
- 7. For an invoke or reply activity, repeat step 6 for the output variable name. Click Finish.
Creating a Reply with Fault
If you select Reply with Fault from the Operation Wizard, complete the following steps.
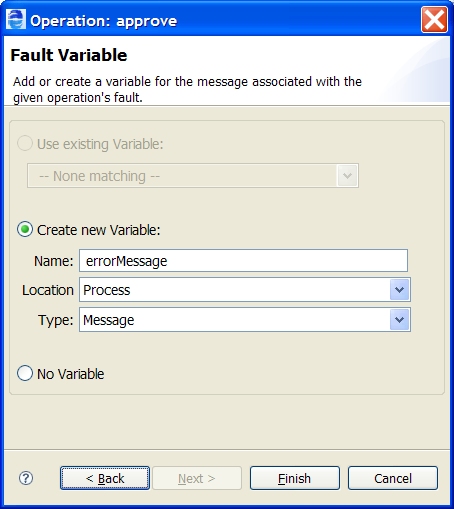
- 1. Select a fault declared for the operation, and click Next.
- 2. Make one of the following selections for the fault variable:
- - Use an existing variable name associated with the operation fault variable
- - Type in a new name for the fault variable in your process. Select the Location for the declaration: Process or Enclosing Scope. Specify the variable type: Message or Element. If the variable is a message type with a single part defined by an element, you can select Element.
- - Select No Variable if the variable is for an empty message or you want to create a fromPart or toPart for the activity. See From Part to Variable for details.
Starting without a Partner Link Type Definition
If the selected operation is not yet associated with a partner link type, you can select an operation from a port type. A wizard appears so you can create a partner link type definition and add it to an existing WSDL file or create a new WSDL file. For more information, see Partner Link Type.
Creating a Custom Activity
Select an activity or activity group previously saved in the Custom palette.
You can save any activity or set of activities from a BPEL file as a custom activity. You can shorten design time by reusing the custom activity in other BPEL files.
To create a custom activity:
- 1. Select one or more activities or containers on the Process Editor canvas.
- 2. Right-mouse click and select Add to Palette.
The Custom palette appears, if it was previously empty. The selection is added to the Custom palette as Custom1.
- 3. Right-click the custom icon and select Customize.
- 4. Rename the custom icon by typing in the Name field.
- 5. You can use either Small (20 x 20 max.) or Large (32 x 32 max.) images for the item's icon.
- 6. Click OK.