You can configure when an objective is triggered and the types of records to which it applies.
You can configure to reject records that fail validations. You can also enable data dependency between rule associations.
Specifying record types for an objective
You can specify the types of records to which an objective can be applied.
You can select master records, source records, or both as input record types for an objective. For example, you can apply an objective only to master records when you create or update them in business applications.
When you set source records as the input record type for an objective, the objective is triggered whenever source and patch records are created or updated. Also, you can refine the condition further by specifying one or more source systems. When you specify a source system, the objective is triggered when source records with the specified source systems are created or updated. For example, if you choose Salesforce as the source system for an objective, the objective applies only to records with the Salesforce source system.
When you select both master and source records as input record types for an objective, consider the following behaviors:
•Based on the source systems that you specify, the rule associations in the objective run on source records from the specified source systems. The results of the rule associations are applied to the source records. Based on the survivorship configuration, the changes might survive to the master records.
•After the master record is created or updated, the rule associations run on the master record again. The results of the rule associations are then applied to the master record.
The following table describes the compatible triggers for input record types:
Record Type
Triggers
Description
Master records
- Business applications
- REST APIs
- Ingress
- Bulk Edit
- Merge Job
- Reprocess Master Data Job
- Recalculate Trust Scores Job
An objective is applied to master records that are created through business applications and REST APIs. If you enabled the ability to run objectives on master records that are created or updated through batch processing for your organization, the objectives can run on master records during batch processing. The triggers for batch processing include ingress, bulk edit, merge job, reprocess master data job, and recalculate master data job.
Note:
When you restore a deleted master record, objectives configured for master records are triggered and applied to the master record.
Note:
Effective in the October 2026 release, enrichment and validation of master records during batch processing through ingress, file import, bulk edit, merge, reprocess master data job, and recalculate trust scores jobs is available for preview. Preview functionality is supported for evaluation purposes but is unwarranted and is not supported in production environments or any environment that you plan to push to production. Informatica intends to include the preview functionality in an upcoming release for production use, but might choose not to in accordance with changing market or technical circumstances. For more information, contact Informatica Global Customer Support.
Source records
- Business applications
- REST APIs
- Ingress
- Bulk Edit
- Reprocess Master Data Job
- Recalculate Trust Scores Job
An objective is applied to source records created or updated through business applications, ingress, file import, REST APIs, bulk edit, reprocess master data jobs, and recalculate trust scores jobs.
Note:
After you import an objective group that you exported before the July 2025 release, if the input record type is set to source records, you can change the record type to master records in the advanced settings of the objective
Effective in the October 2026 release, the ability to configure bulk edit, merge job, reprocess master data job, and recalculate trust scores job as triggers is available for preview. Preview functionality is supported for evaluation purposes but is unwarranted and is not supported in production environments or any environment that you plan to push to production. Informatica intends to include the preview functionality in an upcoming release for production use, but might choose not to in accordance with changing market or technical circumstances. For more information, contact Informatica Global Customer Support.
Configuring actions for an objective
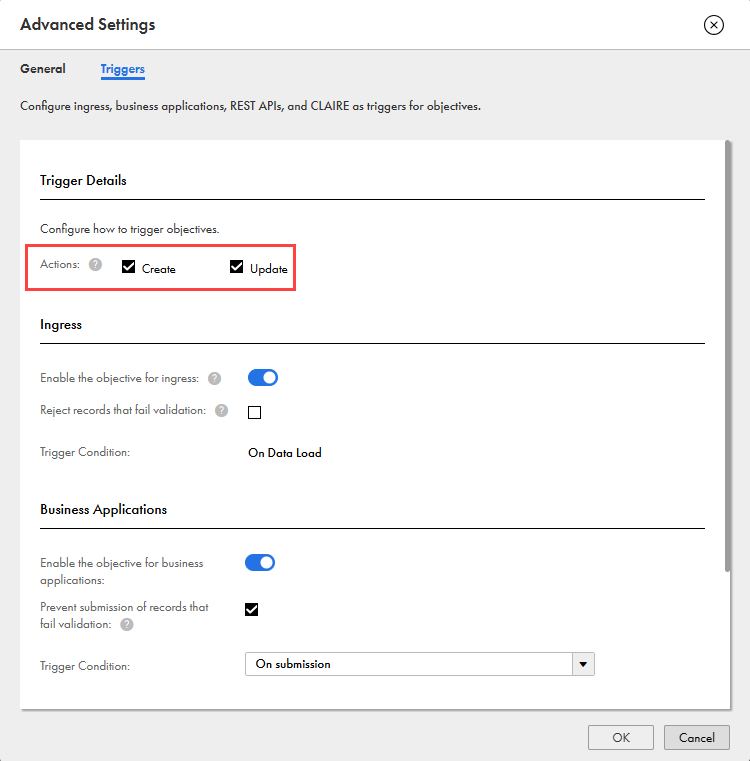
When you configure triggers for an objective, you can configure the objective to run when a user creates records, updates records, or performs both actions.
For example, you are a data entry operator at NovaHealth Hospital. When you onboard a patient by creating their record, you want an objective to automatically populate fields such as record creation date and record status. Similarly, when you update the record with a new address, you want an objective to verify the address. To meet these requirements, you can configure an objective that runs only on new records. You can also configure an objective that runs only when an existing record is updated.
The following image shows the create and update actions enabled in the advanced settings of an objective:
Note:
Effective in the October 2026 release, the ability to configure bulk edit, merge job, reprocess master data job, and recalculate trust scores job as triggers is available for preview. Preview functionality is supported for evaluation purposes but is unwarranted and is not supported in production environments or any environment that you plan to push to production. Informatica intends to include the preview functionality in an upcoming release for production use, but might choose not to in accordance with changing market or technical circumstances. For more information, contact Informatica Global Customer Support.
Objective trigger modes
When you configure objectives, you can specify whether you want to run objectives automatically or on request.
You can configure an objective with one of the following modes:
Automatic
If you want objectives to run automatically when a record is created or updated, choose the trigger mode as automatic and configure the objectives with the triggers, such as business applications, ingress, and REST APIs.
On Request
If you want CLAIRE Copilot to run objectives, choose the on-request trigger mode and configure objectives with CLAIRE as the trigger. On-request objectives run when users request CLAIRE Copilot to enrich records using objectives.
Note:
You can configure on-request objectives only for master records. You can enable up to 10 on-request objectives with CLAIRE as a trigger for a business entity. If you exceed this limit, you can't save the associated objective group.
Configuring business applications as an objective trigger
To run an objective automatically when users create or update a record in business applications, configure business applications as triggers for the objective.
When you configure business applications as a trigger for an objective, you can select one of the following trigger conditions:
•On submission. The objective runs when users submit records.
•On section save and submission. The objective runs when users apply changes to a section or submit a record. This condition allows users to view the results of the objective before they submit records. This condition doesn't trigger objectives for master records. If an objective configured with this trigger condition includes a rule association that adds records to hierarchies, you can't save the objective.
•On field focus change and submission. The objective runs when the focus on a field changes in a record and when users submit the record. This condition doesn't trigger objectives for master records.
Rule associations configured with the following plugins don't run when the field focus changes in a record:
- Application Integration-based Cleansing
- Application Integration-based Enrichment
- Application Integration-based Validation
If an objective configured with this trigger condition includes a rule association that adds records to hierarchies, you can't save the objective.
Only the objectives configured for source records run when a field focus changes or users apply changes to a section. Objectives don't run on master records when a field focus changes or users apply changes to a section.
Note:
If objectives with the On section save and submission or On submission conditions are configured for a field group, MDM SaaS runs those objectives when users delete a field group entry. If the deleted field group entry had validation errors from a previous run, MDM SaaS removes the validation error messages that no longer apply.
If you configure an objective to reject records with validation errors, users can't submit records that fail validation. For more information about rejecting records that fail validation, see Rejecting records with validation errors.
To run objectives automatically when users import or ingress source records, you can configure ingress as a trigger for objectives.
You can't trigger an objective for master records during ingress or file import.
Rule associations in an objective run during the Load step when you ingress or import files. If you configure the objective to reject records with validation errors, records that fail validation are rejected. To identify rejected records, you can download the Rejected Records report from the Errors section in the Load step of the job. You can also use the report to identify rule associations that fail with the Exception status.
Note:
Rule associations that use the following plugins don't run during ingress or import of records:
•Application Integration-based Cleansing
•Application Integration-based Enrichment
•Application Integration-based Validation
Configuring REST APIs as an objective trigger
To run an objective automatically when records are created or updated through REST APIs, you can configure REST APIs as an objective trigger.
When a record is created or updated through REST APIs, MDM SaaS triggers the objective and all rule associations in the objective run. The results are applied to the record before it is saved. The API waits until the record is saved before returning a response. If you configure the objective to reject records with validation errors, records that fail validation aren't created or updated, and the API returns information about the validation error.
If you configure an objective to reject records with validation errors, records that fail validation can't be created or updated. For more information about rejecting records that fail validation, see Rejecting records with validation errors.
To run objectives when users ask CLAIRE Copilot to enrich records using objectives, use CLAIRE as a trigger for the objectives.
You can configure CLAIRE as a trigger only for on-request objectives.
When users ask CLAIRE Copilot to enrich records using objectives, the Copilot displays the on-request objectives. Users can select specific or all objectives to run using CLAIRE Copilot.
CLAIRE Copilot can't run the following types of objectives:
•Objectives that are configured to display enrichment data as recommendations
•Objectives that are configured to perform validation and cleansing
When you configure on-request objectives, don't use rule associations that use system fields as input fields. On-request objectives aren't triggered when system fields are updated.
Preview Notice:
Effective in the April 2026 release, the ability to configure CLAIRE as a trigger is available for preview.
Preview functionality is supported for evaluation purposes but is unwarranted and is not supported in production environments or any environment that you plan to push to production. Informatica intends to include the preview functionality in an upcoming release for production use, but might choose not to in accordance with changing market or technical circumstances. For more information, contact Informatica Global Customer Support.
Configuring bulk edit as a trigger
You can configure objectives to run when users edit records in bulk.
This trigger works on both master records and source records. You can enable the option to reject records only for objectives that are configured to run on source records. You can't enable the option for objectives configured for master records. However, you can find records with validation errors or an exception status in the reports that are available in the bulk edit step of the job.
You can't use the following plugins in an objective that has the bulk edit trigger enabled:
•DaaS Real-Time Email Verification
•DaaS Real-Time Phone Verification
You can enable this trigger only for objectives configured to run on record updates or on both record creation and updates, because it triggers objectives only when users edit records.
Preview Notice:
Effective in the October 2026 release, the ability to configure an objective with bulk edit as a trigger is available for technical preview. Preview functionality is supported for evaluation purposes but is unwarranted and is not supported in production environments or any environment that you plan to push to production. Informatica intends to include the preview functionality in an upcoming release for production use, but might choose not to in accordance with changing market or technical circumstances. For more information, contact Informatica Global Customer Support.
Configuring merge job as a trigger
You can configure the merge job as a trigger for an objective to validate and enrich master records when they are created through a merge job.
The trigger runs the objective when match and merge jobs merge records and create new master records. This trigger doesn't run objectives when users manually merge records in business applications.
The merge job trigger works only on master records. You can enable this trigger only for the objectives that are configured to run on record creation or both record creation and updates. When you enable this trigger, you can't enable the option to reject records that fail validation.
You can't use the following plugins in an objective that has the merge job trigger enabled:
•DaaS Real-Time Email Verification
•DaaS Real-Time Phone Verification
Preview Notice:
Effective in the October 2026 release, the ability to configure an objective with the merge job as a trigger is available for technical preview. Preview functionality is supported for evaluation purposes but is unwarranted and is not supported in production environments or any environment that you plan to push to production. Informatica intends to include the preview functionality in an upcoming release for production use, but might choose not to in accordance with changing market or technical circumstances. For more information, contact Informatica Global Customer Support.
Configuring reprocess master data job as a trigger
You can configure the reprocess master data job as a trigger for an objective to validate and enrich master records and source records that already exist.
After you update rule associations or configurations for enrichment and validation, you can reprocess records to apply the updated rule associations or configurations by using this trigger. The trigger runs the objective when a reprocess master data job runs. The objectives that have this trigger enabled run on master records, source records, or both. The objectives run on master records only if the values from reprocessed source records survive into those master records.
You can enable the option to reject records only for objectives that are configured to run on source records and not on master records. However, you can find the records with validation errors or an exception status in the reports that are available in the reprocess master data step of the job.
If the reprocess master data job is configured for both active and deleted records, the objective runs only on active records.
You can't use the following plugins in an objective that has the reprocess master data job trigger enabled:
•DaaS Real-Time Email Verification
•DaaS Real-Time Phone Verification
Preview Notice:
Effective in the October 2026 release, the ability to configure an objective with the reprocess master data job as a trigger is available for technical preview. Preview functionality is supported for evaluation purposes but is unwarranted and is not supported in production environments or any environment that you plan to push to production. Informatica intends to include the preview functionality in an upcoming release for production use, but might choose not to in accordance with changing market or technical circumstances. For more information, contact Informatica Global Customer Support.
Configuring recalculate trust score job as a trigger
You can configure the recalculate trust score job as a trigger for an objective to validate and enrich master records.
Use this trigger to recalculate trust scores of master records after you update survivorship configurations. The trigger runs the objective when a reprocess master data job with the recalculate trust score process type runs. This trigger works only on master records. You can't configure the trigger for source records. The objectives with this trigger run on master records only if the values survive into those master records.
You can enable the option to reject records only for objectives that are configured to run on source records and not on master records. However, you can find the records with validation errors or an exception status in the reports that are available in the recalculate trust score step of the job.
You can't use the following plugins in an objective that has the recalculate trust score trigger enabled:
•DaaS Real-Time Email Verification
•DaaS Real-Time Phone Verification
Preview Notice:
Effective in the October 2026 release, the ability to configure an objective with the recalculate trust score job as a trigger is available for technical preview. Preview functionality is supported for evaluation purposes but is unwarranted and is not supported in production environments or any environment that you plan to push to production. Informatica intends to include the preview functionality in an upcoming release for production use, but might choose not to in accordance with changing market or technical circumstances. For more information, contact Informatica Global Customer Support.
Data dependency between rule associations
You can configure an objective to allow a rule association to use the output of another rule association as its input.
Rule associations within an objective run sequentially. By default, a rule association can't use the output of another rule association as input. You can override this behavior by enabling data dependency between rule associations within the same objective.
Note:
If one of the rule associations fails with the Exception status, the subsequent rule associations in the objective don't run.
For example, consider that you work for a pharmaceutical company. To comply with regulations in the US market, you already use a unique National Drug Code (NDC) with every product. To comply with regulations in the European markets, you want to generate Medicinal Product Package Identifier (PCID) and Medicinal Product Identifier (MPID) codes from the National Drug Code.
To meet this validation and enrichment requirement, configure the following rule associations in an objective:
1Validate and Cleanse NDC. Validates the national drug code to check if the value in the field contains 11 characters. If the length is 9-10, the rule association adds zeros to the input value and returns the cleansed value. If the length is below 9, the validation fails, and the rule association returns validation results without any cleansed data.
2Generate PCID from NDC. Generates PCID by concatenating the value in the National Drug Code field with the country code.
3Generate MPID from PCID. Generates MPID by removing the packaging code from the PCID value.
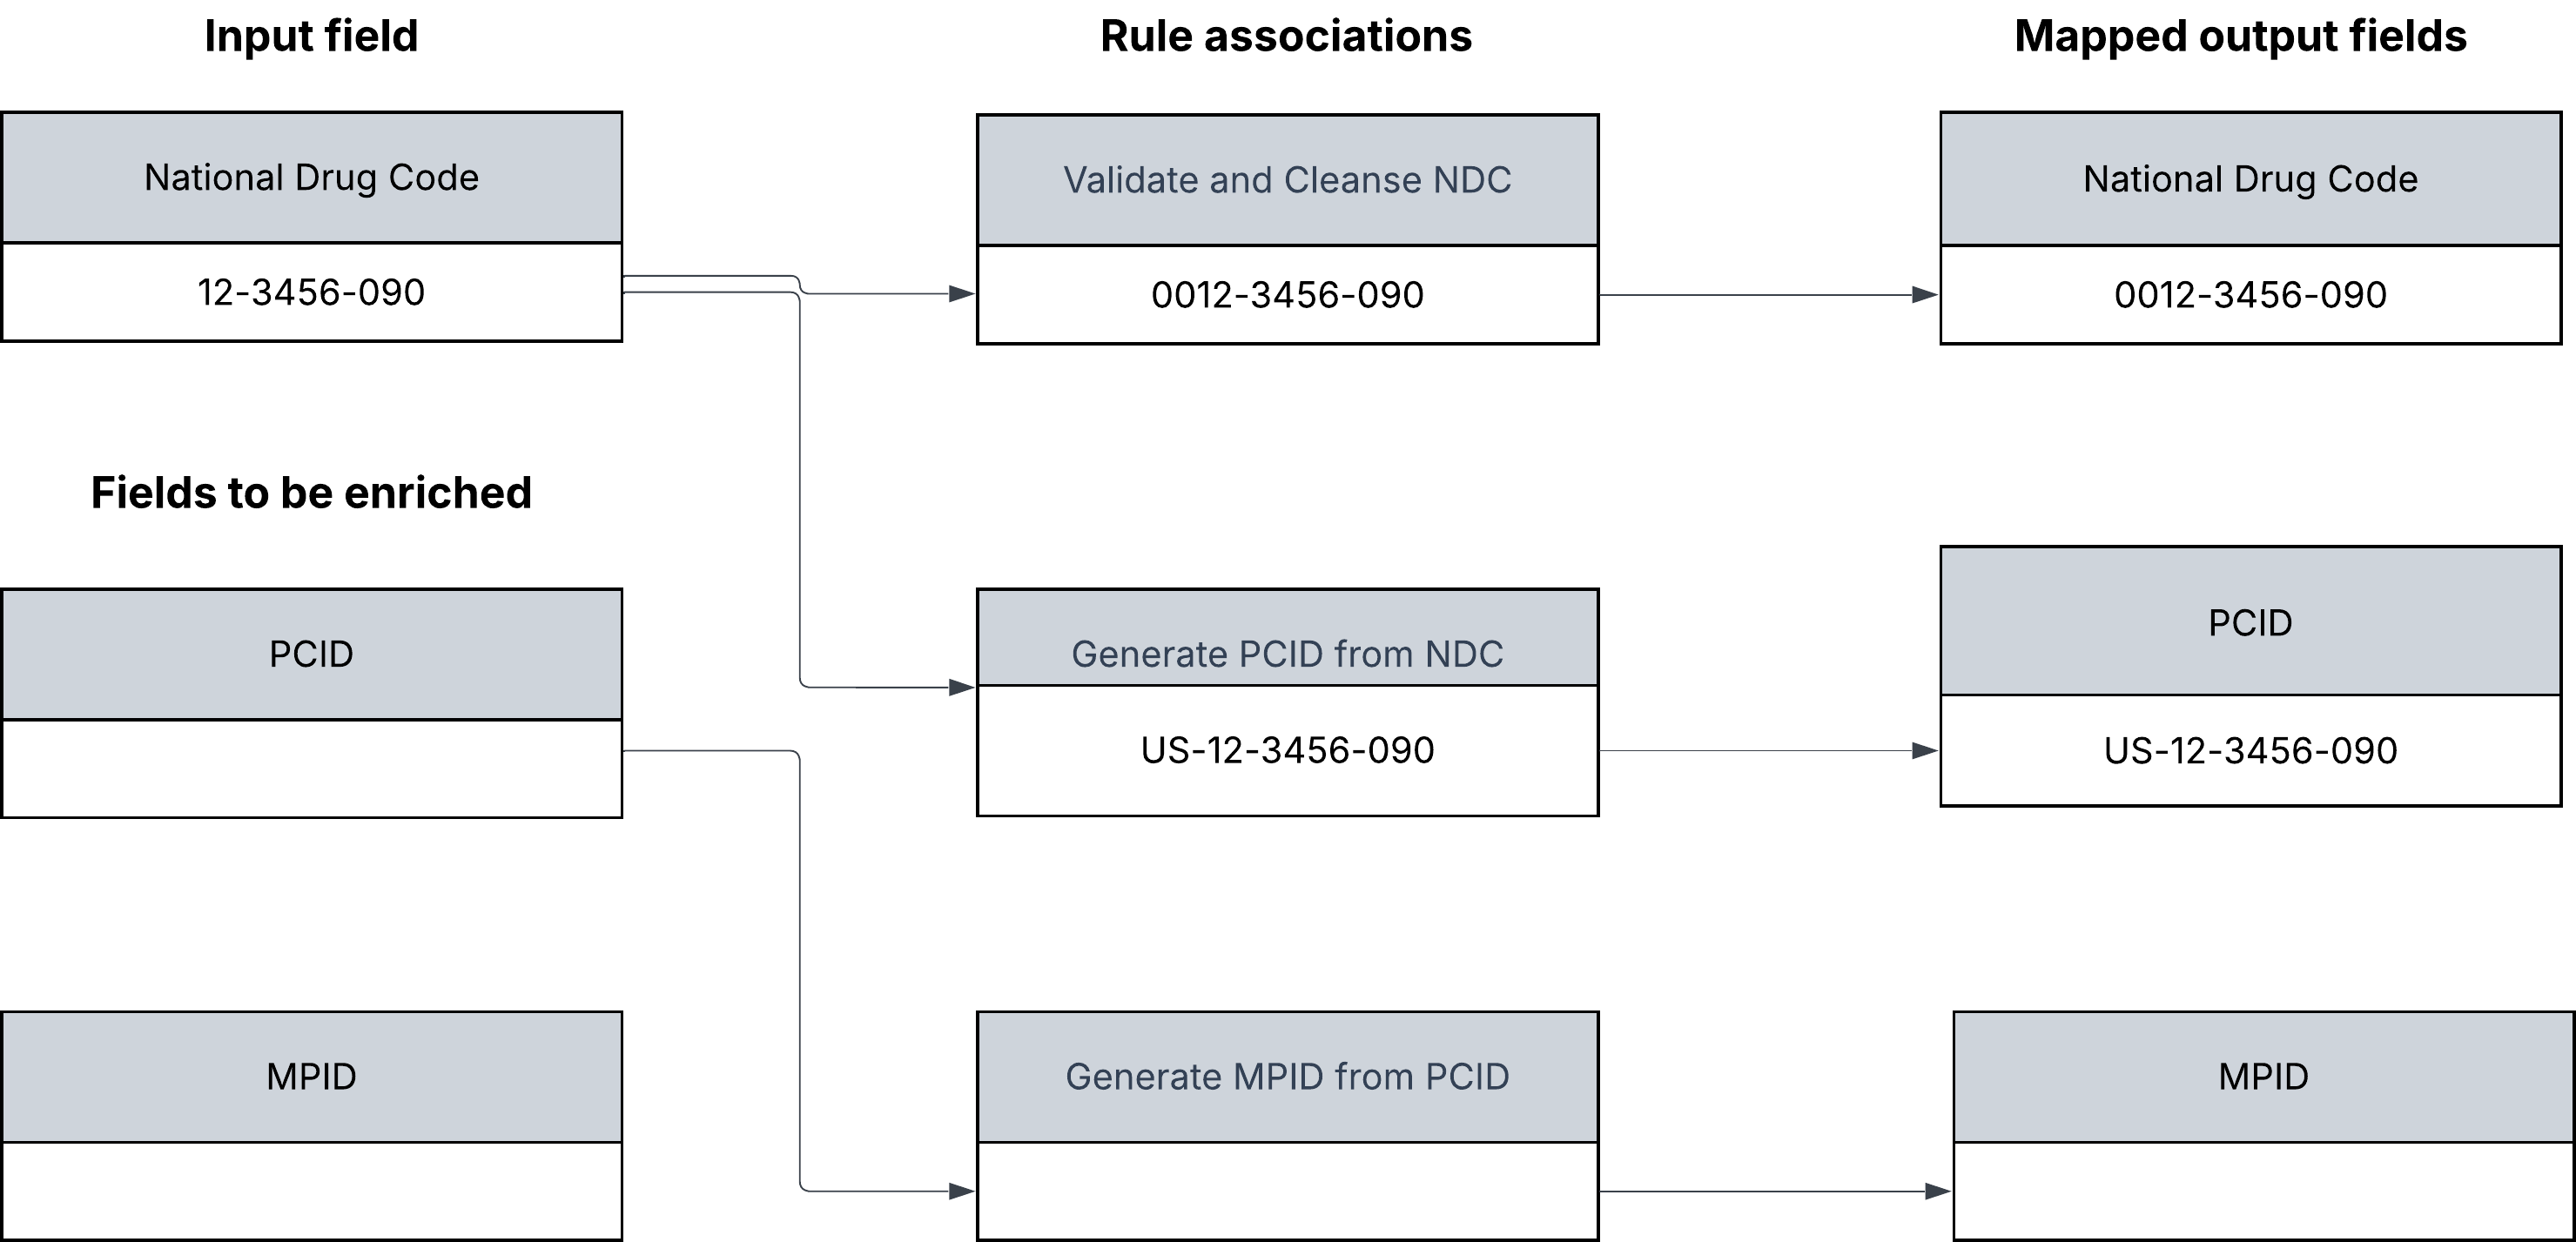
The following diagram shows how rule associations work without data dependency:
MDM SaaS saves the results only after all rule associations complete their run. In this sample scenario, the MPID field remains blank because the Generate MPID from PCID rule association didn't get the result of Generate PCID from NDC rule association.
When a user enters 12-3456-090 in the National Drug Code field and submits the record, the Validate and Cleanse NDC rule association standardizes the value to 0012-3456-090. However, this value isn't saved to the record until all rule associations complete their run. As a result, when the Generate PCID from NDC rule association runs, the National Drug Code field still contains the value 12-3456-090. The rule association adds the country code to that value and generates the value US-12-3456-090 for the PCID field.
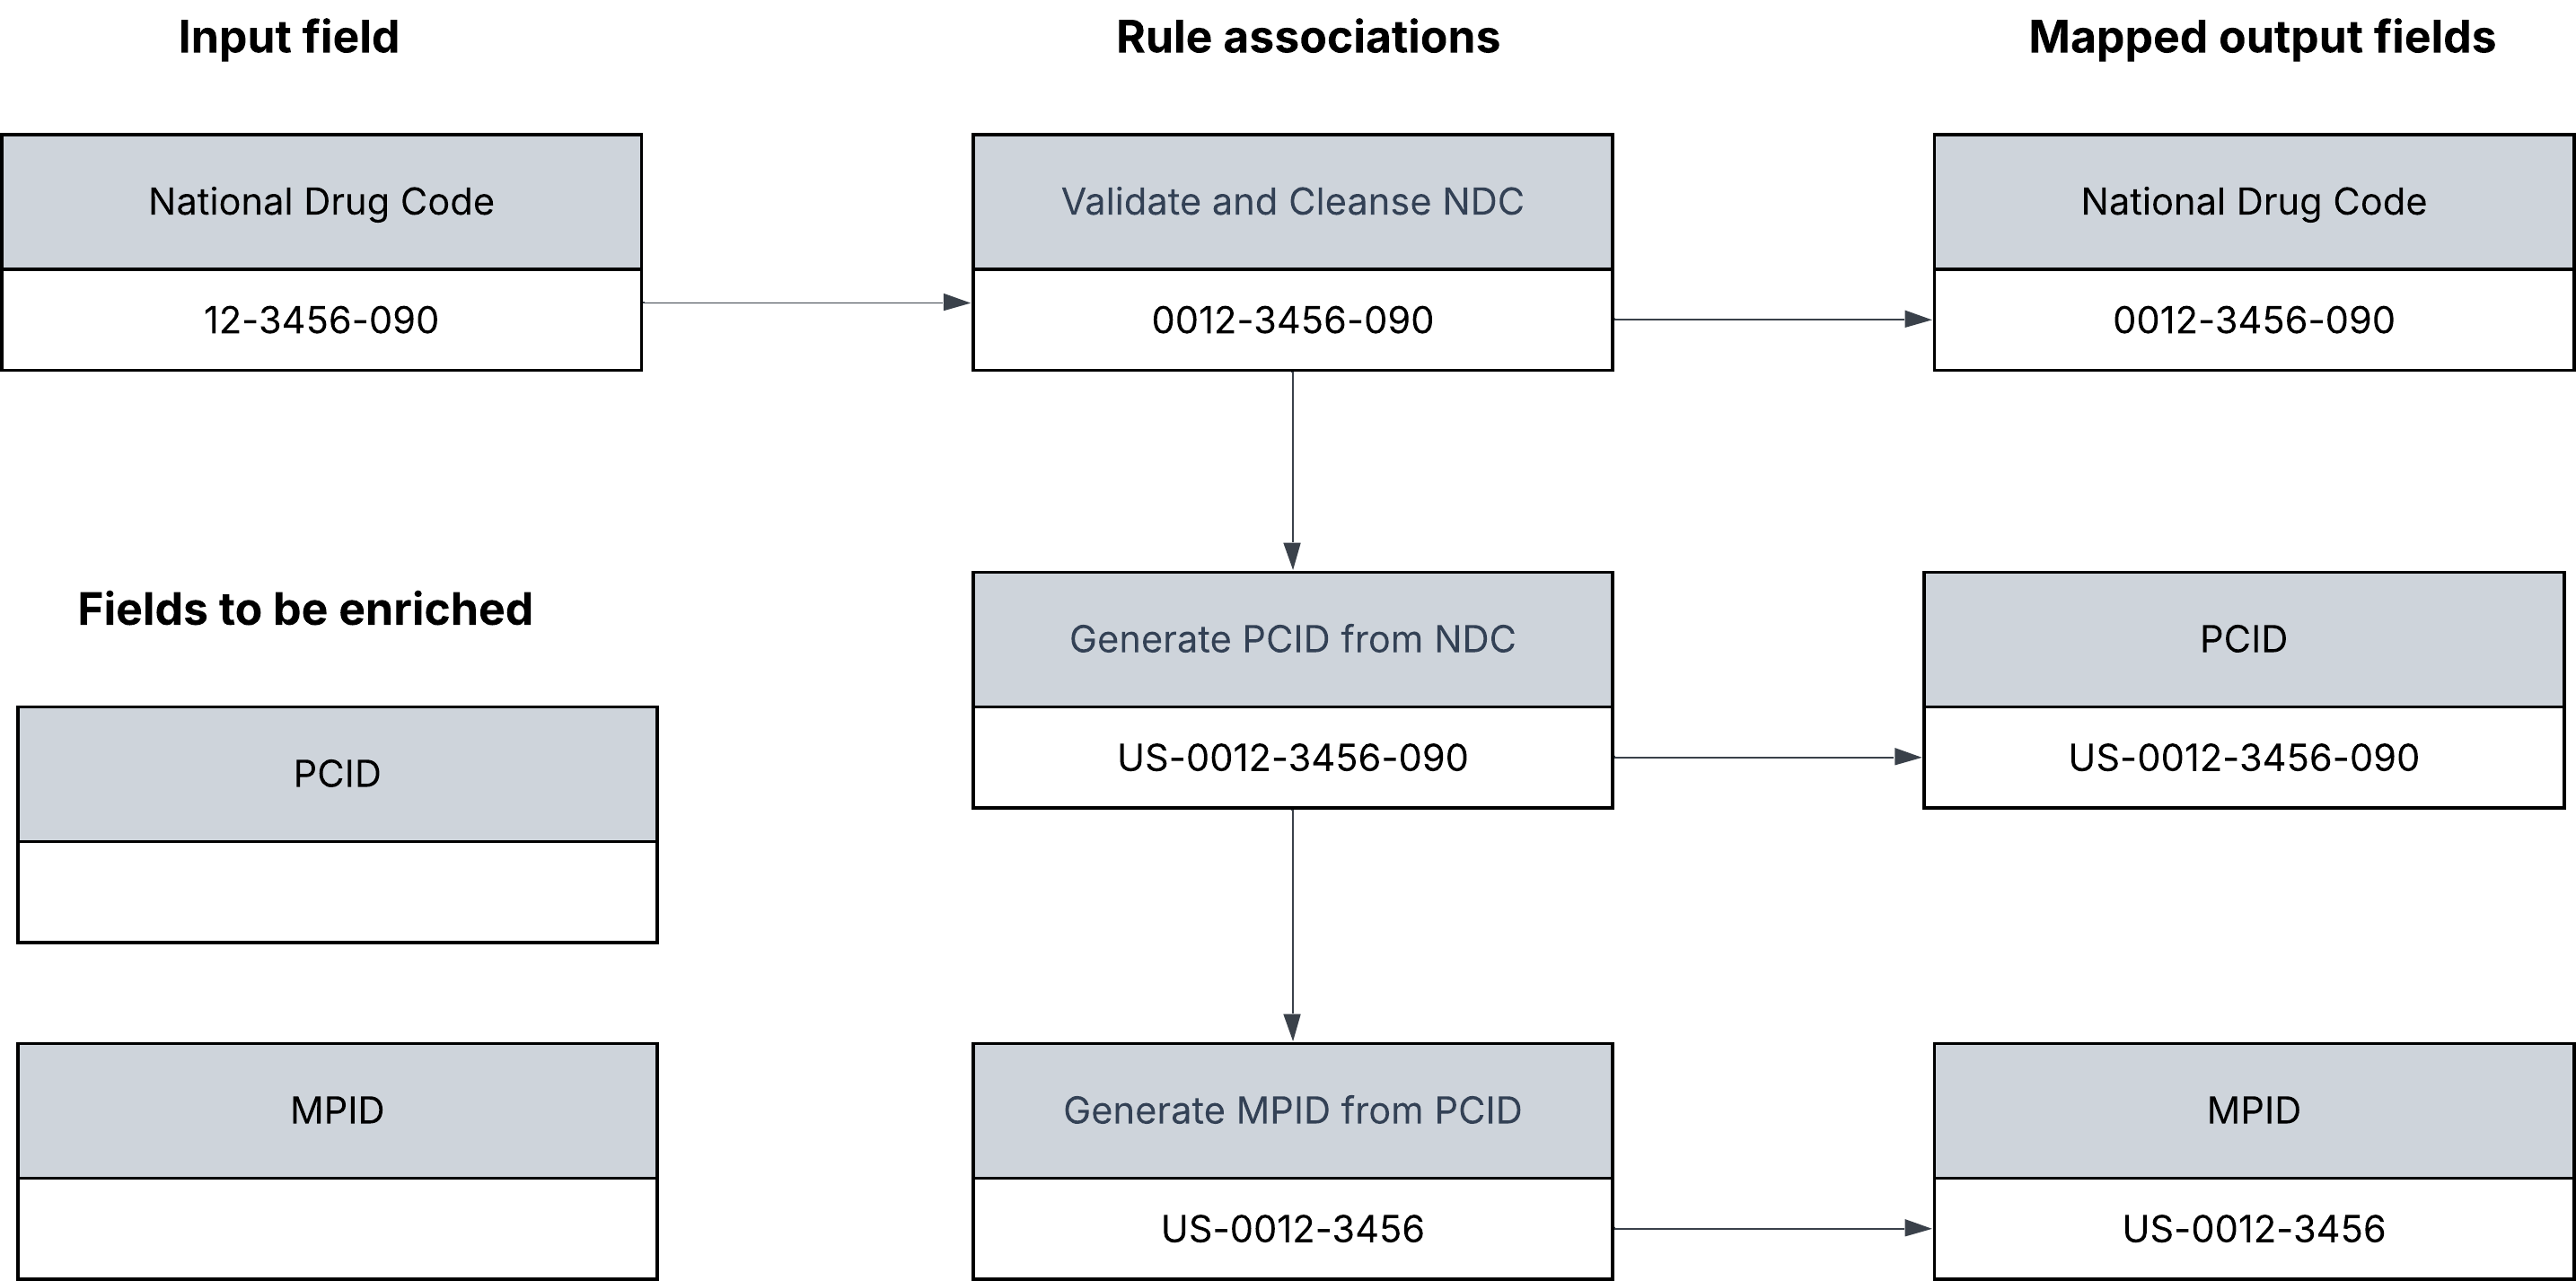
The following diagram shows how the rule associations work with data dependency:
When a user enters 12-3456-090 in the National Drug Code field and submits the record, the Validate and Cleanse NDC rule association standardizes the value to 0012-3456-090. The Generate PCID from NDC rule association gets the output of the previous rule association as input. The rule association adds the country code and generates US-0012-3456-090, which includes country code plus the 11-digit drug code. The Generate MPID from PCID rule association gets the output US-0012-3456-090 from the previous rule association as input. It removes the packaging code from the PCID value to produce the MPID value US-0012-3456.
Note:
If data dependency between rule associations is enabled for an objective, disabled rule associations in the objective don't run when the objective is triggered. If an objective includes a disabled rule association, the subsequent rule association might not receive an input value from the disabled rule association.
When you configure objectives that handle validations, you can choose to reject records that fail validations.
When you enable the option to reject records, MDM SaaS rejects source records with validation errors or exception status. This option works on master records that are created or updated through business applications and REST APIs. MDM SaaS doesn't reject master records that are created or updated through the ingress, file import, bulk edit, recalculate trust scores, merge, and reprocess master data jobs that process data in batches.
When users apply changes to sections in drafts, objectives run on input fields in each section. If you enable the option to reject records for the objectives and the input fields fail validation, the drafts aren't rejected. Users can continue to work on the drafts and correct validation errors before they submit the drafts. However, if the drafts contain validation errors when users submit them, those records are rejected.
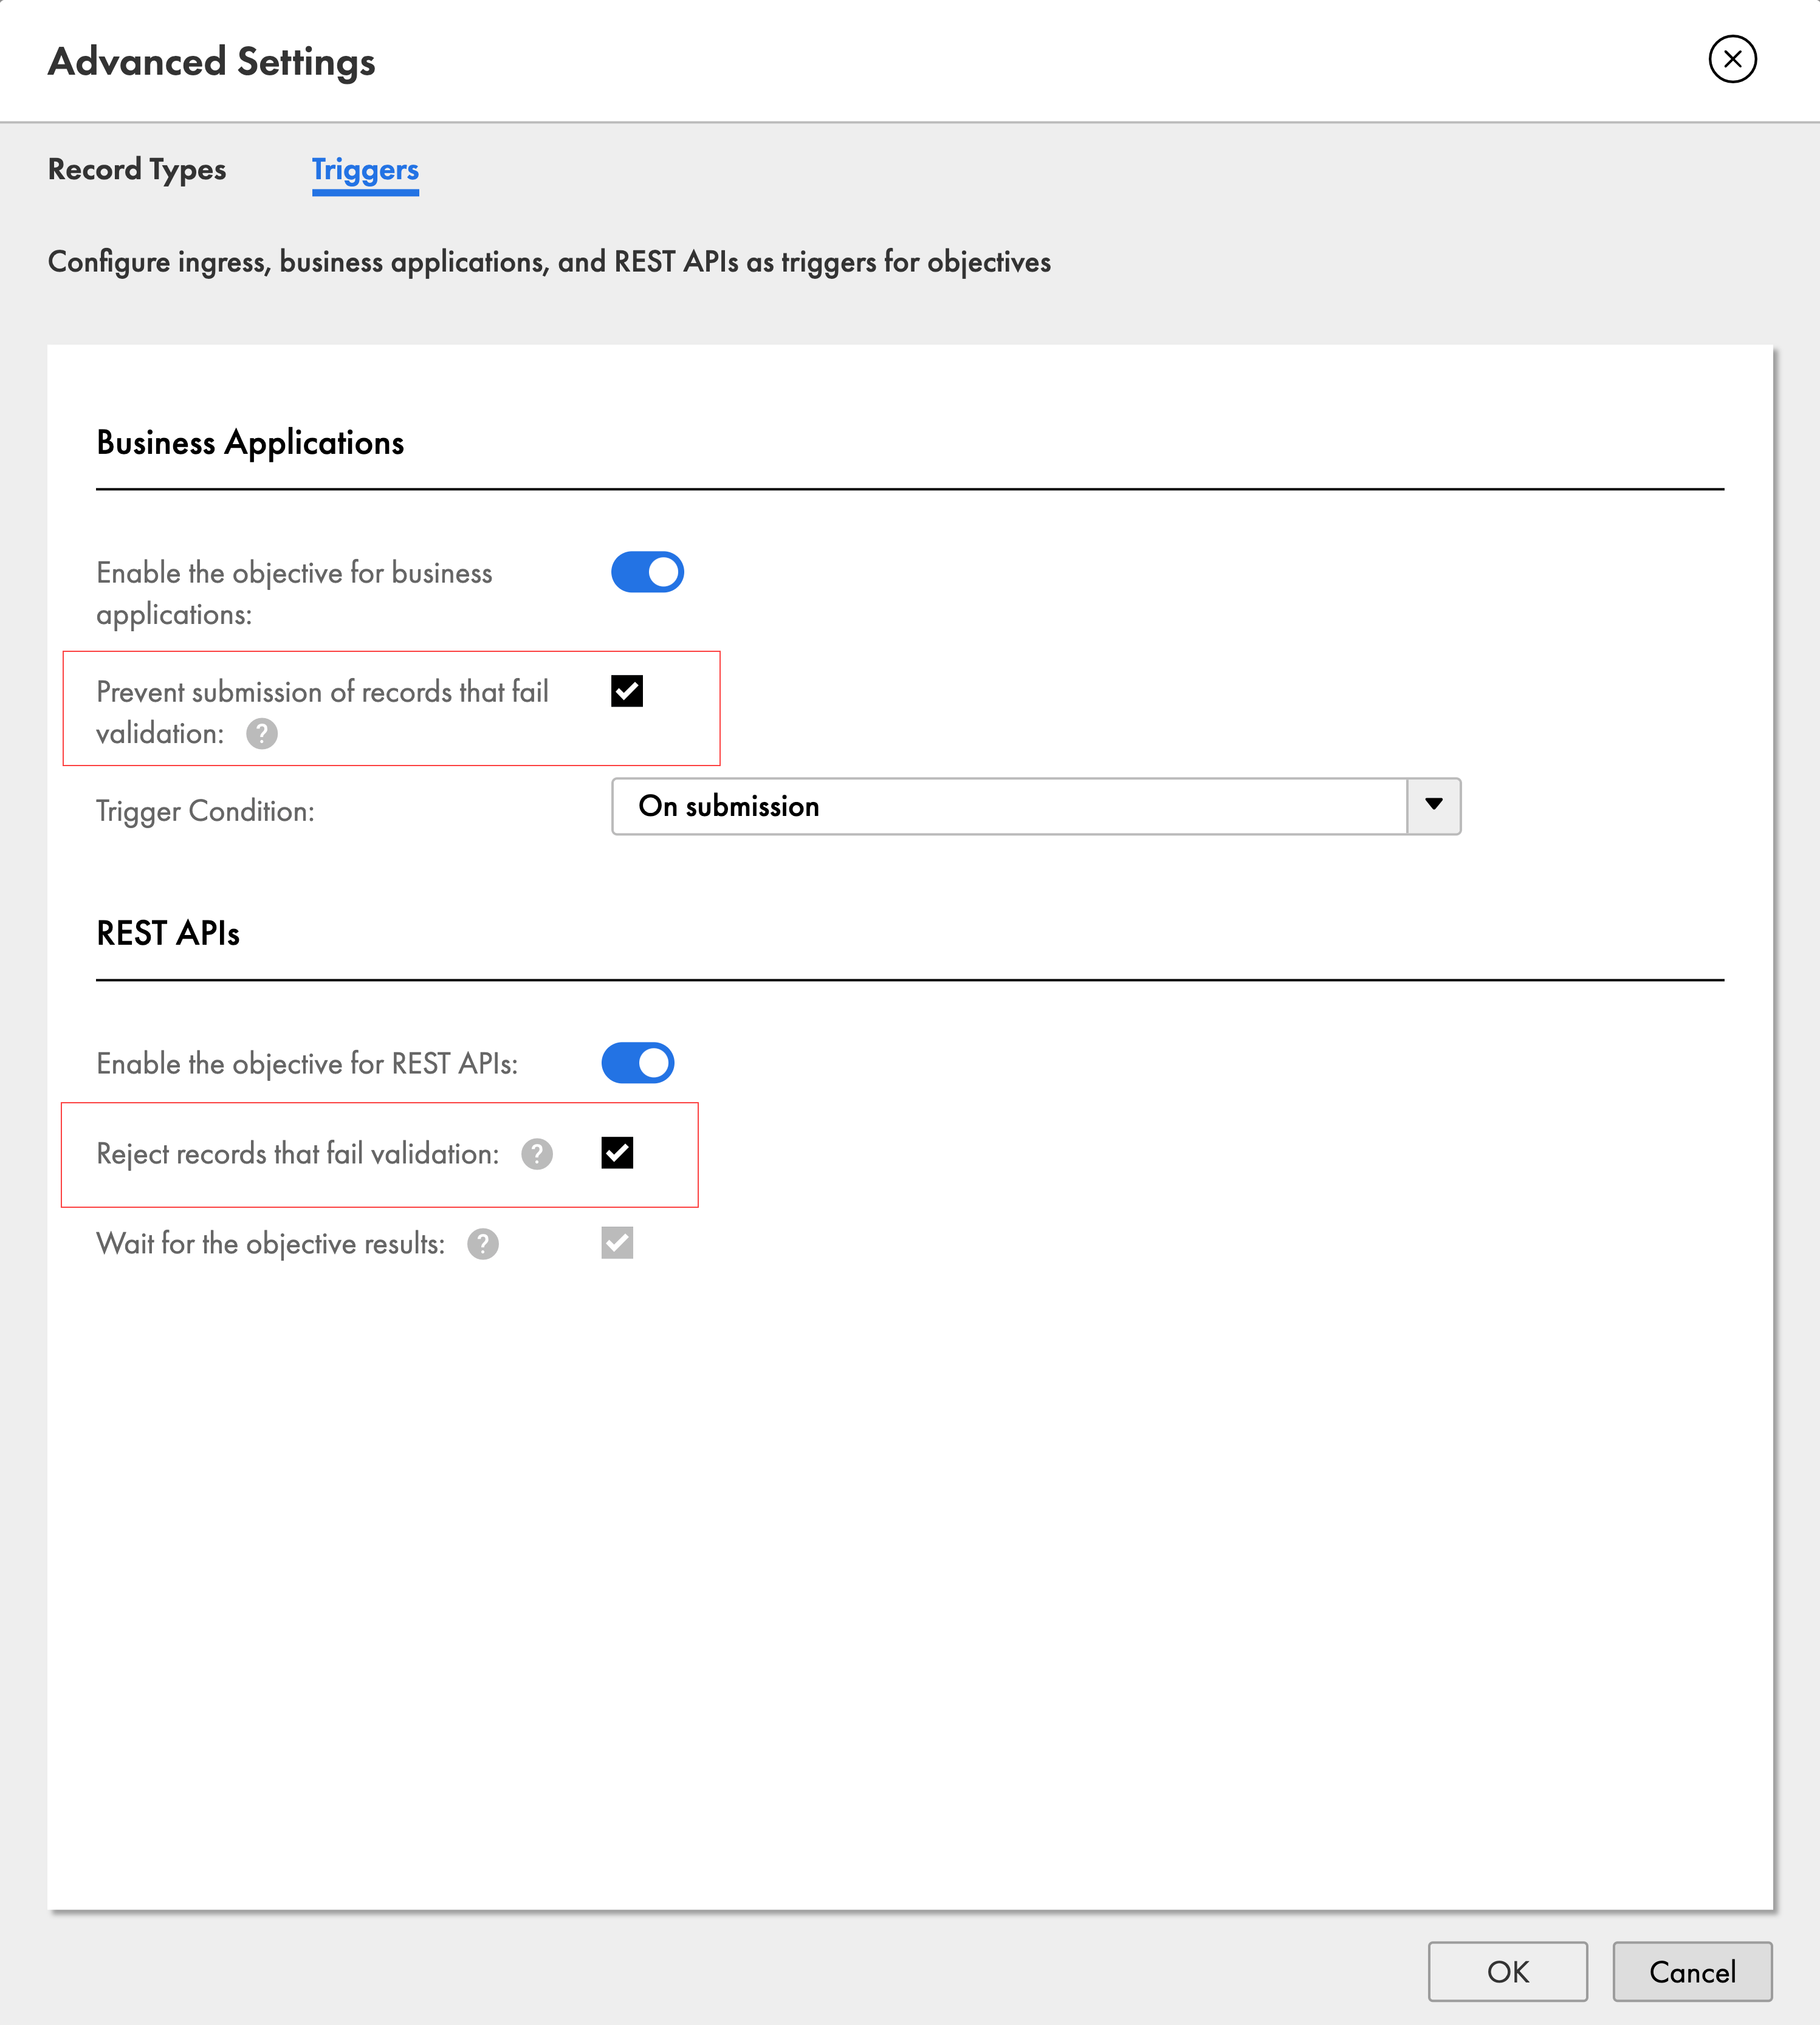
The following image shows the advanced settings of an objective with the Reject Records with Errors option highlighted:
Preview Notice:
Effective in the October 2026 release, the ability to configure bulk edit, merge job, reprocess master data job, and recalculate trust scores job as triggers is available for technical preview. Also, enrichment and validation of master records during batch processing is available for technical preview. Preview functionality is supported for evaluation purposes but is unwarranted and is not supported in production environments or any environment that you plan to push to production. Informatica intends to include the preview functionality in an upcoming release for production use, but might choose not to in accordance with changing market or technical circumstances. For more information, contact Informatica Global Customer Support.
If the error remediation property of a business entity is disabled, the option to reject records that fail validation is enabled by default. To allow records with validation errors to be created or submitted, disable the option to reject records that fail validation. If the error remediation property is enabled, the option to reject records that fail validation is disabled by default.
The Reject records that fail validation setting works only when you specify error as the error severity in the rule association that performs validation. If you specify information or warning as the severity, records that fail validation aren't rejected.
Note:
If you enable the option to reject records that fail validation in an objective, include at least one rule association that has error severity set to Error. Records aren't rejected if rule associations have their error severity set to Information or Warning. When this option is enabled, if a rule association results in an exception, the record on which it ran is rejected. This behavior applies to all rule associations that perform validation, enrichment, or cleansing.
The following table describes how the Reject records that fail validation setting works with the On submission trigger condition:
Reject records that fail validation
Error remediation
Result
Disabled
Enabled
Users can submit records with validation errors, and the records display error messages after users submit records.
Enabled
Enabled
Users can't submit records with validation errors. The records display error messages after users try to submit records.
Disabled
Disabled
Users can submit records with validation errors. However, the records don't display error messages after users submit records.
Note:
When you use the On Submission trigger condition, if you disable both the option to reject records and the error remediation property, users can't see error messages. So, avoid disabling both properties.
Enabled
Disabled
Users can't submit records with validation errors. The records display error messages after users try to submit records.
The following table describes how the Reject records that fail validation setting works with the On section save and submission condition:
Reject records that fail validation
Error remediation
Result
Disabled
Enabled
Users can submit records with validation errors. The records display error messages after users save the section and after users submit the records.
Enabled
Enabled
When the fields within a section fail validation, users can't save the section. The records display error messages after users try to save the section.
Disabled
Disabled
When the fields within a section fail validation, users can save the section and submit the record. The record displays error messages after users save the section. The record doesn't display error messages after users submit the records.
Enabled
Disabled
When the fields within a section fail validation, users can't save the section. The records display error messages after users try to save the section.
The following table describes how the Reject records that fail validation setting works with the On field focus change and submission trigger condition:
Reject records that fail validation
Error remediation
Result
Disabled
Enabled
Users can submit records with validation errors. The records display error messages after the field focus changes and after users submit the records.
Enabled
Enabled
When a field fails validation, users can't save the section. The records display an error message after field focus changes.
Disabled
Disabled
When a field fails validation, users can save the section and submit the record. The record displays an error message after the field focus changes. The record doesn't display error messages after users submit the records.
Enabled
Disabled
When a field fails validation, users can't save the section. The records display error messages after the field focus changes.
For more information about the error remediation property of business entities, see Business entities properties.
Configuring objectives to run on empty fields
You can configure an objective to run when the input fields of all associated rule associations are empty.
An objective runs when an input field is updated during record creation or updates. However, you can configure objectives to run on empty input fields when the following conditions are true:
•All input fields of its rule associations are empty.
•A sibling field of the input fields changes.
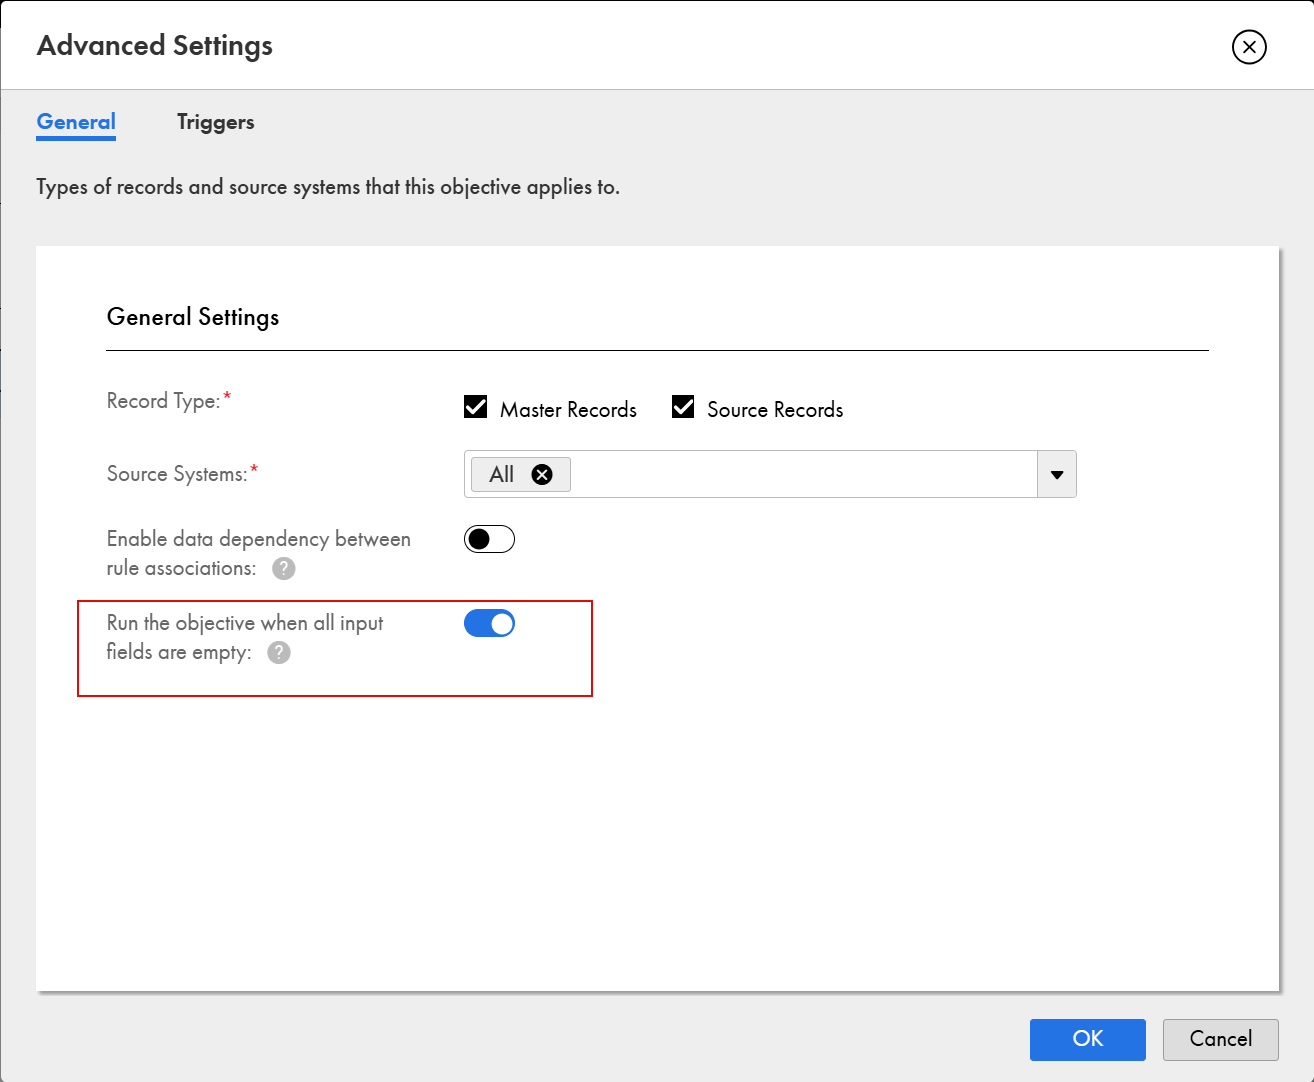
The following image shows the Advanced Settings dialog box with the option enabled to run an objective when input fields are empty:
To control the scope of objectives running on empty fields, choose the lenient mode or controlled mode.
Lenient mode
Use the lenient mode to run objectives on input fields that are at different levels. You can mix root fields, field groups, and nested fields in objectives. Objectives in lenient mode run on empty fields only during record creation, and not during record updates.
Lenient mode example
You work for a financial services company that manages customer records for tax assessments. Before you assess a customer, you must have a complete set of details, such as name, date of birth, primary and secondary addresses, email address, and phone number. Customer records often arrive with missing details, and data stewards add them later.
You want to catch incomplete records as soon as users create them, even when the fields being checked are empty. Because these validations span field groups, you configure null execution in lenient mode.
Consider a customer business entity that has objectives configured to run on empty fields in lenient mode. Each objective runs on empty fields only when all of its input fields are empty.
The following table describes sample objectives configured to run on empty fields in lenient mode:
Objective
Input fields
Field location
What triggers the objective in lenient mode
Validate Name and Primary Address
- First name
- Last name
- Address > Address line 1
Root fields and the Address field group
A change to any root field or to any field in the Address field group
Validate Date of Birth
Date of birth
Root field
A change to any root field
Validate Secondary Contact Details
- Address > Address line 2
- Email > Email address
Address field group and Email field group
A change to any field in the Address field group or the Email field group
Validate Phone Number
Phone > Number
Phone field group
A change to any field in the Phone field group, such as phone type
Use the lenient mode to save Validate Name and Primary Address and Validate Secondary Contact Details even though their input fields come from different levels or field groups. Validate Secondary Contact Details also shows that each rule association can cover a different field group, because the trigger works at the objective level.
When users add a value to the Middle name field during record creation, the Validate Name and Primary Address and Validate Date of Birth objectives run because the Middle name is a sibling of the First name, Last name, and Date of birth fields.
Similarly, when users add a value to the city field in an address entry during record creation, the Validate Name and Primary Address and Validate Secondary Contact Details objectives run. In this case, the objective also runs on the email address field because it is one of the input fields of the objectives. If the option to include all field group entries in the payload is enabled for the associated rule association, the objectives run on all entries of the field groups.
Controlled mode
Use the controlled mode to run objectives on empty fields when a sibling field at the same level changes. Objectives in controlled mode run during both record creation and updates.
If the plugin that a rule association uses has flat input structure, you can map root fields together with fields from a field group or a nested field group as input fields. You can't use fields from more than one field group or a nested field group as input fields.
If you map root fields and a field group, the fields from the field group determine whether the objective runs. The objective runs only when mapped fields in the field group change. If only the root fields change, the objective doesn't run. For example, you map the Customer Name root field and the Line 1, City, and Postal Code fields from the Address field group. If a user updates the city, the objective runs. If a user updates only the customer name, the objective doesn't run. Use this mode when you want to limit which objectives run on empty fields.
Controlled mode example
You work for a financial services company that manages customer records for tax assessments. You want to validate each section independently in a controlled manner. You also want to run objectives on empty fields both during record creation and updates.
The following table describes sample objectives configured to run on empty fields in controlled mode:
Objective
Input fields
Field location
What triggers the objective in controlled mode
Validate Full Name
- First name
- Last name
Root fields
A change to any root field, such as middle name or date of birth
Validate Date of Birth
Date of birth
Root fields
A change to any root field, such as first name or middle name
Validate Primary Address
- Address > Address line 1
- Address > Country
Address field group
A change to another field in the Address field group, such as city
Validate Phone Number
Phone > Number
Phone field group
A change to another field in the Phone field group, such as phone type
Guidelines for configuring objectives with the controlled mode
Consider the following guidelines when you configure an objective to run on empty fields in controlled mode:
•Ensure that the data enhancement rule used in each rule association has a flat input field structure. You can't save an objective if any rule association uses a data enhancement rule with a nested input field structure.
•Map fields from only one field group across all rule associations in the objective. For example, if one rule association maps fields from the Address field group and another from the Contact Details field group, you can't save the objective. Either disable the option to run on empty fields or map all rule associations to the same field group.
•Ensure that all rule associations share at least one common field that triggers the objective. If a field from a field group is mapped to an input field of a plugin with a flat input structure, the rule association runs only when the user adds a value to the field group during record creation.
•Don't map system fields as input fields in any of the rule associations in the objective. For example, if you map the Business ID system field as an input field, you can't save the objective.
•Ensure that the data enhancement rule in a rule association includes only new or updated field group entries in the input payload. If the data enhancement rule includes all field group entries in the payload, you can't save the objective. In the data enhancement rule, enable the option to include only new or updated field group entries.