Part 2: Planning and Designing a Process
Part 1: Starting a New Process covered creating a new project and a new BPEL file.
After completing Part 2 of the tutorial, you will be able to:
- •Understand the design of the loan approval process.
- •Understand top-down vs. bottom-up design.
- •Use layout features of the Process Editor to optimize process display.
- •Review BPEL validation messages.
At the end of this tutorial part, you will understand the loan approval process we will build.
What is the Loan Approval Process?
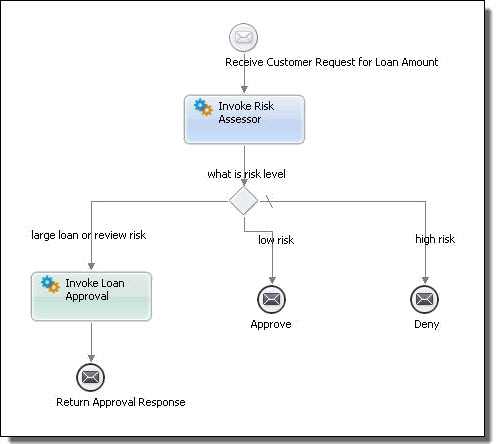
The Loan Approval process starts by receiving a customer request for a loan amount. The risk assessment Web service is invoked to assess the request. If the loan is small and the customer is low risk, the loan is approved. If the customer is high risk, the loan is denied. If the customer needs further review or the loan amount is for $10,000 or more, the request is sent to the approver Web service. The customer receives feedback from the assessor or approver.
A top-down design would begin by adding activities to the Process Editor without adding any valid attributes to them; for example:
This part of the tutorial familiarizes you with the Process Editor, demonstrating features you can use to create a top-down design. You will not create a complete top-down design.
Step 1: Create a Receive activity
A BPEL process begins by receiving an input message. This means a top-down design would start with either a Receive or a Pick activity, since they are structured to receive data from a business partner's Web service.
- 1. If the tutorial.bpel file that you created in Part 1 is not open, open it in the Process Editor.
- 2. If Cheat Sheets view is open, close it to make more room.
- 3. Click the Show Palette arrow.
- 4. From the Catch Event palette, drag a Message icon to the canvas.
The activity is labeled with Message.
- 5. Make sure that the message is selected. A selection box encloses it. When it is selected, the Properties view displays Receive attributes.
- 6. To make the activity name more meaningful, do one of the following:
- - Click on the activity label Message and type in Receive Customer Request for Loan Amount.
- - In Properties view, type the following in the Activity Name field, Receive Customer Request for Loan Amount.
Here's what your activity should look like.
Step 2: Working with Layout Features in the Process Editor
You can use several features in the Process Editor to optimize the display of your process. You will now complete a short exercise to demonstrate its layout features.
- 1. From the Task palette, drag an Abstract task to the canvas.
- 2. Try the following features by selecting them from the toolbar:
- - Use Auto Layout to layout activities in a grid
- - Select two or more activities and Align them
- - Magnify the display area with Zoom
- - Display the Thumbnail view to select one area of your design to view. By default the Thumbnail view is closed. Open it from the Window > Show View command.
- 3. Delete the Abstract task.
Step 3: Save the File and Review BPEL Validation Messages
Take a moment to save your file. You will notice a change to your Receive activity icon as it now has a error icon next to it. Also, this error is now within the the Problems view. These "errors" are added to the Problems view by default when you save your file. They relate to the validation of BPEL code generated for your process. You can see the BPEL XML code in the Source view of the Process Editor.
The errors listed in Problems view will automatically disappear as you complete this BPEL process in the tutorial.