Part 3: Creating a Process Service Consumer Participant
In Part 2 of the tutorial, you learned how to create a top-down design by arranging BPEL activities on the Process Editor canvas. Now you will begin creating an executable process based on WSDL files.
In the Project Explorer view of Process Developer, you should have the following:
- •Tutorial project
- •tutorial.bpel that you created in Part 1
After completing Part 3 of the tutorial, you will be able to:
- •Understand the imported WSDL and schema for the loan approval process and orchestrated services.
- •Use the Participants View to create a Process Service Consumer.
- •Create the receive and reply activities.
Step 1: Viewing the WSDL and Schema
A Web Services Description Language (WSDL) file describes business operations that are invoked to carry out the activities of a BPEL process. WSDL files, and the schema types and elements they import, are required in order to create a valid executable BPEL file. A good practice is to include your business partners' WSDL and schema files in your orchestration project so that you can easily move the files in the project to a deployment package.
If you do not have access to WSDL files, you can create them in Process Developer.
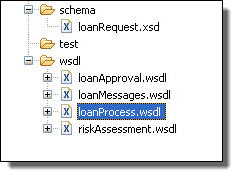
Normally you would create an orchestration project folder and import (or create) WSDL files into it. To save time, the WSDL files are already imported, as shown in the following illustration:
The WSDL and schema file definitions are as follows:
loanRequest.xsd | Schema that defines the data types used in messages. The schema is imported into loanMessages.wsdl. |
loanApproval.wsdl | WSDL describing the approve operation for the loan approver partner service. The service is invoked to approve or deny requests for large loans. |
loanMessages.wsdl | WSDL containing the message definitions for data exchanged among the service partners. This WSDL is imported by the other WSDLs. |
loanProcess.wsdl | WSDL for the participation of the BPEL process itself, describing the request operation. The BPEL process starts by receiving a loan applicant's request for a loan. |
riskAssessment.wsdl | WSDL describing the check operation for the risk assessment partner service. The service is invoked to check the risk level of an applicant applying for a small loan. |
Step 2: Using the Participants View to Create a Process Service Consumer
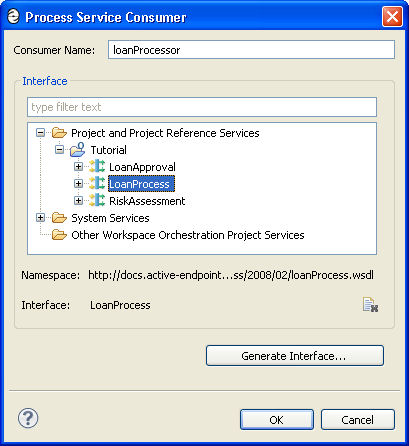
Participants are the Web services and clients using your process and the partner Web services your process uses. A participant exposes an interface to exchange messages with other services.
The loan approval process has three participants: one participant is the process itself, playing the role of receiving a customer request and replying to the customer. The other two participants are partner services that are created later.
- 1. Right-mouse click on Process Service Consumers and select New Process Service Consumer.
Each process plays at least one participant role, that of being consumed by a Web Service to start the process.
- 2. In the Interface tree, expand Project and Project Reference Services to see three port types listed in the Tutorial project. A port type is a required element of WSDL. It describes the operation to use for invoking a Web service and the messages to be exchanged between Web services. These port types are defined in the WSDLs that are provided with the Tutorial orchestration project. Select the LoanProcess port type.
- 3. The default Consumer Name is Process_Consumer. Rename this to loanProcessor to identify the participant role that this process is playing.
- 4. Click OK. The new participant is displayed, and you can expand it to show the interface details from loanProcess.wsdl.
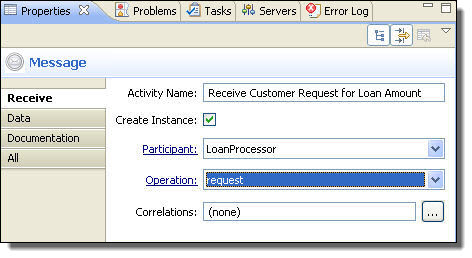
Step 3: Complete the Interface Details for the Receive Activity
The loanProcessor participant is consumed by the request operation to begin the process. Implement this by filling in the details for the Receive activity.
- 1. On the Process Editor canvas, select the Receive activity.
- 2. In the Properties view, select the Receive tab on the left, and then select the drop-down arrow in the Participant field, and select loanProcessor.
- 3. In the Operation field, select the request operation, as shown.
- 4. Select the Data tab on the left.
- 5. From the Assignment Type picklist arrow, select Single Variable.
- 6. From the Variable picklist, select New Variable.
The New Variable dialog displays a suggested name and data type, based on the schema imported into LoanMessages.wsdl.
- 7. Rename the variable to creditInformation, as shown.
Step 4: Create a Reply Activity
The request operation that the process starts with is a request-response operation. You now need to create the mandatory reply. The reply tells the customer whether or not the loan amount is approved.
- 1. From the Throw Event palette, drag a Message to the canvas. Place it within the bounding box surrounding the receive, as shown.
- 2. In the Properties view, look at the Activity Name field, then name the Reply Return Approval Response.
- 3. In the Participant field, select loanProcessor.
- 4. In the Operation field, select request.
- 5. Select the Data tab.
- 6. From the Assignment Type, select Single Variable.
- 7. From the Variable picklist, select New Variable.
- 8. Name the new variable approval.
After you save your file, you will notice that the errors that existed when you saved the file in Part 2 (see
Step 3: Save the File and Review BPEL Validation Messages) no longer appear.
Part 4: Creating Partner Service Provider Activities
In Part 3 of the tutorial, you created a participant for the process role and the associated receive and reply activities. Now you will create the partner services that assess and approve or deny the loan request.
In the Project Explorer view of Process Developer, you should have the following:
- •Tutorial project
- •Tutorial/bpel/tutorial.bpel that you created in Part 1
After completing Part 4 of the tutorial, you will be able to:
- •Create the risk assessment and loan approval partner service participants.
- •Create the risk assessment activity.
Step 1: Create the Risk Assessment Service Provider
Recall that the process receives a request for a loan approval and is evaluated by the risk assessment service. This service checks the customer risk level and loan amount.
- 1. Ensure your file, tutorial.bpel, is open in the Process Editor.
- 2. In the Participants view, right-mouse click on Partner Service Providers and select New Partner Service Provider.
- 3. Name the service provider RiskAssessment.
- 4. Notice that the Interfaces tree displays the LoanProcess port type already in use for the process. Expand Project and Project Reference Services to display available port types, and select RiskAssessment, as shown.
- 5. Click OK.
Step 2: Create the Invoke Risk Assessor Activity
The process requires invocation of the risk assessment service. Here's a shortcut:
- 1. In Participants view, expand RiskAssessment.
- 2. Select the check operation, as shown in the example.
- 3. Drag the check operation to the Process Editor, and place it between the receive and reply, as shown.
- 4. A new invoke activity is automatically created, named check. In the Properties view, change the Activity Name to Invoke Risk Assessor.
Notice that the participant and operation are automatically filled in.
From the Color property palette, select Blue. Color adds a visual difference between participants.
- 5. Select the Input tab.
- 6. In the Assignment Type field, select Single Variable.
- 7. From the Variable picklist, select creditInformation, as shown.
- 8. Select the Output tab.
- 9. In the Assignment Type field, select Single Variable, if needed.
- 10. From the Variable picklist, select New Variable.
- 11. In the New Variable dialog, name the variable riskAssessment, as shown.
Tip: Receive and Reply activities can also be created automatically (like these invoke activities) by dragging a process service consumer operation to the Process Editor.
Step 3: Create the Loan Approval Service Provider
Next, create a service for the process.
- 1. In the Participants view, right-mouse click on Partner Service Providers and select New Partner Service Provider.
- 2. Name the service provider LoanApproval.
- 3. Expand Project and Project References Services to display available port types, and select LoanApproval.
- 4. Click OK.
- 5. Save your file.
The Participants view should look similar to this:
You will create the invoke loan approval activity later.
Part 5: Adding Process Activities and Properties
You have now completed parts 1 through 4 of this tutorial.
In the Project Explorer view, you should have the following:
- •Tutorial project
- •tutorial.bpel that you created in Part 4
After completing Part 5 of the tutorial, you will be able to:
- •Use the Outline tab to see your process in a hierarchical view.
- •Rename a namespace prefix.
- •Create an If activity.
- •Create if conditions using the Expression Builder.
- •Understand the Create Instance attribute for the Receive activity.
Step 1: Use the Outline Tab to Add and Select Building Blocks
The Outline tab (also called a "view"), shown displays all major components of a BPEL process. Here are two Outline views. The one on the left is the default for a new process, containing only the parent nodes. Your outline should look like the one on the right. By starting your process using participants, you have automatically added a namespace, participants, variables, and several activities.
- 1. In Outline view, select Correlation Sets.
- 2. Click and hold the Correlation Sets node, drag it to the bottom of the outline, and move it slightly until you see a black bar, indicating you can drop it. The loan approval process does not include correlation sets, so you can move this node out of the way.
Tip: You can move items up and down to reorganize them. You can right-mouse click on a node to add new items of the same type.
Step 2: Rename a Namespace Prefix
Each WSDL and schema file declares one or more namespaces that provide a context for messages, port types, and other definitions. The namespaces that are declared in the schema and WSDL files that your process references must also be declared in the process itself.
Because one namespace can have many WSDL files associated with it, Process Developer identifies the WSDL file by using the Imports function. The import is automatically added when you create a participant, and a default namespace prefix is also added, which you can rename to make more meaningful.
- 1. In Outline view, expand Imports to see the location of the WSDL.
- 2. Expand Namespaces and notice the new namespaces. The loan prefix and the loanMessages prefix are two of the namespaces added.
Process Developer creates namespace prefixes based on WSDL filenames and adds them to the process. The loanProcess.wsdl generates the loan prefix the loanRequest.xsd file and loanMessages for loanMessages.wsdl file.
- 3. Notice the prefixes for all imported WSDLs, which will appear in variable expression that you will create in the process:
WSDL/XSD file from the Namespace URI | Prefix |
loanRequest.xsd | loan |
loanMessages.wsdl | loanMessages |
loanProcess.wsdl | loanProcess |
riskAssessment.wsdl | riskAssessment |
loanApproval.wsdl | loanApproval |
Tip: All new processes contain common namespaces. The xsd namespace defines the location of the XML schema. The bpel namespace defines the location of the BPEL schema. Process Developer adds other namespaces used internally by the process.
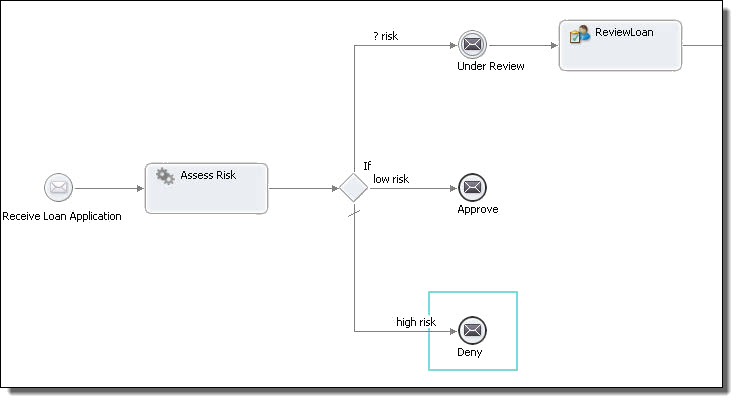
Step 3: Adding Programming Logic with an If Activity
The risk assessment determines who is a high risk or low risk, or who needs more review. These conditions will be represented using the If control flow activity.
- 1. From the Control Flow drawer of the palette, select a Conditional Pattern activity and drop it just below the invoke activity as shown.
Note that the activity is already structured with If and Else conditional paths. The else condition is indicated with a slash at the beginning of its path.
- 2. We need to add an Else If condition. Select the starting diamond of the If, and right mouse-click to select Add > Other > If Condition, as shown.
- 3. Select the first If Condition label and rename it large loan or review risk.
Tip: Click once to select the label and then click the text to edit it.
- 4. Select the next If Condition label and rename it low risk.
Be sure to label the two if conditions in order, left to right. The left-most condition is evaluated first at runtime, as you will see later.
- 5. Select the Else label and rename it high risk.
- 6. Select the Conditional Pattern label and change it to what is risk level.
Here is what your process should look like:
- 7. Save your file. More errors are reported, which will now be fixed.
Step 4: Create Conditional Expressions
Begin by adding conditional processing for each if condition path.
- 1. Double-click the low risk If activity (not the label) to open the If Expression Builder, as shown.
- 2. In the Builder dialog, expand the riskAssessment variable and double-click the riskAssessment part to add an expression to the If Expression box.
- 3. Complete the expression as follows: $riskAssessment/loan:riskAssessment = 'low' This is shown in the following example.
- 4. For the large loan or review risk condition, create an expression for two conditions:
- a. Expand the creditInformation message, and double-click the amountRequested part.
- b. Complete the expression by adding the large loan amount and the risk assessment review condition, as shown.
$creditInformation/loan:amountRequested >= 10000 or
$riskAssessment/loan:riskAssessment = 'review'
Step 5: Create the Reply for the Low Risk Condition
If the customer requests less than $10,000 and is a low risk, the customer is approved for a loan. Here's how to create a reply with this message.
- 1. From the Throw Event drawer of the palette, drag a Message to the blue bounding box of the low risk condition as shown.
- 2. Fill in the reply properties in the Properties view as follows:
- a. Activity Name: Approve
- b. Participant: loanProcessor
- c. Operation: request
- 3. Select the Data tab of the Properties view.
- 4. Note that the Assignment Type is XPaths. XPath expressions allow you to select nodes from a variable for assignment. You will now map a literal expression to the reply variable, as follows.
- a. The table structure on this data tab allows for several XPath expressions. We need only one expression. Select Add. (The button is to the right of the table.)
- b. In the E/L column, select the f(x) (Expression) entry and change it to (k) Literal expression.
- c. Click in the From column and select the Dialog (...) button to open the Literal Contents dialog.
- d. Select Generate, and in the XML Data Wizard, notice that the matching data type, loanApprovalResponse, is selected as the Root Element. The element-based approval message is a single part element.
- e. Select Finish. The Literal Contents looks like the following:
- f. Replace the loan:responseDescription string with the following: Your excellent credit has earned you automatic approval for your loan.
- g. Delete the entire <loan:rejectionReason> </loan:rejectionReason> element. The literal expression will be:
<loan:loanApprovalResponse xmlns:loan=
"http://schemas.active-endpoints.com/sample/LoanRequest/
2008/02/loanRequest.xsd">
<loan:responseToLoanRequest>approved
</loan:responseToLoanRequest>
<loan:responseDescription>Your excellent credit has earned you automatic
approval for your loan.
</loan:responseDescription>
</loan:loanApprovalResponse>
The Data tab should look like the following.
Step 6: Create the Reply for the High Risk Condition
The reply for the high risk customer is created with almost identical steps used for the low risk customer. You can use a shortcut and make a copy of the approve reply to create the deny reply.
- 1. Copy the Approve reply and paste it into a blank area of the canvas. The reply is pasted into the top-left corner.
- 2. In the Properties view, rename the Activity Name to Deny. The Participant and Operation are already filled in.
- 3. In the Data tab, select in the From cell to display a dialog (...) button, and then select it.
- 4. Select Generate, then Finish.
- 5. Edit the literal contents for the denied loan. The message should read as follows:
<loan:loanApprovalResponse xmlns:loan=
"http://schemas.active-endpoints.com/sample/LoanRequest/
2008/02/loanRequest.xsd">
<loan:responseToLoanRequest>
declined
</loan:responseToLoanRequest>
<loan:responseDescription>We are sorry, this application
falls outside of our credit risk guidelines.
</loan:responseDescription>
<loan:rejectionReason>
<loan:reason>lowCredit</loan:reason>
<loan:description>low credit score
</loan:description>
</loan:rejectionReason>
</loan:loanApprovalResponse>
- 6. Drag the Deny reply to the bounding box in the high risk condition. Your process should now look like the following.
Step 7: Create the Invoke Loan Approver Activity
You have one more path to complete for the If activity: the case where the loan request is large or the customer's risk level could not be determined by the risk assessment service.
Recall that you have already created two partner services for the process and are already using the risk assessment service via the risk assessment invoke activity. Now you will use the loan approval service.
- 1. In the Participants view expand Partner Service Providers to view the LoanApproval partner.
- 2. Expand LoanApproval to view the approve operation.
- 3. Drag the approve operation to the bounding box of the large loan or review risk condition. A new invoke activity is created, as shown.
- 4. In the Properties view, name the activity Invoke Loan Approval.
- 5. Select Green for the activity color.
- 6. On the Input tab, in Assignment Type, select Single Variable.
- 7. For the Variable, select creditInformation.
- 8. On the Output tab, in Assignment Type, select Single Variable.
- 9. For the Variable, select approval.
Step 8: Add the Loan Approval Reply
Select the Return Approval Response reply and drag it into the bounding box containing the new invoke activity. Be sure to move the activity very close to the bottom of the invoke activity to place it in sequence inside the bounding box.
Notice that the process now has three discrete end activities, clarifying the process flow.
Your completed process definition should look like the following.
Step 9: View the Create Instance property for the Receive activity
The Receive is the activity that kicks off the process, so you want to ensure that the Create Instance property is enabled. Process Developer automatically adds the Create Instance property to the Receive (or other start) activity that you add to the process.
- 1. In the Process Editor, select the Receive activity.
- 2. In the Properties view, notice that a checkmark was added to the Create Instance box.
Step 10: Save Your File and Validate Your Process
- 1. Save your file. When you save it, it is automatically validated for BPEL.
- 2. View Problems view, stacked next to Properties view. There should be no errors listed.
If any errors are listed, double-click the error to go to the source of the error.
Tip: You can compare your file to tutorialCompleted.bpel to discover any differences. To open a completed version of the tutorial, select File > New > Orchestration Project, name the project, click Next, and then select the Template Tutorial Completed.
Note that the tutorialCompleted.bpel file has one difference: The sequence surrounding the process was removed by using the Ungroup right-mouse menu option.
You have completed the main process definition.
Part 6: Adding Fault Handling
To start at the beginning of the tutorial, see
Part 1: Starting a New Process.
Fault handling in a BPEL process is reverse work, undoing the partial and unsuccessful work of a scope in which a fault has occurred. When a fault occurs, normal processing is terminated, and control is transferred to the associated fault handler.
So far in the tutorial, you have completed a BPEL process definition that contains all the steps for normal processing. Now you will add a fault handler to handle a service invocation fault.
If the loan process throws a fault, it terminates the process using a standard fault, and turns over control to the fault handler activity.
In the loanprocess.wsdl file, there is a fault name and a fault message defined for the WSDL's operation, namely the request operation. The loan process uses the fault name and message in defining fault handling activities for the assessor and approver services.
In the Project Explorer view, you should have the following files:
- •tutorial.bpel that you created in Part 2
- •tutorialCompleted.bpel, which is a completed version of the file (optional)
After completing Part 6 of the tutorial, you will be able to:
- •Add a Catch fault handler for the process.
- •Add a fault variable.
- •Add a fault handling activity to the Catch handler.
Step 1: Add a Catch Fault Handler and Fault Variable
When a fault handler receives an inbound fault message, it assigns the fault message to a variable before proceeding to perform an activity enclosed by the catch.
- 1. Click on the Fault Handlers tab of the Process Editor.
- 2. From the Catch Event palette, drag an Error activity to the canvas.
- 3. Select the activity.
- 4. In the Properties view, select Fault Variable Definition, and click the dialog (...) button at the end of the row.
- 5. Fill in the Fault Variable Definition dialog as follows and click OK:
- a. Select the Element radio button.
- b. From the list of messages, select loan:errorMessage.
- 6. In the Properties view, select Fault Name, and click the dialog (...) button at the end of the row.
- 7. In the Fault Name list, notice that the WSDL fault name associated with both the assessor and approver services is the same, but each is in a different namespace. For convenience, the WSDL for each service used the same fault name, but usually if you are orchestrating two different services the fault names would be different. Select the loanApproval:loanProcessFault, as shown in the example.
- 8. In the Fault Variable field, type errorApprove, which is the name we will associate with the fault variable definition. The properties for the Catch activity should look like the following example:
Notice that a new variable named errorApprove was to Process Variables view. This variable is exclusively for fault handling, and this is shown using an icon that differs from normal process variables.
Step 2: Add a Fault Handling Activity
When a fault is caught, the fault handler must execute an activity. You will add a Reply activity to tell the customer that the process was unable to handle the request.
- 1. From the Throw Event palette, drag a Message activity into the Catch handler and name the activity ReplywithApprovalFault, as shown.
- 2. Fill in the properties for the reply activity to handle the fault, as shown in the example. You must select them in the following order:
- a. Participant (loanProcessor)
- b. Operation (request)
- c. Fault Name (unableToHandleRequest)
- 3. On the Data tab, select the new variable (errorApprove).
- 4. Add a similar Fault handler for the risk assessment service by selecting the same fault variable definition and the new fault name riskAssessment:loanProcessFault and naming the fault variable errorRisk. Name the Reply ReplywithRiskFault.
Your Fault Handlers view should be similar to the following:
Part 7: Adding Compensation and Correlation
To start at the beginning of the tutorial, see
ActiveVOS Tutorial.
Compensation is the process of reversing or providing an alternative for a successfully completed activity, especially when a fault occurs. Compensation restores data to what it was before the activity work was done.
Correlation is a construct for keeping track of a group of messages that belong together in one particular business partner interaction. Correlation matches messages and interactions with the business process instances they are intended for.
The loan approval tutorial does not require correlation or compensation.
For more information, see "Compensation and Correlation" elsewhere in this help.
Part 8: Simulating the Process
To start at the beginning of the tutorial, see
ActiveVOS Tutorial.
If you have followed all tutorial parts so far, you have completed a BPEL process definition that contains all the steps for normal and fault processing.
Now you will turn from the design phase to the testing phase by simulating execution of your process.
In the Project Explorer view, you should have the following files:
- •tutorial.bpel that you created in Part 2
- •tutorialCompleted.bpel, a completed version of the file (optional)
After completing Part 8 of the tutorial, you will be able to:
- •Complete the prerequisite checklist for simulation.
- •Add sample data files for WSDL message parts.
- •Display data values for process variables.
- •Simulate execution of a BPEL process.
- •Test all execution paths in a process by overriding default data values.
Step 1: Complete the Prerequisite Checklist for Simulation
Process Developer validates your BPEL process before you execute it, adding validation tasks to the Problems view for you to complete. The tasks are broken down into errors, warnings, and information. You must ensure your process is executable, and you must complete all error tasks before running your process.
- 1. Open tutorial.bpel.
- 2. Ensure that the Abstract Process property is set as follows:
- a. Select Properties view.
- b. Click on an empty part of the Process Editor (or select tutorial from the Outline view).
- c. Select the All tab in the Properties view and note that Abstract Process is set to No to indicate that the process should be validated for execution.
- 3. Ensure that Process Developer is reporting BPEL validation tasks, as follows:
- a. Select Window > Preferences > Process Developer > Tasks and Problems.
- b. All BPEL Validation settings should be selected, as shown.
- 4. Validate your file by selecting the Validate Process toolbar button. This action ensures that all validation tasks appear in the Problems view.
- 5. Select Problems view.
- 6. If an error task exists, such as the one shown in the following example, correct the error, and save your file.
Step 2: Load Sample Data Files for the Messages
To simulate process execution, you need to initialize process variables. Process Developer has a convenient way to provide default data values and ways to override the defaults for different test scenarios.
When you create an orchestration project, you can add sample data files into the Process Variables view (or into the Project Explorer). The sample data is registered and is available for all processes that use the messages.
- 1. Expand the sample-data folder in the Tutorial project. Note that several files were created for you to test with. You will load some of these files into variables for different test scenarios.
- 2. Select Process Variables view.
- 3. Open the creditInformation variable by double-clicking it. You can see the data type definition.
- 4. Right-mouse click creditInformation and select View Data.
- 5. Right-mouse click and select Load Data > From Project File.
- 6. Select CredInfo_Jones5001.xml from the sample-data folder.
Your creditInformation variable should look similar to the following example.
- 7. Load assessment_low.xml sample data file for the riskAssessment variable.
Step 3: Generating a New Sample Data File for the errorRisk Variable
The errorRisk variable, as all the other variables, is defined with a schema complex type and requires namespace-qualified sample data. This means the sample data file must contain references to the data type definition. You will automatically generate a valid data file using the XML Data Wizard, as you can do with any variable to create your own samples. This step is similar to generating literal contents for the Copy Operation, as you did in Part 5 of the tutorial. This wizard uses the type definition located in loanmessages.xsd.
- 1. In Participants view, select the loanProcessor participant to view the request operation's messages.
- 2. Expand the Fault errorMessage.
- 3. Select the document part of the fault message, and from the right-mouse menu, select Generate Sample as the illustration shows.
- 4. The definition of the message points to a schema element, which was selected by the wizard as shown in the following example:
- 5. Leave the remaining preferences as is, since they do not apply to the schema definition of this message, and click Next.
- 6. In the Save Results wizard page, select the Tutorial\sample-data folder, and name the generated sample data file errorSample.
- 7. Click Finish, and then expand the Document message part to see the errorSample.xml file.
If you wish to view the contents of the data file, right-mouse click it, and select Open. The XML file opens in the editor. Close the file when you are done.
- 8. In Process Variables, notice that errorSample.xml was loaded into the errorRisk variable.
- 9. Your open process variables should look similar to the following:
Notice the following visual information cues in the Process Variables view:
- •In the Process Variables list, bold indicates an open variable.
- •The errorRisk and errorApprove variables are two-toned, indicating they are available only as fault variables.
Step 4: Simulate Process Execution
If you have completed all previous steps in this part of the tutorial, you are ready to begin simulating execution of your process.
- 1. Click on a blank part of the Process Editor canvas to activate the main toolbar.
- 2. Select the Start Simulation icon, as shown.
- 3. Notice the changes to the Process Developer environment, as shown in the following example.
1 | The perspective switches to a Debug perspective. |
2 | The beginning activity is highlighted |
3 | The current variable is highlighted |
4 | The sample data is cleared |
5 | The Debug view is opened to run and step through a process |
6 | The Process Console view is opened to report simulation events |
- 4. In the Debug view, click the Step Into button to continue, as shown.
- 5. Step through your process, inspecting process variables as each activity is executed. The simulator stepped through the low risk path because Jones is a low risk and the loan amount requested was less than $10,000. The Process Editor canvas should look like the following example when you are done.
Step 5: Clear the Process Execution State
- 1. Click anywhere on a blank part of the Process Editor canvas.
- 2. On the main toolbar, click the Clear Process Execution State icon, which is next to the Start Simulation icon.
Step 6: Override Default Values for Different Test Scenarios
The simulation path went through the risk assessor's service using the default sample data value of 5001. To test the loan approval path, do the following.
- 1. Select the Receive activity.
- 2. In the Process Variables view, open the creditInformation variable.
- 3. Right-mouse-click and select Load Data > from Project File.
- 4. From the sample-data folder, load credInfo_Jones15001.xml.
- 5. Save and rerun the process.
- 6. Notice that the simulation engine informs you that sample data is missing from the approval service, and presents a list of valid data files that match the message. Select approval_approved.xml.
- 7. Your simulation path should look like the following example:
- 8. Clear the process execution state.
- 9. Inspect the Process Console view to see all simulation events.
- 10. From the Debug view toolbar, select Remove All Terminated Launches.
Step 7: Simulate Fault Handling
In the loan approval process, a fault is thrown if the loan approval or risk assessment service cannot handle the customer request. In
Part 6: Adding Fault Handling , you added two fault handlers to catch this fault and send a reply containing an error code. You will simulate this.
- 1. On the Process Editor canvas, select the Invoke Loan Approval activity.
- 2. In Properties view, select the All tab, and under Simulation, do the following:
- a. Set Result to Fault.
- b. Set Fault Name to loanProcessFault.
- 3. Start simulation and step through the process.
- 4. The simulator executes the fault handler, as shown.
- 5. In the Process Activities tab, the simulator shows the activity with a fault, as shown.
- 6. Look at the Process Console view to see execution path events.
- 7. Clear the process execution state.
Tip: You can also simulate fault handling for the risk assessment service. The same fault message is defined for both the loan approval and the risk assessment service.
To simulate fault handling for the risk assessment service, select the Invoke Risk Assessor activity and set the Result property to Fault and set the Fault Name. Change the sample data file to use an amountRequested to be less than 10000 and re-simulate.
Part 9: Deploying the Process
If you have followed all tutorial parts so far, you have designed and debugged a BPEL process. You are now ready to deploy your process. Deployment is the act of publishing your BPEL process to the Process Server where it can run. In the deployment procedure, you use the WS-Addressing specification to define endpoint references.
It is time to deploy the process to the ActiveVOS embedded server. Deployment is the act of publishing your BPEL process to the ActiveVOS server where it can run. In the deployment procedure, you use the WS-Addressing specification to define endpoint references.
In the Project Explorer view of Process Developer, you should have the following files:
- •tutorial.bpel that you created in Part 2
- •tutorialCompleted.bpel, a completed version of the file created in Part 2 (optional)
After completing Part 9 of the tutorial, you will be able to:
- •Complete the prerequisite checklist for deployment.
- •Create a process deployment descriptor file.
- •Create a business process deployment archive.
- •Deploy the business process archive to the server.
Step 1: Complete the Prerequisite Checklist for Deployment
A BPEL file is ready for deployment to the Process Server when there are no errors in the Problems view and when a simulated execution of the process terminates normally.
- 1. Open tutorial.bpel.
- 2. Simulate the process, as described in Part 8: Simulating the Process , and test all execution paths.
Step 2: Create a Process Deployment Descriptor File
A Process Deployment Descriptor (.pdd) file describes the relationship between the participant partner links defined in the BPEL file and the implementation required to interact with actual partner endpoints. You create a .pdd file to add address information about your endpoint references. The .pdd file is an integral part of the deployment package for the process.
Recall that the loan approval process has the following definitions for partner links:
- •loanProcessor is the process service consumer. In BPEL terminology, the My Role partner.
- •RiskAssessment and LoanApproval are partner service providers. In BPEL terminology, the Partner Role partners.
You will assign an endpoint type for each partner role and will provide access protocol information for the process role (My Role). An endpoint type is a binding property that indicates the actual service the process interacts with. Different types give you control over specifying services you work with now and in the future. In this tutorial, you will indicate a static reference to partner services.
- 1. Select File > New > Deployment Descriptor to open the New Deployment Descriptor dialog.
- 2. Select tutorial.bpel, and click Next.
- 3. Select the deploy folder to store your deployment descriptor, shown in the example below, and click Finish to open the PDD Editor.
- 4. Do not make any changes on the General tab.
- 5. On the Partner Links tab, select the LoanApproval partner link.
- 6. Select WSA Address from the Invoke Handlers list. This addressing technique provides flexibility in deploying your processes into different server locations.
- 7. Select the dialog (...) button next to the Endpoint Reference text box. In the Endpoint Reference dialog, notice that LoanApproval.wsdl is selected, and the matching service is selected as shown. Select OK.
WS-Addressing is automatically added based on the binding information in the WSDL file.
- 8. On the Partner Links tab, leave Static as is from the Endpoint Type list, as shown in the example.
- 9. Select RiskAssessment, select WSA Address as the Invoke Handler, accept the riskAssessment.wsdl and service as the Endpoint Reference, and leave Static as the Endpoint Type.
- 10. Select loanProcessor, and in the My Role panel, select Document Literal for the Binding style.
- 11. In the Service field, type the name TutorialService.
- 12. Save and close tutorial.pdd.
Step 3: Starting the Process Server
You will now deploy tutorial.pdd and its resources to the server. The first step is to start the server.
The Process Server consists of an engine running under Apache Tomcat. Tomcat is the servlet container that is used in the official Reference Implementation for the Java Servlet and JavaServer Pages technologies.
- 1. Select the Servers view in the lower right of the workspace and then right-mouse click within it. Select New > Server as shown in the illustration.
- 2. In the Server type list, select Process Server, click Next, and select Finish.
- 3. Select the Start the Server button, as shown in the example.
- 4. As the server starts up, you see start up tasks scroll in the Process Console. Files are deployed to the embedded server each time you start it. Many of these files are for BPEL for People activities that you may want to create for your next project. After the server starts, you'll see the message at the bottom of this figure.
Step 4: Create a Business Process Deployment Contribution Archive
To deploy your process to the Process Server, you must add all relevant files to an archive file (.bpr file), which is similar to a Web archive file.
- 1. Select File > Export > Orchestration > Contribution-Business Process Archive File and click Next.
- 2. Select the tutorial.pdd file to include in the archive, as shown in the following example.
- 3. For the export destination BPR file, browse to the deploy folder and name the .bpr file tutorial_completed.bpr. Your path should be similar to the following:
Tutorial/deploy/tutorial_completed.bpr
- 4. In the Type field, select Web Service. The engine's default address is automatically filled in for the Deployment URL. If you changed your host and port information during installation, change the URL here.)
Selecting this option automatically deploys your .bpr file to the Process Server upon completion of the export.
- 5. Type in the Group name Tutorials and Description Process Developer Tutorials. These properties help you identify groups of processes on the server as you develop many types of processes.
- 6. Select the check box next to Save the contribution specification..., and browse to the deploy folder.
- 7. Name the BPRD file tutorial_completed.bprd. This file is an Ant script which you can run to re-deploy the bpr file whenever you modify a .bpel or .pdd file.
- 8. Select Finish. A deployment details dialog shows the results.
Your BPR file has been automatically deployed to the server, as indicated by the information dialog. You can also see the results in the Process Console.
Part 10: Creating a Form to Run the Process
To start at the beginning of the tutorial, see
ActiveVOS Tutorial .
If you have followed all tutorial parts so far, you have deployed a BPEL process to Process Server.
After deploying the process to the Process Server, you must deploy the partner services, and then you can run the process by sending in a credit information request and getting back a response from the risk assessment or loan approval service.
After completing Part 10 of the tutorial, you will be able to:
- •View the Process Console in a workspace browser.
- •Deploy the Risk Assessment and Loan Approval services.
- •Create and deploy a process request form and Central Configuration file for Process Central.
- •Sign in to Process Central and send a request to the process and receive a reply.
Step 1: Open a Browser to View the Process Console
You can view deployment details for your processes in the Process Console.
- 1. On the Process Developer menu bar, select the Process Console icon.
- 2. The Process Console opens, using a URL of http://localhost:8080/activevos.
- 3. On the menu, select Admin.
- 4. Select URN Mappings. Notice that a URN to URL mapping is defined. This mapping is for the address of the Loan Approval and Risk Assessment services. (This URN mapping exists only in the embedded server in Process Developer. If you are deploying to a different server, such as JBoss, you will not see any pre-existing URN mappings. You must add them.)
Normally you will add your own URN mappings. However, for the convenience of the tutorial, the partner role URNs were mapped to a URL for you.
Note: Be sure that the host port 8080 in the URL is correct. If you selected a different port during installation of Process Developer, select the URN to open the URL for editing. Update the URL so that the host port matches your server host port.
Step 2: Deploy the Risk Assessment and Loan Approval Services
The Loan Approval and Risk Assessment services have been created as BPEL processes for the convenience of this tutorial, and they have already been packaged in a BPR file. You must deploy these services. Then, when you execute the tutorial process, one or both of these services will also execute. They will be invoked at the URL defined in the URN mapping.
- 1. In the Process Console, select Deploy as shown.
- 2. In the Deploy dialog, browse to the following location:
[Process Developer installation folder]\
Process Developer\workspace\Tutorial\
Partner_Services\riskAssessment.bpr
- 3. Deploy this BPR, and select Deploy another resource and select the loanApproval.bpr.
You can view the deployed processes. Do this in the Process Console by selecting Catalog, and then Process Definitions. You will see the listing for the tutorial, risk assessment, and loan approval processes.
Step 3: Create a Process Request Form
You will now use Process Central to send a request to the process to start it. Process Central is a client application that contains forms, as well as other work items, such as tasks and reports.
- 1. Select File > New > Process Request Form.
- 2. In the wizard, select the request operation, which is the operation for the starting receive activity.
- 3. Select Next and name the file tutorialRequest.html. Notice that the file will be added to a new folder called request. (This name is not related to the request operation. It is a generic name for all process requests that you may create for a project.)
- 4. Select Finish. Your process request form opens in the Web Page Editor, as shown.
- 5. Select the first occurrence of Request from the form title, Request Process Request and change it to Tutorial so that the title is Tutorial Process Request.
- 6. Notice that the input message is in a table, and the title of the table is Loan Process Request. This title is based on the schema element of the message. We will change it to provide instructions for testing different paths in the process.
- 7. Open the HTML Palette, and drop a table beside the input message header, as shown:
- 8. In code view, add the following HTML code between the <table></table> tags:
<tr><td>5000 <loan amount <=20000</td>
<td>Jones is declined</td></tr>
<tr><td>20000 <loan amount <=50000</td>
<td>Only Smith is approved</td></tr>
<tr><td>loan amount > 50000</td>
<td>Everyone is declined</td></tr>
<tr><td>Last Name: Approvefault</td>
<td>Loan approval faults</td></tr>
<tr><td>Last Name: Assessfault</td>
<td>Risk Assessment faults</td></tr>
- 9. In code view, your HTML code should be:
- 10. Your form should look like the following example:
- 11. Save and close your form.
Step 4: Create a Central Configuration File
To deploy your form to Process Central, you must create a configuration file that contains deployment information about the form. The purpose of the configuration file is similar to that of a Process Deployment Descriptor.
- 1. Select File > New > Central Configuration.
- 2. Select the deploy folder for the location.
- 3. Name the file tutorialRequest. The avcconfig extension is automatically added.
- 4. Select Finish, and the file opens in an XML Editor.
- 5. Select the Source tab to view the file.
- 6. Scroll down to the Requests section as shown.
- 7. You need to uncomment the XML in this section. Add an HTML end comment tag (-->) at the end of the Requests line, the top line shown in the illustration above.
- 8. Remove the end comment tag at the end of the Requests section.
- 9. Remove the <avccom:allowedRoles> section. There are four lines of code to remove.
If you make a mistake, close the form, delete it from the deploy folder, and create a new form.
- 10. Fill in the placeholder values exactly as shown. Note that the values are case-sensitive:
<tns:requestCategoryDefs>
<tns:requestCategoryDef id="education_category"
name="Tutorial and Samples">
<avccom:requestDef id="tutorial_request"
name="Tutorial Request Form">
<avccom:description>
Submit loan approval request (basic tutorial).
</avccom:description>
<avccom:formLocation>
project:/Tutorial/form/request/tutorialRequest.html
</avccom:formLocation>
</avccom:requestDef>
</tns:requestCategoryDef>
</tns:requestCategoryDefs>
- 11. Save the file. Your completed file should look like this:
Step 5: Re-deploy Your BPR Contribution
Now that we have a request form and a configuration file describing how to display it in Process Central, you can deploy the BPR contribution, because the Tutorial project was updated with new files. Each time you update your project, redeploy the entire project to keep your files together as a contribution unit.
- 1. In the Project Explorer, select File > Export > Contribution-Business Process Archive.
- 2. Do not change any values on the first page of the wizard.
- 3. Select Next. Notice that two new resources were added to the contribution:
- 4. Select Finish to deploy tutorial.bpr. On the server, you now have two contributions. The older one (version 1) is offline and the new one (version 2) is online.
Step 6: Open Process Central and Submit a Request
Process Central is a great place to test the different paths of your process.
- 1. Ensure that the server is running and that you have deployed your BPR for your project.
- 2. You can open Process Central from the Process Developer toolbar to view an embedded browser. To open a larger, stand-alone window, select the Open Web Browser button from the toolbar.
- 3. In the Address bar, type in the following URL:
http://localhost:8080/activevos-central
- 4. In the Sign On screen, sign on with the following user name and password:
Username: manager
Password: manager
- 5. In the navigation area underneath Home select Forms.
- 6. Select the Tutorial and Samples folder. This is the folder you created in the tutorialRequest.avcconfig file.
- 7. Click on the Tutorial Request Form in the work area. You will see the Tutorial Process Request form you created.
- 8. Submit a request as follows:
- - In the Last Name field, type in Jones (case-sensitive)
- - In the Amount Requested field, type in an amount between 5000 and 20000
- - Fill in the other fields as desired
- 9. Your form should look like the following:
- 10. Scroll to the bottom of the form, and select Send Request.
- 11. The response from the loan approval process is displayed:
Step 7: View a Completed Process
- 1. In the Process Console, go back to the Service Definition page, and select Home from the menu, and then select Active Processes. Notice that two processes completed.
- 2. On the Active Processes page, select the tutorial process. You can see the actual results returned from the risk assessment service. Because Jones is a credit risk, the loan was denied.
For more details about the two services, and to debug your running or completed process from within Process Developer, go to
Part 11: Debugging Your Process Remotely .
Part 11: Debugging Your Process Remotely
To start at the beginning of the tutorial, see
ActiveVOS Tutorial .
If you have followed all tutorial parts so far, you have deployed and run a BPEL process on the Process Server.
Before starting this part of the tutorial, we recommend that you complete
Part 10: Creating a Form to Run the Process .
In the Project Explorer view of Process Developer, you should have the following files:
- •tutorial.bpel that you created in Part 4
- •tutorial.bpr that you created in Part 9
After completing Part 11 of the tutorial, you will be able to:
- •Add a breakpoint to tutorial.bpel.
- •Create a configuration file for launching a remote debugging session.
- •Start a remote debugging session.
- •Step through your process and inspect variables.
Step 1: Add a Breakpoint to tutorial.bpel
You can connect to a running or completed process from within Process Developer for remote debugging. There are several options for remote debugging, and we will set a breakpoint in the process and then attach to the running process when the breakpoint is hit.
- 1. Open tutorial.bpel in the Process Editor.
- 2. Right-mouse click on the Receive activity and select Add Breakpoint. The Receive activity should look like the following example.
Step 2: Start the server
The server must be running in order to start remote debugging, so start the server now (if it is not already running) before setting up a debug configuration.
- 1. If the server is already running, as described in Part 10 of the tutorial, you can skip to Step 3.
- 2. Select the Servers view in the lower right of the workspace, and select Start the Server.
Step 3: Create a Configuration for Launching a Remote Debug Session
A remote debug configuration indicates where processes are running and how you want to attach to them.
- 1. From the Run menu, select Debug Configurations.
- 2. In the Debug dialog, select Remote Process and then select the New Launch Configuration icon in the toolbar.
- 3. In the Name field, type tutorial_run_to_breakpoint.
- 4. In the Main tab, note that the default Server URL is displayed for deployed server processes.
- 5. In the Process Selection panel, select Manual process selection or breakpoints. This selection indicates that you do not want to immediately debug a process, but rather will select a process manually.
- 6. Enable the option Attach to any process on breakpoint to indicate that a process containing a breakpoint will be attached to, if not already attached, when a breakpoint is hit.
Your Debug Create, manage, and run configurations dialog should look like the following example.
- 7. Select Debug to begin remote debugging for the current configuration.
Your Debug view should look like the following example.
Step 4: Instantiate the Process
You can create an instance of the process by using the Process Central request form, as you did in Part 10 of the tutorial.
- 1. In Process Central, fill in the form with Last Name of Jones and amount-Requested value of 10000.
- 2. Select Send Request.
Step 5: Begin Remote Debugging
- 1. In Process Developer, open all variables in the Process Variables view and position the view next to the Process Editor canvas. Your Process Editor should look like the following example.
- 2. Notice that the running process is stopped on the Receive activity with the breakpoint, as we configured.
- 3. In Debug view, click the Step Into icon on the toolbar. The debug highlighter moves to the Invoke Risk Assessor activity. The creditInformation variable displays the data submitted by the Process Central request.
- 4. Click Step Into twice to terminate and disconnect the process automatically.
- 5. Inspect the approval variable. Notice that Jones is not going to get a loan. The reply indicates a decline, as shown.
- 6. Repeat the above steps by adding different Last Name and amountRequested values.
The LoanApproval and RiskAssessment services are built on the following logic:
5000 <loan amount <=20000 | Jones is declined, all others approved |
20000<loan amount<=50000 | Only Smith is approved, all others declined |
loan amount>50000 | Everyone is declined |
Last name: Approvefault | Loan approver faults |
Last name: Assessfault | Loan assessor faults |
Next Steps
Create a new orchestration project for Human Approval Completed. This process replaces the Invoke Loan Approval activity with a People activity, as shown in the illustration. The documentation that accompanies the Human Task (BPEL for People) sample describes how to deploy and run the sample. You can also review the Human Tasks help for details on building a People activity to add human workflow to your BPEL process.
Part 12: Using the Web Services Explorer to Start a Process
If you deployed your tutorial to Process Server and do not yet have an Identity Service enabled, you will not be able to sign into Process Central. Process Central requires that authenticated users sign in, enabled through the Identity Service in Process Server. The Process Central embedded in Process Developer is already enabled.
To start your process from an Process Server, such as JBoss or WebLogic, use the following instructions to use the Web Services Explorer.
Step 1: Launch the Web Services Explorer
You need to copy the TutorialService URL into the Web Services explorer in order to send a request to the process.
- 1. From the Process Developer Run menu, select Launch the Web Services Explorer.
- 2. Select the icon (upper right pane) for WSDL Page.
- 3. Select WSDL Main.
- 4. Return to the browser, and in the Process Console, select Service Definitions.
- 5. On the Service Definitions page, select TutorialService.
- 6. From the address bar, copy the TutorialService URL:
http://localhost:8080/active-bpel/services/TutorialService?wsdl
- 7. Paste this URL into the Web Services Explorer WSDL URL field as shown:
Step 2: Send a Request to the Process
You can create an instance of the process by using the Web Services Explorer to initiate the Receive activity in tutorial.bpel.
- 1. In the Web Services Explorer, select Go under the WSDL URL field.
- 2. In the Bindings table, select the link for the supported SOAP binding (SOAP 1.1).
- 3. In the Operations table, select the request link.
- 4. Fill in the message parts. The required parts are Last Name and amountRequested. Fill in Smith for Last name and a high amount, such as 15000, as shown:
- 5. Select Go, which is located at the bottom of the message.
- 6. Click the Source link, and then double-click the Status box to see the SOAP request and response sent and received.
- 7. In the Process Console, go back to the Service Definition page, and select Home from the menu, and then select Active Processes. Notice that two processes completed.
- 8. On the Active Processes page, select the tutorial process. You can see the actual results returned from the loan approval service. The high amount loan request was sent to the approver. The approver approved the loan.
For more details about the two services, and to debug your running or completed process from within Process Developer, go to
Part 11: Debugging Your Process Remotely .