Creating a Process Central Process Form
Select an operation to create an HTML form used for sending a request message to a process. You can accept the default request folder and default file name for the process request form, or enter new ones.
For an overview of this topic, see
What is Process CentralA process request form is an HTML file generated from the input message for a starting (create instance) receive or pick activity. You deploy the form to the server, and users can then submit it to start a process from Process Central.
To create a Process Request Form:
- 1. We recommend that you create a process deployment descriptor (PDD) before creating a process request form so that the service you want to target is already known. If the service name (that is, the My Role service name in the PDD) is not known, you must add it manually to the form, as described in Understanding the Process Request Form Template.
- 2. Select File > New > Process Request Form.
- 3. Select the port type and operation defined in the starting activity of the process.
- 4. Accept the default location and filename for the form or modify them. The default filename is the operation name.
- 5. For multilingual support of the form, select Advanced. For details, see Adding Multilingual Support to Process Central.
See also:
Understanding the Process Request Form Template
When a user submits a process request form, the server must match the request to the service name in the PDD. Be sure that the service name shown in the form matches the My Role service name in the PDD (for the starting activity of the process).
In the generated form, find the line of code for the service name and verify the name:
<script type="text/javascript">
//<![CDATA[
// request form to submit requests and handle response
var AeRequestForm$ID = function() {
// this
var mFormInstance = this;
// the service name
var mServiceName = "EstimationService";
Making Additional Modifications
If you wish to make additional modifications to a process request form, it is helpful to understand the template used to create the form and the HTML file that is generated from it.
Visual Parts of the Form
- • Title
By default the title is based on the operation name of the receive activity's interface. It is in the top-most table of the HTML page.
- • Input Message Parts
If the message is a single-part element, there is one table containing one row for each child element. There is a separate table for each element. If an element is repeating, two command buttons are added: Add and Remove.
- • Send Request command button
At the bottom of the form, a command button is added to submit the request and start the process.
Script Section of the Form
The script contains the commands to format and display the form dynamically in Process Central. The script is JavaScript, containing JavaScript Object Notation (JSON) and jQuery syntax to provide functionality in the form as well as transport protocol. For details, see
Customizing Task and Form Scripts An Introduction.
Editing HTML in Process Central Forms
Use the Eclipse Web Page Editor for creating HTML Requests and Tasks for Process Central.
Once you create an Process Central form, it is displayed in the Web Page editor. You may want to make simple edits to the form as follows:
About the Web Page Editor
Process Developer includes the Eclipse Web Page editor for editing request and task forms. Note that in Process Developer Preferences, a setting is enabled for the Web Page editor to include a Process Central style sheet. The style sheet includes the font and background styles for Process Central.
Editing in the Web Page Editor
The Web Page editor contains two editing panes: Design and Source. The Design pane shows the form in graphical mode and the Source pane contains the HTML tags and JavaScript functions.
Toolbar buttons allow you to show or hide either pane or split the panes horizontally or vertically. Additionally, you can apply simple formatting for text elements, such as bold or italics.
An Outline view is helpful for selecting a construct in the editing pane.
For a view of what the form will look like in Process Central, select the Preview tab. Preview shows the placement and look of paragraphs, tables, control buttons and other constructs, but command buttons are for display only.
In Design mode, use the HTML palette to add additional constructs, such as text fields, images and lines.
See also:
Adding a New Service Operation for a Form or a Task
Select an operation to create an HTML form used for sending a request message to a process. You can also select an operation to add a new service to a process request or task form.
If desired, you can modify an existing form or task form by adding fields and functions generated from service operations. A service operation is a WSDL operation from a Workspace WSDL that represents the endpoint of a BPEL process running in A Process Server. The operation must have a service name associated with it.
When a task or form is open in the Web Page editor, the Participants view, normally displaying process participants, shows only the service operations available for forms, as shown.
There are several use cases for adding new service operations. Here are some examples:
- •If you have an existing task or form, but the schema for the task or service operation has been updated, you can modify or add the additional fields to your existing form by dragging and dropping them into the form
- •Enhance the functionality of form fields by calling a service. For example, if the form field is "Select a Country," call a service to provide a list of country names.
If you have a deployed process that contains an operation you want to use, you must import the WSDL service definition into your workspace.
To add a WSDL to the Workspace:
- 1. In the Process Console, display the Catalog Service Definitions page.
- 2. Select the Service Definition of a deployed process to display the WSDL for the service.
- 3. Copy the URL. For example, http://localhost:8080/active-bpel/services/loanservice?wsdl.
- 4. In your project, right-mouse click on Service References.
- 5. Select Import.
- 6. Paste the URL into the field for Enter the URL to import from, and select Finish.
To add a new service operation:
- 1. Open a task or form in the Web Page editor.
- 2. In the Participants view, right-mouse click on Service Operations, and select Add Service Operation.
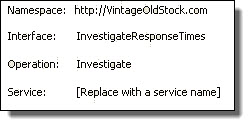
- 3. In the Select Service Operation dialog, select a Port Type and Operation.
- 4. Notice that the service name may be unknown, if it does not exist in the process PDD file. Ensure that you add the service name, as described in Understanding the Process Request Form Template. If the name is unknown, the dialog lets you know, as shown:
Events that happen when you add a new service operation:
- •A Send Request button is added to the bottom of the HTML form for the new operation
- •A new JavaScript section is appended to the source file. This is the section where you must specify the service name.
- •The operation and input/output messages are added to the Participants view
To use the new service operation in your form:
- 1. Ensure that your form is in focus in the Web Page editor.
- 2. In the Participants view, expand an operation to display the input and/or output message.
- 3. Drag the operation's input/output message, or a message's part, or a part's element to a location in the Design view.
If you are adding multilingual support for forms, you must manually add multilingual support to the new fields and add the language values to properties files. For details on how to manually update the form, review
Adding Multilingual Support to Process Central.
See also:
Customizing Task and Form Scripts An Introduction
The generated HTML forms for tasks and forms fulfill a basic requirement of rendering XML message data into HTML. In addition, the form allows for powerful customization by taking advantage of several HTML-based technologies that Process Developer uses to create the form, namely:
- •JavaScript and Asynchronous JavaScript and XML (AJAX)
- •JavaScript Object Notation (JSON)
- •JQuery and JQuery UI
These technologies in combination provide dynamic forms and tasks. Note the following development features for a form:
- •Uses a standards-based solution
- •Allows you to work in any HTML editor
- •Provides many rendering possibilities for task and form message data, such as date pickers, tabs, check boxes and combo boxes
- •Allows rich additions, including calls to additional services, images, and most anything you can script for a Web application project
- •Provides access to large amount of technical resources, knowledge bases and web application developers
Below are some details on each of the technologies used to create tasks and forms.
JavaScript and AJAX
JavaScript is the binding for the form and includes the subset of JSON and JQuery. AJAX calls services asynchronously in the background without interfering with the display and behavior of forms and tasks.
JSON
JavaScript Object Notation (JSON) is a data interchange format. XML messages from the form or task are converted to a JSON object. Process Developer's implementation of JSON is within the Google Data Protocol. For more information on JSON, see http://code.google.com/apis/gdata/json.html.
The Google Data Protocol has the following rules:
- •XML is represented as a JSON object.
- •XML version and encoding attributes are converted to version and encoding attributes of the root element, respectively.
- •If an element has a namespace alias, the alias and element are concatenated using "$". For example, ns:element becomes ns$element.
- •Each nested element or attribute is represented as a name/value property of the object.
- •Attributes are converted to string properties.
- •Child elements are converted to object properties.
- •Elements that can appear more than once are converted to array properties.
- •Text values of tags are converted to $t properties.
The following is an example of a XML to JSON conversion:
XML Message:
<?xml version="1.0" encoding="UTF-8"?>
<types1:EstimationRequest
xmlns:ns="http://example.org/QuoteRequest.xsd"
xmlns:ns1="http://example.org/QuoteRules.xsd"
xmlns:types1="http://example.org/Estimation.xsd">
<ns:refNumber>1</ns:refNumber>
<ns:quoteRequest>
<ns:contact>
<ns:name>JZ</ns:name>
<ns:email>activevos@gmail.com</ns:email>
</ns:contact>
<ns:model>500</ns:model>
<ns:year>1983</ns:year>
<ns:description>a fine car</ns:description>
</ns:quoteRequest>
</types1:EstimationRequest>
JSON Object:
{"EstimationRequest":{"xmlns":"http:\/\/example.org\
/Estimation.xsd",
"refNumber":{"xmlns":"http:\/\/example.org\
/QuoteRequest.xsd","$t":"1"},
"quoteRequest":{"xmlns":"http:\/\/example.org\
/QuoteRequest.xsd",
"contact":{"name":{"$t":"JZ"},
"email":{"$t":"activevos@gmail.com"}},
"model":{"$t":"500"},
"year":{"$t":"1983"},
"description":{"$t":"a fine car"}}}}
Tip: In order for forms to work with Process Central (JSON + JavaScript), the form element names must observe the same rules used to define JavaScript variables. For example, the variables can only contain contains letters, numbers, or underscores. Also element names should not be a reserved JavaScript keyword.
jQuery and JQuery UI
jQuery is a JavaScript library that simplifies HTML document traversing, event handling, animating, and Ajax interactions. jQuery is built to select certain elements on a page and manipulate them. jQuery UI provides visual controls, including core interaction plug-ins as well as many UI widgets.
For details, see http://jquery.com/
JQuery Example
The selection process in jQuery is a filter process, whereby every element on a page is put through the filter you supply in a command, and the command returns either the single matching object or an array of matching objects from which you can traverse.
For example, to get an array of all the matching HTML elements in a page, you pass the HTML tag into the jQuery search field:
// Create a red background for every <p> tag in the page.
$("p").css("background", "#ff0000");
In a form, Process Server uses jQuery to select data elements. In the following example, a jQuery command creates a table for repeating elements. If a user wants to add a new row, the following code is used:
// Handles the adding of a new repeating field
$("#processRequestForm$ID").find("table.avc_repeating_field_data_table input[type='button'].avc_add_field_element").click(function() {
var table = $(this).parents("table:first");
var rows = $(table).find("tbody tr").length;
var lastRow = $(table).find("tbody tr:last");
var newRow = $(lastRow).clone(true);
$(lastRow).after(newRow);
HTML element ID attributes must end with $ID suffix, such as in the example above (#processRequestForm$ID). The $ID suffix provides a unique HTML element ID to avoid collisions with other forms.
See also:
Using the Informatica Business Process Manager SDK for Customizing Forms
To take full advantage of customizing forms and tasks, we recommend that you download and familiarize yourself with the Informatica Business Process Manager SDK Package. This package includes a detailed discussion of Process Developer XML-JSON and Process Developer XML-JSON for Process Central, showing you form development and usage. (This discussion is also part of this help.)
Where to find the Process Developer SDK
The SDK Package and Documentation kit is available in the Informatica InfoCenter. The latest InfoCenter is located at http://infocenter.activevos.com. Note that you must use the version of the SDK that is available for your product version.
You can link remotely to the InfoCenter's SDK documentation from Process Developer Online Help. For instructions on displaying remote help, refer to the Help Preference in Process Developer.