Creating and Deploying a Business Process Archive Contribution
View the selected deployment descriptor files and other project resources to deploy. On the Catalog Resources page, view the list of selected and excluded resources to ensure your contribution contains all files to be managed as a unit. Upon export, deploy the file and save a script to redeploy the .bpr file.
To deploy your process to A Process Server, you package a contribution of processes and resources in a business process archive file (.bpr file), which is similar to a Web archive file.
Before creating a .bpr file, you must create a .pdd file, described in Creating a Process Deployment Descriptor File. Optionally, you can additional resources, such as Process Central forms and tasks.
We recommend that you create only one BPR file per project. The processes and resources are managed as a unit of files on the server. For details, see Managing Deployment Contributions.
To create a .bpr file:
- 1. If you have created and used a project reference for the current project, be sure to deploy that contribution first. Project dependencies must be deployed to the server first.
- 2. Select File > Export > Orchestration > Contribution-Business Process Archive.
- 3. Notice that all process deployment descriptor files (.pdd files) are pre-selected to include in the archive, as shown in the following example.
- 4. Select the export location and filename for the BPR file.
- 5. Select a Server Deployment Type:
- - None. Select this option if you do not wish to deploy your BPR archive upon completion of the export.
- - File. Select this option to save the archive upon export to a file system location. In the Deployment location field, browse to any folder.
- - Web Service. Select this option if your server is running and you want to automatically deploy to it. Is your server is secured, provide the username and password for access to it.
- 6. If desired, type in a Group name and description for this contribution. On the Process Console you can use the group name as a selection filter for listing files. The description appears on the Contribution detail page of the Console.
- 7. If desired, select the option to Save the contribution specification as an Ant script in the workspace, and select a location for this file, such as the Orchestration Folder's deploy folder. For details on this option, see Using a BPRD Script to Regenerate and Deploy a BPR Contribution.
- 8. Click Next to view a list of catalog resources. See the following topics.
- - Contribution Preference
- - Deploying Project Dependencies and Viewing Excluded Dependencies
- - Deploying Additional Resources
- 9. Click Finish to create and export the .bpr file and optional .bprd file.
- 10. Refresh the project to view the new BPR file.
See also Managing Deployment Contributions.
Deploying Project Dependencies and Viewing Excluded Dependencies
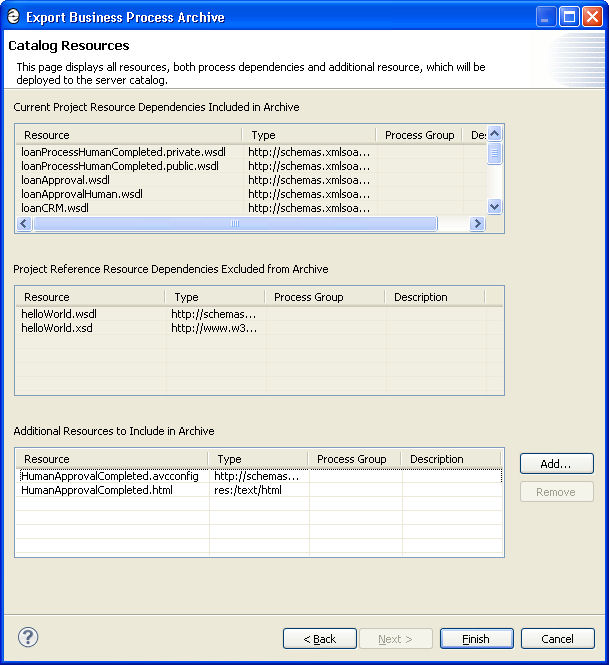
As described in Creating and Deploying a Business Process Archive Contribution, you begin a deployment at the project level, by including the process deployment descriptors (PDDs) of the processes in your project. The Export Business Process Archive Wizard then shows you all project resources pre-selected and project references excluded from deployment, as shown in the example.
The parts of this dialog are described as follows:
Project Resource Dependencies
The current project resource dependencies are deployed. They include the following types:
- •WSDL and schema from this project
- •WSDL and schema imported from another workspace project if you do not have project references specified
- •Human task HTML forms
- •(not displayed) XSL files used in the doXSLTransform function, based on the location of the file you specified as a parameter to the function
- •Java jars specified in the PDD
Project Reference Dependencies Excluded from Archive (not deployed)
You must deploy these resources in a contribution prior to deploying this contribution.
Project References specified in the project properties and used within the process are listed on the Catalog Resources page. For example, if you create a participant based on a referenced WSDL, you will see the WSDL listed in the excluded list. For details on the advantage of this approach, see Using Project References.
Additional Resources
Additional resources are automatically pre-selected, based on the Contribution Preference.
You can deploy more resources as described in Deploying Additional Resources.
Deploying Additional Resources
Add resources to deploy to the server. View the selected deployment descriptor files and other project resources to deploy. On the Catalog Resources page, view the list of selected and excluded resources to ensure your contribution contains all files to be managed as a unit. Upon export, deploy the file and save a script to redeploy the .bpr file.
As you develop a process, there are two kinds of resources you can add: dependent and non-dependent resources. Dependent resources include WSDL, schema, human task forms, XSL for doXSLTransform, and Java jars specified in the PDD. Dependent resources can be deployed in the same BPR contribution containing the process PDD or in a referenced project.
You may want to deploy XQuery modules in a separate BPR.
The resources you may want to deploy in a separate BPR include:
To deploy additional resources to the server:
- 1. Ensure that the server is running, and ensure that your resource file is in a Workspace project.
- 2. Select File > Export > Orchestration > Contribution- Business Process Archive File.
- 3. If the resources are not directly imported into the process, you can skip the process deployment descriptor files (.pdd files) to include in the .bpr archive.
- 4. Select the export location and filename for the .bpr archive.
- 5. In the Deployment section, select Web Service as the Type.
- 6. On the Catalog Resources page, if needed, select Add.
- 7. Select a Resource Type and Location. Select a resource from the Project Explorer.
For Other, add a URI. The URI can be any reference desired, preferably related to the resource type. For example, an XML resource URI should be the root namespace of the XML document.
- 8. In the Resources list, do the following:
- - Optionally, type in a new or existing Group Name. The Server can display resources by groups.
- - Optionally, type in a Description. The description is displayed in the Catalog Resources list on the server.
- 9. Add additional resources as desired.