Lesson 1: Creating a Guide
This lesson explains how to create a guide. Other lessons will have you deploy and run what you create.
Part 1: First Steps
Note: Before following along and creating the tutorial guide, you must have previously created the Guide Designer orchestration project. You will do this from within the Process Developer. You will find complete information in an Process Developer Cheat Sheet and an overview in Installing the Guide Designer Orchestration Project.
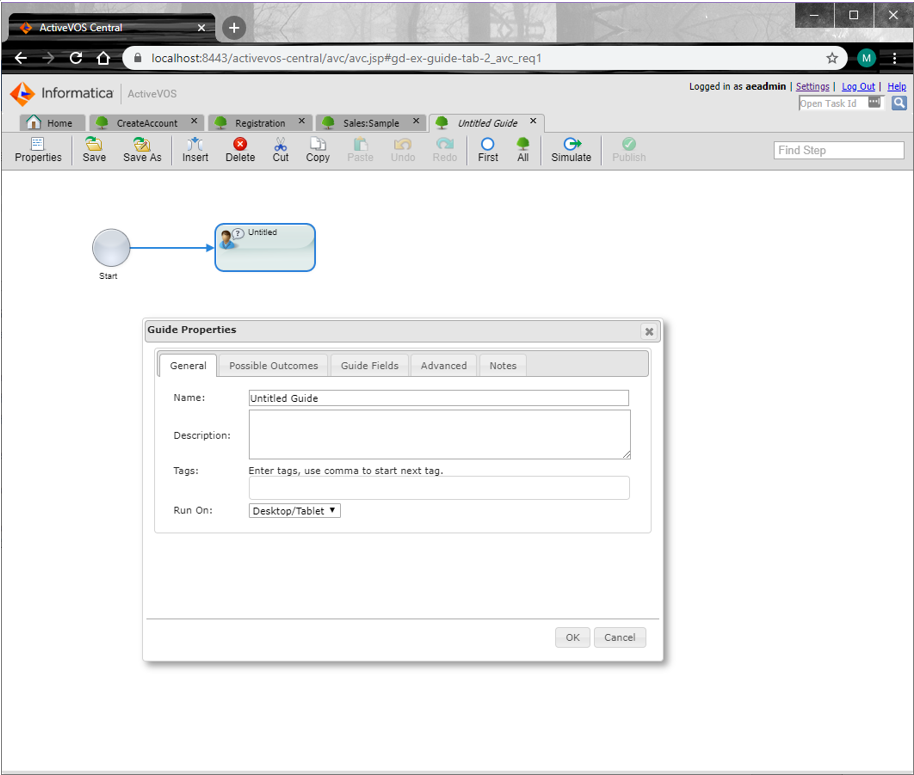
Begin creating a guide by pressing the New button.
A new tab displays and this tab contains the Guide Properties dialog box. Underneath it (or perhaps to the side) are two steps that give you a place to begin.
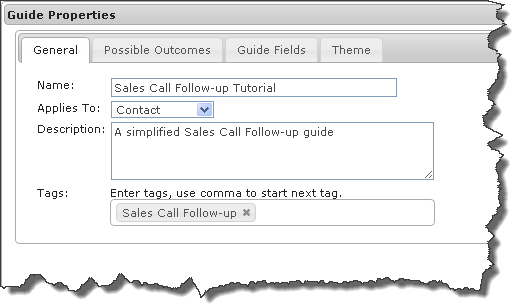
Enter the following information into this dialog, and when you're done, press OK.
Field | Action |
Name | Type "Sales Call Follow-up Tutorial". |
Applies To | Select Contact from the picklist. What you select here makes data within a database table available to the guide. |
Description | Type "A simplified Sales Call Follow-up guide". |
Tag | Type "Sales Call Follow-up". A "Tag" is a category under which the guide appears when Guide Designer presents guides to the user. |
Part 2: Beginning the Guide The First Step
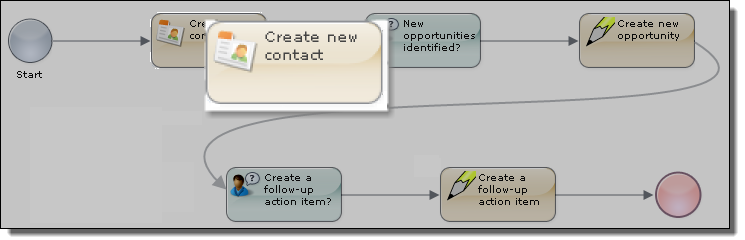
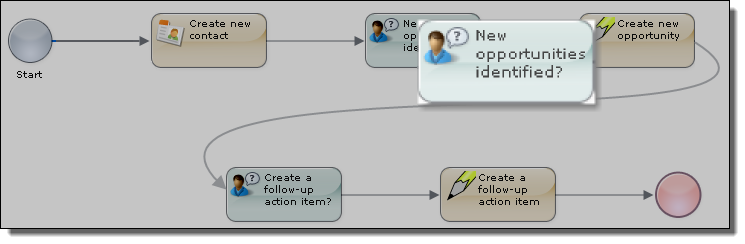
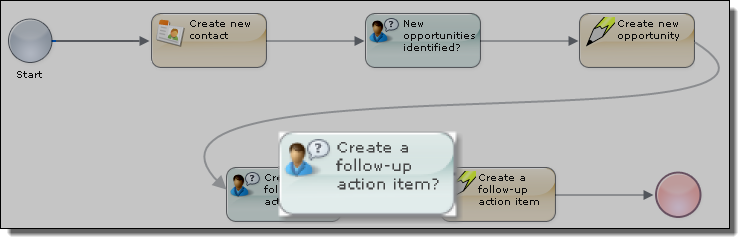
All actions that Guide Designer performs are defined by the steps that you place within it. This topic describes the Create new contact an Service Call step. Here it is in relation to the steps that you will create:
To help you get started, the Guide Designer added two steps to the canvas. The first (the one on the left within a circle) is a "start step". There are no actions that you will ever perform on a start step. As it name indicates, it is the place where Guide Designer will begin executing your guide. The second is an untitled step. This is actually where you begin. You will add additional steps in other parts.
The Create new contact step adds information about a contact to your application's database. Guide Designer will do this automatically when users complete this step.
The procedure is as follows:
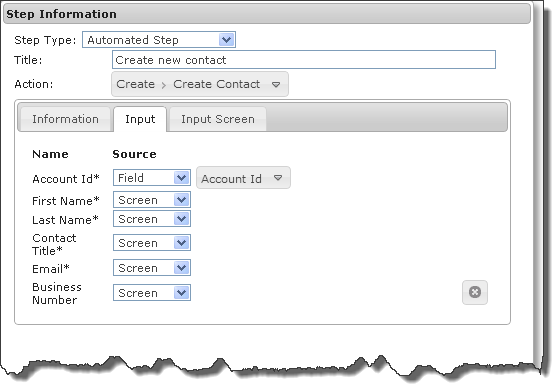
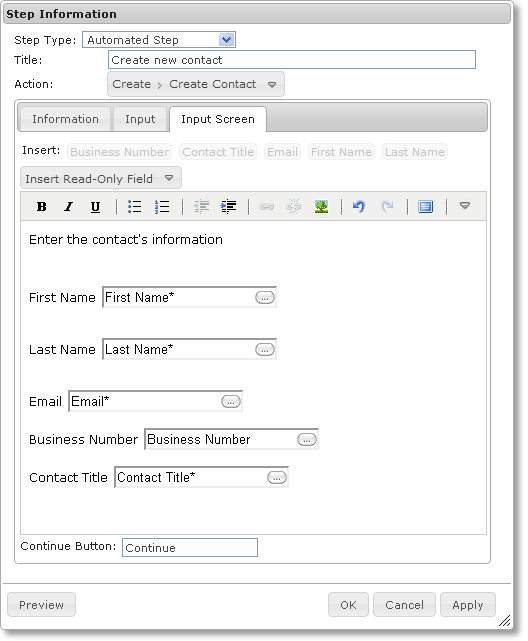
- 1. Double-click on the untitled step.
- 2. Step Type: Select Service Call from the picklist.
- 3. Title: Type "Create new contact".
- 4. Action: Select Create, then in the displayed menu click Create Contact.
The Information tab now contains input and output fields. The field's data type is displayed and if it is in an input field, a description of the field.
- 5. Click the Input tab.
The Input tab has all of the field's within a contact record. All but Business Number are required--notice the asterisk. If a Business Number isn't needed, you can delete it from by clicking the "x" to the right. Not all Service Call input tabs contain all of the table's fields. (The developer who connected Guide Designer to an application defines which are displayed and which are required.)
- 6. Set the source for Account Id to be Field, then select Account Id from the Field picklist. The rest should have their sources set to Screen. When the source is set to Field, Guide Designer uses the value in the current context. When it is set to Screen, you will need to insert a place into which the user can type information within the Input Screen tab.
Note: For information on setting sources, see Setting Source Values elsewhere in this help.
- 7. Click on the Input Screen tab.
Guide Designer places a button for each of the sources you set to Screen within the Input tab. You will need to insert these buttons into the canvas.
The area beneath the editing buttons is called a "canvas". You will use it in much the same way as you would a page within a text editor such as Microsoft Word.
Begin by typing text that tells the user what to do: "Enter the contact's information". Next, type press your keyboard's Enter key. Click on the buttons in the order shown in the following figure, pressing the Enter key between each. Notice that after the field is inserted, the button is shown in gray.
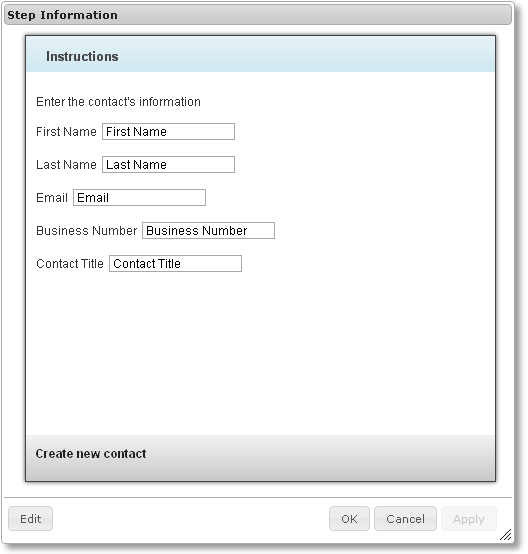
- 8. At any time, you can see what a step looks like by pressing the Preview button in the bottom-left corner.
The Preview button is now an Edit button. Press it to return to the Service Call step's canvas.
- 9. Press the OK button in the Service Call step.
- 10. Go to the menu bar and press Save.
After you press OK, the Guide Designer uses the title you had typed as the name of the Service Call step. The Guide Designer also adds another untitled step. In the next topic, you will set this to be a screen step.
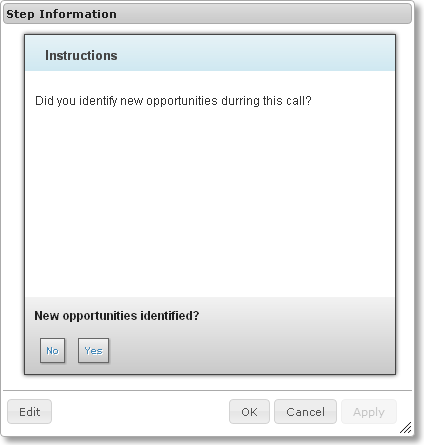
Part 3: Adding the New opportunities identified Screen Step
This topic adds a a second step to the guide. This step will be a screen step and will follow the Create new contact Service Call step.
Here are some of the more common ways in which screen steps are used. Here are the most common ways it is used:
- •It can just contain information text.
- •It can ask a question.
- •It can contain read-only fields. These fields display information contain in your application's database.
- •It can contain updateable fields. An updateable field can also display database information or it can be empty. When the user changes existing field information or add new text, Guide Designer adds the changes to your application's database.
Here is a procedure for creating this screen step:
Field | Action |
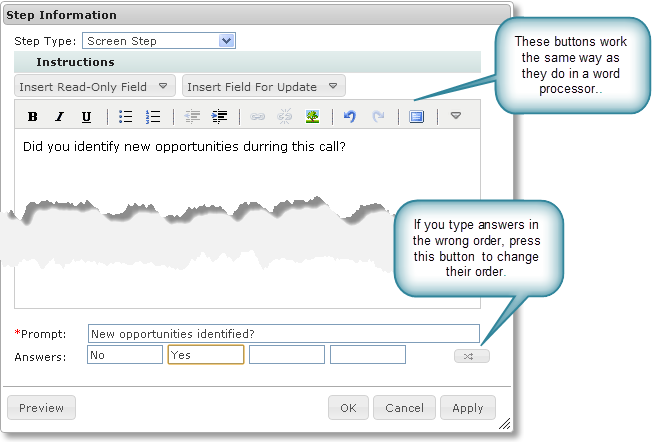
Step Type | Select Screen Step |
Canvas | Type "Did you identify new opportunities during this call" |
Prompt | Type "New opportunities identified?" |
Answers | Type No and Yes |
Here's what your step should look like:
After clicking OK (and you should also save your changes), Guide Designer uses the prompt as the step's title. It also adds two untitled steps to the right, one for each answer.
For now, you'll ignore the No branch.
Exercise:
Exercise 1: Adding the Click continue to begin Screen Step: Here you will add a screen step that is very similar to the one you added in Part 2.
Part 4: Adding the Create new opportunity Service Call Step
In this part, you'll add another Service Call step.
Here's how you should fill in the Input tab:
Field | Action |
- | Click on the untitled step that is the target of the Yes branch that was created in the previous topic |
Step Type | Service Call Step |
- | Click on the Input tab |
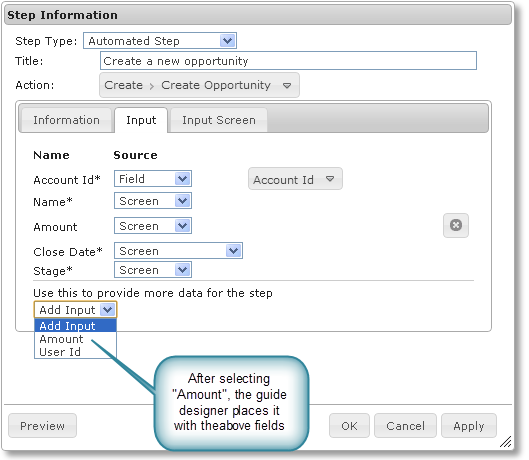
Title | Type "Create a new opportunity" |
Action | Select Create > Create Opportunity |
Account Id | Set Source to Field, and then select Account Id |
Name | Set Source to Screen |
Close Date | Set Source to Screen |
Stage | Set Source to Screen |
Add Input | Select Amount--it was added to the fields above it--then set its Source to Screen |
Note: For information on setting sources, see Setting Source Values elsewhere in this help.
Here's what the Input tab should look like:
The order of the fields here may be different than what appears in your Input tab.
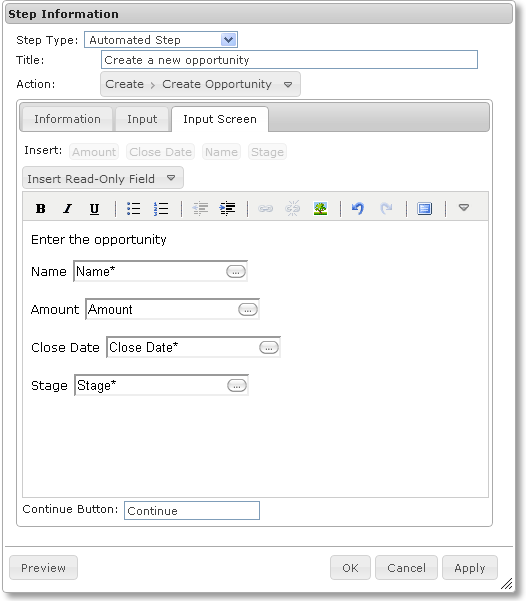
Now create the Input Screen:
Field | Action |
-- | Click the Input Screen tab |
Canvas | Type "Enter the opportunity" |
Insert | Click on each button--don't forget to press the Enter key between items |
Here's what the step should look like:
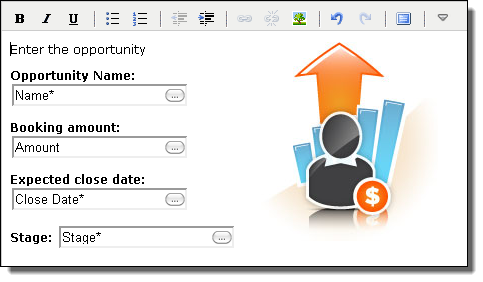
Change the text of the three of the labels and use the "B" toolbar button on all four labels to set the text to bold. Here's what you canvas could look like.
Note: For information on using this toolbar, see Using the Screen Editor.
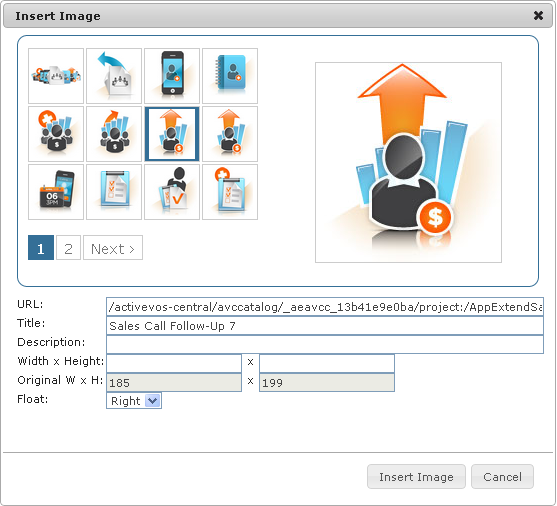
Let's make the page a bit more attractive by adding an image.
- 1. By default, images float right. Placing the cursor to the right of text often has the best visual results.
- 2. Select an image (it doesn't matter which one), and then click the Insert Image button.
The canvas should not look something like this:
After clicking OK at the bottom of the Step Information dialog, the right part of your guide should look like this:
Press the Save button.
Exercises
Part 5: Adding the Create a follow-up action item Screen Step
You'll add a second screen step in the same way you added one previously.
Do the following:
Field | Action |
- | Click on the untitled step |
Step Type | Select Screen Step |
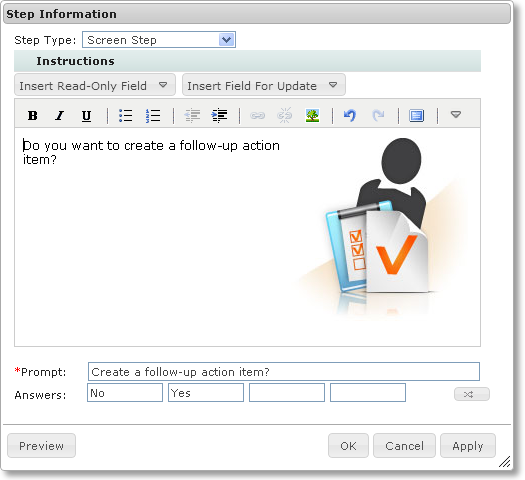
Canvas | Type "Do you want to create a follow-up action item?" |
Insert Picture | It doesn't matter which one you choose |
Prompt | Type "Create a follow-up action item?" |
Answers | Type No and Yes |
Your step should look something like this:
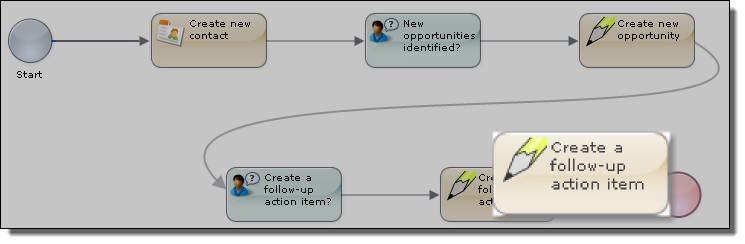
After clicking OK, the right side of your guide should look as follows:
Part 6: Adding the "Create a follow-up action item" Service Call Step
This topic has you creating a third Service Call step. You will learn to use the Insert Read-Only Field picklist that occurs within many steps.
In this step, you'll set the Source for a field to Constant. (You've already set Source to either Field or Screen.) When you set a field's Source as Constant, Guide Designer will set the field to what is entered here and when the record is added, this constant will be the value written into the field.
Note: For information on setting sources, see Setting Source Values elsewhere in this help.
Here's what you should do:
Field | Action |
|---|
- | Click on the Yes branch following the Create a follow-up actionitem step |
Step Type | Select Service Call from the picklist |
Title | Type "Create a follow-up action item" |
Action | Create > Create Account Task |
Input tab | Select it if it isn't selected |
Description | Set Source to Screen |
Due Date | Notice the two fields to the right - 1. Click in the left field to see what displays
- 2. Set Source to Screen
|
Add Input | Click Status within the picklist |
Status | - 1. Set Source to Constant.
- 2. Select "Not Started" in the picklist to the right of Constant.
|
Add Input | Click Priority within the pickllst |
Priority | - 1. Set Source to Constant.
- 2. In the picklist to the right of Constant , select Normal
|
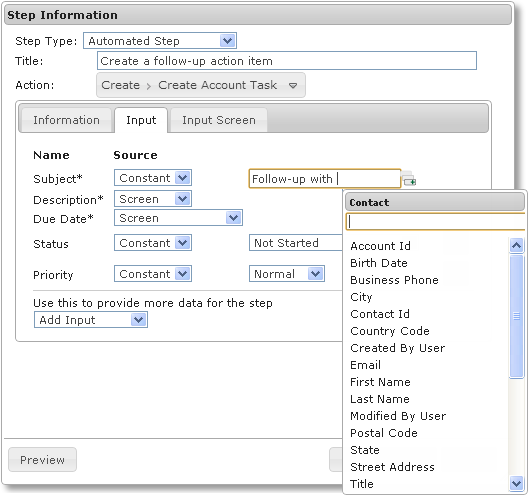
Subject | - 1. Set Source to Constant.
- 2. Type "Follow-up with " in the text box to the right of Constant.
- 3. A small icon appears after the text field; click it
Here's what the Input tab should look like: While a Constant field is written directly into a record, it can also include the text of other fields. |
| Add two Contact fields: First Name and Last Name. You will need to use your End key to see what you're doing when you insert the second field. Here's what the top of the Input tab should look like: |
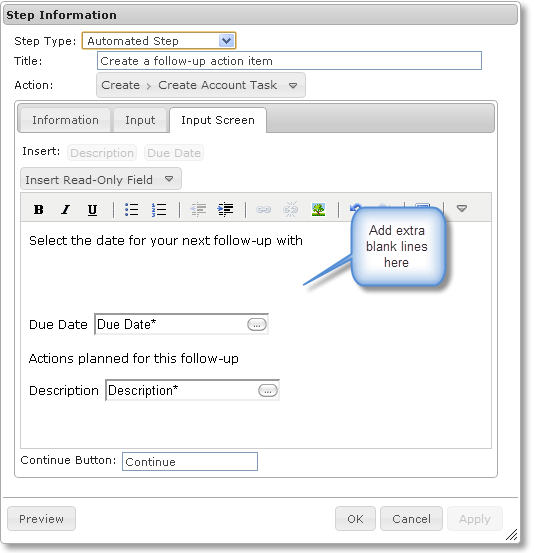
| Select the Input Screen tab, and make the canvas look as follows: |
When the user sees a step, it should have context information. For example, in this Service Call step, the user should see the name of the person who the person receiving this task will be contacting. You can do this by inserting the contact's name into the canvas. Do this by Selecting First Name and Last Name within the Insert Read-Only Field picklist.
Part 7: Creating an End Step
This topic shows how to create an End Step.
Field | Action |
- | After you created the Create a follow-up action item step, the Guide Designer added an untitled step (as usual). Click on this untitled step |
Action | Select End Step |
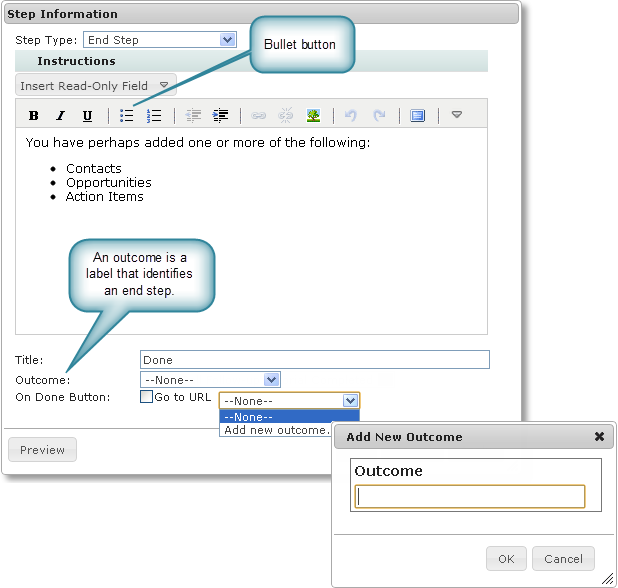
Canvas | Type the text shown in the next figure. You will need to use the bullet button on the toolbar |
Title | Type "Done" |
Outcome | Click on the picklist. Within the picklist, select Add new outcome. The Guide Designer displays its Add New Outcome dialog. |
Outcome | Type "Sales Call Follow-up Tutorial Completed" in the Add New Outcome dialog, then click OK. After you add an outcome, it will appear in the Outcomes picklist. |
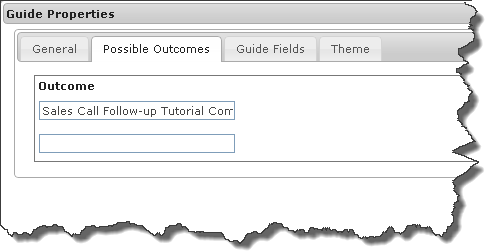
Guides can have multiple outcomes and an outcome could be associated with more than one end step. As a guide executes, Guide Designer monitors the guide's progress, recording the steps that the user executes. When the guide finishes, it records the label of the end step that was executed (The guide being built here only has one outcome: Sales Call Follow-up Tutorial Completed. Most guides have many.) When an administrator asks for a report, the outcome indicates how the interaction ended.
While you can interactively add outcomes, you can also enter them into Guide Properties dialog. If you add an outcome in an end step, the Guide Designer also enters it within the Guide Properties dialog.
Exercises
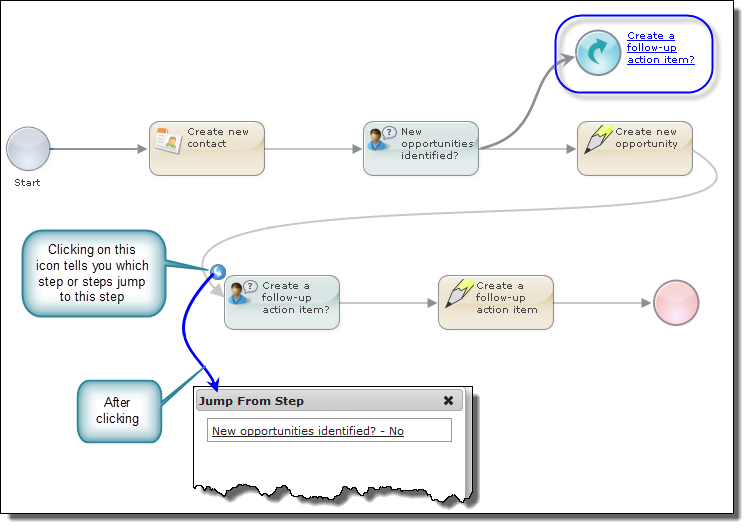
Part 8: Adding a Jump State
If you recall the diagram of the whole guide, there were places that jumped forward and others that jumped backward. As you will see, creating a jump step is very easy.
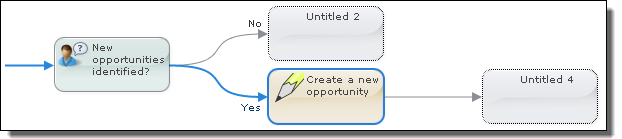
In the following figure, the step in the upper-right corner is a Jump Step. Notice the curved arrow icon.
This step will jump from New opportunities identified step to the Create a follow-up action item? screen step. Notice the small curved arrow icon pointing into this Screen Step. This lets you know that the step is the target of a jump set.
Here's how to add it:
- 1. Click the untitled step that is ends the No branch emerging from the New opportunity identified screen step.
- 2. Click on the untitled step.
- 3. Action: Jump Step.
- 4. To: Select Create a follow-up action item? from the picklist.
- 5. Click OK
When users execute the New Opportunities identified screen step, they have two choices: No and Yes. If the user selects No, the next step that is displayed is Create a follow-up action item?
Exercises
Part 9: Adding the Find existing contacts Service Call Step
After a meeting, users should validate that the information for their contacts is correct. To do this, they will need to select the contact from a list. This topic introduces the following concepts:
- •Creating an output field using the Guide Properties dialog
- •Defining the output field
- •Using a Set Fields action within a Service Call step
- •Creating the list
Creating an Output Field
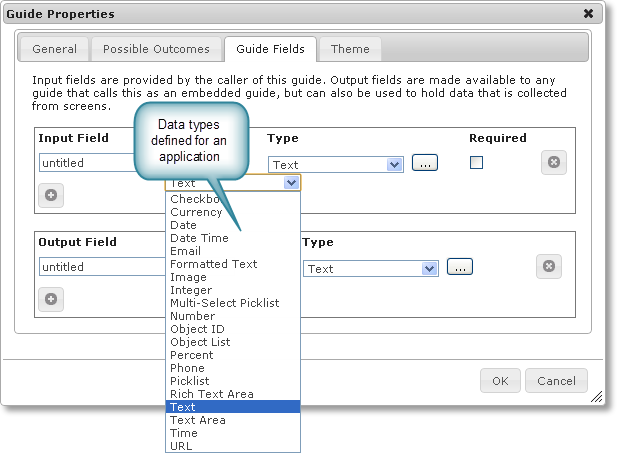
Guides read, create, and update your application's data. This information is stored in fields, and these are the items that you see within the Insert Read-Only Field and Insert Field for Update picklists. These fields are defined within the application. However, there are times when a guide needs to temporarily store information. To do this, you will need to add fields, fields that are only used within the guide. The place where you add them is the Guide Fields tab within the Guide Properties dialog.
You can create input and output fields.
- •Input Field: Used to pass data to an embedded guide. This is not discussed in this tutorial.
- •Output Field: Used in two ways. The field can create a field into which you can assign data. The second is to receive data from an embedded guide. (This also is not discussed in this tutorial.)
All fields have a data type. Guide Designer has the built-in data types shown in the picklist in the previous figure. Developers can add additional data types.
Some of these data types are ones used in most programming languages; for example, text and numbers. Others such as checkbox and picklist are elements that are used in interactive forms. Object ID and Object List are unique to Guide Designer. An object ID is a built-in type into which Guide Designer can write data that identifies an object. Object IDs can be passed to or returned from Service Call steps and guides as fields. The guide can also be started with an object ID association, which is set using Applies To in the Guide Properties dialog.
An Object List is also a built-in type. It is a multi-valued data type where each item identifies one object ID. This list can be operated on as a set and the guide can individually execute on each element of the list or displayed as a table to the user.
This guide needs to display a list of contacts, and this information will be stored in an Object List.
- 1. Select the Guide Properties dialog and click the Guide Fields tab
- 2. Press the "+" symbol within the Output Field area
- 3. In the left-most area, type "Contact List"
- 4. Select Object List from the Type picklist
Defining an Output Field
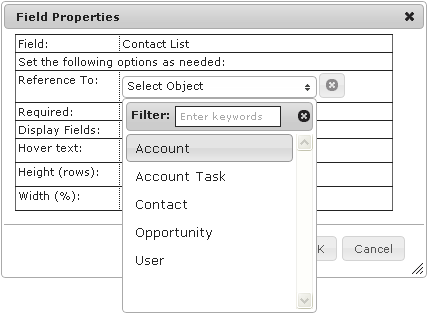
All fields, both those created and those contained within an object, have settable properties. Normally, you just ignore them. However. you need to set properties when defining a list. Here is what you do to define this Contact List field:
- 1. Click the "..." button to the right of the Object List item selected previously. The Guide Designer displays the following dialog:
- 2. Take a moment to look at the properties you can set. Only two need be set for this guide. Set the Reference To property to Contact and set the Height property to 6. The Reference To property makes fields within that object available. Height indicates how many items are displayed in a step. If there are more than 6, Guide Designer adds a scroll bar.
- 3. Click OK in this dialog.
- 4. Click OK in the GuideProperties dialog.
Using a Set Fields Action Within an Service Call Step
In the Guide Fields tab of the Guide Properties dialog, you defined the Contact List field. You now will define the items that will appear in it.
Here's how to set up a Service Call step.
Field | Action |
|---|
- | Select the Create new contact step, and then click the Insert button. |
Step Type | Select Service Call Step from the picklist |
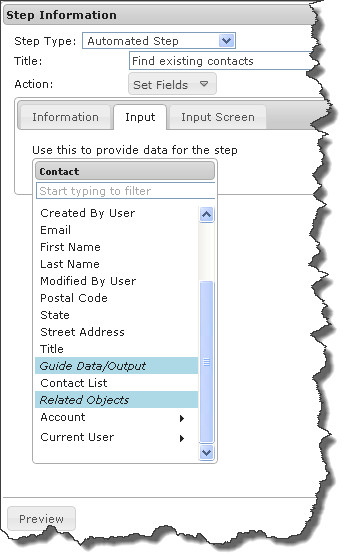
Title | Type "Find existing contacts" |
Action | Select Set Fields from the picklist |
Add Input | Select Contact List from the picklist You will need to scroll the list. Notice that the Guide Designer has added a Guide Data/Output section and placed Contact List within it. |
Creating a List
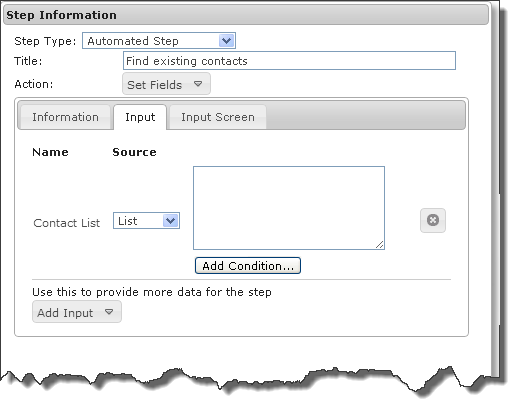
In other topics, source values could be Field, Constant, and Screen. In this context, the picklist contains Field, List, and Screen.
Here's how the step appears after you select List.
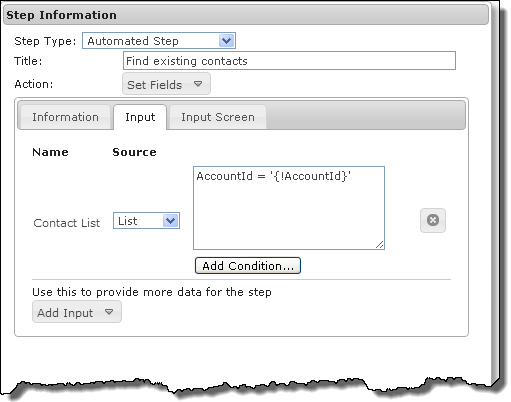
What you will need to do now is add one or more conditions that select contacts contained within your application. You could directly type an SQL WHERE clause into this text area. However, the Guide Designer can give you considerable help if you use the Add Condition dialog. Display it by clicking the dialog's button. The following composite figure shows the contents of each of the picklists within this dialog:
As every contact has an Account Id field, you can obtain a list of contacts associated with a contact by using the Account Id field. Here is how you set this dialog.
After clicking OK, the Step Information dialog looks as follows: