Mapping Configuration Task Configuration
Complete the following steps to configure a Mapping Configuration task:
- 1. Define the Mapping Configuration task.
- 2. Configure the source.
- 3. Configure the target.
- 4. Define other parameters.
- 5. Optionally, configure a schedule and advanced options.
When you configure a Mapping Configuration task, you can save your work at any time. You can choose one of the following options:
- •Save and continue
- •Save and run
- •Save and close
Advanced Connection Properties for Integration Templates
For tasks based on integration templates, you can configure advanced properties for Informatica Cloud Connector connections. For tasks based on mappings, you define advanced connection properties in the mapping.
Connections for Informatica Cloud Connectors can display advanced properties, such as page size, flush interval, or row limit. The advanced properties display based on the connection type and how the connection is used. Some Informatica Cloud Connectors might not be configured to display advanced properties.
Related Source Configuration
When a mapping includes a source that is a parameter and configured for multiple objects, you can join related objects in the task.When a mapping or integration template includes a source that is a parameter and configured for multiple objects, you can join related objects in the task.
You can join related objects based on existing relationships or custom relationships. The task wizard restricts the type of relationships that you can create based on the connection type.
Use the following relationships to join related objects:
- Existing relationships
- You can use relationships defined in the source system to join related objects. You can join objects with existing relationships for Salesforce, database, and some Informatica Cloud Connectors connection types.
- After you select a primary object, you select a related object from a list of related objects.
- Custom relationships
- You can use custom relationships to join multiple source objects. You can create custom relationships for the database connection type.
- When you create a custom relationship for database objects, you create an inner join on the source fields that you select.
To add a related object, in the Objects and Relationships table, use the Action menu to add the primary source object. And then, from the Action menu for the source object, select Add Related Objects.
Advanced Relationships
When you create a Mapping Configuration task based on a mapping, you can create advanced relationships for database sources.
You can create an advanced relationship for database sources when the source object in the mapping is a parameter and configured for multiple sources. You cannot create an advanced relationship between source objects that have been joined using a custom relationship.
When you create an advanced relationship, the wizard converts any relationships that you defined to an SQL statement that you can edit.
To create an advanced relationship, add a primary source object, and then select Advanced Relationships from the Action menu of Objects and Relationships table.
In the Advanced Relationship dialog box, you can select fields and write the SQL statement that you want to use. Use an SQL statement that is valid for the source database. You can also add additional objects from the source system.
Advanced Session Properties
Advanced session properties are optional properties that you can configure in integration templates and Mapping Configuration tasks. Use caution when you configure advanced session properties. The properties are based on PowerCenter advanced session properties and might not be appropriate for use with all tasks.
You can configure the following types of advanced session properties:
- •General
- •Performance
- •Advanced
- •Error handling
General Options
The following table describes the general options:
General Options | Description |
|---|
Write Backward Compatible Session Log File | Writes the session log to a file. |
Session Log File Name | Name for the session log. Use any valid file name. You can use the following variables as part of the session log name: - - $CurrentTaskName. Replaced with the task name.
- - $CurrentTime. Replaced with the current time.
|
Session Log File Directory | Directory where the session log is saved. Use a directory local to the Secure Agent to run the task. By default, the session log is saved to the following directory: <Secure Agent installation directory>/apps/Data_Integration_Server/logs |
$Source Connection Value | Source connection name for integration templates. |
$Target Connection Value | Target connection name for integration templates. |
Treat Source Rows as | When the task reads source data, it marks each row with an indicator that specifies the target operation to perform when the row reaches the target. Use one of the following options: - - Insert. All rows are marked for insert into the target.
- - Update. All rows are marked for update in the target.
- - Delete. All rows are marked for delete from the target.
- - Data Driven. The task uses the Update Strategy object in the data flow to mark the operation for each source row.
|
Commit Type | Commit type to use. Use one of the following options. - - Source. The task performs commits based on the number of source rows.
- - Target. The task performs commits based on the number of target rows.
- - User Defined. The task performs commits based on the commit logic defined in the integration template.
When you do not configure a commit type, the task performs a target commit. |
Commit Interval | Interval in rows between commits. When you do not configure a commit interval, the task commits every 10,000 rows. |
Commit on End of File | Commits data at the end of the file. |
Rollback Transactions on Errors | Rolls back the transaction at the next commit point when the task encounters a non-fatal error. When the task encounters a transformation error, it rolls back the transaction if the error occurs after the effective transaction generator for the target. |
Java Classpath | Java classpath to use. The Java classpath is added to the beginning of the system classpath when the task runs. Use this option when you use third-party Java packages, built-in Java packages, or custom Java packages in a Java transformation. |
Performance Settings
The following table describes the performance settings:
Performance Settings | Description |
|---|
DTM Buffer Size | Amount of memory allocated to the task from the DTM process. By default, a minimum of 12 MB is allocated to the buffer at run time. Use one of the following options: - - Auto. Enter Auto to use automatic memory settings. When you use Auto, configure Maximum Memory Allowed for Auto Memory Attributes.
- - A numeric value. Enter the numeric value that you want to use. The default unit of measure is bytes. Append KB, MB, or GB to the value to specify a different unit of measure. For example, 512MB.
You might increase the DTM buffer size in the following circumstances: - - When a task contains large amounts of character data, increase the DTM buffer size to 24 MB.
- - When a task contains n partitions, increase the DTM buffer size to at least n times the value for the task with one partition.
- - When a source contains a large binary object with a precision larger than the allocated DTM buffer size, increase the DTM buffer size so that the task does not fail.
|
Incremental Aggregation | Performs incremental aggregation for tasks based on integration templates. |
Reinitialize Aggregate Cache | Overwrites existing aggregate files for a task that performs incremental aggregation. |
Enable High Precision | Processes the Decimal datatype to a precision of 28. |
Session Retry on Deadlock | The task retries a write on the target when a deadlock occurs. |
Pushdown Optimization | Type of pushdown optimization. Use one of the following options: - - None. The task processes all transformation logic for the task.
- - To Source. The task pushes as much of the transformation logic to the source database as possible.
- - To Target. The task pushes as much of the transformation logic to the target database as possible.
- - Full. The task pushes as much of the transformation logic to the source and target databases as possible. The task processes any transformation logic that it cannot push to a database.
- - $$PushdownConfig. The task uses the pushdown optimization type specified in the user-defined parameter file for the task.
When you use $$PushdownConfig, ensure that the user-defined parameter is configured in the parameter file.
When you use pushdown optimization, do not use the Error Log Type property. |
Allow Temporary View for Pushdown | Allows the task to create temporary view objects in the database when it pushes the task to the database. Use when the task includes an SQL override in the Source Qualifier transformation or Lookup transformation. You can also for a task based on an integration template that includes a lookup with a lookup source filter. |
Allow Temporary Sequence for Pushdown | Allows the task to create temporary sequence objects in the database. Use when the task is based on an integration templates that includes a Sequence Generator transformation. |
Allow Pushdown for User Incompatible Connections | Indicates that the database user of the active database has read permission on idle databases. If you indicate that the database user of the active database has read permission on idle databases, and it does not, the task fails. If you do not indicate that the database user of the active database has read permission on idle databases, the task does not push transformation logic to the idle databases. |
Session Sort Order | Order to use to sort character data for the task. |
Advanced Options
The following table describes the advanced options:
Advanced Options | Description |
|---|
Constraint Based Load Ordering | Loads targets based on primary key-foreign key constraints when possible. |
Cache Lookup() Function | Caches lookup functions in integration templates with unconnected lookups. Overrides lookup configuration in the template. By default, the task performs lookups on a row-by-row basis, unless otherwise specified in the template. |
Default Buffer Block Size | Size of buffer blocks used to move data and index caches from sources to targets. By default, the task determines this value at run time. Use one of the following options: - - Auto. Enter Auto to use automatic memory settings. When you use Auto, configure Maximum Memory Allowed for Auto Memory Attributes.
- - A numeric value. Enter the numeric value that you want to use. The default unit of measure is bytes. Append KB, MB, or GB to the value to specify a different unit of measure. For example, 512MB.
The task must have enough buffer blocks to initialize. The minimum number of buffer blocks must be greater than the total number of Source Qualifiers, Normalizers for COBOL sources, and targets. The number of buffer blocks in a task = DTM Buffer Size / Buffer Block Size. Default settings create enough buffer blocks for 83 sources and targets. If the task contains more than 83, you might need to increase DTM Buffer Size or decrease Default Buffer Block Size. |
Line Sequential Buffer Length | Number of bytes that the task reads for each line. Increase this setting from the default of 1024 bytes if source flat file records are larger than 1024 bytes. |
Maximum Partial Session Log Files | The maximum number of partial log files to save. Configure this option with Session Log File Max Size or Session Log File Max Time Period. Default is one. |
Maximum Memory Allowed for Auto Memory Attributes | Maximum memory allocated for automatic cache when you configure the task to determine the cache size at run time. You enable automatic memory settings by configuring a value for this attribute. Enter a numeric value. The default unit is bytes. Append KB, MB, or GB to the value to specify a different unit of measure. For example, 512MB. If the value is set to zero, the task uses default values for memory attributes that you set to auto. |
Maximum Percentage of Total Memory Allowed for Auto Memory Attributes | Maximum percentage of memory allocated for automatic cache when you configure the task to determine the cache size at run time. If the value is set to zero, the task uses default values for memory attributes that you set to auto. |
Additional Concurrent Pipelines for Lookup Cache Creation | Restricts the number of pipelines that the task can create concurrently to pre-build lookup caches. You can configure this property when the Pre-build Lookup Cache property is enabled for a task or transformation. When the Pre-build Lookup Cache property is enabled, the task creates a lookup cache before the Lookup receives the data. If the task has multiple Lookups, the task creates an additional pipeline for each lookup cache that it builds. To configure the number of pipelines that the task can create concurrently, select one of the following options: - - Auto. The task determines the number of pipelines it can create at run time.
- - Numeric value. The task can create the specified number of pipelines to create lookup caches.
|
Custom Properties | Configure custom properties for the task. You can override the custom properties that the task uses after the job has started. The task also writes the override value of the property to the session log. |
Pre-build Lookup Cache | Allows the task to build the lookup cache before the Lookup receives the data. The task can build multiple lookup cache files at the same time to improve performance. You can configure this option in an integration template template or in a task. The task uses the task-level setting if you configure the Lookup option as Auto for an integration template. Configure one of the following options: - - Always allowed. The task can build the lookup cache before the Lookup receives the first source row. The task creates an additional pipeline to build the cache.
- - Always disallowed. The task cannot build the lookup cache before the Lookup receives the first row.
When you use this option, configure the Configure the Additional Concurrent Pipelines for Lookup Cache Creation property. The task can pre-build the lookup cache if this property is greater than zero. |
DateTime Format String | Date time format for the task. You can specify seconds, milliseconds, or nanoseconds. To specify seconds, enter MM/DD/YYYY HH24:MI:SS. To specify milliseconds, enter MM/DD/YYYY HH24:MI:SS.MS. To specify microseconds, enter MM/DD/YYYY HH24:MI:SS.US. To specify nanoseconds, enter MM/DD/YYYY HH24:MI:SS.NS. By default, the format specifies microseconds, as follows: MM/DD/YYYY HH24:MI:SS.US. |
Pre 85 Timestamp Compatibility | Do not use with Informatica Cloud. |
Error Handling
The following table describes the error handling options:
Error Handling Options | Description |
|---|
Stop On Errors | Indicates how many non-fatal errors the task can encounter before it stops the session. Non-fatal errors include reader, writer, and DTM errors. Enter the number of non-fatal errors you want to allow before stopping the session. The task maintains an independent error count for each source, target, and transformation. If you specify 0, non-fatal errors do not cause the session to stop. |
Override Tracing | Overrides tracing levels set on an object level. |
On Stored Procedure Error | Determines the behavior when a task based on an integration template encounters pre- or post-session stored procedure errors. Use one of the following options: - - Stop Session. The task stops when errors occur while executing a pre-session or post-session stored procedure.
- - Continue Session. The task continues regardless of errors.
By default, the task stops. |
On Pre-Session Command Task Error | Determines the behavior when a task that includes pre-session shell commands encounters errors. Use one of the following options: - - Stop Session. The task stops when errors occur while executing pre-session shell commands.
- - Continue Session. The task continues regardless of errors.
By default, the task stops. |
On Pre-Post SQL Error | Determines the behavior when a task that includes pre- or post-session SQL encounters errors: - - Stop Session. The task stops when errors occur while executing pre-session or post-session SQL.
- - Continue. The task continues regardless of errors.
By default, the task stops. |
Error Log Type | Specifies the type of error log to create. You can specify flat file or no log. Default is none. You cannot log row errors from XML file sources. You can view the XML source errors in the session log. Do not use this property when you use the Pushdown Optimization property. |
Error Log File Directory | Specifies the directory where errors are logged. By default, the error log file directory is $PMBadFilesDir\. |
Error Log File Name | Specifies error log file name. By default, the error log file name is PMError.log. |
Log Row Data | Specifies whether or not to log transformation row data. When you enable error logging, the task logs transformation row data by default. If you disable this property, n/a or -1 appears in transformation row data fields. |
Log Source Row Data | Specifies whether or not to log source row data. By default, the check box is clear and source row data is not logged. |
Data Column Delimiter | Delimiter for string type source row data and transformation group row data. By default, the task uses a pipe ( | ) delimiter. Tip: Verify that you do not use the same delimiter for the row data as the error logging columns. If you use the same delimiter, you may find it difficult to read the error log file. |
Field Metadata
You can edit field metadata such as the type, precision, and scale for a parameterized source when the source connection is for a flat file or Informatica Cloud Connector.
You cannot edit field metadata when you use multiple sources.
To edit field metadata, use the Edit Types option on the Sources page of the Mapping Configuration Task wizard.
Pushdown Optimization
You can use pushdown optimization to push transformation logic to source databases or target databases for execution. Use pushdown optimization when using database resources can improve task performance.
When you run a task configured for pushdown optimization, the task converts the transformation logic to an SQL query. The task sends the query to the database, and the database executes the query.
The amount of transformation logic that you can push to the database depends on the database, transformation logic, and task configuration. The task processes all transformation logic that it cannot push to a database.
Use the Pushdown Optimization advanced session property to configure pushdown optimization for a task.
Pushdown Optimization Types
You can use the following pushdown optimization types:
- Source Pushdown Optimization
- The task analyzes the mapping from source to target until it reaches transformation logic that it cannot push to the source database.
- The task generates and executes a Select statement based on the transformation logic for each transformation that it can push to the database. Then, the task reads the results of the SQL query and processes the remaining transformations.
- Target Pushdown Optimization
- The task analyzes the mapping from target to source or until it reaches transformation logic that it cannot push to the target database.
- The task generates an Insert, Delete, or Update statement based on the transformation logic for each transformation that it can push to the target database. The task processes the transformation logic up to the point where it can push the transformation logic to the database. Then, the task executes the generated SQL on the target database.
- Full Pushdown Optimization
- The task analyzes the mapping from source to target or until it reaches transformation logic that it cannot push to the target database.
- The task generates and executes SQL statements against the source or target based on the transformation logic that it can push to the database.
- You can use full pushdown optimization when the source and target databases are in the same relational database management system.
- When you run a task with large quantities of data and full pushdown optimization, the database server must run a long transaction. Consider the following database performance issues when you generate a long transaction:
- - A long transaction uses more database resources.
- - A long transaction locks the database for longer periods of time, which can reduce database concurrency and increase the likelihood of deadlock.
- - A long transaction increases the likelihood of an unexpected event.
- To minimize database performance issues for long transactions, consider using source or target pushdown optimization.
Pushdown Optimization User-Defined Parameters
You can use a pushdown optimization user-defined parameter to perform pushdown optimization based on the parameter value defined in a parameter file. Use a pushdown optimization user-defined parameter when you want to perform different pushdown optimization options at different times.
For example, you might use source or target pushdown optimization during the peak hours of the day, but use full pushdown optimization from midnight until 2 a.m. when database activity is low.
To use the pushdown optimization user-defined parameter, perform the following steps:
- 1. Configure a parameter file to use the $$PushdownConfig user-defined parameter. Save the file to a directory local the Secure Agent to run the task.
Use the following format to define the parameter:
$$PushdownConfig=<pushdown optimization type>
For example: $$PushdownConfig=Source.
Configure a different parameter file of the same name for each pushdown type that you want to use.
- 2. In the task, add the Pushdown Optimization property and select the $$PushdownConfig option.
- 3. Configure the task to use the parameter file.
- 4. Replace the parameter file version as needed.
Defining the Mapping Configuration Task
In the Mapping Configuration Task Details area, configure the following fields:
Field | Description |
|---|
Task Name | Name of the task. Task names must be unique within the organization. Task names can contain alphanumeric characters, spaces, and the following special characters: _ . + - Maximum length is 100 characters. Task names are not case sensitive. |
Description | Description of the task. Maximum length is 4000 characters. |
Runtime Environment | Runtime environment that contains the Secure Agent to run the task. |
Task Based On | The basis for the task. Select Mapping or Integration Template. |
Mapping | Mapping associated with the task. You can select any mapping in the organization. To select a mapping, click Select. The Select a Mapping dialog box displays up to 200 mappings. If the mapping you want to use does not display, enter a search string to reduce the number of mappings that display. Select a mapping and click OK. An image of the mapping displays below the mapping name. |
Integration Template | The integration template associated with the task. You can select any integration template imported to the organization. To select an integration template, click Select. The Select an Integration Template dialog box displays up to 200 templates. If the object you want to use does not display, enter a search string to reduce the number of objects that display. Select an integration template and click OK. If you select an integration template that includes a template image file, the image file displays below the integration template name. |
Configuring Sources
The Sources page displays differently based on the basis for the task.
1. For a task based on a mapping, on the Sources page, select the required source connections or source objects.
You can add a single or multiple source objects based on the connection type and the mapping configuration. You can also configure a source filter.
If the mapping does not include source parameters, the Sources page might not appear.
2. For a task based on an integration template, on the Sources page, configure the following source template parameter details:
Source Parameter Detail | Description |
|---|
Connection | Source connection. The list of available connections depends on the connections associated with the runtime environment and the connection types allowed by the integration template. To configure advanced properties for the connection, click Advanced. Not available for all connection types. |
Object | Source object. If a list of objects does not appear, click Select. The Select Source Object dialog box displays up to 200 objects. If the object you want to use does not appear, enter a search string to reduce the number of objects that appear. |
Display Technical Field Names Instead of Labels | Displays technical names instead of business names. Not available for all connection types. |
Display Source Fields in Alphabetical Order | Displays source fields in alphabetical order. By default, fields appear in the order returned by the source system. |
3. For a parameterized source object, configure field metadata if necessary. You can configure field metadata when the source connection is for a flat file or Informatica Cloud Connector.
To configure field metadata, click Edit Types. In the Edit Field Datatypes dialog box, configure field metadata as necessary and then click OK.
4. If necessary, configure lookup details.
This appears when a lookup requires a connection or object, and the lookup is configured to display on this page. If you need to select a lookup object, select the object from the list. If a list does not appear, click Select.
For some connection types, you can click
Advanced to configure advanced properties for the connection. For more information, see
Advanced Connection Properties for Integration Templates.
For some connection types, you can select Display technical field names instead of labels to display technical names instead of business names.
To display fields in alphabetical order, click Display lookup fields in alphabetical order.
5. If necessary, configure mapplet details.
This appears when a mapplet requires a connection, and the mapplet is configured to display on this page.
For some connection types, you can select Display technical field names instead of labels to display technical names instead of business names.
To display fields in alphabetical order, click Display mapplet fields in alphabetical order.
6. If necessary, configure stored procedure details.
This displays when a stored procedure requires a connection, and the stored procedure is configured to appear on this page.
7. Click Next.
Configuring the Target
The Targets page displays differently depending on the basis for the task.
For mappings, the Targets page displays when the mapping includes parameters for target connections or target objects.
For integration templates, the Targets page can display connection and object template parameters for targets, lookups, and stored procedures, as well as mapplets that contain lookups.
Note the following additional information about template parameters:
- •The connection and object names that display are based on the template parameter names in the integration template.
- •For a mapplet, you select a connection. You do not select objects for mapplets.
- •When a connection name displays without surrounding dollar signs, it is a logical connection. If the logical connection is associated with multiple objects on the Targets page, you select the logical connection once, and then select each object.
- •If the logical connection is associated with objects on other pages of the wizard, be sure to use the same connection for logical connections with the same name.
When you select an object, the Data Preview area shows the first ten rows of the first five columns in the object. It also displays the total number of columns in the object. If the page has more than one object, you can select the object in the Data Preview area to display its data. Data preview does not display mapplet data.
The Data Preview area does not display certain Unicode characters correctly. If the data contains binary data, the Data Preview area shows the following text:
BINARY DATA
You can preview all columns in a flat file. The flat file includes the first ten rows of the object.
1. For a task based on a mapping, on the Targets page, select the required target connections or objects, and click Next.
If the task updates or upserts data to a relational target, you can optionally configure the update columns for the target.
If the mapping does not include target parameters, the Targets page does not display.
If the mapping includes a target object parameter, you can display the target fields in alphabetical order. By default, fields display as ordered from the target system.
2. For a task based on an integration template, on the Targets page, configure target template parameter details.
Target Parameter Detail | Description |
|---|
Connection | Select a connection. The list of available connections depends on the connections associated with the selected runtime environment and the connection types allowed by the integration template. To create a connection, click New. To edit a connection, click View, and in the View Connection dialog box, click Edit. To configure advanced properties for the connection, click Advanced. Not available for all connection types. |
Object | Select a target object. If a list of objects does not appear, click Select. The Select Target Object dialog box displays up to 200 objects. If the object you want to use does not display, enter a search string to reduce the number of objects that display. Select a target object and click Select. |
Display Technical Field Names Instead of Labels | Displays technical names instead of business names. Not available for all connection types. |
Display Target Fields in Alphabetical Order | Displays target fields in alphabetical order. By default, fields appear in the order returned by the target system. |
Formatting Options | For Flat File and FTP/SFTP connections only. Select a delimiter and text qualifier. Optionally, select an escape character. If you choose Other for the delimiter, the delimiter cannot be an alphanumeric character or a double quotation mark. If you choose a delimiter for an FTP/SFTP flat file, Informatica Cloud applies the delimiter to the local file, not the remote file, when previewing and reading data. If the remote and local files are not synchronized, you might see unexpected results. |
Create Target | Flat File connection only. Creates a target file. Enter a file name. |
3. If necessary, configure lookup details.
This displays when a lookup requires a connection or object, and the lookup is configured to display on this page. If you need to select a lookup object, select the object from the list. If a list does not display, click Select.
For some connection types, you can click
Advanced to configure advanced properties for the connection.
For more information, see Advanced Connection Properties for Integration Templates.For some connection types, you can select Display technical field names instead of labels to display technical names instead of business names.
To display fields in alphabetical order, click Display lookup fields in alphabetical order.
4. If necessary, configure mapplet details.
This displays when a mapplet requires a connection, and the mapplet is configured to display on this page.
For some connection types, you can select Display technical field names instead of labels to display technical names instead of business names.
To display fields in alphabetical order, click Display mapplet fields in alphabetical order.
5. If necessary, configure stored procedure details.
This displays when a stored procedure requires a connection, and the stored procedure is configured to display on this page.
6. Click Next.
Configuring Parameters
The Input Parameters page and In-Out Parameters page display differently depending on the basis for the task.
For mappings, the Input Parameters page displays parameters that are not in the Source transformation or Target transformation. Depending on the mapping data flow, you might need to configure some parameters before the task wizard allows you to configure other parameters. For more information, see Design.
For integration templates, the Input Parameters page can display lookups, mapplets or stored procedures that require connections, and string template parameters.
String template parameters display based on the template parameter properties in the imported integration template.
Aggregate Functions
You can use aggregate functions for template parameters associated with an Aggregator object.
Aggregate functions display in the Field Expression dialog box when the you configure the template parameter display options in the integration template to allow aggregate functions. You can use the following aggregate functions:
- •AVG
- •COUNT
- •FIRST
- •LAST
- •MAX (Date)
- •MAX (Number)
- •MAX (String)
- •MEDIAN
- •MIN (Date)
- •MIN (Number)
- •MIN (String)
- •PERCENTILE
- •STDDEV
- •SUM
- •VARIANCE
Configuring Input or In-Out Parameters
1. For a task based on a mapping, on the Input Parameters or In-0ut Parameters page, configure the parameters that display.
Depending on the data flow of the mapping, you might need to configure certain parameters before the task wizard allows you to configure other parameters.
For more information on using in-out parameters and input parameters in mappings, see Design.
2. For a task based on an integration template, on the Input Parameters page, configure shared connection details if necessary.
Logical connections display in the Shared Connection Details area.
If the logical connection is associated with multiple objects, select the logical connection, and then select each object.
If the logical connection is associated with objects on other pages of the wizard, be sure to use the same connection for logical connections with the same name.
3. If necessary, configure lookup details.
This displays when a lookup requires a connection or object, and the lookup is configured to display on this page. If you need to select a lookup object, select the object from the list. If a list of objects does not appear, click Select.
For some connection types, click Advanced to configure advanced properties for the connection. For more information, see Connections.
For some connection types, you can select Display technical field names instead of labels to display technical names instead of business names.
To display fields in alphabetical order, click Display lookup fields in alphabetical order.
4. If necessary, configure mapplet details.
This displays when a mapplet requires a connection and the mapplet is configured to display on this page.
For some connection types, you can select Display technical field names instead of labels to display technical names instead of business names.
To display fields in alphabetical order, click Display mapplet fields in alphabetical order.
5. If necessary, configure stored procedure details.
This displays when a stored procedure requires a connection and the stored procedure is configured to display on this page.
6. Define the remaining template parameters, as needed.
String template parameters display individually based on the integration template. The following table describes how to define a string template parameter based on the input control type:
Input Control Type | Description |
|---|
Text box | Enter any valid value. Note: You cannot use blank spaces. Also, leading and trailing spaces are removed at run time. |
Data filter dialog box | To define the template parameter, click New. To create a simple data filter, in the Data Filters dialog box, select a column and operator and enter the value you want to use. To create an advanced data filter, click Advanced. Enter the field expression that you want to use, and click OK. If the template parameter is already defined with a data filter, delete the existing data filter before creating a new data filter. Note: For a template parameter included in a source filter, use an advanced data filter. |
Field expression dialog box | To define the template parameter, click New. In the Field Expressions dialog box, enter the expression you want to use and click OK. For more information about configuring field expressions, see Field Expressions. |
Field list | To define the template parameter, select a field from the list. |
Field mapping dialog box | To define the template parameter, configure the field mappings you want to use: - - The left table can display fields from sources, mapplets, and lookups. The right table can display fields from multiple targets, as well as mapplets and lookups.
Use the Object list to display fields from different objects. By default, all available fields display. - - To match fields with similar names, click Automatch.
- - You can select and drag the source fields to the applicable target fields.
- - To clear all field mappings, click Clear Mapping.
- - To clear mapped field, click the Clear Mapped Field icon for the target field.
If you map a target field in a task with multiple targets, you also map any matching fields in other targets. A matching field is one with the same name and datatype, precision, and scale. If the target fields have the same name, but different datatypes, precision, or scale, you can map one of the target fields. If fields from a lookup do not display, configure the lookup connection and object, save the task, then edit the task again. |
Custom Dropdown | To define the template parameter, select an option from the list. |
7. Click Next.
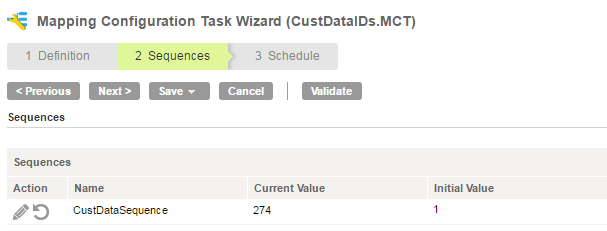
Sequence Generator Configuration
When you run a Mapping Configuration task that includes a Sequence Generator transformation in the mapping, you can change the beginning value for the sequence.
To change the beginning value, you change the Current Value field in the Sequences page in the Mapping Configuration Task wizard. The Current Value field shows the first value the task will generate in the sequence, based on the last value generated in the last task execution.
For example, the last time you ran the CustDataIDs.MCT task, the last value generated was 273. The next time the task runs, the first number in the sequence is 274 because the Sequence Generator transformation is configured to increment by 1. If you want the sequence to begin with 300, you change the Current Value to 300.
The following image shows the Sequences tab in the Mapping Configuration Task wizard:
Configuring a Schedule and Advanced Options
On the Schedule page, you specify whether to run a Mapping Configuration task manually or schedule it to run at a specific time or interval. You can create a schedule or use an existing schedule.
You can also configure email notification and advanced options for the task on the Schedule page.
1. To specify whether to run the task on a schedule or without a schedule, choose one of the following options:
- - If you want to run the task on a schedule, click Run this task on schedule. Select the schedule you want to use or click New to create a schedule.
- - If you want to run the task without a schedule, click Do not run this task on a schedule.
2. Configure email notification options for the task.
3. Optionally, enter the following advanced options:
Field | Description |
|---|
Preprocessing Commands | Command to run before the task. |
Postprocessing Commands | Command to run after the task completes. |
Parameter File Name | Name of the file that contains the definitions and values of user-defined parameters used in the task. |
Maximum Number of Log Files | Number of session log files and import log files to retain. By default, Informatica Cloud stores each type of log file for 10 runs before it overwrites the log files for new runs. |
4. Choose whether to run the task in standard or verbose execution mode.
If you select Verbose mode, the mapping generates additional data in the logs that you can use for troubleshooting. It is recommended that you select verbose execution mode only for troubleshooting purposes. Verbose execution mode impacts performance because of the amount of data it generates.
5. Optionally, configure advanced session properties.
- a. Click Add.
- b. Select an advanced session property.
- c. Configure the advanced session property.
6. Click Save.Click Finish.