Supplier Portal Database
The Product 360 Supplier Portal needs its own data storage. It is recommended to use the same database server as for Product 360 Server, however, this is not mandatory.
Supplier Portal supports the standard DBMS Oracle and MS SQL Server. For non-productive environments (e.g. local development or demo purposes), a H2 database (http://www.h2database.com/) can also be used. Please note that H2 is not meant to be used in productive environments by design.
There are two ways to install the Supplier Portal database:
An automatic installation script which installs a database with default settings. This is recommended for most scenarios.
Alternatively, the manual installation guide for custom database setup. This can be used if specific requirements exists, e.g. the installation in an Oracle RAC infrastructure.
All necessary database tables and indices are created during the first application bootstrap. No additional scripts need to be executed. Internally, the framework flyway is used for database setup and migrations.
Supplier Portal uses the workflow engine Activiti that uses its own persistence. The Activiti tables are created (and updated) during the application bootstrap as well. No additional scripts are needed.
Download the Product 360 Supplier Portal install file
The package is part of the Product 360 installation package and named PIM_8.0.xx_SupplierPortal.zip.
Create your Database Installation Root
Perform the following instructions to extract the database setup archive.
Unzip the PIM_<Version>_SupplierPortal.zip to an installation root of your choice.
(in our example: <PIM_SUPPLIER_PORTAL_INSTALLATION_ROOT> = C:\INFORMATICA\PIM\SupplierPortal )
Check if the following folder structure under the installation root exists afterwards
Screenshot: Supplier Portal Folder Structure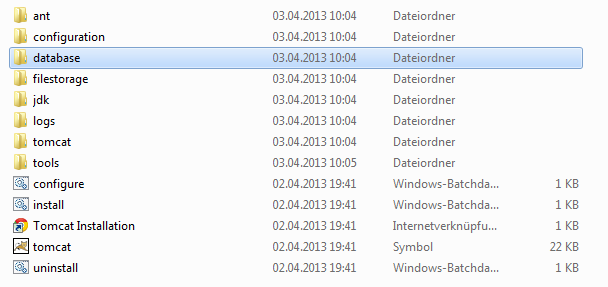
Setup initial database by install script
The setup script requires a database command-line tool in the windows PATH environment variable:
in case of Oracle this is sqlplus
while MS SQL Server uses sqlcmd
Because of this, it's recommended to execute the setup script on the database server. Another pre-requisite is a JRE and a ANT distribution which both comes within the PIM_<Version>_SupplierPortal.zip.
Configure the database properties in the configuration.properties file
Before running the database installation, some basic configuration needs to be done. All database configuration properties can be found under the location
<PIM_SUPPLIER_PORTAL_INSTALLATION_ROOT>/configuration/configuration.properties.
For the database installation the following aspects need special attention:
MSSQL Installation:
Just uncomment and change the appropriate template settings in the configuration.properties.
|
|
|
database.type |
Type of DBMS mssql |
database.name |
Name of the database, which will be created by the script e.g. database.name=hsx_1.4 |
database.server |
Hostname of the database server e.g. database.server=localhost |
database.port |
Port number of the database server default is database.port=1433 |
database.username |
Database user which needs dbcreator and public permissions e.g. database.username=hsx |
database.password |
password for the above specified database user |
database.data.dir |
Specifies the operating-system path to the database data file. |
database.data.size |
Is the initial size of the database data file. The kilobyte (KB), megabyte (MB), gigabyte (GB), or terabyte (TB) suffixes can be used. The default is MB. Specify a whole number; do not include a decimal. The minimum value for size is 512 KB. |
database.data.size.growth |
Specifies the growth increment of the databases data file. It is the amount of space added to the database data file each time new space is needed. Specify a whole number; do not include a decimal. A value of 0 indicates no growth. The value can be specified in MB, KB, GB, TB, or percent (%). If a number is specified without an MB, KB, or % suffix, the default is MB. When % is specified, the growth increment size is the specified percentage of the size of the database data file at the time the increment occurs. |
database.log.dir |
Specifies the operating-system path to the database log file. |
database.log.size |
Is the initial size of the database log file. The kilobyte (KB), megabyte (MB), gigabyte (GB), or terabyte (TB) suffixes can be used. The default is MB. Specify a whole number; do not include a decimal. The minimum value for size is 512 KB. |
database.log.size.growth |
Specifies the growth increment of the databases log file. It is the amount of space added to the database log file each time new space is needed. Specify a whole number; do not include a decimal. A value of 0 indicates no growth. The value can be specified in MB, KB, GB, TB, or percent (%). If a number is specified without an MB, KB, or % suffix, the default is MB. When % is specified, the growth increment size is the specified percentage of the size of the database log file at the time the increment occurs. |
Oracle Installation:
Just uncomment and change the appropriate template settings in the configuration.properties.
|
|
|
database.type |
Type of DBMS oracle |
database.name |
In case of oracle the database.name property is the SID or Service Name of the oracle database e.g. database.name=XE |
database.server |
Hostname of the database server e.g. database.server=localhost |
database.port |
Port number of the database server default is database.port=1521 If you want to connect P360 Supplier Portal to an Oracle Database via TCPS, please refer to chapter "How to configure a secure database connection for Product 360 Supplier Portal" in the "Supplier Portal Configuration" manual. |
database.username |
Database user which needs dbcreator and public permissions e.g. database.username=hsx |
database.password |
password for the above specified database user |
database.systemUser |
DON'T FORGET User which has the permission to create other users/tablespaces, is needed only to run the database creation script, feel free to remove this property after successfull script execution. e.g. database.systemUser=SYSTEM |
database.systemUser.password |
password for the above specified database system user |
database.data.dir |
Specifies the operating-system path to the database data file. |
database.data.size |
Specify the size of the database data tablespace file in bytes. Use K, M, G, or T to specify the size in kilobytes, megabytes, gigabytes, or terabytes. Specify a whole number; do not include a decimal. |
database.data.size.growth |
specify the size in bytes of the next increment of disk space to be allocated automatically when more extents are required. Use K , M , G , or T to specify the size in kilobytes, megabytes, gigabytes, or terabytes.Specify a whole number; do not include a decimal. |
database.temp.dir |
Specifies the operating-system path to the database temporary tablespace file. |
database.temp.size |
Specify the size of the database temporary tablespace file in bytes. Use K, M, G, or T to specify the size in kilobytes, megabytes, gigabytes, or terabytes. Specify a whole number; do not include a decimal. |
database.temp.size.growth |
specify the size in bytes of the next increment of disk space to be allocated automatically when more extents are required. Use K , M , G , or T to specify the size in kilobytes, megabytes, gigabytes, or terabytes.Specify a whole number; do not include a decimal. |
database.index.dir |
Specifies the operating-system path to the database index tablespace data file. |
database.index.size |
Specify the size of the database index tablespace data file in bytes. Use K, M, G, or T to specify the size in kilobytes, megabytes, gigabytes, or terabytes. Specify a whole number; do not include a decimal. |
database.index.size.growth |
specify the size in bytes of the next increment of disk space to be allocated automatically when more extents are required. Use K , M , G , or T to specify the size in kilobytes, megabytes, gigabytes, or terabytes.Specify a whole number; do not include a decimal. |
Execute Setup.cmd script
The database scripts are executed using ANT. The SQL template files can be found in /database/templates/mssql/createDatabase.sql and /database/templates/oracle/createDatabase.sql.
In most cases, the default settings should fit your needs. However, the scripts can be changed to adopt to the specific system environment. Please consult the Product 360 Server Database guide for an example how to configure Oracle ASM/RAC compatible tablespaces.
Perform the following steps to finally create the database schema.
Open the folder <PIM_SUPPLIER_PORTAL_INSTALLATION_ROOT>/database
Run the setup.cmd, while right clicking on the setup.cmd and choosing "run as administrator".
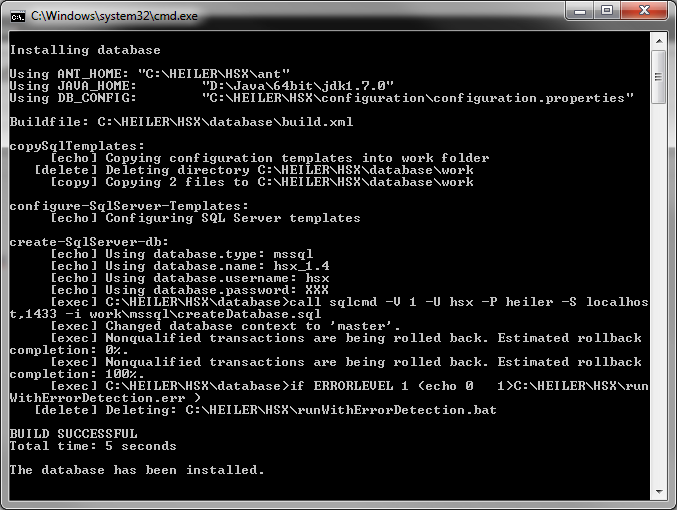
A successful console output should look similar to the following screenshot.
Screenshot: Setup.cmd console output
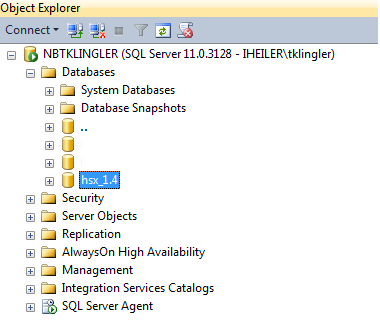
Screenshot: SQL Server Management Studio 2012 showing created database
Alternatively: Setup custom database manually
Setup Oracle Schema
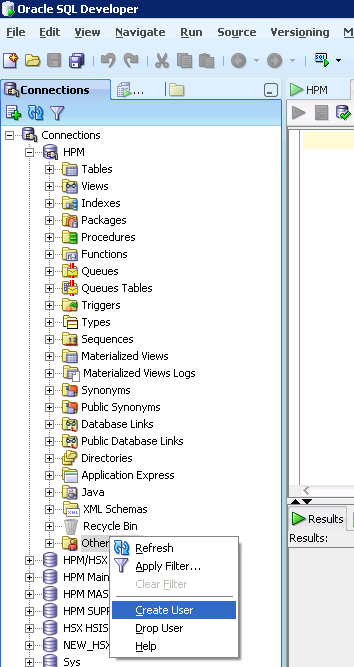
To create a new user/schema, log in with Oracle SQL developer and the SYSTEM account. Navigate to "Other users..." and choose "Create User" in the context menu.
Screenshot: Oracle SQL Developer showing how to create an database user.
Enter a user name (which will be the schema name, too) and a corresponding password. This password will be needed later when configuring the jdbc connection.
Choose appropriate tablespaces:
Default Tablespace: USERS
Temporary Tablespace: TEMP
On the System Privileges tab, grant the following privileges:
CREATE SEQUENCE
CREATE SESSION
CREATE TABLE
CREATE TRIGGER
On the Quotas tab, grant Unlimited Tablespaces to USERS.Click Apply to create the user.
If you use a command-line tool like sqlplus the following script will create the user described above. Change "HENRI" and "heiler" to the name and password of your database.
-- USER SQLCREATE USER HENRI IDENTIFIED BY heiler DEFAULT TABLESPACE USERSTEMPORARY TABLESPACE TEMP;-- ROLES-- SYSTEM PRIVILEGESGRANT CREATE SEQUENCE TO HENRI;GRANT CREATE TABLE TO HENRI;GRANT CREATE SESSION TO HENRI;GRANT CREATE TRIGGER TO HENRI; -- QUOTASALTER USER HENRI QUOTA UNLIMITED ON USERS;Oracle Password Expiration
By default, the user password expires after a certain period of time. To disable password expiration you will have to execute the following lines:
alter profile default limit password_life_time unlimited;
Setup MS SQL Schema
To create a new database, start the SQL Server Management studio and log in with a user that has either the role dbcreator or sysadmin assigned. Right click on "Databases" and click on "New Database..." to create a new database.
Screenshot: Microsoft SQL Server Management Studio 2012 showing how to create an database.
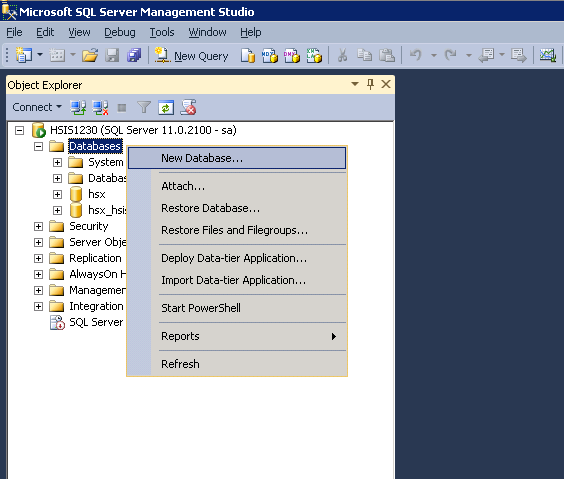
Enter a database name, e.g. "HENRI" and select an appropriate owner. This owner and his credentials are needed when configuring the jdbc connection later on. The database collation is the same as for the Product 360 Core Database (Latin1_General_CS_AS).
Press OK to create the database. Afterwards right click on the new database and choose "New Query" to execute the following script and change the default isolation mode to READ_COMMITED_SNAPSHOT (more info):
Change "HENRI" to the name of your database. This statement may take several minutes.
alter database HENRI set READ_COMMITTED_SNAPSHOT on with NO_WAIT;alter database HENRI set ALLOW_SNAPSHOT_ISOLATION on;The NO_WAIT option causes the statement to fail immediately, if there are open connections to the database. If this is the case, make sure that all connections are closed. You can call sp_who to list all open connections.
To close all open connections and run the change script for the isolation mode you can execute the following sql script:
-- go to single user mode set your current connection to use master otherwise you might get an erroruse masterALTER DATABASE HENRI SET SINGLE_USER WITH ROLLBACK IMMEDIATE -- change isolation mode alter database HENRI set READ_COMMITTED_SNAPSHOT on with NO_WAIT;alter database HENRI set ALLOW_SNAPSHOT_ISOLATION on;-- go back to multi user modeALTER DATABASE HENRI SET MULTI_USERVerify the isolation mode settings via the following command:
select snapshot_isolation_state, snapshot_isolation_state_desc, is_read_committed_snapshot_on from sys.databases where name = 'HENRI';Result should look similar to this:

As soon as the script to create the table spaces has been executed successfully there is no need to run any additional database scripts manually in the future.
The server takes care of executing any database updates.