Media Manager Database
Installing the Media Manager database
Important
Please ensure that the "Microsoft Visual C++ 2010 Redistributable" package is installed! If it's not installed you can download it from the Microsoft download page or you run the client installation program (see: Installing the client modules) which automatically installs this package.
Oracle initializing parameter for the database configuration
Database character set: AL32UTF8
Country specific character set: UTF8 – Unicode 3.0
Standard language: American
Standard date format: USA
To install the Product 360 - Media Manager database, you require the file PIM_<Version>_MediaManager.zip from your Product 360 distribution.
The procedure for installing your Product 360 - Media Manager database is as follows:
Uncompress the file PIM_<Version>_MediaManager.zip on your Windows computer.
Navigate to the folder \MAIN_DVD\Setup\win\install database of the uncompressed archive.
Remove the write protection of the copied folder and its subfolders.
Run the program IMM__ins.exe.
Select a folder in which you want to save the log file.
Select the type of the destination database (MSSQL or Oracle).
Enter the password assigned to the user sys during Oracle installation or the password assigned to the user sa during the MSSQL installation.
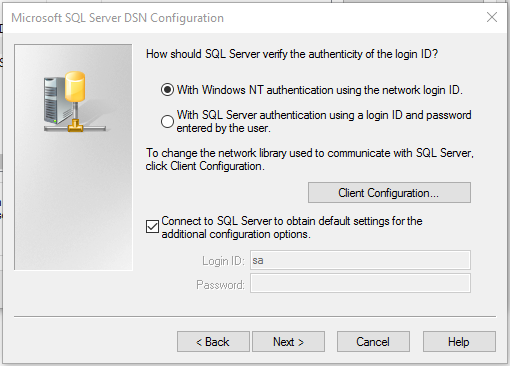
MSSQL connection with Domain Account
You can use also a Windows Domain account to install the database. This account must be configured in the ODBC connection. In this case leave username and password empty. (Available with 8.0.6 Hotfix 4)
Enter host string for your database.
Important for Oracle
Please make sure that you installed the Oracle instant client software to connect to an existing oracle database. The easiest way to install this software is to install the Product 360 - Media Manager modules (see: Installing the client modules).
An example for the host string is: //HSQS540:1521/IMMImportant for Microsoft SQL Server
The host string has to start with MSSQL and it has to be defined as an ODBC connection in the register User DSN.

Go through the configurations wizard and set database host, credentials and default database.
If you want to create the tablespaces manually for Oracle RAC/ASM support then see next chapter Create tablespaces manually for Oracle. This will skip the table space creation process in installation programm and start the content installation directly.
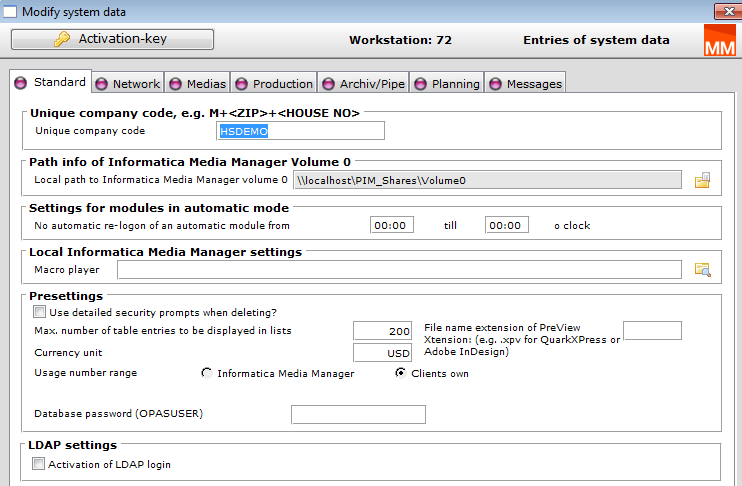
You may now change the password for Product 360 - Media Manager database user OPASUSER.
Oracle ony: Enter the size and absolute path for the OPASALL table space.
The recommended file name is opasall1.dbf. The recommended size is 750 MB.
Oracle only: Click on Create to create the table space.
Oracle only: Repeat this procedure for the table spaces OPASPRD and OPASIMG.
The recommended file names are opasprd1.dbf and opasimg1.dbf. The recommended size is 1 GB each.
Oracle only: You will see a message confirming that the table spaces have been created and the database content has been transferred.
Oracle only: Acknowledge this message by clicking on OK.
Now view the Database installation log and acknowledge it by clicking on OK.
You can view all the relevant entries again later in the log file, which is located in the installation directory.
Oracle specific information
Create tablespaces manually for Oracle RAC, Oracle ASM (Automated Storage Management)
To support Oracle RAC / ASM it is possible to create the Media Manager tablespaces manually. The database setup will skip the user and tablespace creation part in case it recognizes that those elements are already there. For this, the users and tablespaces need to be named correctly otherwise the setup won't recognize them. The following script shows an example how these tablespaces (OPASALL, OPASIMG and OPASPRD) can be created.
CREATE TABLESPACE "OPASALL" LOGGING DATAFILE '+DATAGRP1/pimfhqa/datafile/opasall.297.860648937' SIZE 1024M AUTOEXTEND ON NEXT 250M MAXSIZE UNLIMITED EXTENT MANAGEMENT LOCAL SEGMENT SPACE MANAGEMENT AUTO;CREATE TABLESPACE "OPASIMG" LOGGING DATAFILE '+DATAGRP1/pimfhqa/datafile/opasimg.298.860648958' SIZE 512M AUTOEXTEND ON NEXT 250M MAXSIZE UNLIMITED EXTENT MANAGEMENT LOCAL SEGMENT SPACE MANAGEMENT AUTO;CREATE TABLESPACE "OPASPRD" LOGGING DATAFILE '+DATAGRP1/pimfhqa/datafile/opasprd.299.860648972' SIZE 512M AUTOEXTEND ON NEXT 250M MAXSIZE UNLIMITED EXTENT MANAGEMENT LOCAL SEGMENT SPACE MANAGEMENT AUTO;Minimum Oracle privileges
|
Role |
Granted |
Admin |
Default |
Mandatory |
|
CONNECT |
X |
X |
X |
X |
|
RESOURCE |
X |
X |
X |
X |
|
CTXAPP |
X |
X |
- |
- |
|
System Privileges |
Granted |
Admin |
|
CREATE USER |
X |
- |
|
CREATE TRIGGER |
X |
X |
|
CREATE TABLESPACE |
X |
X |
|
CREATE TABLE |
X |
X |
|
CREATE ANY INDEX |
X |
- |
|
GRANT ANY OBJECT |
X |
- |
|
CREATE VIEW |
X |
X |
|
CRETE ROLE |
X |
- |
|
ALTER USER |
X |
X |
|
CREATE ANY TABLE |
X |
- |
|
UNLIMITED TABLESPACE |
X |
X |
|
SELECT ANY DICTIONARY |
X |
- |
|
CREATE PROFILE |
X |
- |
|
ALTER SESSION |
X |
X |
|
Object Privileges |
Grant option |
|
SELECT ON SYS.V_$SESSION |
X |
|
SELECT ON SYS.ALL_INDEXES |
X |
|
SELECT ON SYS.V_$DATABASE |
X |
|
SELECT ON SYS.DBA_TABLESPACES |
X |
-- USER SQLCREATE USER INFA_IMM_DBINSTALL IDENTIFIED BY "password" DEFAULT TABLESPACE "USERS" TEMPORARY TABLESPACE "TEMP";-- ROLESGRANT "RESOURCE" TO INFA_IMM_DBINSTALL WITH ADMIN OPTION;GRANT "CTXAPP" TO INFA_IMM_DBINSTALL WITH ADMIN OPTION;GRANT "CONNECT" TO INFA_IMM_DBINSTALL WITH ADMIN OPTION;ALTER USER INFA_IMM_DBINSTALL DEFAULT ROLE "RESOURCE","CONNECT";-- SYSTEM PRIVILEGESGRANT CREATE USER TO INFA_IMM_DBINSTALL ;GRANT CREATE TRIGGER TO INFA_IMM_DBINSTALL WITH ADMIN OPTION;GRANT CREATE TABLESPACE TO INFA_IMM_DBINSTALL ;GRANT CREATE TABLE TO INFA_IMM_DBINSTALL WITH ADMIN OPTION;GRANT CREATE ANY INDEX TO INFA_IMM_DBINSTALL ;GRANT GRANT ANY OBJECT PRIVILEGE TO INFA_IMM_DBINSTALL ;GRANT CREATE VIEW TO INFA_IMM_DBINSTALL WITH ADMIN OPTION;GRANT CREATE ROLE TO INFA_IMM_DBINSTALL ;GRANT ALTER USER TO INFA_IMM_DBINSTALL WITH ADMIN OPTION;GRANT CREATE ANY TABLE TO INFA_IMM_DBINSTALL ;GRANT UNLIMITED TABLESPACE TO INFA_IMM_DBINSTALL WITH ADMIN OPTION;GRANT SELECT ANY DICTIONARY TO INFA_IMM_DBINSTALL ;GRANT CREATE PROFILE TO INFA_IMM_DBINSTALL ;GRANT ALTER SESSION TO INFA_IMM_DBINSTALL WITH ADMIN OPTION;-- OBJECT PRIVILEGESGRANT SELECT ON SYS.V_$SESSION TO INFA_IMM_DBINSTALL with grant option; GRANT SELECT ON SYS.ALL_INDEXES TO INFA_IMM_DBINSTALL with grant option;GRANT SELECT ON SYS.V_$DATABASE TO INFA_IMM_DBINSTALL with grant option;GRANT SELECT ON SYS.DBA_TABLESPACES TO INFA_IMM_DBINSTALL with grant option;Secure connection to Oracle
Using a secure connection to Oracle is supported. Please note that it is necessary to distribute the server's certificate on the client machines where you wish to establish a secure connection to Oracle. For details on secure connection configuration please refer to the corresponding manuals provided by Oracle.
Microsoft SQL Server specific information
The mimimum privileges for the user wich installs the database are:
|
Permission |
With grant |
|
ALTER ANY LOGIN |
- |
|
CONNECT SQL |
- |
|
CREATE ANY DATABASE |
- |
|
VIEW ANY DATABASE |
- |
|
VIEW SERVER STATE |
X |
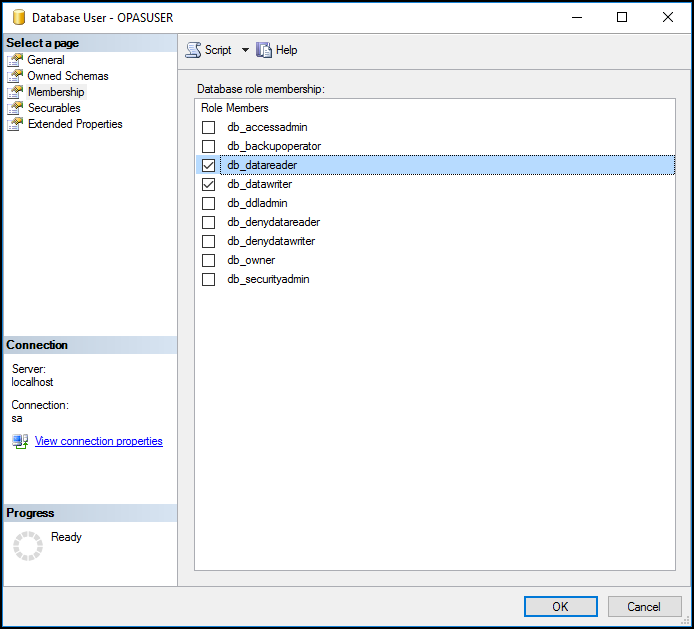
Operating the application without db_owner role
If your company policy prescribe a limited database access for application users it is possible to restrict the access of the database user "OPASUSER" to the roles: db_datareader and db_datawriter.
Update or Hotfix
While the update or hotfix process you have to grant the db_owner role temporary again to the user "OPASUSER" till this process is finished. Plese do not remove this role until at leaset one IMM module was started (e.g. Administration).
Operating the application without database user "OPASPUBLIC"
The Media Manager application works with a predefined database user "OPASPUBLIC". It is not possible to modify the hardcoded password of this user. If this violates aiaginst you company policy you have the possibilty to work with domain accounts. How to confiugre this will be described below.
Required access for the domain users in the Media Manager database:
|
Table |
Permission |
|
dbo.O_DEFAULTS |
Select |
|
dbo.O_DEFAULTS |
Update |
|
dbo.O_DEFAULTS |
Insert |
Define the domain user for the ODBC connection.
Now it is safe to lock the user "OPASPUBLIC", but keep in my mind that you have to work with domain users in your ODBC connections on all workstations which uses the Media Manager applications.
OPASUSER Password
The password of the database user OPASUSER can only be changed within the MediaManager.Adminstion module. If you change it mnual for eaxample in the SQL server management studio the application will not work.
Installing full-text search for Microsoft SQL Server
Microsoft SQL Server can create a full-text index only on data that exist in the database; i.e. the data that is to be indexed must be copied completely in the database. This means that with large files the database files grow accordingly.
Microsoft SQL server can indicate all data types, for which the operating system can execute a full-text search in the Windows Explorer. The engines used for this purpose are called "iFilter". If the full-text search is to be extended for further data types, the appropriate iFilter has to be installed, e.g. for PDF the iFilter by Adobe.
To install the full-text search under Microsoft SQL Server, carry out the steps described below:
Open Microsoft SQL Server Management Studio.
Log on as administrator (user sa).
Navigate to [database server name]/Databases/opasdsb/Tables.
Choose New Table… at the context menu of the table list.
Define following columns for the table:
Column Name
Data Type
Allow Nulls
PKONT_PNR
nvarchar(20)
NO
DATEINAME
nvarchar(2000)
NO
PKONT_EXT
nvarchar(50)
NO
PKONT_CONTENT
varbinary(MAX)
YES
Define PKONT_PNR as Primary Key by clicking on the Set Primary Key Button at the menu bar.
Click on the Save Button at the menu bar.
Enter F_IMGKONT as table name.
Click on OK.
Instead of performing the steps 4-9 you can run the create table F_IMGKONT.sql SQL script. You find the script in the PIM_<Version>_MediaManager.zip archive in the manual/MSSQL directory.
Mark Tables at the Object Explorer and click on the Refresh button.
Mark the F_IMGKONT table at the Object Explorer and choose Full-Text index > Define Full-Text Index at the context menu.
The wizard for installing the full-text search opens.
Click on Next.
At the first step the PK_F_IMGKONT index is already chosen; click on Next.
At the second step mark the PKONT_CONTENT column by clicking at the check box on the left.
Choose PKONT_EXT under the Type Column.
Click on Next.
At the third step leave the setting on Automatically and click on Next.
At the fourth step enter the name and location of the full-text catalog.
Name: F_IMGKONT
Location: If possible the full-text catalog should be for performance reasons on another hard disk. (This option is not available on MS SQL Server 2008 R2.)
Click on Next.
At the fifth step, click on Next without any changes.
At the last step you see a summary; click on Finish.
Execute the F_IMGKONT_UPLOADER.sql script to install the trigger. You find the script on your Product 360 - Media Manager DVD at the manual\MSSQL scripts folder.
Add the bulkadmin role to the user OPASUSER by executing the following SQL script: EXEC master..sp_addsrvrolemember @loginame = N'OPASUSER', @rolename = N'bulkadmin'GO Alternatively you can run the OPASUSER bulkadmin role.sql SQL script. You find the script on your Product 360 - Media Manager DVD at the manual/MSSQL scripts directory.
The full-text search is activated at the customer in the Administration. This is only possible if you have a corresponding license and an existing F_IMGKONT table.
Activating further iFilters on Microsoft SQL Server 2008
If you have installed a further iFilter (e.g. Adobe PDF iFilter) you have to enable your Microsoft SQL Server for calling that iFilter.
Open the Microsoft SQL Server Management Studio.
Log on as administrator (user sa).
Open a new query.
Execute the following commands:
Update the OS resources: EXEC sp_fulltext_service @action='load_os_resources', @value=1
Disable signature verification: EXEC sp_fulltext_service 'verify_signature', 0
Update the language list: EXEC sp_fulltext_service 'update_languages'
Restart the daemon: EXEC sp_fulltext_service 'restart_all_fdhosts'
If you want to check what iFilters are active execute this command: EXEC sp_help_fulltext_system_components 'filter'
Post-flight steps
After you've performed the database setup you also have to run the database update. This is done by the first startup of P360 Server, Media Manager web application or the Process Engine automatically by default.
If you've turned off the automatic update in Product 360 Server, the Media Manager web application or the Process Engine, or if you're not using one of those please refer to this chapter for database update instructions: Media Manager Migration