Software Development Kit
SDK Package
The SDK zip package has the following structure
|
Folder |
Description |
|
eclipse |
Third-party eclipse plugins and external development tools |
|
example |
Example projects (customizing template projects, testing examples, PDE build examples, export templates, web access, etc) |
|
preferences |
Eclipse IDE preferences |
|
projects |
Example Eclipse project with configuration files required to start HPM server and client in development environment |
|
targets |
Product 360 runtime, javadoc, development tools and frameworks |
Prerequisites
Database
An available database server with the corresponding Product 360 schemas needs to be installed and configured to be accessible from the development machine. Refer to the installation manual for details
Java Development Kit
A Java Development Kit Version 1.8 in 64bit must be available on the machine to run the eclipse distribution. Due to licensing limitations the SDK package is delivered without a JDK. However, usually it's enough to just use the most recent 1.8 JDK available.
https://www.azul.com/downloads/zulu-community/?version=java-8-lts&os=windows&architecture=x86-64-bit&package=jdk
Eclipse
You need to have Eclipse as your IDE, others will not work. The minimum required version is the Eclipse IDE 4.4 (Luna). The versions up to Eclipse 2020-06 are also supported.
In all cases, we recommend to use the "Eclipse for RCP and RAP Developers" edition.
Eclipse 2020-06
https://www.eclipse.org/downloads/packages/release/2020-06/r/eclipse-ide-rcp-and-rap-developers
Installation of the SDK Online Help
The SDK online help contains the javadoc for the API, the list of available extension points as well as the general knowledge base and technical development articles. After installation it is accessible within Eclipse via Help -> Help Contents.
Unzip the SDK distribution to an arbitrary place on your hard drive. In this example we use, C:\Informatica\PIM-SDK.
Copy all plugins from the C:\Informatica\PIM-SDK\eclipse\sdkdoc\plugins folder to the dropins\plugins folder of your eclipse installation (you may have to create the plugins subfolder before)
Restart Eclipse
If you now open Help Contents inside of eclipse, you should see two sections named "Informatica Product 360" and "Informatica Product 360 API" as shown on this picture.
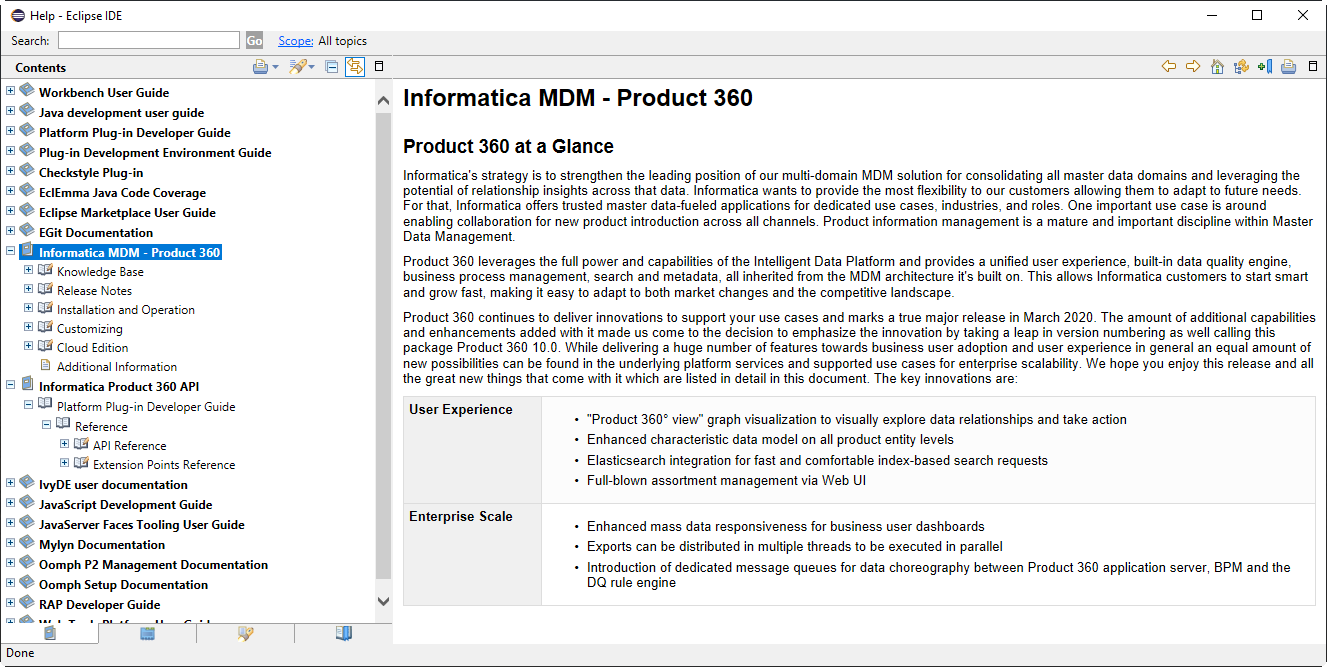
Installation of the SDK
Run eclipse and choose an arbitrary workspace for the project you want to build.
For convenience the SDK has a built-in project structure which you might find useful. We use C:\Informatica\PIM-SDK\projects\HENRI\workspace as the development workspace location for our "HENRI" project.A good advice is to use workspace paths as short as possible.
Otherwise this may lead to Data Quality related problems during server start or during Data Quality execution that some plugins or other objects cannot be found.(optional) Install 3rd party plugins from C:\Informatica\PIM-SDK\eclipse\3rdparty.
We recommend to install the Resource Bundle Editor plugin which makes it very easy to edit resource property files like the i18n files needed for multi-language support. This editor can be found on the Eclipse marketplace: http://marketplace.eclipse.org/content/resourcebundle-editor
Go to File > Import > Preferences and import the Eclipse_4.4_Preferences.epf preferences into your workspace. This preference file is located in the C:\Informatica\PIM-SDK\preferences folder. Preferences contain Java formatter settings which satisfy the Informatica standard coding conventions.
We suggest to use the provided development preferences, but you can also use your own conventions. In any case, we strongly recommend that the whole team uses the same conventions unless that you will have lots of "merge conflicts" with your source code management system.
Add the 1.8 JDK 64bit to the workspace, if not already done.
Open Window > Preferences > Java > Installed JREs
Add the JDK 1.8 to the list of available JREs and set the JRE instance name, for example jdk8.
Make sure to use a JDK. By this means you have the Java source code available.Set the installed JRE to "default" (check the checkbox).
Check the Java compiler settings. Open Window > Preferences > Java > Compiler and make sure that the default compliance level is 1.8.
Install target definition
Open Window > Preferences > Plug-in Development > Target Platform.
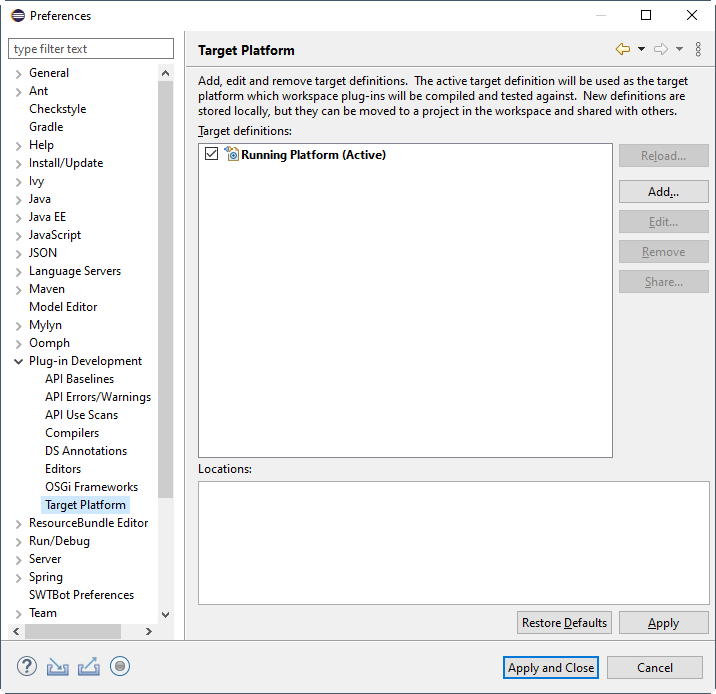
Create new target definition: Add > Start with empty target definition. Set name to "Product 360 Target 64Bit"
Open environment tab and set Target Environment.
Operating System: win32, Windowing System: win32, Architecture: x86_64.
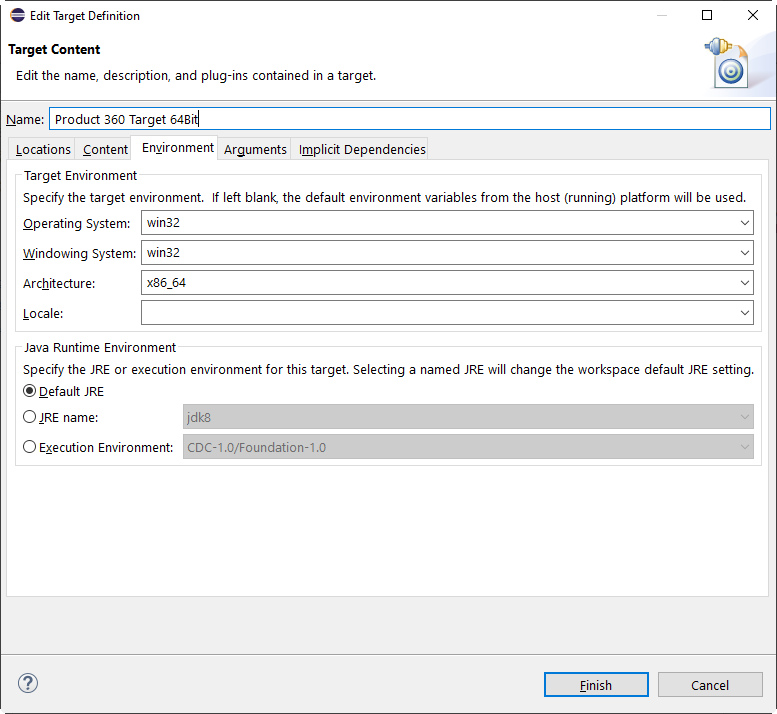
Add new Software Site location: Locations > Add > Software Site
Add new local software site: Add > Local... Select C:\Informatica\PIM-SDK\targets\10.1.0.00.00\ folder and click ok.
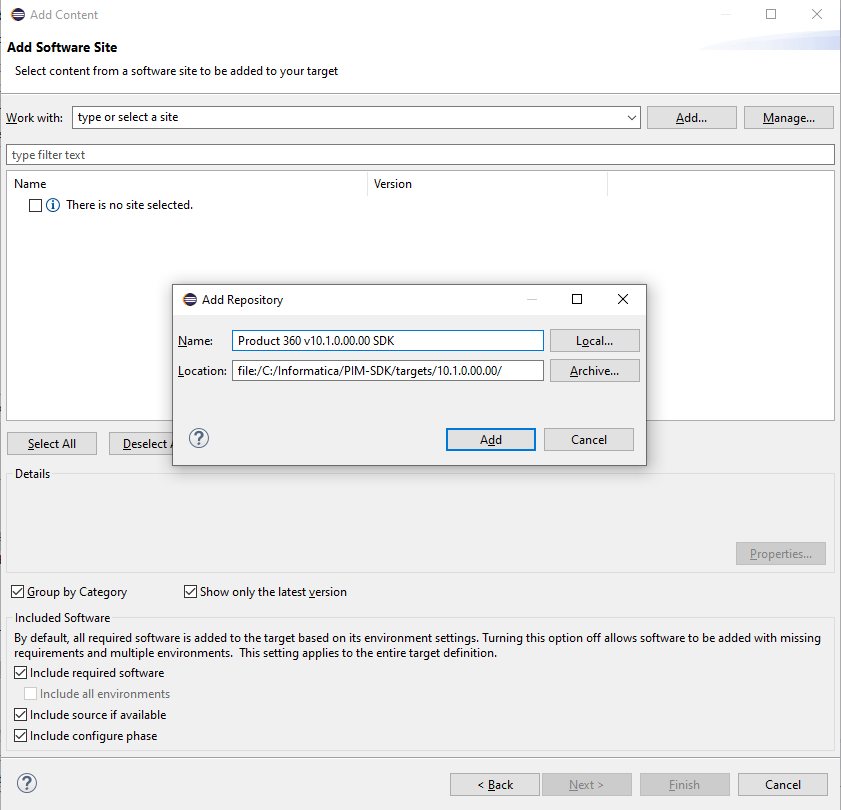
Now you will see a list of available features in the SDK including all 3rd Party and Eclipse features:
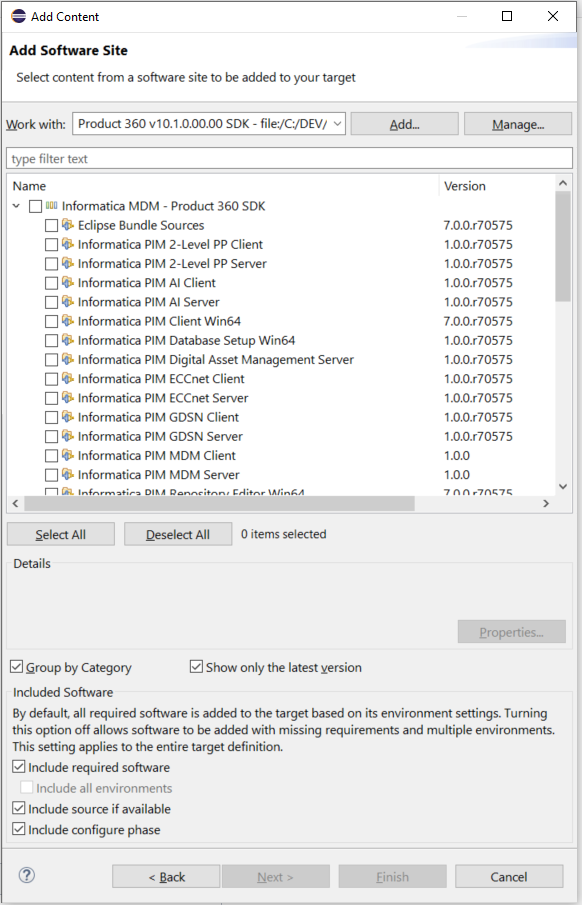
SDK Feature
|
SDK Feature |
Description |
|
Eclipse Bundle Source |
Sources of important Eclipse Bundles (e.g. org.eclipse.runtime.core) |
|
Informatica PIM Repository Editor Win64 |
Repository editor (Windows 64bit platform) |
|
Informatica PIM Database Setup Win64 |
Database Setup (Windows 64bit platform) |
|
Informatica PIM Server Runtime |
Server runtime |
|
Informatica PIM Server Win64 Support |
Windows 64 platform server specific bundles (GraphicsMagick, eclipse launcher, etc) |
|
Informatica PIM Rich Client |
Runtime of Product 360 Desktop Client |
|
Informatica PIM Client Win64 |
Windows 64 platform Desktop client specific bundles |
|
Informatica PIM Web Client |
Web Access components that are needed when starting the Product 360 Desktop Client (Web Action Rights) |
|
Informatica PIM Web Server |
Web Access runtime for the Product 360 Server. |
|
Informatica PIM 2-Level PP Client |
Add-On to Desktop Client for 2-tier Product Paradigm. |
|
Informatica PIM 2-Level PP Server |
Add-On to Product 360 Server for 2-tier Product Paradigm. |
|
Informatica PIM Web 2-Level PP Server |
Web Access runtime for the Product 360 Server for 2-tier Product Paradigm. |
|
Informatica PIM Variant Client |
Add-On to Desktop Client for 3-tier Product Paradigm. |
|
Informatica PIM Variant Server |
Add-On to Product 360 Server for 3-tier Product Paradigm. |
|
Informatica PIM Web Variant Server |
Web Access runtime for the Product 360 Server for 3-tier Product Paradigm. |
|
Informatica PIM GDSN Client |
Add-On to Desktop Client for the GDSN Accelerator |
|
Informatica PIM GDSN Server |
Add-On to Product 360 Serverfor the GDSN Accelerator |
|
Informatica PIM Web GDSN |
Web Access runtime for the GDSN Accelerator |
|
Informatica PIM Digital Asset Management Server |
This feature contains the plugin(s) that are needed to use Digital Asset Management system |
|
Informatica PIM Supplier Exchange REST Interface |
This feature contains the plugin(s) for the use of PIM Supplier Portal system |
|
Informatica PIM Supplier Exchange Client |
This feature contains the plugin(s) for the use of PIM Supplier Portal system specific actions in the rich client |
|
Informatica PIM Websphere Client |
This feature contains the plugin(s) for the use of IBM Websphere specific actions in the Product 360 Desktop Client |
|
Informatica PIM Websphere Client I18N |
This feature contains the language plugin(s) for the use of IBM Websphere specific actions in the Product 360 Desktop Client |
|
Informatica PIM Websphere Server |
This feature contains the plugin(s) that are needed to use IBM Websphere integration in the Product 360 Server |
|
Informatica PIM Websphere Server I18N |
This feature contains the language plugin(s) that are needed to use IBM Websphere integration in the Product 360 Server |
|
Informatica PIM SDK Javadoc |
Contains the javadoc for the server and client binaries. |
|
Informatica PIM Web SDK Javadoc |
Contains the javadoc for the Web Access binaries. |
|
Informatica PIM Testing Framework |
Testing framework including junit, mockito and eclipse testing framework |
|
Informatica PIM Tooling Client/Server |
Runtime Tools (Command Inspector, Eclipse Plugin Spy and others) |
|
Informatica PIM ECCnet Client |
Add-On to Desktop Client for the ECCnet Accelerator. (Not a standard feature) |
|
Informatica PIM ECCnet Server |
Add-On to Product 360 Server for the ECCnet Accelerator. (Not a standard feature) |
|
Informatica PIM Web ECCnet |
Web Access runtime for the ECCnet Accelerator (Not a standard feature) |
|
Informatica PIM AI Client |
Add-On to Desktop Client for the CLAIRE Accelerator. (Not a standard feature) |
|
Informatica PIM AI Server |
Add-On to Product 360 Server for the CLAIRE Accelerator. (Not a standard feature) |
|
Informatica PIM Web AI |
Web Access runtime for the CLAIRE Accelerator (Not a standard feature) |
Select at least
'Informatica PIM Rich Client',
'Informatica PIM Client Win64',
'Informatica PIM Repository Editor Win64',
'Informatica PIM Server Runtime',
Informatica PIM Server Win64 Support'.
For full-fledged development you will need all features.
Click next. Eclipse will now unpack target platform bundles and features into its internal folders. Click finish and select 'Product 360 Target 64Bit' as default target platform.
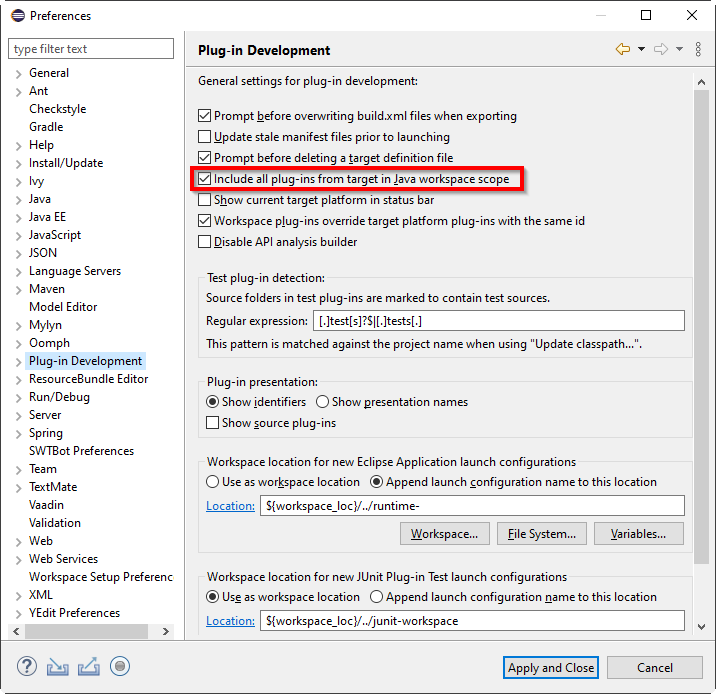
Add target platform bundles to java search. Window > Show View > Plug-in development > Plug-ins.
In the Plug-ins view toolbar click on 'Add All Plug-ins to Java Search'.
Your can also check the preference 'Include all plug-ins from target in Java workspace scope' (resp. 'Include all plug-ins from target in Java search' in older Eclipse versions)
Install launches and configuration
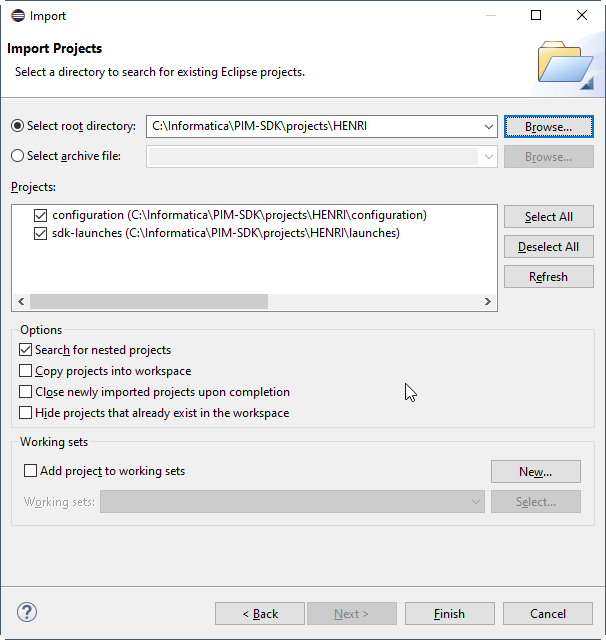
Import the launch and configuration projects into your workspace.
Open File > Import > Existing Projects into Workspace.
Select the C:\Informatica\PIM-SDK\projects\HENRI directory for the root directory.
Check the configuration and the launches project and press finish
Configure the configuration settings of your project. In the configuration project in your workspace you will find two sub folders, client and server. The client folder holds all configuration files for the client start, usually you do not need to modify anything here. The server folder contains all required configuration files for the server start. At least the server.properties file needs to be configured. In the server folder you will find several server.properties templates (one per supported database). There are a few properties that must be set in order to start the server: See the corresponding section in the PIM Core Installation Manual for details on this configuration.
filestorage.dir.shared = C:/Informatica/PIM-SDK/projects/HENRI/runtimelicense.customer.file.local = ${filestorage.dir.shared}/license/<YourLicenseFile.license>license.customer.key = <CustomerKey>db.default.server = localhostdb.default.dir = C:/Informatica/PIM-SDK/projects/HENRI/runtime/databasedb.default.schema.suffix = _SDK101Before setting up your SDK environment you can set up a standalone Product 360 runtime system for your project, you will need the development database anyway. After this you can use the configuration files from this working system and copy them to the configuration/client and configuration/server directory.
For setting up your SDK environment you need a "Informatica Product 360 v10.1" license. Consulting and external implementation partners can request this license from the support department.
Copy your license file to the directory C:/Informatica/PIM-SDK/projects/HENRI/runtime/license
Launch Product 360 Server
Go to Run > Run Configurations > Eclipse Application > Informatica MDM - Product 360 Server.
(Optional) To run P360 with Informatica Media Manager, select 'com.heiler.ppm.feature.opasg.server' as feature to launch with, too.
Press run.
Launch Product 360 Client
Go to Run > Run Configurations > Eclipse Application > Informatica MDM - Product 360 Desktop Client.
Press run.
Enter default credentials in the authentication dialog (Username: Administrator, Password: Administrator).
Launch Web Access
Open your browser and enter the following url: http://localhost:1512/pim (replace localhost with the dest.host from server.properties if configured)
Congratulations, you're ready to start developing with Informatica MDM - Product 360!
Launch Product 360 Repository Manager
Go to Run > Run Configurations > Eclipse Application > Informatica MDM - Product 360 Repository Manager.
Press run.
Launch PIM Database Setup
Go to Run > Run Configurations > Eclipse Application > Informatica MDM - Product 360 Database Setup.
Press run.
For further steps to work with Database setup see: Server Database
Install examples
Open File > Import > Existing Projects into Workspace.
Select the C:\Informatica\PIM-SDK\examples directory for the root directory.
Check all example projects, but the customizing.build and press finish
Examples at a glance
|
Project |
Description |
|
com.heiler.ppm.custom.rest |
Examples for own rest based services. Contains a running example for a rest service which is able to return some item data based on EAN numbers |
|
com.heiler.ppm.customizing.activities |
Examples how to disable UI contributions (like views, menu items etc.) using "Eclipse activities" |
|
com.heiler.ppm.customizing.article.ui.contributionclass |
Example how to replace a standard view (like "Items #1") with a custom view using the extension point contributionClassProviders |
|
com.heiler.ppm.customizing.article.ui.searchView |
Example how to customize the standard "Search view" using the extension pont searchViewAdditions |
|
com.heiler.ppm.customizing.ckeditor |
Examples how to customize the standard RichText-Editor using extension ponts ckeditorConfiguration, richTextValidators and richTextMarkupConversionExtensions |
|
om.heiler.ppm.customizing.core |
Core functionality of your own customizing, is empty by default. Use it as a template for your own customizing code |
|
com.heiler.ppm.customizing.core_test |
Test bundle for unit and integration tests. Contains an example for a unit test (CustomizingUnitTest) as well as for an integration test (CustomizingIntegrationTest). Additionally to that it contains working launch configurations for the given test suites. One for integration and one for unit tests. Use this bundle to implement your own tests for your customizing business code. |
|
com.heiler.ppm.customizing.export.core |
Examples for implementation of own export data providers, data types and export functions |
|
com.heiler.ppm.customizing.export.core.test |
Examples for writing tests for own export functionality |
|
com.heiler.ppm.customizing.server |
Server functionality of your own customizing, is empty by default. Use it as a template for your own customizing code |
|
com.heiler.ppm.customizing.spelling.ui |
Example how to use the SpellCheckingAPI to spellcheck the whole catalog in a mass-operation |
|
com.heiler.ppm.customizing.ui |
UI functionality of your own customizing, is empty by default. Use it as a template for your own customizing code |
|
com.heiler.ppm.feature.customizing.* |
Features for the client, server and tests (junit), used for the launch configurations and automatic builds. Add your own customizing plugins to these features |
|
com.heiler.ppm.web.custom.theme |
Sample project that demonstrates how to contribute a custom theme for WebAccess. Put your additional style defintions into the styles.css file. |
|
com.heiler.ppm.web.custom.app |
Sample project with some basic programmatic extensions of the PIM Web UI. |
|
com.heiler.ppm.web.vaadinsample |
Sample web project that shows how to integrate a all new web interface by leveraging the PIM stack and the Vaadin framework. |
|
customizing.build |
Ready to use ant targets to build your customizing bundles and tests in an integrated and automated build system. Based on Eclipse p2 build infrastructure. |