Import business assets in Data Governance and Catalog using the predefined template files for each asset type.
Download predefined Microsoft Excel (.xlsx and .xlsm) templates for different asset types from Data Governance and Catalog, enter the details of assets in the templates, and import the template files. Data Governance and Catalog reads the details of assets in the template files and then creates, updates, or deletes assets in the catalog depending on the operation specified in the template file.
Alternatively, you can also use your own Microsoft Excel file to import the assets into the catalog. Informatica recommends that you use the predefined templates that you download from Data Governance and Catalog.
The following image shows the steps that you need to perform to bulk import assets in Data Governance and Catalog using the template file:
Perform the following tasks to import assets into the catalog using the template files:
After you successfully import assets using the bulk import template file, you can search and find the imported assets in Data Governance and Catalog.
Step 1: Get template file
Download a predefined Microsoft Excel (.xslx and .xlsm) template file for the asset types that you want to import.
When you download a predefined template, the file already contains the field names that you must enter for the assets. The file also indicates the properties that are mandatory and the properties that are optional. The column header cells contain notes for the properties to help you enter the values correctly. When you download the template file for an asset, you can also download additional sheets for adding relationships between assets and adding stakeholders. To ensure that the bulk import operation is successful, download the latest predefined template.
To download the template for any asset, the organization administrator must assign the read privilege for the Role asset to your user role in the Administrator service.
Perform the following steps to download a template file:
1On the Home page, click New > Import Assets > Download Import Template.
2In the Download Import Template dialog box, select the asset types and additional fields for which you want to import values.
Note:
The following information applies to other file types that you can use apart from the predefined template:
- Instead of using the predefined template, you can use your own Microsoft Excel (.xslx and .xlsm), comma-separated value (.csv), or archive (.zip) file to import the assets. However, this requires you to manually map each sheet, column, or parameter in the file to the fields in Data Governance and Catalog. Consider using the predefined template files to upload the assets. The system can read the predefined templates quickly and import the assets correctly.
- The archive (.zip) file can contain a combination of Microsoft Excel (.xslx and .xlsm) and comma-separated value (.csv) files within it.
3Click Download.
Step 2: Populate template file
After you download the template file, enter the asset details in the file.
For more information about entering asset values in the template file, see Template file properties.
The following guidelines apply when you populate a template file:
•Each asset type appears as a separate sheet in the Microsoft Excel template file. In each sheet, enter the asset details. Enter one asset per row. Column headers in red color indicate a mandatory field, and column headers in black color indicate an optional field. See the note in the column headers for helpful tips on entering the asset details correctly.
Note:
- The columns in the template file will depend on how the asset's fields are configured by your administrator. If your administrator has configured new custom fields for an asset, it might affect the order of all the fields in the template file.
- The order in which you specify the assets in the import file doesn't influence the sequence in which the assets are imported. The asset import sequence is randomized.
- An asset's position in the import sequence determines the ref ID that the system assigns to it. Consider the following example:
You want to import a file that contains 10 assets that are of a type that is not present in your catalog. In the import file, you had specified the details about Asset 1 in the first row, about Asset 2 in the second row and so on. Despite this, it is possible for Asset 1 to be the tenth asset in the import sequence. If Asset 1 is the tenth asset that is imported, the system assigns the ref ID AST-10 to it.
•If you are using your own personalized Microsoft Excel file, make sure that you enter one asset per row while populating the file with asset details.
•If you are using a comma-separated value (.csv) file, make sure that you populate the file as per the rules of the .csv file format.
•If you are using an archive (.zip) file with multiple supported file formats, make sure that you archive the import files.
•If you are updating the name of the stakeholder of an asset, add a space only between the first name and the second name of the stakeholder in the template file. For stakeholder names with more than two words, enter the username or the email ID of the stakeholder in the template file. For example, to enter John Daniel Smith as a stakeholder, enter the username johndsmith.
Step 3: Import the file
After you populate one or more template file, import the files containing asset details into Data Governance and Catalog.
Perform the following steps to import one or more files:
1On the Home page, click New > Import Assets > Import.
2On the New Import page, click Import Files and select the import file, or drag the file to the window. Ensure that the file name doesn't contain the following characters: [, /, !, {, }, ], |, <, [, ^, >, ], *, >
When you import the file, the system reads the file to understand and interpret the values for any errors.
3The system verifies for duplicate files with the same file name. If there is a duplicate file, you can select an option from the Duplicate Files dialog box.
Step 4: Prepare to import the assets
You can validate the asset types and columns from the import files to map with the respective asset types and the asset properties that are imported into Data Governance and Catalog.
Preparing a predefined import file
If you use a predefined Microsoft Excel file as the template, the column headers should already map correctly to the correct interface fields. Before you move to the next step, perform the following steps to verify that the mapping is correct:
1In the New Import dialog box, select the sheet in the template file for which you want to map the column headers. Each sheet corresponds to an asset type.
2Confirm if the column header in the import file corresponds to the correct field in Data Governance and Catalog.
Preparing a custom Microsoft Excel file
If you use a custom Microsoft Excel file as the template, the sheets in the file might not match the asset types in Data Governance and Catalog. Before you move to the next step, perform the following steps to verify that the mapping is correct with the corresponding asset types that you want to import:
1Click Map Sheets for the custom Microsoft Excel file.
2In the Map Sheets dialog box, map the sheets in the file to the corresponding asset types in Data Governance and Catalog.
3Click OK to map the sheets.
Preparing a CSV file
If you use a comma-separated value (.csv) file as the template, the data in the file might not match the asset types in Data Governance and Catalog. Before you move to the next step, perform the following steps to verify that the mapping is correct with the corresponding asset types that you want to import:
1Click Map File for the comma-separated value (.csv) file.
2In the Map File dialog box, select the asset type that corresponds to the file in Data Governance and Catalog.
3Click OK to map a .csv file.
Preparing an archive file
The archive (.zip) file can contain a combination of Microsoft Excel (.xslx and .xlsm) and comma-separated value (.csv) files. Before you move to the next step, perform the following steps to import the assets into Data Governance and Catalog:
1Click Map Files for the archive (.zip) file to map the constituent files and sheets with the corresponding asset types.
2In the Map Files dialog box, map the sheets of each individual file type to the corresponding asset types in Data Governance and Catalog.
3Click OK to map the files.
Step 5: Start import of assets
When the file is ready and you have mapped all the asset types and asset properties in the file with the corresponding asset types and asset properties in Data Governance and Catalog, you are ready to import the assets.
Perform the following steps to import a file:
1Click Start Import.
2In the Start Import dialog box, enter the Job Name field and select an Error Handling option.
The following table lists the Error Handling options:
Error type
Description
Stop import on warning
The system evaluates the data in the file. If the system encounters a row with warning data, the process stops, and no data is imported.
Select this option if you want to import only data that is correct and ready for use.
Stop import on error
The system evaluates the data in the file and ignores rows with warning data. If the system encounters a row with error data, the process stops, and no data is imported. If there are no rows with error data, the system imports valid data from the file, and warning data is marked as skipped.
Select this option if you want to ignore the warnings and proceed with the import process. You can later download the error report, correct the warning data, and re-upload the file.
Skip errors and warnings
The system imports all valid rows from the template. Rows with warning and error data are marked as skipped.
Select this option if you want to ignore the warnings and errors and proceed with the import process. You can later download the error report, correct the warning and error data, and re-upload the file.
3Click Start Import.
A new page displays the progress of the import file.
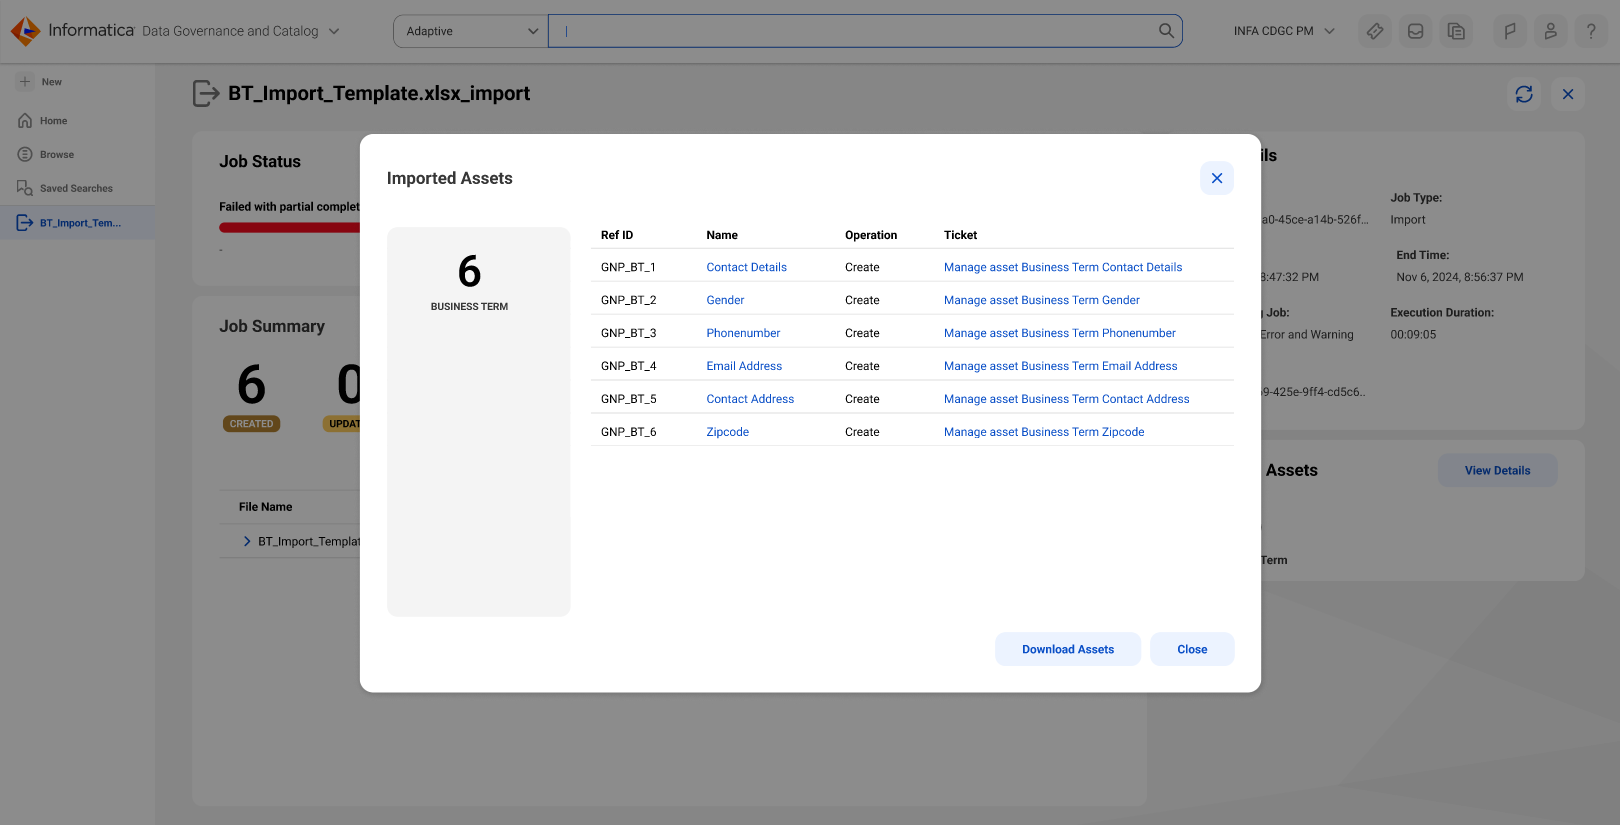
4The new import file page displays the Job Status, Job Summary, Job Details, and Imported Assets fields.
Note:
If assets in the import file are still in-review lifecycle status, such assets cannot be imported to Data Governance and Catalog. Only assets that in published and draft status can be imported to the catalog.
Managing tickets for imported assets
If an asset that you create or update through bulk import is associated with a workflow, Data Governance and Catalog triggers the ticket creation for that asset type.
After the import job is complete, you can view the tickets created for the imported assets.
1On the import file page, click View Details from the Imported Assets section.
2Select the tickets associated with each asset to view their details on the Ticket Manager page.
Note:
When you manage tickets for assets, consider the following guidelines:
- When you specify that a ticket is required for a new asset, the bulk import operation creates assets in the Draft state. The system doesn't consider the Lifecycle value that you specified in the template and is driven by the workflow configuration in Metadata Command Center.
- The system creates tickets only if all required stakeholders are specified. If some required stakeholders are missing, the asset update and ticket creation will fail.
- When you delete assets, the system checks for open tickets associated with the asset. The system can't delete assets that have open tickets.
For more information about managing tickets, see Workflows and tickets in the Asset Management help.
The following image shows the Imported Assets dialog box with asset details like Name, Operation and Ticket.