Customize Icons and Configure Relationships Views for Custom Resources
You can configure custom icons to represent data assets from custom resources in Enterprise Data Catalog. You can also configure the Relationships Views page in Enterprise Data Catalog for custom resources.
After you configure custom icons, the icons appear in Enterprise Data Catalog to represent the data assets from a custom resource. You can use custom icons to distinguish custom resource data assets in Enterprise Data Catalog.
As part of the configuring the Relationships Views page, you can define a set of configurations for classes in the custom model.
The steps to include custom icons for the custom resource and defining configurations for classes is integrated in the process to create custom models. The steps are optional when you define the custom model. You can configure the features based on your requirement.
Workflow
The workflow to customize icons for custom resource data assets and configure the Relationships Views page in Enterprise Data Catalog for custom resources includes the following steps:
- 1. Exporting the model template. The step involves downloading the following files that you can use to create the custom model, associate custom icons, and configure Relationships Views for custom resources:
- - model.xml
- - ViewConfiguration.xml
- - icons.zip
- 2. Creating the custom resource model in the model.xml file as described in the Creating the Custom Model XML File section.
- 3. Optional. Placing the custom icons in the icons.zip file as described in the Creating the Icons ZIP File section.
- 4. Optional. Creating the ViewConfiguration.xml file to define a set of configurations for classes in the custom model as described in the Creating the View Configuration XML File section.
- 5. Registering the custom resource model as described in the Creating the Custom Model with Custom Icons section.
- 6. Preparing the metadata to be ingested as described in the Metadata Ingestion Overview section.
- 7. Creating the custom resource as described in the Creating Custom Resource Types section.
Exporting the Model Template
To download the template to configure the custom icons, perform the following steps:
- 1. Log in to Catalog Administrator.
- 2. Click Manage > Models. The Models page appears.
- 3. Click
 from the Models pane.
 The following options appear:
- - New Custom Model
- - Download Model Definition File
- - Export Model Content Template
- 4. Click Export Model Content Template .
The ModelContentTemplate.zip file that includes the following files is downloaded to the machine:
- - model.xml
- - ViewConfiguration.xml
- - icons.zip
Creating the Custom Model XML File
Use the model.xml file to create a custom model that defines the structure of metadata ingested into the catalog by the custom resource.
You can use the custom_model.xsd file to create and validate the model.xml file.
Creating the Icons ZIP File
To create the icons.zip file that includes the custom icons, perform the following steps:
- 1. Unzip the icons.zip file to the local machine.
- 2. Rename the directory named default in the unzipped location with the model name. For example, if the name of the model is com.infa.access, rename the directory to com_infa_access. Ensure that you replace the dot (.) in the package name with underscore (_) when you rename the directory.
- 3. Verify that the icon files are named based on the classes in the model. For example, if the model includes classes such as Tables, Views, and Reports, name the icons as Tables.svg, Views.svg, and Reports.svg.
Note: Ensure that you match the icon names and class names for case sensitivity.
- 4. Place the icon files in .svg format in the directory you renamed.
- 5. Zip the file and name the file as icons.zip.
Creating the View Configuration XML File
Use the ViewConfiguration.xml file to define a set of configurations for classes in the custom model.
To identify and use the tags that you can use in the XML file, see the following table:
Tag | Description | Sample |
|---|
<ViewConfigurationCollection> </ViewConfigurationCollection> | The root element for the viewConfiguration.xml file. Include all the configuration information within the <viewConfigurationCollection> </viewConfigurationCollection> tag. | <ViewConfigurationCollection> <viewConfigurations> <viewConfiguration> <classId>com.infa.db.Table</classId> <associationConfigs> <entry> <key>core.DataSet</key> <value> <name>Views</name> </value> </entry> </associationConfigs> </viewConfiguration> </viewConfigurations> </ViewConfigurationCollection> |
<viewConfigurations> </viewConfigurations> | The parent tag that includes a set of <viewConfiguration> </viewConfiguration> tags that you use to define the configurations for the classes in the model. | See the sample in the previous row. |
<viewConfiguration> </viewConfiguration> | Defines the required configurations for the class that you want to customize. As shown in the sample, the configurations are defined in the tags specified within the <viewConfiguration> </viewConfiguration> tags. | <viewConfiguration> <classId>com.infa.db.Table</classId> <associationConfigs> <entry> <key>core.DataSet</key> <value> <name>Views</name> </value> </entry> </associationConfigs> </viewConfiguration> |
<classId> </classId> | The tag to specify the class for which you want to define the configurations. As shown in the sample, com.infa.db.Table is the name of the class for which you are defining the configurations. | <classId>com.infa.db.Table</classId> |
<associationConfigs> </associationConfigs> | The tag that defines a configuration for every association where you want to include the class. As shown in the sample, the association configured is core.DataSet and the class included is com.infa.db.Table | <viewConfiguration> <classId>com.infa.db.Table</classId> <associationConfigs> <entry> <key>core.DataSet</key> <value> <name>Views</name> </value> </entry> </associationConfigs> </viewConfiguration>> |
<entry> </entry> | The tag to define the configuration for a specific association where the specified class can be included. | <entry> <key>core.DataSet</key> <value> <name>Views</name> </value> </entry> |
<key> </key> | The tag to define the association for which you want to define the configuration. | <key>core.DataSet</key> |
<value> </value> | The tag to define the configuration details for the association. | <entry> <key>core.DataSet</key> <value> <name>Views</name> </value> </entry> |
<name> </name> | The tag to create a group based on the specified name. Based on the association type with the seed object in the class, Enterprise Data Catalog displays all the objects in the group name on the Relationship Views page. The name specified for the group in the sample is Views. | <classId>com.infa.db.Table</classId> <associationConfigs> <entry> <key>core.DataSet</key> <value> <name>Views</name> </value> </entry> </associationConfigs> |
<type> </type> | The tag to define all the objects that you want to collect based on the class type and association configured. In the sample, all the objects of type com.infa.ldm.relational.View associated with the class infa.ldm.relational.Table through the association core.DataSetDataFlow are collected. | <viewConfiguration><classId>com.infa.ldm.relational.Table</classId><associationConfigs> <entry> <key>core.DataSetDataFlow</key> <value><name>Views</name><type>com.infa.ldm.relational.View</type> </value> </entry></associationConfigs></viewConfiguration> |
<classTypes> </classTypes> | Use the tag to configure associations for every class type associated with another class through a specific association. For example, a data domain can be associated with relational tables and views in the catalog. The requirement is to classify the objects of type relational tables and relational views associated with the data domain separately in the relationship diagram. In the sample, the class that represents that objects of type data domain is com.infa.ldm.profiling.DataDomain. The objects of type tables is represented by the class type com.infa.ldm.relational.Table. The objects of type views is represented by the class com.infa.ldm.relational.View. The association between the data domain and the tables and views is represented by the association com.infa.ldm.profiling.DataDomainTable. | <viewConfiguration> <classId>com.infa.ldm.profiling.DataDomain</classId> <associationConfigs> <entry> <key>com.infa.ldm.profiling.DataDomainTable</key> <value> <classTypes> <entry> <key>com.infa.ldm.relational.Table</key> <value>Tables</value> </entry> <entry> <key>com.infa.ldm.relational.View</key> <value>Views</value> </entry> </classTypes> </value> </entry> </associationConfigs> </viewConfiguration> |
<incomingName> </incomingName> <outgoingName> </outgoingName> | Use the <incomingName> </incomingName> and <outgoingName> </outgoingName> tags to classify subsets of objects from a group based on specific association types with the seed object. In the sample, objects with the following association types are associated with the seed object class com.infa.ldm.relational.Table: - - core.LookupRelatedDataSets
- - core.JoinRelatedDataSets
- - core.PkFkRelatedDataSets
All objects related to the seed object with the defined associations types appear within the name Tables. You can use the <incomingName> </incomingName> and <outgoingName> </outgoingName> tags to configure specific names for subsets of objects based on association types with the class. The subset names appear within the Tables group name. The specific names assigned to classify subsets of objects with the specific association types are the following: - - core.LookupRelatedDataSets. Lookup
- - core.JoinRelatedDataSets. Join
- - core.PkFkRelatedDataSets. Primary Key Tables, Foreign Key Tables
The specific names appear within the Tables name. Note: You can use the <incomingName> </incomingName> tag if the objects in the association are of the same type. For example, columns in a table related to columns in another table. | <viewConfiguration> <classId>com.infa.ldm.relational.Table</classId> <associationConfigs> <entry> <key>core.LookupRelatedDataSets</key> <value> <name>Tables</name> <incomingName>Lookup</incomingName> <outgoingName>Lookup</outgoingName> </value> </entry> <entry> <key>core.JoinRelatedDataSets</key> <value> <name>Tables</name> <incomingName>Join</incomingName> <outgoingName>Join</outgoingName> </value> </entry> <entry> <key>core.PkFkRelatedDataSets</key> <value> <name>Tables</name> <incomingName>Primary Key Tables</incomingName> <outgoingName>Foreign Key Tables</outgoingName> </value> </entry> </associationConfigs> </viewConfiguration> |
Sample View Configuration XML File
<?xml version="1.0" encoding="UTF-8"?>
<ViewConfigurationCollection>
<ViewConfigurations>
<viewConfiguration>
<classId>com.infa.ldm.relational.Table</classId>
<associationConfigs>
<entry>
<key>core.DataSetDataFlow</key>
<value>
<name>Views</name>
</value>
</entry>
</associationConfigs>
</viewConfiguration>
<viewConfiguration>
<classId>com.infa.ldm.relational.Table</classId>
<associationConfigs>
<entry>
<key>core.DataSetDataFlow</key>
<value>
<name>Views</name>
<type>com.infa.ldm.relational.View</name>
</value>
</entry>
</associationConfigs>
</viewConfiguration>
<viewConfiguration>
<classId>com.infa.ldm.profiling.DataDomain</classId>
<associationConfigs>
<entry>
<key>com.infa.ldm.profiling.DataDomainTable</key>
<value>
<classTypes>
<entry>
<key>com.infa.ldm.relational.Table</key>
<value>Tables</value>
</entry>
<entry>
<key>com.infa.ldm.relational.View</key>
<value>Views</value>
</entry>
</classTypes>
</value>
</entry>
</associationConfigs>
</viewConfiguration>
<viewConfiguration>
<classId>com.infa.ldm.relational.Table</classId>
<associationConfigs>
<entry>
<key>core.LookupRelatedDataSets</key>
<value>
<name>Tables</name>
<incomingName>Lookup</incomingName>
<outgoingName>Lookup</outgoingName>
</value>
</entry>
<entry>
<key>core.JoinRelatedDataSets</key>
<value>
<name>Tables</name>
<incomingName>Join</incomingName>
<outgoingName>Join</outgoingName>
</value>
</entry>
<entry>
<key>core.PkFkRelatedDataSets</key>
<value>
<name>Tables</name>
<incomingName>Primary Key Tables</incomingName>
<outgoingName>Foreign Key Tables</outgoingName>
</value>
</entry>
</associationConfigs>
</viewConfiguration>
</ViewConfigurations>
</ViewConfigurationCollection>
Sample Use Cases and Relationship Diagrams
For more information about defining tags in the ViewConfiguration.xml file based on specific use cases, see the following sections . Each section also includes a relationship diagram at the end of the section to show how the group names appear based on the definitions.
Using the <name> Tag
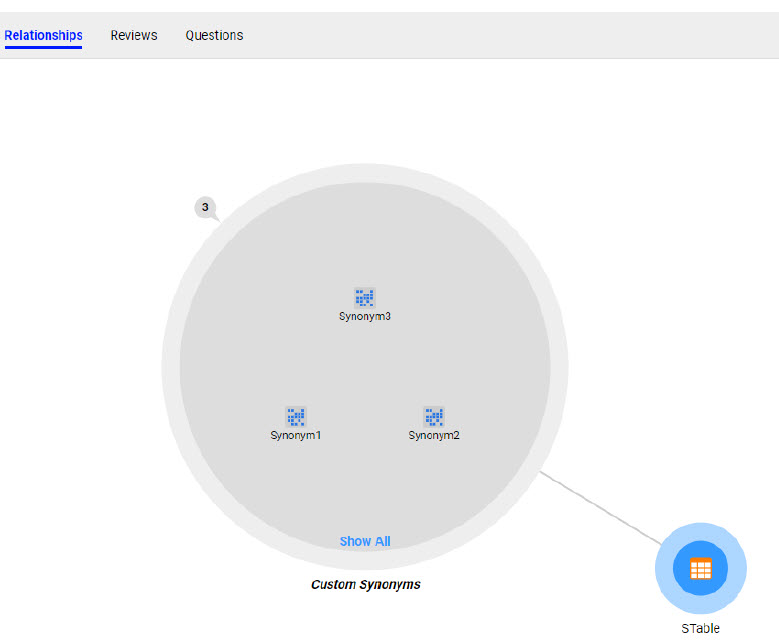
In the use case scenario, the objective is to group all objects of type synonym associated with the table under the group name Custom Synonyms.
The details of the table, synonyms, and association are provided in the following list:
- •STable, a table object from a relational database included in the class with the ID org.custom.relational.Table
- •Synonyms with the names Synonym1, Synonym2, and Synonym3 associated with STable through the association, core.TableSynonym.
- •Name for the group that you want to define to include all objects of type synonyms with the specific association type with the class is Custom Synonyms.
To address the use case, you can add the following tags in the ViewConfiguration.xml file:
<viewConfiguration>
<classId>org.custom.relational.Table</classId>
<associationConfigs>
<entry>
<key>core.TableSynonym</key>
<value>
<name>Custom Synonyms</name>
</value>
</entry>
</associationConfigs>
</viewConfiguration>
After you run the custom resource and view the Relationships Views tab page for the data asset STable, you can see all the synonyms in the Custom Synonyms group name as shown in the following image:
Using the <type> Tag
In the use case scenario, the objective is to show only specific types of objects that are involved in a lineage with the table. The table can be associated with other tables and views. In the sample, the requirement is to show only views associated with the table under the group name Custom Views.
The details of the table, types of views, and association are provided in the following list:
- •TableA, a table object from a relational database included in the class with the ID org.custom.relational.Table
- •View ViewA is associated with TableA through the association, core.DataSetDataFlow.
- •Name for the group that you want to define to include all objects of a specific type Custom Views
To address the use case, you can add the following tags in the ViewConfiguration.xml file:
<viewConfiguration>
<classId>org.custom.relational.Table</classId>
<associationConfigs>
<entry>
<key>core.DataSetDataFlow</key>
<value>
<name>Custom Views</name>
<type>org.custom.relational.View</type>
</value>
</entry>
</associationConfigs>
</viewConfiguration>
After you run the custom resource and view the Relationships Views tab page for the data asset TableA, you can see all the views in the Custom Views group name as shown in the following image:
Using the <classTypes> Tag
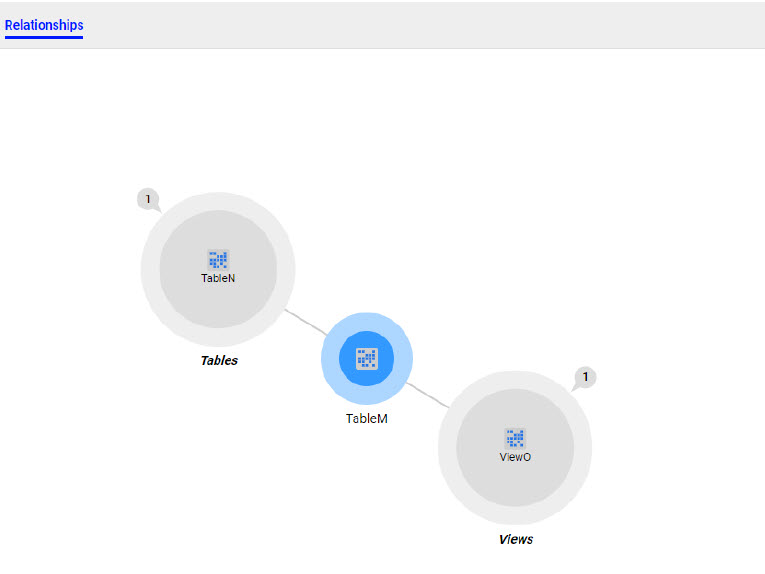
In the use case scenario, for a table, there are views and tables associated with the table using the same association type. We want to group all the tables that are involved in a lineage with the table under the Tables group name and all the views that are associated in a lineage with the table under the Views group name.
The details of the data assets, the specific table, and association are provided in the following list:
- •TableM, a table object from a relational database included in the class with the ID org.custom.relational.Table
- •View ViewO is associated with TableM through the association, core.DataSetDataFlow.
- •Table TableN is associated with TableM through the association, core.DataSetDataFlow.
- •Names for the groups that represent the specific tables associated with TableM is Tables and views associated with the table is Views.
To address the use case, you can add the following tags in the ViewConfiguration.xml file:
<viewConfiguration>
<classId>org.custom.relational.Table</classId>
<associationConfigs>
<entry>
<key>core.DataSetDataFlow </key>
<value>
<classTypes>
<entry>
<key>com.infa.ldm.relational.Table</key>
<value>Tables</value>
</entry>
<entry>
<key>com.infa.ldm.relational.View</key>
<value>Views</value>
</entry>
</classTypes>
</value>
</entry>
</associationConfigs>
</viewConfiguration>
After you run the custom resource and view the Relationships Views tab page for the data asset TableM, you can see all the tables and views in the group names Tables and Views as shown in the following image:
Using the <incomingName> and <outgoingName> Tags
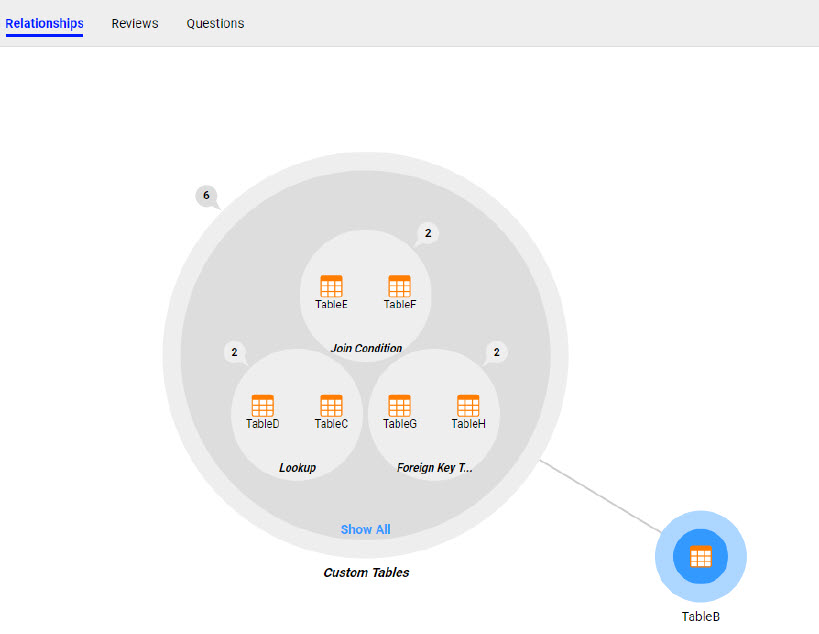
In the use case scenario, we have a table and we have a set of tables related to the table with Join, Lookup and primary key-foreign key associations. We want to join all the tables under the group name Tables, but want to group the tables specifically based on the association such as Join, Lookup or primary key-foreign key. The sample lists the steps to view the tables with the primary key-foreign key association.
The details of the tables and association are provided in the following list:
- •TableB, a table object from a relational database included in the class with the ID org.custom.relational.Table
- •TableB is associated with TableG through the primary key-foreign key association, core.PkFkRelatedDataSets. TableB holds the primary key.
- •TableB is associated with TableH through the primary key-foreign key association, core.PkFkRelatedDataSets. TableB holds the primary key.
- •Name for the group that represents the specific association when TableB is the seed object or source object in a relationship diagram is Foreign Key Tables.
- •Name for the group that represents the specific association when TableG or TableH is the seed object or target object in a relationship diagram is Primary Key Tables.
To address the use case, you can add the following tags in the ViewConfiguration.xml file:
<viewConfiguration>
<classId>org.custom.relational.Table</classId>
<associationConfigs>
<entry>
<key>core.PkFkRelatedDataSets</key>
<value>
<name>Custom Tables</name>
<incomingName>Primary Key Tables</incomingName>
<outgoingName>Foreign Key Tables</outgoingName>
</value>
</entry>
</associationConfigs>
</viewConfiguration>
After you run the custom resource and view the Relationships tab page for the data asset TableB, you can see that Custom Tables is the group that includes TableG and Table H under the sub group Foreign Key Tables as shown in the following image:
Creating the Custom Model with Custom Icons
After you create the model.xml, ViewConfiguration.xml, and icons.zip files, include the files in a ZIP file and perform the following steps to create the custom model:
- 1. Click Manage > Models. The Models page appears.
- 2. Click from the Models pane.
The menu appears with the following options:
- - New Custom Model
- - Download Model Definition File
- - Export Model Content Template
- 3. Click New Custom Model. The Upload Custom Model Definition File dialog box appears.
- 4. Click Browse and select the ZIP file that includes the following files:
- - model.xml.
- - ViewConfiguration.xml.
- - icons.zip.
The custom model is registered with the catalog. A successful registration of the custom model is mandatory to view the custom resource association details and the custom icons.