UI adjustments
Creating additional elements in Desktop UI
After we created our new entity ArticlePackaging we want to edit data using the UI of Product 360.
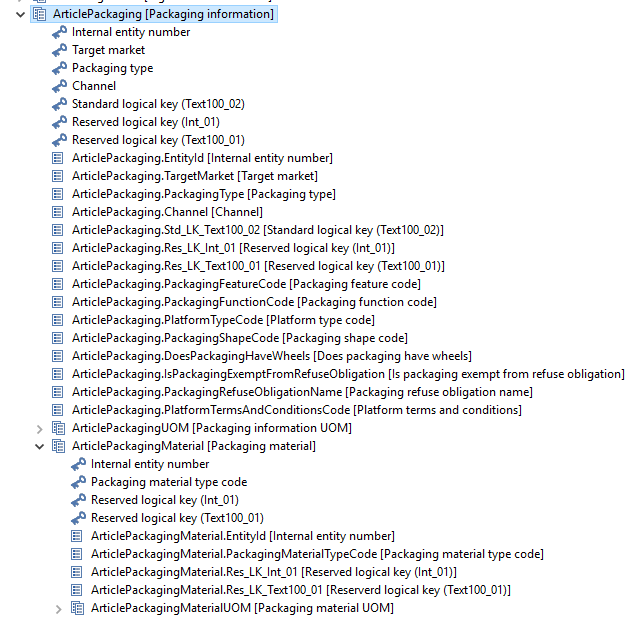
We will need a view for the sub entity ArticlePackaging and one for the sub entity ArticlePackagingMaterial. The customer decided that no additional views for the UOM or the Lang sub entities are needed as they can be seen in their appropriate higher level sub entity.
General information
To have all UI elements concentrated in a specific place it is best practice to create a separate plugin for the UI elements ending with .ui, for example com.informatica.customizing.additionalviews.ui. When creating the plugin please make sure that the checkbox "This pug-in will make contributions to the UI" is checked.
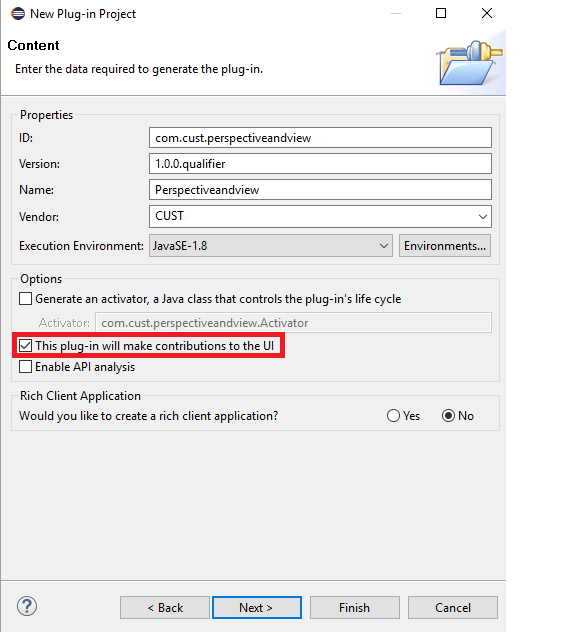
When the box is checked a plugin.xml file will be created where we can add contributions to specific extension points.
After each headline the result can be seen by adding the new UI plugin to the plugin directory of Product 360 client.
Adding views
A view is used to show every field from the given entity. Every sub entity, besides UOM and Lang entities, needs a separate view.
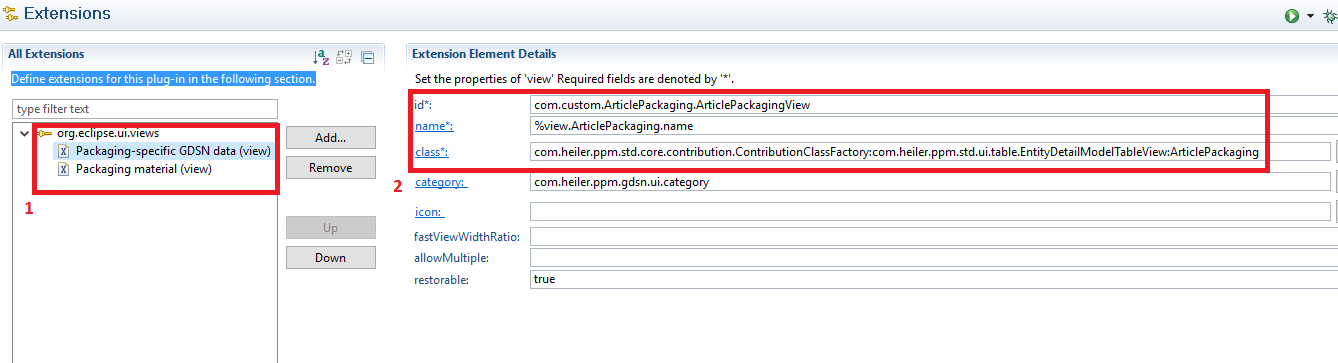
Contribute the views to the extension point org.eclipse.ui.views
Complete the mandatory properties marked with a *. Details about the properties can be found in the "Creating custom perspectives" section (chapter "Customizing") in the document "Informatica MDM - Product 360 - <VERSION>- Knowledgebase, Installation and Customization".
Because the ArticlePackaging entity is a direct sub entity of the root entity Article we can use the com.std.ui.table.EntityDetailModelTableView which is used by direct sub entities.
Sub entities which are not direct sub entities from a root entity are called third level hierarchy entities. They must use a different TableView.
Third level hierarchy
In our example ArticlePackagingMaterial is a third level hierarchy entity (Article → ArticlePackaging → ArticlePackagingMaterial). When having a third level hierarchy in the repository it is necessary to use another value at the class text field because the content which is shown in the ArticlePackagingMaterial view should depend on the selection made in the ArticlePackaging view.
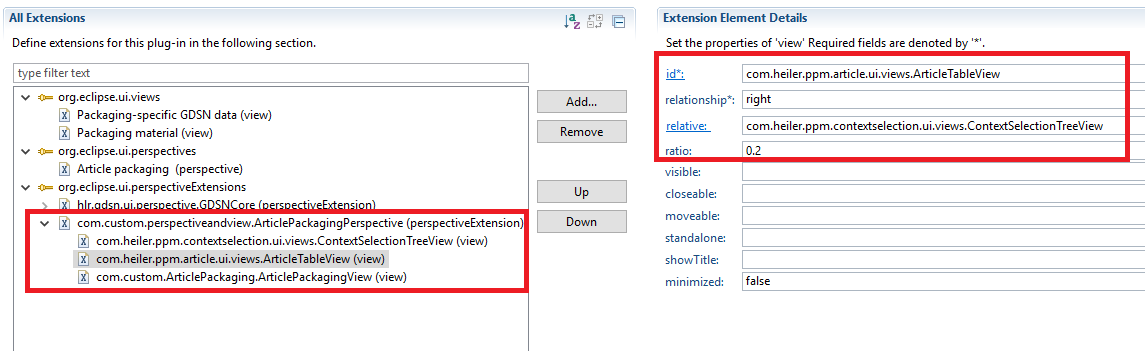
The TableView which we have to use is: com.heiler.ppm.article.ui.view.ArticleDomainBasedThirdLevelTableView
So the configuration for the third level hierarchy view looks like this:

Take care when placing the ArticlePackagingMaterial view
It is necessary that both views can be visible at the same time and therefore we recommend to place the ArticlePackaging view on the opposite side. Otherwise the selection paradigm cannot work. This has to be done for every third level hierarchy view and their counterparts.

Adding perspectives
To add a perspective we first need to add a new java class to the UI plugin containing the new perspective with a perspective identifier.
public class PackagingPerspective implements IPerspectiveFactory{ public static String PERSPECTIVE_ID = "com.custom.perspectiveandview.ArticlePackagingPerspective"; //$NON-NLS-1$ @Override public void createInitialLayout( IPageLayout layout ) { layout.setEditorAreaVisible( false ); }}Now we have to add a contribution to the org.eclipse.ui.perspectives extension point.
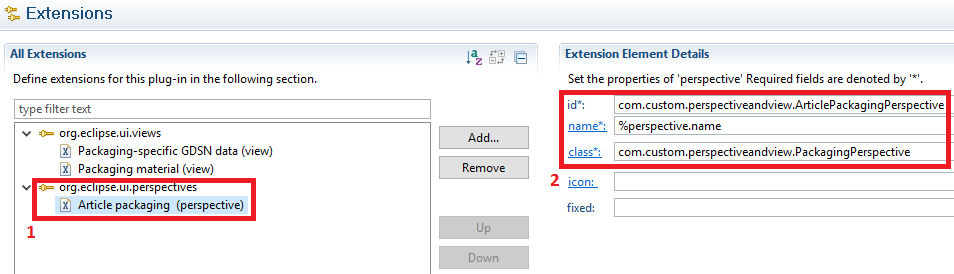
Add perspective to the extension point.
Fill the mandatory properties marked with a *. More information about perspective properties can be found in the "Creating custom perspectives" section (chapter "Customizing") in the document "Informatica MDM - Product 360 - <VERSION>- Knowledgebase, Installation and Customization".
In our case the value for the class attribute is the class we just created. The name has to be fully qualified with the package where the class is located. Here: com.custom.perspectiveandview.PackagingPerspective.
The perspective can now be seen in the client but the perspective is empty. In the next chapter we will add views to the perspective.
Adding views to a perspective

To add a view to an existing perspective you have to add a contribution to the perspectiveExtensions extension point.
The target id of the contribution perspectiveExtension has to be the id of the perspective where you want to make the modifications. In our example we want to add a view to our "ArticlePackagingPerspective" we created in the section above. So we use the id com.custom.perspectiveandview.ArticlePackagingPerspective. We can then right click the perspective extension contribution and add a view.
In the "Extension Element Details" (2) we can then fill the values for the view. More information about the creation of perspective extensions can be found in the "Creating custom perspectives" section (chapter "Customizing") in the document "Informatica MDM - Product 360 - <VERSION>- Knowledgebase, Installation and Customization".
Adding standard views to a custom perspective
When creating a new perspective most of the time it is necessary to add standard views like the Article table (Items #1) or the Context selection view to it. To do this, the same procedure for adding views in the perspectiveExtension has to be done.
The view ids can be found in the plugin.xml of standard com.heiler.*.ui plugins.
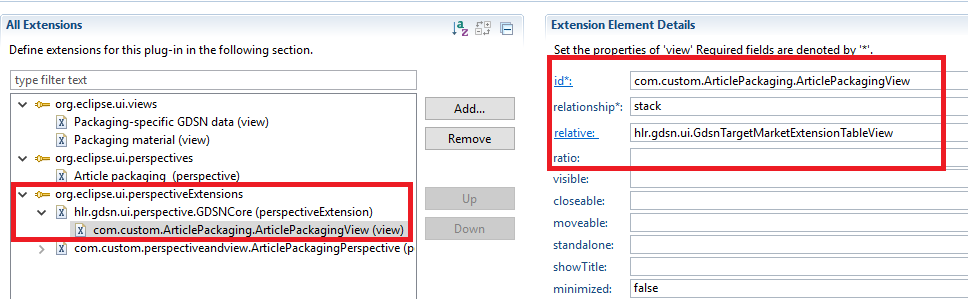
Extend a standard GDSN perspective with custom views
It is possible to add a view to a standard GDSN perspective. To do this the same procedure like adding views to perspectives is used. That means only a contribution to the perspectiveExtensions extension point is needed. To add for example a view to the GDSN core perspective, the id "hlr.gdsn.ui.perspective.GDSNCore" has to be declared in the relative value in the "Extension Element Details".
All perspective and view ids from GDSN can be found in plugin.xml of the com.heiler.ppm.gdsn.ui plugin.
Creating additional elements in Web UI
General information
For editing detail tabs in the web, a detailed documentation can be found in the chapter "Detail Tab Definition Examples" in the document "Informatica MDM - Product 360 - <VERSION>- Knowledgebase, Installation and Customization".
To add new tabs when working with items in the web UI we have to copy the generated article.detailtab.xml from the server/configuration/HPM/webdefinitions/default directory to the server/configuration/HPM/webdefinitions directory. That way it will not get overwritten when restarting the Product 360 Server.
We can now edit the detail tab for our needs.
When referencing Product 360 repository fields, make sure to specify the field identifier from the custom area but not the field type identifier from the types area.
Adding a new field
When only adding a new field to an existing module just add the tag field with the identifier of the new field to the already existing field group or table group.
[...]<fieldGroup displaySectionWidget="true" subEntityId="ArticlePackaging">[...] <field identifier="ArticlePackaging.NewFieldCreatedInTheRepository"/>[...] Adding a new module
Depending on the module, you can choose between a field group and a table group.
A field form group can be seen as a single field list. We will use the fieldGroup for the ArticlePackaging and ArticlePackagingUOM entity.
Make sure to use the field identifier from the custom area of the repository.
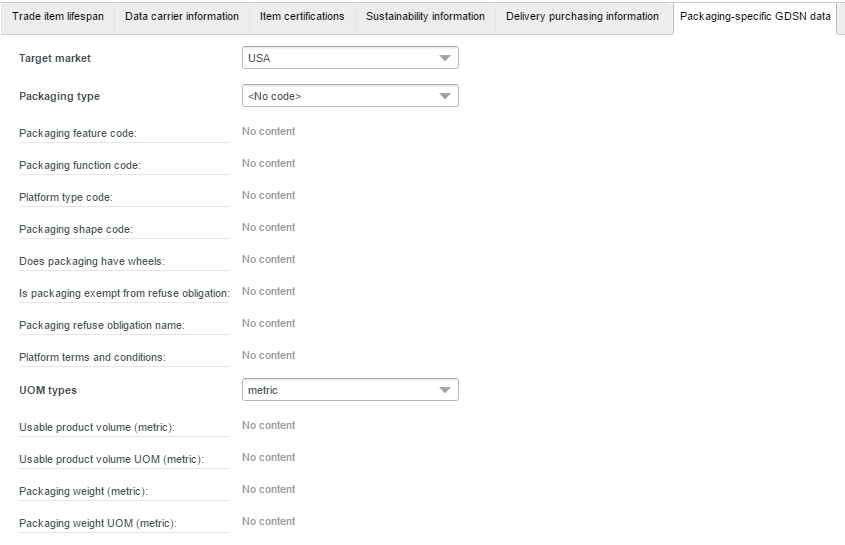
<definition debugId="article_packaging_tab" i18NKey="%web.article.detail.tab.packaging" permissionId="web.article.detail.tab.packaging" position="509" rootEntity="Article"> <column/> <column> <enumGrouping caption="%field.targetMarket.name" enumIdentifier="Enum.Territory" selectable="true" value="US"/> <enumGrouping caption="%field.packagingType.name" enumIdentifier="Enum.PackagingTypeCode.WithOptionalCode" selectable="true" value="NO_CODE"/> <fieldGroup displaySectionWidget="true" subEntityId="ArticlePackaging"> <field identifier="ArticlePackaging.PackagingFeatureCode"/> <field identifier="ArticlePackaging.PackagingFunctionCode"/> <field identifier="ArticlePackaging.PlatformTypeCode"/> <field identifier="ArticlePackaging.PackagingShapeCode"/> <field identifier="ArticlePackaging.DoesPackagingHaveWheels"/> <field identifier="ArticlePackaging.IsPackagingExemptFromRefuseObligation"/> <field identifier="ArticlePackaging.PackagingRefuseObligationName"/> <field identifier="ArticlePackaging.PlatformTermsAndConditionsCode"/> <logicalKey identifier="ArticleDomainType.LK.Std_LK_Text100_01" selectable="true" value="<No code>"/> <logicalKey identifier="ArticleDomainType.LK.TargetMarket" selectable="true" value="USA"/> </fieldGroup> <fieldGroup displaySectionWidget="true" subEntityId="ArticlePackagingUOM"> <field identifier="ArticlePackagingUOM.UsableProductVolume"/> <field identifier="ArticlePackagingUOM.UsableProductVolumeUOM"/> <field identifier="ArticlePackagingUOM.PackagingWeight"/> <field identifier="ArticlePackagingUOM.PackagingWeightUOM"/> <logicalKey identifier="ArticleDomainType.LK.Std_LK_Text100_01" selectable="true" value="<No code>"/> <logicalKey identifier="ArticleDomainType.LK.TargetMarket" selectable="true" value="USA"/> <logicalKey identifier="ArticleDomainUOMType.LK.UOMType" selectable="true" value="metric"/> </fieldGroup> </column> </definition>The result will look like this:
For the sub entity ArticlePackagingMaterial we will use the tableGroup to show the fields in a table.
<definition debugId="article_packagingMaterial_tab" i18NKey="%web.article.detail.tab.packagingMaterial" permissionId="web.article.detail.tab.packagingMaterial" position="510" rootEntity="Article"> <column/> <column> <tableGroup> <actionPanel> <actionButton action="create" i18NKey="%web.article.detail.tab.create.packagingMaterial"/> <actionButton action="edit" i18NKey="%web.article.detail.tab.edit.packagingMaterial"/> <actionButton action="delete" i18NKey="%web.article.detail.tab.delete.packagingMaterial"/> <fieldFormGroup displaySectionWidget="true" subEntityId="ArticlePackagingMaterialUOM"> <field identifier="ArticlePackaging.TargetMarket"/> <field identifier="ArticlePackaging.PackagingType"/> <field identifier="ArticlePackagingMaterial.PackagingMaterialTypeCode"/> <field identifier="ArticlePackagingMaterialUOM.UOMType"/> <field caption="%field.packagingMaterialCompositionQuantity.name" identifier="ArticlePackagingMaterialUOM.PackagingMaterialCompositionQuantity"/> <field caption="%field.packagingMaterialCompositionQuantityUOM.name" identifier="ArticlePackagingMaterialUOM.PackagingMaterialCompositionQuantityUOM"/> </fieldFormGroup> </actionPanel> <tableDefinition i18NKey="" identifier="detail_packagingMaterial" rootEntity="ArticlePackagingMaterialUOM"> <field identifier="ArticlePackaging.TargetMarket" sortable="true"/> <field identifier="ArticlePackaging.PackagingType" sortable="true"/> <field identifier="ArticlePackagingMaterial.PackagingMaterialTypeCode" sortable="true"/> <field caption="%field.packagingMaterialCompositionQuantity.name" identifier="ArticlePackagingMaterialUOM.PackagingMaterialCompositionQuantity" sortable="true"/> <field caption="%field.packagingMaterialCompositionQuantityUOM.name" identifier="ArticlePackagingMaterialUOM.PackagingMaterialCompositionQuantityUOM" sortable="true"/> </tableDefinition> </tableGroup> </column> </definition>The result will look like this:

Note that the action panel, marked in red, has to be explicitly declared in the XML as actionButton to be shown.
Interface visibility and display rights
When creating a new view and contributing it to the extension point the display right is automatically generated and can be seen in the "Interface visibility" view in the desktop client.
For more information about the visibility of the new views and perspectives please read the "Frontend visibilty" chapter in the "Informatica MDM - Product 360 - <VERSION>- Knowledgebase, Installation and Customization" document. There is a description how to mange your views and perspectives with action and visibility rights.
Limitation
It is not possible to display sub entities which exceed the 4th level repository hierarchy. When having such a case have a look at the "Deep structures" chapter in the GDSN Implementation Guidelines.