Server Installation on Windows
Create Your Product 360 Supplier Portal Server Installation Root
Prerequisite
Before you can start with this chapter, you need to have finished the following parts:
Download the Product 360 Supplier Portal zip
To obtain the download package for Product 360 Supplier Portal please raise a Shipping Request with Informatica.
Create Your Product 360 Supplier Portal Server Installation Root
In case you don't use same location like in your database installation, you have to unzip/copy the PIM_<Version>_SupplierPortal.zip again to the new location.
In this manual we assume you are using the following installation root:
<INSTALLATION ROOT> = C:\INFORMATICA\PIM\SupplierPortal
feel free to change this to another location.
Screenshot: Product 360 - Supplier Portal Folder Structure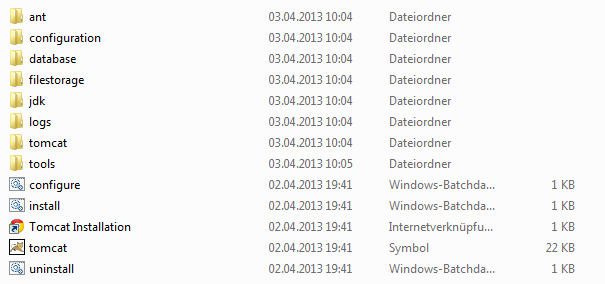
Configuration
Before running the Product 360 Supplier Portal application server, some basic configuration needs to be done.
Configure Product 360 Supplier Portal central configuration file
All configuration properties can be found under the location: <INSTALLATION ROOT>/configuration/configuration.properties. See the Configuration Manual for more information about all possible configuration parameters. For a default installation the following aspects need special attention:
Setup Database Connection
Make sure you set the following database properties in the <INSTALLATION ROOT>/configuration/configuration.properties file.
|
|
|
database.type |
Type of DBMS mssql/oracle |
database.name |
MSSQL: Name of the created database e.g. database.name=hsx_1.4 Oracle: SID or ServiceName of the Oracle DB e.g. database.name=XE |
database.server |
Hostname of the database server e.g. database.server=localhost |
database.port |
Port number of the database server e.g. MSSQL default is database.port=1433 If you want to connect P360 Supplier Portal to an Oracle Database via TCPS, please refer to chapter "How to configure a secure database connection for Product 360 Supplier Portal" in the "Supplier Portal Configuration" manual. |
database.username |
database user you created while setup the database. e.g. database.username=hsx |
database.password |
password for the above specified database user If you want to encrypt the password please refer to chapter Encryption of secure information in the Server Installation manual. |
The installation zip also comes with a Hibernate configuration file (<INSTALLATION ROOT>/configuration/persistence-[DBMS].xml) for each supported DBMS. Be careful when changing values in these files, usually this is not needed.
Setup Product 360 - Server Connection
All communication between Product 360 Supplier Portal and Product 360 - Server is done using REST, which means via HTTP. No direct access to the Product 360 Core database or specific Product 360 - Server directories is needed. The Product 360 - Server Service API is protected via HTTP authentication.
Make sure you set the following Product 360 - Server properties in the <INSTALLATION ROOT>/configuration/configuration.properties file.
|
|
|
hpm.restUri |
Product 360 - Server Service API Base URL e.g. hpm.restUri=http://localhost:1512/rest |
hpm.webClientUri |
Product 360 - Web URL e.g. http://localhost:1512/pim/webaccess |
hpm.systemUserName |
Product 360 Core User --> Product 360 Supplier Portal System User e.g. hpm.systemUserName=hsx |
hpm.systemUserPassword |
Product 360 Supplier Portal System User's password If you want to encrypt the password please refer to chapter Encryption of secure information in the Server Installation manual. |
You can test the configured Product 360 - Server/Product 360 Supplier Portal connection in the browser by entering the REST URL and providing the given user credentials. Example: localhost:1501/rest/V1.0/list/info
Setup Product 360 - Media Manager Connection
Make sure you set the following hmm properties in the <INSTALLATION ROOT>/configuration/configuration.properties file.
|
|
|
hmm.restUri |
Product 360 - Media Manager REST Services URL e.g. hmm.restUri=http://hmmserver:8080/rest/rest |
Similar to Product 360 - Server/Product 360 Supplier Portal the communication is done via REST. The Product 360 - Media Manager REST interface is not protected at all so make sure that it is visible internally only.
Setup Mail Server
Make sure you set the following mail server properties in the <INSTALLATION ROOT>/configuration/configuration.properties file.
|
|
|
mail.enabled |
To activate mail notification within Product 360 - Supplier Portal set this property to true. mail.enabled=true |
mail.protocol |
Mail protocol as passed to javax.mail e.g. mail.protocol=smtp |
mail.serverHost |
Mail server host e.g. mail.serverHost=smtp.company.com |
mail.serverPort |
Mail server port e.g. mail.serverPort=25 |
mail.senderAddressDefault |
The default sender address for mails. Will be used and displayed as mail sender. e.g. admin@company.com |
mail.username |
User for mail server authentication. ( only in case your mail server requires authentication ) |
mail.password |
User password for mail server authentication. If you want to encrypt the password please refer to chapter Encryption of secure information in the Server Installation manual. |
Setup File Storage Location
Product 360 - Supplier Portal also stores binary files (e.g. files uploaded to the timeline or used for test runs). These files are not stored in the database but in the file system. The location needs to be configured, too. This could also be a Windows shared drive.
Make sure you set the following file storage property in the <INSTALLATION ROOT>/configuration/configuration.properties file.
|
|
|
fileStorageService.rootDirectory |
Folder pointing to the root directory for all binary files e.g C:/HEILER/HSX/filestorage |
Setup Product 360 - Supplier Portal URL Root
Make sure you set the following URL root property in the <INSTALLATION ROOT>/configuration/configuration.properties file.
|
URL Root Settings |
|
hostAdressWithAppRoot |
Product 360 Supplier Portal Root Url. Normally contains the absolute path including context path plus the suffix "/html/" e.g. hostAdressWithAppRoot=http://localhost:9090/hsx/html/ |
Configure Logging
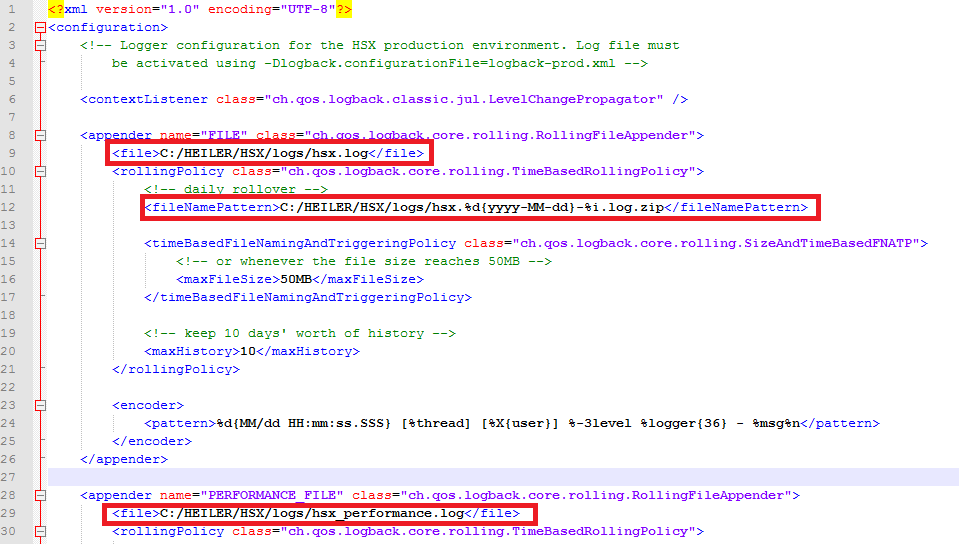
Product 360 Supplier Portal uses Logback (successor of log4j) as logging framework. The logging configuration can be defined at <INSTALLATION ROOT>/configuration/logback.xml.
By default, the log files are written to C:\Heiler\HSX\logs. If your installation root vary from this location you have to fix all occurrences in the logging configuration file <INSTALLATION ROOT>/configuration/logback.xml.
Screenshot: Cutout of the logging configuration file
Install Tomcat
A pre-configured Apache Tomcat is part of the Product 360 - Supplier Portal archive and can be found in the directory <INSTALLATION ROOT>/tomcat. It is recommended to run Product 360 - Supplier Portal Tomcat as a Windows Service.
Install Product 360 - Supplier Portal Tomcat Windows Service
The installation root contains three batch files to install (install.bat) and uninstall (uninstall.bat) and configure (configure.bat) the Tomcat service.
Open a new command line with administrator privileges (choose "Run as administrator" in context menu)
Navigate into the <INSTALLATION ROOT>
To install the tomcat with the default service name Supplier Portal, run the batch file <INSTALLATION ROOT>/install.bat to register the Tomcat Windows Service. If you wish to define a different service name, run the batch file with the desired new service name as argument: <INSTALLATION ROOT>/install.bat ServiceName
Start/Stop/Configure Product 360 - Supplier Portal Tomcat Windows Service
You need to install the service before you can configure it.
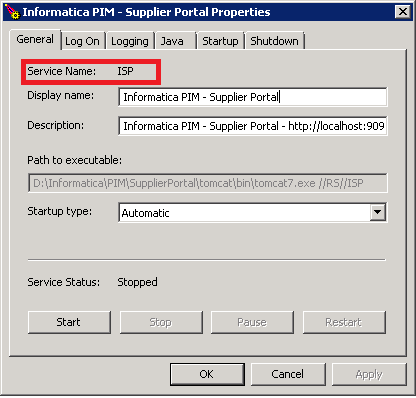
Run the file <INSTALLATION ROOT>configure.bat. If you installed the service under an different service name, then the default ISP, you have to run the configure batch file with your service name as argument: <INSTALLATION ROOT>/configure.bat ServiceName
To initially start Tomcat, open the General Tab and press Start.
By default, Tomcat runs on port 9090. No SSL is configured. No Tomcat user is configured for the Tomcat manager application. To change any of the Tomcat settings, edit the configuration files in <INSTALLATION ROOT>/tomcat/conf. See the Tomcat manual for more information.
The Product 360 - Supplier Portal application server is deployed within the <INSTALLATION ROOT>/tomcat/webapps directory. The default name is hsx.war that means that the default local URL is
http://localhost:9090
/hsx
. To change the URL suffix, rename the war file accordingly.
After Tomcat has been registered successfully, it is automatically started. The war file in the webapps folder is deployed and the application starts. To verify that everything works as expected open http://localhost:9090/hsx in a browser. Go to the login page and log in with any existing Product 360 Core user to act as a portal administrator.
(optional) Uninstall Product 360 - Supplier Portal Tomcat Windows Service
The installation root contains three batch files to install (install.bat) and uninstall (uninstall.bat) and configure (configure.bat) the Tomcat service.
Open a new command line with administrator privileges (choose "Run as administrator" in context menu)
Navigate into the <INSTALLATION ROOT>
To uninstall the tomcat with the default service name ISP, run the batch file <INSTALLATION ROOT>/uninstall.bat to unregister the Tomcat Windows Service. If you installed the service under an different service name then the default ISP, you have to run the uninstall batch file with your service name as argument: <INSTALLATION ROOT>/uninstall.bat ServiceName
If you want to connect P360 Supplier Portal to an Oracle Database via TCPS, please refer to chapter "How to configure Oracle TCPS connection for P360 Supplier Portal" in the "Supplier Portal Configuration" manual.